x-em26/x-em16 · 2016-09-30 · radio wave caution x-em26 only this unit uses a 2.4 ghz radio wave...
TRANSCRIPT
X-EM26/X-EM16CD Receiver SystemMicro chaîne CDCD-Receiversystem Sistema CD con amplificatore CD Receiver System Sistema receptor de CD Система ресивера CD
Operating InstructionsMode d’emploiBedienungsanleitungIstruzioni per l’usoHandleidingManual de instruccionesИнструкции по эксплуатации
Register your product on/ Enregistrez votre produit sur / Registre su producto enRegistrare il proprio prodotto su / Registrieren Sie hier Ihr Produkt / Registreer uw product op / Зарегистрируйте ваше изделиеhttp://www.pioneer.eu (Europe / Europe / Europa / Europa / Europa / Europa / Европа)
SN29402702_X-EM16_26_En(Europe).book 1 ページ 2016年8月6日 土曜日 午後3時12分
WARNINGThis equipment is not waterproof. To prevent a fire or shock hazard, do not place any container filled with liquid near this equipment (such as a vase or flower pot) or expose it to dripping, splashing, rain or moisture.
D3-4-2-1-3_A1_En
WARNINGTo prevent a fire hazard, do not place any naked flame sources (such as a lighted candle) on the equipment.
D3-4-2-1-7a_A1_En
Operating EnvironmentOperating environment temperature and humidity:+5 °C to +35 °C (+41 °F to +95 °F); less than 85 %RH (cooling vents not blocked)Do not install this unit in a poorly ventilated area, or in locations exposed to high humidity or direct sunlight (or strong artificial light) D3-4-2-1-7c*_A1_En
This product is for general household purposes. Any failure due to use for other than household purposes (such as long-term use for business purposes in a restaurant or use in a car or ship) and which requires repair will be charged for even during the warranty period. K041_A1_En
CAUTIONThis product is a class 1 laser product classified under the Safety of laser products, IEC 60825-1:2007.
CLASS 1 LASER PRODUCT
D58-5-2-2a_A1_En
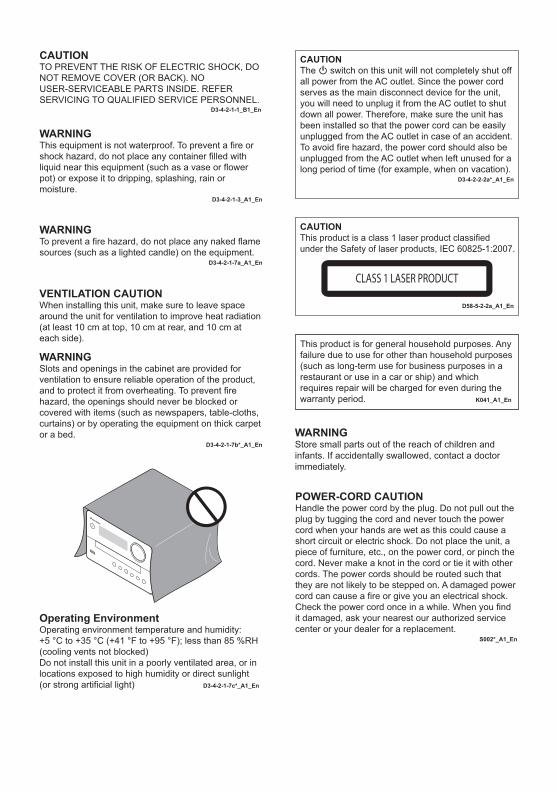
VENTILATION CAUTIONWhen installing this unit, make sure to leave space around the unit for ventilation to improve heat radiation (at least 10 cm at top, 10 cm at rear, and 10 cm at each side).
WARNINGSlots and openings in the cabinet are provided for ventilation to ensure reliable operation of the product, and to protect it from overheating. To prevent fire hazard, the openings should never be blocked or covered with items (such as newspapers, table-cloths, curtains) or by operating the equipment on thick carpet or a bed.
D3-4-2-1-7b*_A1_En
CAUTIONTO PREVENT THE RISK OF ELECTRIC SHOCK, DO NOT REMOVE COVER (OR BACK). NO USER-SERVICEABLE PARTS INSIDE. REFER SERVICING TO QUALIFIED SERVICE PERSONNEL.
D3-4-2-1-1_B1_En
POWER-CORD CAUTIONHandle the power cord by the plug. Do not pull out the plug by tugging the cord and never touch the power cord when your hands are wet as this could cause a short circuit or electric shock. Do not place the unit, a piece of furniture, etc., on the power cord, or pinch the cord. Never make a knot in the cord or tie it with other cords. The power cords should be routed such that they are not likely to be stepped on. A damaged power cord can cause a fire or give you an electrical shock. Check the power cord once in a while. When you find it damaged, ask your nearest our authorized service center or your dealer for a replacement.
S002*_A1_En
WARNINGStore small parts out of the reach of children and infants. If accidentally swallowed, contact a doctor immediately.
CAUTIONThe switch on this unit will not completely shut off all power from the AC outlet. Since the power cord serves as the main disconnect device for the unit, you will need to unplug it from the AC outlet to shut down all power. Therefore, make sure the unit has been installed so that the power cord can be easily unplugged from the AC outlet in case of an accident. To avoid fire hazard, the power cord should also be unplugged from the AC outlet when left unused for a long period of time (for example, when on vacation).
D3-4-2-2-2a*_A1_En
X-EM16_26_Cover_Anki_En(Europe).fm 2 ページ 2016年8月6日 土曜日 午後6時56分
Information for users on collection and disposal of old equipment and used batteriesThese symbols on the products, packaging, and/or accompanying documents mean that used electrical and electronic products and batteries should not be mixed with general household waste.
For proper treatment, recovery and recycling of old products and used batteries, please take them to applicable collection points in accordance with your national legislation.
By disposing of these products and batteries correctly, you will help to save valuable resources and prevent any potential negative effects on human health and the environment which could otherwise arise from inappropriate waste handling.
For more information about collection and recycling of old products and batteries, please contact your local municipality, your waste disposal service or the point of sale where you purchased the items.
These symbols are only valid in the European Union.
For countries outside the European Union:If you wish to discard these items, please contact your local authorities or dealer and ask for the correct method of disposal.
K058a_A1_En
Symbol examples for batteries
Symbol for equipment
Pb
Radio wave cautionX-EM26 onlyThis unit uses a 2.4 GHz radio wave frequency, which is a band used by other wireless systems (Microwave ovens and Cordless phones, etc.). In this event noise appears in your television image, there is the possibility this unit (including products supported by this unit) is causing signal interference with the antenna input connector of your television, video, satellite tuner, etc. In this event, increase the distance between the antenna input connector and this unit (including products supported by this unit).• We are not responsible for any malfunction of the
compatible product due to communication error/malfunctions associated with your network connection and/or your connected equipment. Please contact your Internet service provider or network device manufacturer.
• A separate contract with/payment to an Internet service provider is required to use the Internet.
CondensationIf the unit is moved suddenly from a cold place into a warm room (in winter, for example) or if the temperature in the room in which the player is installed rises suddenly due to a heater, etc., water droplets (condensation) may form inside (on operating parts and the lens). When condensation is present, the player will not operate properly and playback is not possible. Let the player stand at room temperature for 1 or 2 hours with the power turned on (the time depends on the extent of condensation). The water droplets will dissipate and playback will become possible.Condensation can also occur in the summer if the player is exposed to the direct wind from an air-conditioner. If this happens, move the player to a different place.
S005_A1_En
SN29402702_X-EM16_26_En(Europe).book 3 ページ 2016年8月6日 土曜日 午後3時12分
4En
Thank you for buying this Pioneer product.Please read through these operating instructions so that you will know how to operate your model properly. After you have finished reading the instructions, put them in a safe place for future reference.
ContentsBefore you start . . . . . . . . . . . . . . . . . . . . . . 4Part names and functions . . . . . . . . . . . . . . 5Overview of the main unit . . . . . . . . . . . . . . . . . . . . . 5Overview of the remote control . . . . . . . . . . . . . . . . . 6
Connections . . . . . . . . . . . . . . . . . . . . . . . . . 6Speaker connection . . . . . . . . . . . . . . . . . . . . . . . . . . 6FM antenna installation . . . . . . . . . . . . . . . . . . . . . . . 7Connect power. . . . . . . . . . . . . . . . . . . . . . . . . . . . . . 7
Getting started . . . . . . . . . . . . . . . . . . . . . . . 7Turning on . . . . . . . . . . . . . . . . . . . . . . . . . . . . . . . . . 7Setting the clock. . . . . . . . . . . . . . . . . . . . . . . . . . . . . 7Selecting a source . . . . . . . . . . . . . . . . . . . . . . . . . . . 7
Playing. . . . . . . . . . . . . . . . . . . . . . . . . . . . . . 8Playing a disc. . . . . . . . . . . . . . . . . . . . . . . . . . . . . . . .8Playing from a USB storage device . . . . . . . . . . . . . . 8Controlling playback. . . . . . . . . . . . . . . . . . . . . . . . . . 8
Bluetooth® Audio playback (X-EM26 only) . . . . . . . . . . . . . . . . . . . . . . . . 9Pairing with the unit (Initial registration) . . . . . . . . . . . 9Listen to music on the unit from a Bluetooth capable device . . . . . . . . . . . . . . . . . . . . . . . . . . . . . 10
Listening to the FM radio. . . . . . . . . . . . . . 11Tuning to an FM radio station . . . . . . . . . . . . . . . . . 11Programming radio stations . . . . . . . . . . . . . . . . . . . 11
Other features. . . . . . . . . . . . . . . . . . . . . . . 11Additional information . . . . . . . . . . . . . . . . 13Troubleshooting . . . . . . . . . . . . . . . . . . . . . . . . . . . . 13Cautions on use . . . . . . . . . . . . . . . . . . . . . . . . . . . . 14Handling discs . . . . . . . . . . . . . . . . . . . . . . . . . . . . . 14Specifications. . . . . . . . . . . . . . . . . . . . . . . . . . . . . . 15
Before you start∫ IntroductionWith this system, you can:
• enjoy audio from discs, USB storage devices, and other external devices
• listen to FM radio stations• enjoy audio from Bluetooth wireless technology
enabled device (X-EM26 only)Playable media:
• Discs: CD-DA, CD-R, CD-RW, MP3-CD• Files: .mp3• USB storage device
– Compatibility: USB 1.1/2.0 (Full Speed)– Class support: MSC (Mass Storage Class)– File system: FAT16, FAT32– Maximum number of albums/folders: 256– Maximum number of tracks/files: 999– Maximum level of directory: 8
∫ What’s in the boxCheck and identify the contents of the package:
• Main unit• Speaker unit x 2• Remote control• AAA battery (R03)• FM wire antenna• Non-skid pads x 8• Warranty card (European models only)• Operating Instructions (this document)
∫ Loading the battery in the remote control1 Open the rear lid and load the battery as
illustrated below.
2 Close the rear lid.The battery included with the unit has been provided to allow you check product operation and may not last long. We recommend using an alkaline battery that has a longer life.
SN29402702_X-EM16_26_En(Europe).book 4 ページ 2016年8月6日 土曜日 午後3時12分
EnglishFrançais
Español
5En
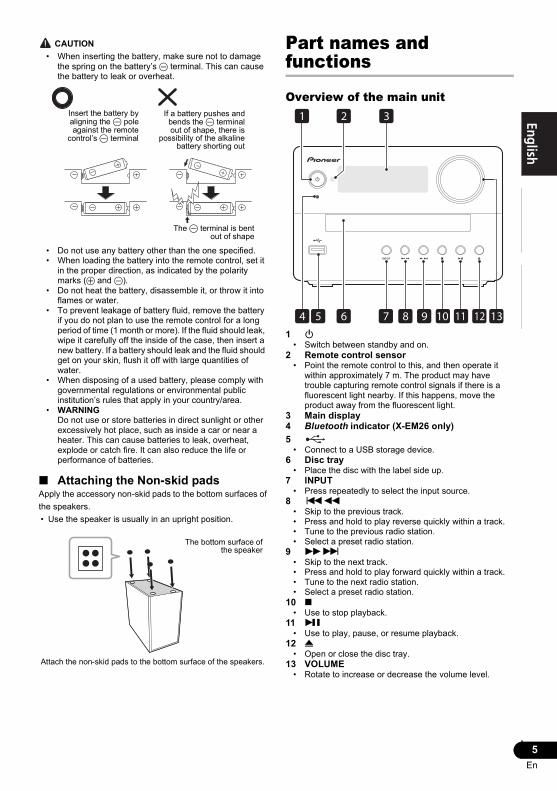
CAUTION• When inserting the battery, make sure not to damage
the spring on the battery’s - terminal. This can cause the battery to leak or overheat.
• Do not use any battery other than the one specified.• When loading the battery into the remote control, set it
in the proper direction, as indicated by the polarity marks (+ and -).
• Do not heat the battery, disassemble it, or throw it into flames or water.
• To prevent leakage of battery fluid, remove the battery if you do not plan to use the remote control for a long period of time (1 month or more). If the fluid should leak, wipe it carefully off the inside of the case, then insert a new battery. If a battery should leak and the fluid should get on your skin, flush it off with large quantities of water.
• When disposing of a used battery, please comply with governmental regulations or environmental public institution’s rules that apply in your country/area.
• WARNINGDo not use or store batteries in direct sunlight or other excessively hot place, such as inside a car or near a heater. This can cause batteries to leak, overheat, explode or catch fire. It can also reduce the life or performance of batteries.
∫ Attaching the Non-skid padsApply the accessory non-skid pads to the bottom surfaces ofthe speakers.• Use the speaker is usually in an upright position.
Attach the non-skid pads to the bottom surface of the speakers.
Part names and functions
Overview of the main unit
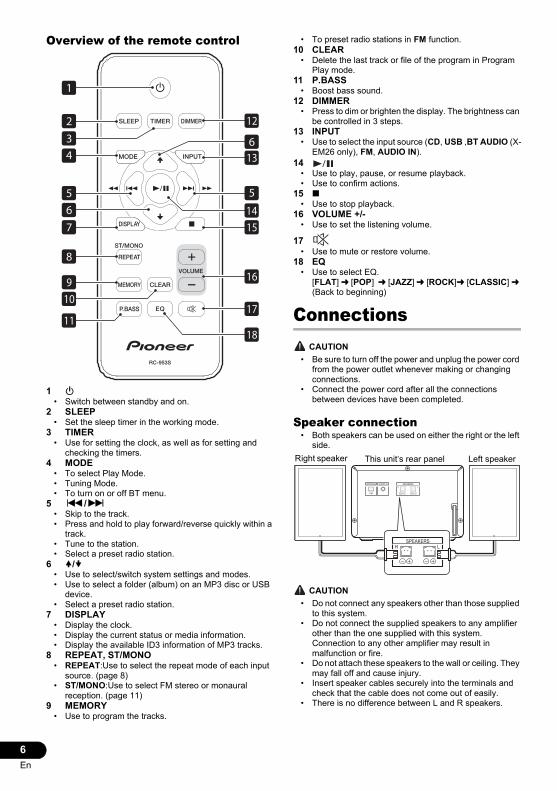
1 Í• Switch between standby and on.
2 Remote control sensor• Point the remote control to this, and then operate it
within approximately 7 m. The product may have trouble capturing remote control signals if there is a fluorescent light nearby. If this happens, move the product away from the fluorescent light.
3 Main display4 Bluetooth indicator (X-EM26 only)5
• Connect to a USB storage device.6 Disc tray
• Place the disc with the label side up.7 INPUT
• Press repeatedly to select the input source.8 :6
• Skip to the previous track.• Press and hold to play reverse quickly within a track.• Tune to the previous radio station.• Select a preset radio station.
9 59• Skip to the next track.• Press and hold to play forward quickly within a track.• Tune to the next radio station.• Select a preset radio station.
10 ∫• Use to stop playback.
11 I• Use to play, pause, or resume playback.
12 <• Open or close the disc tray.
13 VOLUME• Rotate to increase or decrease the volume level.
Insert the battery byaligning the - poleagainst the remote
control’s - terminal
If a battery pushes andbends the - terminalout of shape, there is
possibility of the alkalinebattery shorting out
The - terminal is bentout of shape
The bottom surface ofthe speaker
21
137 8 9 1211
3
4 5 6 10
SN29402702_X-EM16_26_En(Europe).book 5 ページ 2016年8月6日 土曜日 午後3時12分
6En
Overview of the remote control
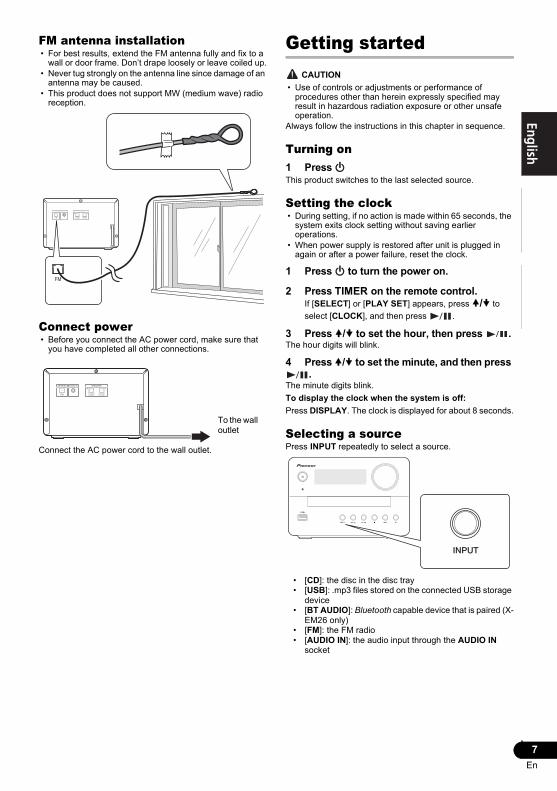
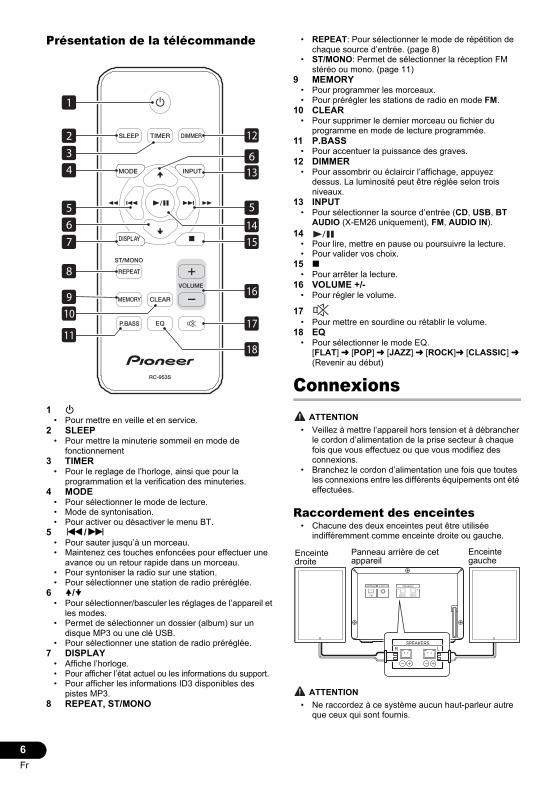
1 Í• Switch between standby and on.
2 SLEEP• Set the sleep timer in the working mode.
3 TIMER• Use for setting the clock, as well as for setting and
checking the timers.4 MODE
• To select Play Mode.• Tuning Mode. • To turn on or off BT menu.
5 :/9• Skip to the track. • Press and hold to play forward/reverse quickly within a
track.• Tune to the station.• Select a preset radio station.
6 /• Use to select/switch system settings and modes.• Use to select a folder (album) on an MP3 disc or USB
device.• Select a preset radio station.
7 DISPLAY• Display the clock.• Display the current status or media information.• Display the available ID3 information of MP3 tracks.
8 REPEAT, ST/MONO• REPEAT:Use to select the repeat mode of each input
source. (page 8)• ST/MONO:Use to select FM stereo or monaural
reception. (page 11)9 MEMORY
• Use to program the tracks.
• To preset radio stations in FM function.10 CLEAR
• Delete the last track or file of the program in Program Play mode.
11 P.BASS• Boost bass sound.
12 DIMMER• Press to dim or brighten the display. The brightness can
be controlled in 3 steps.13 INPUT
• Use to select the input source (CD, USB ,BT AUDIO (X-EM26 only), FM, AUDIO IN).
14• Use to play, pause, or resume playback.• Use to confirm actions.
15 ∫• Use to stop playback.
16 VOLUME +/-• Use to set the listening volume.
17• Use to mute or restore volume.
18 EQ• Use to select EQ.
[FLAT] l [POP] l [JAZZ] l [ROCK]l [CLASSIC] l (Back to beginning)
Connections CAUTION
• Be sure to turn off the power and unplug the power cord from the power outlet whenever making or changing connections.
• Connect the power cord after all the connections between devices have been completed.
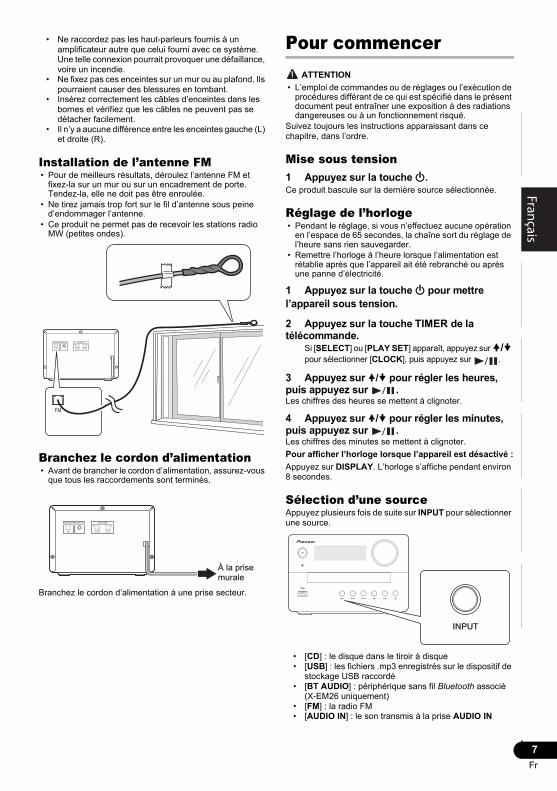
Speaker connection• Both speakers can be used on either the right or the left
side.
CAUTION• Do not connect any speakers other than those supplied
to this system.• Do not connect the supplied speakers to any amplifier
other than the one supplied with this system. Connection to any other amplifier may result in malfunction or fire.
• Do not attach these speakers to the wall or ceiling. They may fall off and cause injury.
• Insert speaker cables securely into the terminals and check that the cable does not come out of easily.
• There is no difference between L and R speakers.
17
16
1
2
4
5
11
10
6
9
5
12
1514
18
6
7
8
13
3
AUDIO INANTENNA SPEAKERSR
FM
L
SPEAKERSR L
Right speaker Left speakerThis unit’s rear panel
SN29402702_X-EM16_26_En(Europe).book 6 ページ 2016年8月6日 土曜日 午後3時12分
EnglishFrançais
Español
7En
FM antenna installation• For best results, extend the FM antenna fully and fix to a
wall or door frame. Don’t drape loosely or leave coiled up.• Never tug strongly on the antenna line since damage of an
antenna may be caused.• This product does not support MW (medium wave) radio
reception.
Connect power• Before you connect the AC power cord, make sure that
you have completed all other connections.
Connect the AC power cord to the wall outlet.
Getting started CAUTION
• Use of controls or adjustments or performance of procedures other than herein expressly specified may result in hazardous radiation exposure or other unsafe operation.
Always follow the instructions in this chapter in sequence.
Turning on1 Press ÍThis product switches to the last selected source.
Setting the clock• During setting, if no action is made within 65 seconds, the
system exits clock setting without saving earlier operations.
• When power supply is restored after unit is plugged in again or after a power failure, reset the clock.
1 Press Í to turn the power on.
2 Press TIMER on the remote control.If [SELECT] or [PLAY SET] appears, press / to select [CLOCK], and then press .
3 Press / to set the hour, then press .The hour digits will blink.
4 Press / to set the minute, and then press .
The minute digits blink.To display the clock when the system is off:Press DISPLAY. The clock is displayed for about 8 seconds.
Selecting a sourcePress INPUT repeatedly to select a source.
• [CD]: the disc in the disc tray• [USB]: .mp3 files stored on the connected USB storage
device• [BT AUDIO]: Bluetooth capable device that is paired (X-
EM26 only)• [FM]: the FM radio• [AUDIO IN]: the audio input through the AUDIO IN
socket
AUDIO INANTENNA SPEAKERSR
FM
L
FM
AUDIO INANTENNA SPEAKERSR
FM
L
To the wall outlet
SN29402702_X-EM16_26_En(Europe).book 7 ページ 2016年8月6日 土曜日 午後3時12分
8En
Playing
Playing a disc1 Press INPUT on the remote control or INPUT repeatedly on the main unit to switch the source to [CD].
2 Press < to eject the disc tray.3 Load a disc with the printed side facing up.4 Press < again to close the disc tray.5 Press .
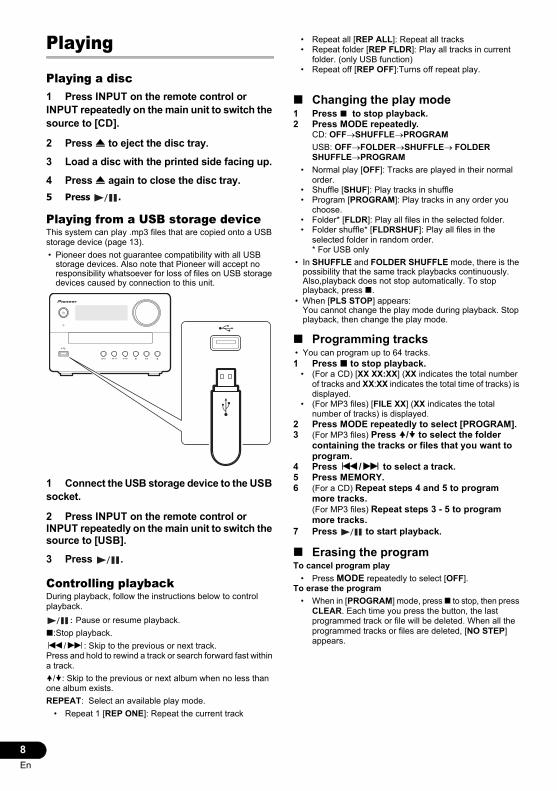
Playing from a USB storage deviceThis system can play .mp3 files that are copied onto a USB storage device (page 13).• Pioneer does not guarantee compatibility with all USB
storage devices. Also note that Pioneer will accept no responsibility whatsoever for loss of files on USB storage devices caused by connection to this unit.
1 Connect the USB storage device to the USB socket.
2 Press INPUT on the remote control or INPUT repeatedly on the main unit to switch the source to [USB].3 Press .
Controlling playbackDuring playback, follow the instructions below to control playback.
:Pause or resume playback.∫:Stop playback.:/9: Skip to the previous or next track.Press and hold to rewind a track or search forward fast within a track./: Skip to the previous or next album when no less than one album exists.REPEAT: Select an available play mode.
• Repeat 1 [REP ONE]: Repeat the current track
• Repeat all [REP ALL]: Repeat all tracks• Repeat folder [REP FLDR]: Play all tracks in current
folder. (only USB function)• Repeat off [REP OFF]:Turns off repeat play.
∫ Changing the play mode1 Press ∫ to stop playback.2 Press MODE repeatedly.
CD: OFFSHUFFLEPROGRAMUSB: OFFFOLDERSHUFFLEFOLDER SHUFFLEPROGRAM
• Normal play [OFF]: Tracks are played in their normal order.
• Shuffle [SHUF]: Play tracks in shuffle• Program [PROGRAM]: Play tracks in any order you
choose.• Folder* [FLDR]: Play all files in the selected folder.• Folder shuffle* [FLDRSHUF]: Play all files in the
selected folder in random order. * For USB only
• In SHUFFLE and FOLDER SHUFFLE mode, there is the possibility that the same track playbacks continuously. Also,playback does not stop automatically. To stop playback, press ∫.
• When [PLS STOP] appears:You cannot change the play mode during playback. Stop playback, then change the play mode.
∫ Programming tracks• You can program up to 64 tracks.1 Press ∫ to stop playback.
• (For a CD) [XX XX:XX] (XX indicates the total number of tracks and XX:XX indicates the total time of tracks) is displayed.
• (For MP3 files) [FILE XX] (XX indicates the total number of tracks) is displayed.
2 Press MODE repeatedly to select [PROGRAM].3 (For MP3 files) Press / to select the folder
containing the tracks or files that you want to program.
4 Press :/9 to select a track.5 Press MEMORY.6 (For a CD) Repeat steps 4 and 5 to program
more tracks.(For MP3 files) Repeat steps 3 - 5 to program more tracks.
7 Press to start playback.
∫ Erasing the programTo cancel program play
• Press MODE repeatedly to select [OFF].To erase the program
• When in [PROGRAM] mode, press ∫ to stop, then press CLEAR. Each time you press the button, the last programmed track or file will be deleted. When all the programmed tracks or files are deleted, [NO STEP] appears.
SN29402702_X-EM16_26_En(Europe).book 8 ページ 2016年8月6日 土曜日 午後3時12分
EnglishFrançais
Español
9En
Bluetooth® Audio playback (X-EM26 only)
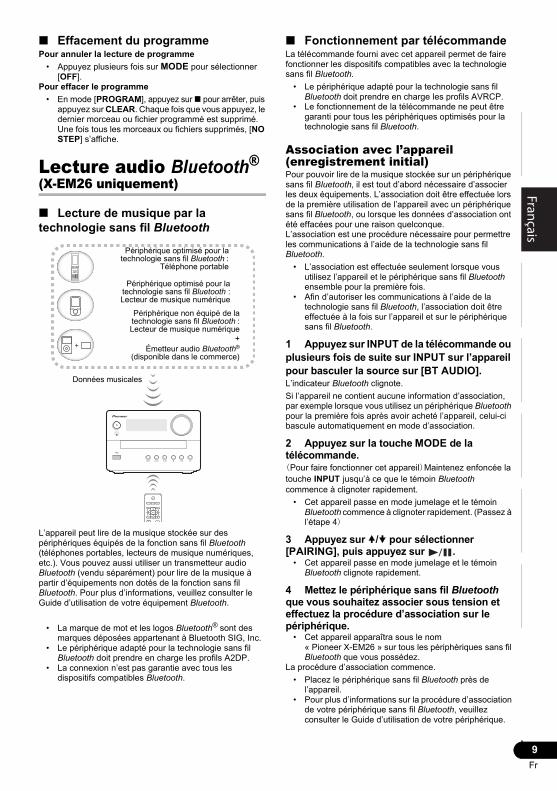
∫ Music playback using Bluetooth wireless technology
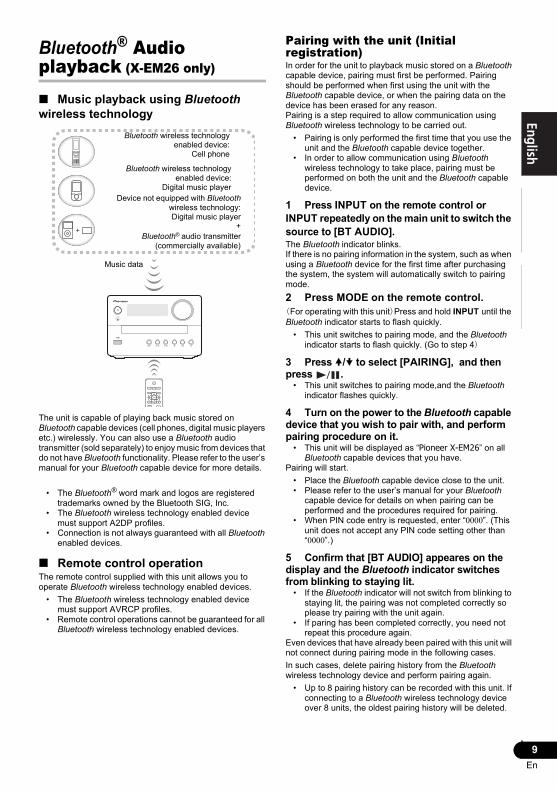
The unit is capable of playing back music stored on Bluetooth capable devices (cell phones, digital music players etc.) wirelessly. You can also use a Bluetooth audio transmitter (sold separately) to enjoy music from devices that do not have Bluetooth functionality. Please refer to the user’s manual for your Bluetooth capable device for more details.
• The Bluetooth® word mark and logos are registered trademarks owned by the Bluetooth SIG, Inc.
• The Bluetooth wireless technology enabled device must support A2DP profiles.
• Connection is not always guaranteed with all Bluetooth enabled devices.
∫ Remote control operationThe remote control supplied with this unit allows you to operate Bluetooth wireless technology enabled devices.
• The Bluetooth wireless technology enabled device must support AVRCP profiles.
• Remote control operations cannot be guaranteed for all Bluetooth wireless technology enabled devices.
Pairing with the unit (Initial registration)In order for the unit to playback music stored on a Bluetooth capable device, pairing must first be performed. Pairing should be performed when first using the unit with the Bluetooth capable device, or when the pairing data on the device has been erased for any reason.Pairing is a step required to allow communication using Bluetooth wireless technology to be carried out.
• Pairing is only performed the first time that you use the unit and the Bluetooth capable device together.
• In order to allow communication using Bluetooth wireless technology to take place, pairing must be performed on both the unit and the Bluetooth capable device.
1 Press INPUT on the remote control or INPUT repeatedly on the main unit to switch the source to [BT AUDIO].The Bluetooth indicator blinks.If there is no pairing information in the system, such as when using a Bluetooth device for the first time after purchasing the system, the system will automatically switch to pairing mode.2 Press MODE on the remote control.
(For operating with this unit)Press and hold INPUT until the Bluetooth indicator starts to flash quickly.
• This unit switches to pairing mode, and the Bluetooth indicator starts to flash quickly. (Go to step 4)
3 Press / to select [PAIRING], and then press .
• This unit switches to pairing mode,and the Bluetooth indicator flashes quickly.
4 Turn on the power to the Bluetooth capable device that you wish to pair with, and perform pairing procedure on it.
• This unit will be displayed as “Pioneer X-EM26” on all Bluetooth capable devices that you have.
Pairing will start.• Place the Bluetooth capable device close to the unit.• Please refer to the user’s manual for your Bluetooth
capable device for details on when pairing can be performed and the procedures required for pairing.
• When PIN code entry is requested, enter “0000”. (This unit does not accept any PIN code setting other than “0000”.)
5 Confirm that [BT AUDIO] appeares on the display and the Bluetooth indicator switches from blinking to staying lit.
• If the Bluetooth indicator will not switch from blinking to staying lit, the pairing was not completed correctly so please try pairing with the unit again.
• If paring has been completed correctly, you need not repeat this procedure again.
Even devices that have already been paired with this unit will not connect during pairing mode in the following cases.In such cases, delete pairing history from the Bluetooth wireless technology device and perform pairing again.
• Up to 8 pairing history can be recorded with this unit. If connecting to a Bluetooth wireless technology device over 8 units, the oldest pairing history will be deleted.
Music data
Device not equipped with Bluetoothwireless technology:Digital music player
+Bluetooth® audio transmitter
(commercially available)
Bluetooth wireless technologyenabled device:
Digital music player
Bluetooth wireless technologyenabled device:
Cell phone
SN29402702_X-EM16_26_En(Europe).book 9 ページ 2016年8月6日 土曜日 午後3時12分
10En
• If the settings are reset to the factory setting, all pairing history will be deleted. In order to reset to factory setting, press and hold INPUT and < on the unit for more than 5 seconds, until “RESET” appears on the display.
To cancel pairing• Press MODE or change the source.
Terminating a Bluetooth connection1 Press MODE.2 Press / to select [DISCONNECT], and then
press .
Listen to music on the unit from a Bluetooth capable device1 Press INPUT on the remote control or INPUT repeatedly on the main unit to switch the source to [BT AUDIO].The unit will start using the BT AUDIO function, and connect with a Bluetooth capable device.
2 A Bluetooth connection will be created between the Bluetooth capable device and the unit.Procedures for connecting to the unit should be performed from the Bluetooth capable device.
• Please refer to the user’s manual for your Bluetooth capable device for details of the connection procedures.
3 Playback music from the Bluetooth capable device.
• Press on the remote control or I on the main unit to playback.You can control and :/9.Stopping playback and other operations can be controlled using the Bluetooth capable device.
• When Bluetooth capable devise is not connected and no operations have been performed for more than 15 minutes, the unit will automatically power off.
∫ Radio wave cautionThis unit uses a 2.4 GHz radio wave frequency, which is a band used by other wireless systems (see list below). To prevent noise or interrupted communication, do not use this unit nearby such devices, or make sure these devices are switched off during use.
• Cordless phones• Cordless facsimiles• Microwave ovens• Wireless LAN devices (IEEE802.11b/g)• Wireless AV equipment• Wireless controllers for game systems• Microwave-based health aids• Some baby monitors
Other, less common, equipment that may operate on the same frequency:
• Anti-theft systems• Amateur radio stations (HAM)• Warehouse logistic management systems• Discrimination systems for train or emergency vehicles
• In the event noise appears in your television image, there is the possibility that a Bluetooth wireless technology enabled device or this unit (including products supported by this unit) are causing signal
interference with the antenna input connector of your television, video, satellite tuner, etc. In this event, increase the distance between the antenna input connector and the Bluetooth wireless technology enabled device or this unit (including products supported by this unit).
• If there is something obstructing the path between this unit (including devices supported by this unit) and the device equipped with Bluetooth wireless technology (such as a metal door, concrete wall, or insulation containing tinfoil), you may need to change the location of your system to prevent signal noise and interruptions.
∫ Scope of operationUse of this unit is limited to home use. (Transmission distances may be reduced depending on communication environment). In the following locations, poor condition or inability to receive radio waves may cause the audio to be interrupted or stopped:
• In reinforced concrete buildings or steel framed or iron-framed buildings.
• Near large metallic furniture.• In a crowd of people or near a building or obstacle.• In a location exposed to the magnetic field, static
electricity or radio wave interference from radio communication equipment using the same frequency band (2.4 GHz) as this unit, such as a 2.4 GHz wireless LAN device (IEEE802.11b/g) or microwave oven.
• If you live in a heavily populated residential area (apartment, townhouse, etc.) and if your neighbor’s microwave is placed near your system, you may experience radio wave interference. If this occurs, move your unit to a different place. When the microwave is not in use, there will be no radio wave interference.
∫ Radio wave reflectionsThe radio waves received by this unit include the radio wave coming directly from the device equipped with Bluetooth wireless technology (direct wave) and waves coming from various directions due to reflections by walls, furniture and building (reflected waves). The reflected waves (due to obstacles and reflecting objects) further produce a variety of reflected waves as well as variation in reception condition depending on locations. If the audio cannot be received properly due to this phenomenon, try moving the location of the device equipped with Bluetooth wireless technology a little. Also note that audio may be interrupted due to the reflected waves when a person crosses or approaches the space between this unit and the device equipped with Bluetooth wireless technology.
∫ Precautions regarding connections to products supported by this unit
• Complete connections for all devices supported by this unit, including all audio cords and power cables before connecting them to this unit.
• After completing connections to this unit, check the audio and power cables to confirm that they not twisted together.
• When disconnecting this unit, confirm that you have sufficient working space in the surrounding area.
• When changing connections of audio or other cables for products supported by this unit, confirm that you have sufficient working space in the surrounding area.
SN29402702_X-EM16_26_En(Europe).book 10 ページ 2016年8月6日 土曜日 午後3時12分

EnglishFrançais
Español
11En
Listening to the FM radio
Tuning to an FM radio station• Make sure that you have connected and fully extended the
FM antenna.
∫ Manual tuning1 Press INPUT on the remote control or INPUT
repeatedly on the main unit to switch the source to FM.
2 Press MODE repeatedly to select [MANUAL].3 Press :/9 on the remote control to tune in
to the desired station.
∫ Automatic tuning1 Press INPUT on the remote control or INPUT
repeatedly on the main unit to switch the source to FM.
2 Press MODE repeatedly to select [AUTO].3 Press :/9.Scanning will start automatically and the tuner will stop at the first receivable broadcast station.
(For European model only) When you tune to an FM station that provides RDS services, the service name or station name appears on the display .
Programming radio stations• You can program up to 20 preset radio stations.• To overwrite a programmed radio station, store another
one with its sequence number.1 Tune to a radio station.2 Press MEMORY.3 Press:/9(/) repeatedly to select a
preset number, and then press .“COMPLETE” appears on the display and the radio station is registered with the preset number.4 Repeat steps 1-3 to program more stations.
∫ Tuning to a preset radio station1 Press INPUT on the remote control or INPUT
repeatedly on the main unit to switch the source to FM.
2 Press MODE repeatedly to select [PRESET].3 Press / to select the desired preset
number.
If reception of an FM stereo broadcast is noisy, press ST/MONO repeatedly to select [MONO] to select monaural reception. This reduces noise.
Other features∫ Automatic standby mode
• After this product is kept inactive for 15 minutes, it automatically switches to the standby mode.
Press and hold Í on the remote control or on the main unit.“AUTO STANDBY ON” or “AUTO STANDBY OFF” is displayed on the main display, then switches the setting.The system may not enter standby mode automatically in the following cases:
• While using the tuner function• While an audio signal is being detected• During playback of audio tracks or files• While the Play Timer or Sleep Timer is being used
The system resets the 15 minute countdown time for entering standby mode in the following cases:
• When a USB device is connected in USB function• When a button on the remote or unit is pressed
∫ Turn on and off automaticallyYou can set a time for automatic power on and off.• Make sure that you have set the clock before this setup.1 Press TIMER.2 Press / to select [PLAY SET], then press
.[ON TIME] appers,and the hour digits blink.3 Press / to set the hour of ON TIME, then
press .The minute digits blink.4 Press / to set the minute, then press .[OFF TIME] appers,and the hour digits blink.5 Press / to set the hour of OFF TIME, then
press .The minute digits blink.6 Press / to set the minute, then press .7 Press / to select the source, then press
.CD, USB and FM can be selected as the playback source.
• It is possible to move cursor between “hour” and “minute” settings by :/9.
To check the setting1 Press TIMER.2 Press / to select [SELECT], then press
.3 Press / to select [PLAY SEL], then press
.To cancel the timer1 Press TIMER.2 Press / to select [SELECT], then press
.3 Press / to select [OFF], then press .
∫ Setting the sleep timerIn the working mode, press SLEEP repeatedly to select a preset period (10, 20, 30, 40, 50, 60, 70, 80, 90 minutes or AUTO).
• To deactivate the sleep timer, press SLEEP repeatedly until [OFF] is displayed.
SN29402702_X-EM16_26_En(Europe).book 11 ページ 2016年8月6日 土曜日 午後3時12分

12En
• If you select [AUTO], this unit turns off automatically after a CD or USB device playback ends.
∫ Routing audio from other devices
CAUTION• We will not accept responsibility for damage arising from
the connection of equipment manufactured by other companies.
Through the AUDIO IN socket
1 Connect a stereo mini-plug cable (commercially available) to
• the AUDIO IN socket on the rear panel of the main unit, and
• the headphones socket on the external device (for example, an MP3 player).
2 Press INPUT on the remote control or INPUT repeatedly on the main unit to switch the source to [AUDIO IN].
3 Play the external device.
∫ USB 500 mA chargeThe USB terminal on this unit has a 500 mA output. A USB device up to 500 mA can be connected and used/charged. Battery charging starts when the USB device is connected to the (USB) port on the unit.Notes on charging USB devices with this system
• You cannot use the system as a battery charger when the system is off.
• Battery charging may not be possible depending on the specifications of the USB device.
∫ Setting the Bluetooth signal on or off1 Press and hold:6 and on the main
unit for 5 seconds.2 Release the button when [BT OFF] (Bluetooth
signal off) or [BT ON] (Bluetooth signal on) is displayed.
• You cannot pair this unit with Bluetooth-enabled devices when this unit is off.
∫ Sound controlsP.Bass controlWhen the power is first turned on, the unit will enter the P.bass mode which emphasises the bass frequencies. To cancel the P.bass mode, press the P.BASS on the remotecontrol.
AUDIO INANTENNA SPEAKERSR
FM
L
SN29402702_X-EM16_26_En(Europe).book 12 ページ 2016年8月6日 土曜日 午後3時12分
EnglishFrançais
Español
13En
Additional information∫ USB playability informationCompatible USB devices:
• USB flash memory (USB1.1/2.0 (Full Speed))• USB flash players (USB1.1/2.0 (Full Speed))
Supported formats:• USB or memory file format: FAT16, FAT32• MP3 bitrates (data rates): 32 kbps to 320 kbps and
variable bitrates• Folder Depth 8: including ROOT• Maximum number of folders: 256 (including ROOT)• Maximum number of tracks/files: 999
Maximum number of files that this unit can recognize in a folder : 999
• ID3tag: v1.0, v1.1, v1.2, v2.0, v2.2, v2.3, v2.4Audio files cannot be played depending on the encoding software settings, USB device type, recording, other conditions.Unsupported formats:
• Empty albums: an album that does not contain MP3 files
• Unsupported file formats are skipped. For example, Word documents (.doc) or MP3 files with extension.dlf are ignored and not played.
• Audio files except for MP3.• Other file systems (exFAT, NTFS, HFS etc.) other than
FAT16 and FAT32.
∫ Supported MP3 disc formats• ISO9660 Level 1/Level 2, Joliet• Maximum number of folders: 256 (including ROOT)• Maximum number of tracks/files: 999
Maximum number of files that this unit can recognize in a folder : 999
• Supported sampling frequencies: 32 kHz, 44.1 kHz, 48 kHz
• Supported bitrates: 32 kbps to 320 kbps, variable bitrates
• Folder Depth 8: including ROOTAudio files cannot be played depending on the encoding software settings, USB device type, recording, other conditions.
Troubleshooting WARNING
• Never remove the casing of this apparatus.• Incorrect operation is often mistaken for trouble or
malfunction. If you think that there is something wrong with this component, check the points below. Sometimes the trouble may lie in another component. Inspect the other components and electrical appliances being used. If the trouble cannot be rectified even after checking the points below, ask your nearest Pioneer authorized service center or your dealer to carry out repair work.
• If the unit does not operate normally due to external effects such as static electricity, disconnect the power plug from the outlet and insert it again to return to normal operating conditions.
If “PROTECT” appears on the display. Immediately unplug the power cord, and check the
following items after “PROTECT” disappears.
• Make sure that nothing is blocking the ventilation holes of the system.After you have checked these above items and found no problems, reconnect the power cord, and turn on the system. If the issue persists, contact your nearest dealer.
No power. Make sure that the AC power cord is connected
properly. Make sure that there is power at the AC outlet. In automatic standby mode, the system switches off
automatically 15 minutes after the system stays inactive.
No sound or poor sound. Adjust the volume. Make sure that the speakers are connected correctly.
No response from the system. Reconnect the AC power plug, and then turn on the
system again. With a power-saving feature, the system switches off
automatically 15 minutes after the system stays inactive.
Remote control does not work. Reduce the distance between the remote control and
the main unit. Insert battery with its polarity (+/– signs) aligned as
indicated. Replace the batteries. Aim the remote control directly at the sensor on the
front panel of the main unit. No disc is detected.
Insert a disc. Make sure that you place the disc with its label facing
upwards. Wait until the moisture condensation at the lens has
cleared. Replace or clean the disc. Make sure that the recordable disc is finalized and the
format is supported. USB storage device is not supported.
Make sure that the USB storage device is compatible with the system.
Is the USB storage device connected properly? Make sure that the device is firmly inserted.
The file or folder name (album name) is not displayed correctly. The character code that can be displayed by this unit
are as follows:• Upper cases (A to Z).• Numbers (0 to 9).• Symbols (< >* +, [ ] _).Other characters appear as “_”.
“OVER CURRENT” appears. A problem has been detected with the level of
electrical current from the (USB) port. Turn off the system and remove the USB device from the
(USB) port. Make sure there is no problem with the USB device. If this display pattern persists, contact your nearest dealer.
Cannot play some files on the USB storage device. Make sure that the file format is supported. Make sure that the file quantity does not exceed the
maximum. (page 13) Radio reception is poor.
Increase the distance between the system and other electrical appliances.
Fully extend the antenna. Timer does not work.
Set the clock correctly. Switch on the timer.
X-EM16_26_TOC&Body.fm 13 ページ 2016年8月8日 月曜日 午後12時23分

14En
Clock/timer setting is erased. Power has been interrupted or the AC power cord has
been disconnected. Reset the clock/timer.
When the Bluetooth wireless technology device is connected or operated (X-EM26 only) The Bluetooth wireless technology device cannot be
connected or operated.Sound from the Bluetooth wireless technology device is not emitted or the sound is interrupted. Check that no object that emits electromagnetic
waves in the 2.4 GHz band (microwave oven, wireless LAN device or Bluetooth wireless technology apparatus) is near the unit. If such an object is near the unit, set the unit far from it. Or, stop using the object emitting the electromagnetic waves.
Check that the Bluetooth wireless technology device is not too far from the unit and that obstructions are not set between the Bluetooth wireless technology device and the unit. Set the Bluetooth wireless technology device and the unit so that the distance between them is less than about 10 m* and no obstructions exist between them.
* The distance given is to be used as a rough guide. The actual allowable distance between devices may vary depending on conditions in the surrounding environment.
The Bluetooth wireless technology device may not be set to the communication mode supporting the Bluetooth wireless technology. Check the setting of the Bluetooth wireless technology device.
Cautions on use
∫ When moving this unitWhen moving this unit, be sure to first check that there is no disc loaded. Then press Í, wait until [STANDBY] disappears on main display to turn off, and then unplug the power cord. Damage may occur if the unit is transported or moved with a disc inserted, or when another device is connected to the USB terminal, or AUDIO IN mini-plug jack.
∫ Place of installation• Choose a stable place near the TV or stereo system
being used with this unit.• Do not place this unit on top of a TV or color monitor.
Also, install it away from cassette decks and other devices easily affected by magnetic forces.
Avoid the following locations:• Places exposed to direct sunlight• Humid or poorly ventilated places• Extremely hot places• Places exposed to vibrations• Places in which there is much dust or cigarette smoke• Places exposed to soot, steam, or heat (kitchens, etc.)
∫ Do not place objects on this unitDo not place any objects on top of this unit.Do not obstruct the ventilation holes.Do not use this unit on shaggy rugs, beds, sofas, etc., or wrapped in cloth, etc. Doing so will prevent the heat from dispersing, leading to damage.Do not expose to heat.Do not place this unit on top of an amplifier or other components that generate heat. When rack mounting it, to avoid the heat given off by the amplifier or other audio components, place it on a shelf below the amplifier.
• Turn off the power of this unit when not using it.• Depending on signal conditions, striped patterns may
appear on a TV screen and noise may enter the sound of radio broadcasts when the power of this unit is on. If this happens, turn off the power of this unit.
∫ Cleaning the product• Unplug the power cord from the power outlet when
cleaning this unit.• Clean this unit using a soft cloth. For tough dirt, apply
some neutral detergent diluted in 5 to 6 parts water to a soft cloth, wring out thoroughly, wipe off the dirt, and then wipe again with a soft, dry cloth.
• Alcohol, thinner, benzene, insecticides, etc., could cause the print or paint to peel off. Also, leaving rubber or vinyl products in contact with this unit for long periods of time could mar the cabinet.
• When using chemical-impregnated wipes, etc., read the cautions included with the wipes carefully.
∫ Cleaning the lens• The lens of this unit should not become dirty in normal
use, but if for some reason it should malfunction due to dust or dirt, consult your nearest Pioneer authorized service center. Although lens cleaners for players are commercially available, we advise against using them since some may damage the lens.
Handling discs
∫ Storing• Always place discs in their cases and store them
vertically, avoiding hot, humid places, places exposed to direct sunlight and extremely cold places.
• Be sure to read the cautions included with the disc.
∫ Cleaning discs• Discs may not play if there are fingerprints or dust on
them. In this case, use a cleaning cloth, etc., to gently wipe the disc from the inside towards the outside. Do not use dirty cleaning cloths.
• Do not use benzene, thinner or other volatile chemicals. Also, do not use record spray or antistatic agents.
• For tough dirt, apply some water to a soft cloth, wring out thoroughly, wipe off the dirt, and then wipe off the moisture with a dry cloth.
• Do not use damaged (cracked or warped) discs.• Do not let the signal surface of discs get scratched or dirty.• Do not attach pieces of paper or stickers to discs. Doing
so could warp discs, making it impossible to play them. Also, note that rental discs often have labels attached to them, and the glue of the label may have oozed out. Check that there is no glue around the edges of such labels before using rented discs.
SN29402702_X-EM16_26_En(Europe).book 14 ページ 2016年8月6日 土曜日 午後3時12分
EnglishFrançais
Español
15En
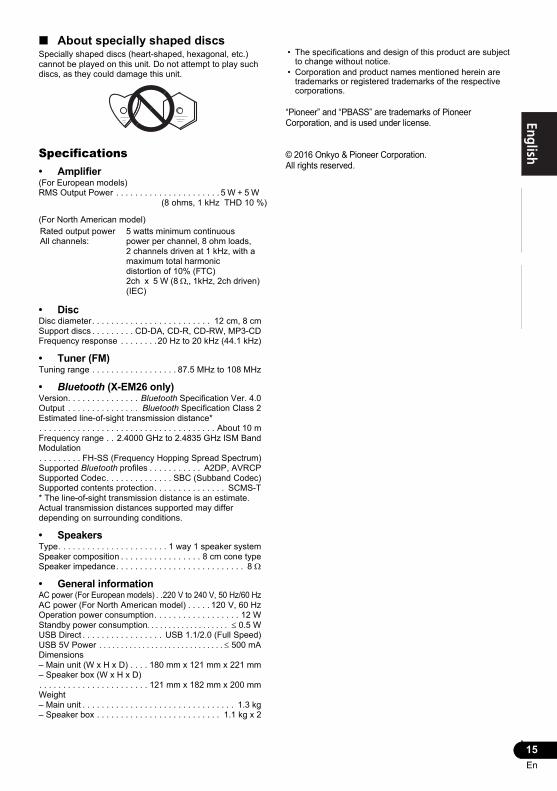
∫ About specially shaped discsSpecially shaped discs (heart-shaped, hexagonal, etc.) cannot be played on this unit. Do not attempt to play such discs, as they could damage this unit.
Specifications• Amplifier(For European models)RMS Output Power . . . . . . . . . . . . . . . . . . . . . . 5 W + 5 W
(8 ohms, 1 kHz THD 10 %)
(For North American model)
• DiscDisc diameter. . . . . . . . . . . . . . . . . . . . . . . . . 12 cm, 8 cmSupport discs . . . . . . . . . CD-DA, CD-R, CD-RW, MP3-CDFrequency response . . . . . . . .20 Hz to 20 kHz (44.1 kHz)
• Tuner (FM)Tuning range . . . . . . . . . . . . . . . . . . 87.5 MHz to 108 MHz
• Bluetooth (X-EM26 only)Version. . . . . . . . . . . . . . . Bluetooth Specification Ver. 4.0Output . . . . . . . . . . . . . . . Bluetooth Specification Class 2Estimated line-of-sight transmission distance*. . . . . . . . . . . . . . . . . . . . . . . . . . . . . . . . . . . . . About 10 mFrequency range . . 2.4000 GHz to 2.4835 GHz ISM BandModulation. . . . . . . . . FH-SS (Frequency Hopping Spread Spectrum)Supported Bluetooth profiles . . . . . . . . . . . A2DP, AVRCPSupported Codec. . . . . . . . . . . . . . SBC (Subband Codec)Supported contents protection. . . . . . . . . . . . . . . SCMS-T* The line-of-sight transmission distance is an estimate.Actual transmission distances supported may differ depending on surrounding conditions.
• SpeakersType. . . . . . . . . . . . . . . . . . . . . . . 1 way 1 speaker systemSpeaker composition . . . . . . . . . . . . . . . . . 8 cm cone typeSpeaker impedance. . . . . . . . . . . . . . . . . . . . . . . . . . . 8
• General informationAC power (For European models) . .220 V to 240 V, 50 Hz/60 HzAC power (For North American model) . . . . . 120 V, 60 HzOperation power consumption. . . . . . . . . . . . . . . . . . 12 WStandby power consumption 0.5 WUSB Direct . . . . . . . . . . . . . . . . . USB 1.1/2.0 (Full Speed)USB 5V Power 500 mADimensions– Main unit (W x H x D) . . . . 180 mm x 121 mm x 221 mm– Speaker box (W x H x D). . . . . . . . . . . . . . . . . . . . . . . 121 mm x 182 mm x 200 mmWeight– Main unit . . . . . . . . . . . . . . . . . . . . . . . . . . . . . . . . 1.3 kg– Speaker box . . . . . . . . . . . . . . . . . . . . . . . . . . 1.1 kg x 2
• The specifications and design of this product are subject to change without notice.
• Corporation and product names mentioned herein are trademarks or registered trademarks of the respective corporations.
“Pioneer” and “PBASS” are trademarks of Pioneer Corporation, and is used under license.
© 2016 Onkyo & Pioneer Corporation.All rights reserved.
Rated output powerAll channels:
5 watts minimum continuous power per channel, 8 ohm loads,2 channels driven at 1 kHz, with a maximum total harmonic distortion of 10% (FTC)2ch x 5 W (8 ,, 1kHz, 2ch driven) (IEC)
X-EM16_26_TOC&Body.fm 15 ページ 2016年8月9日 火曜日 午後3時42分
ATTENTIONPOUR ÉVITER TOUT RISQUE D’ÉLECTROCUTION, NE PAS ENLEVER LE COUVERCLE (NI LE PANNEAU ARRIÈRE). AUCUNE PIÈCE RÉPARABLE PAR L’UTILISATEUR NE SE TROUVE À L’INTÉRIEUR. CONFIER TOUT ENTRETIEN À UN PERSONNEL QUALIFIÉ UNIQUEMENT.
D3-4-2-1-1_B1_Fr
AVERTISSEMENTCet appareil n’est pas étanche. Pour éviter les risques d’incendie et de décharge électrique, ne placez près de lui un récipient rempli d’eau, tel qu’un vase ou un pot de fleurs, et ne l’exposez pas à des gouttes d’eau, des éclaboussures, de la pluie ou de l’humidité.
D3-4-2-1-3_A1_Fr
AVERTISSEMENTPour éviter les risques d’incendie, ne placez aucune flamme nue (telle qu’une bougie allumée) sur l’appareil.
D3-4-2-1-7a_A1_Fr
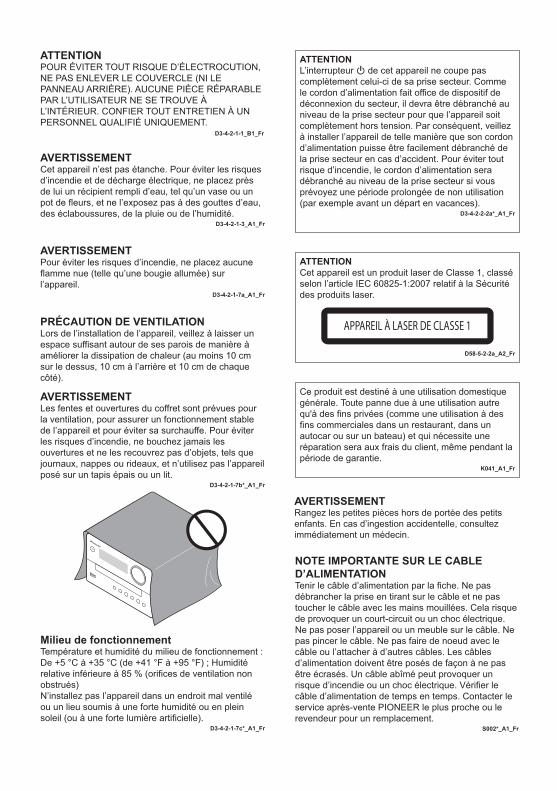
PRÉCAUTION DE VENTILATIONLors de l’installation de l’appareil, veillez à laisser un espace suffisant autour de ses parois de manière à améliorer la dissipation de chaleur (au moins 10 cm sur le dessus, 10 cm à l’arrière et 10 cm de chaque côté).
AVERTISSEMENTLes fentes et ouvertures du coffret sont prévues pour la ventilation, pour assurer un fonctionnement stable de l’appareil et pour éviter sa surchauffe. Pour éviter les risques d’incendie, ne bouchez jamais les ouvertures et ne les recouvrez pas d’objets, tels que journaux, nappes ou rideaux, et n’utilisez pas l’appareil posé sur un tapis épais ou un lit.
D3-4-2-1-7b*_A1_Fr
Milieu de fonctionnementTempérature et humidité du milieu de fonctionnement :De +5 °C à +35 °C (de +41 °F à +95 °F) ; Humidité relative inférieure à 85 % (orifices de ventilation non obstrués)N’installez pas l’appareil dans un endroit mal ventilé ou un lieu soumis à une forte humidité ou en plein soleil (ou à une forte lumière artificielle).
D3-4-2-1-7c*_A1_Fr
ATTENTIONCet appareil est un produit laser de Classe 1, classé selon l’article IEC 60825-1:2007 relatif à la Sécurité des produits laser.
APPAREIL À LASER DE CLASSE 1
D58-5-2-2a_A2_Fr
Ce produit est destiné à une utilisation domestique générale. Toute panne due à une utilisation autre qu'à des fins privées (comme une utilisation à des fins commerciales dans un restaurant, dans un autocar ou sur un bateau) et qui nécessite une réparation sera aux frais du client, même pendant la période de garantie.
K041_A1_Fr
NOTE IMPORTANTE SUR LE CABLE D’ALIMENTATIONTenir le câble d’alimentation par la fiche. Ne pas débrancher la prise en tirant sur le câble et ne pas toucher le câble avec les mains mouillées. Cela risque de provoquer un court-circuit ou un choc électrique. Ne pas poser l’appareil ou un meuble sur le câble. Ne pas pincer le câble. Ne pas faire de noeud avec le câble ou l’attacher à d’autres câbles. Les câbles d’alimentation doivent être posés de façon à ne pas être écrasés. Un câble abîmé peut provoquer un risque d’incendie ou un choc électrique. Vérifier le câble d’alimentation de temps en temps. Contacter le service après-vente PIONEER le plus proche ou le revendeur pour un remplacement.
S002*_A1_Fr
ATTENTIONL’interrupteur de cet appareil ne coupe pas complètement celui-ci de sa prise secteur. Comme le cordon d’alimentation fait office de dispositif de déconnexion du secteur, il devra être débranché au niveau de la prise secteur pour que l’appareil soit complètement hors tension. Par conséquent, veillez à installer l’appareil de telle manière que son cordon d’alimentation puisse être facilement débranché de la prise secteur en cas d’accident. Pour éviter tout risque d’incendie, le cordon d’alimentation sera débranché au niveau de la prise secteur si vous prévoyez une période prolongée de non utilisation (par exemple avant un départ en vacances).
D3-4-2-2-2a*_A1_Fr
AVERTISSEMENTRangez les petites pièces hors de portée des petits enfants. En cas d’ingestion accidentelle, consultez immédiatement un médecin.
SN29402702_X-EM16_26_Fr.book 2 ページ 2016年8月6日 土曜日 午後4時20分
K058a_A1_Fr
Pb
Information à destination des utilisateurs sur la collecte et l’élimination des équipements et batteries usagés
Ces symboles qui figurent sur les produits, les emballages et/ou les documents d’accompagnement signifient que les équipements électriques et électroniques et batteries usagés ne doivent pas être jetés avec les déchets ménagers et font l’objet d’une collecte sélective.
Pour assurer l’enlèvement et le traitement appropriés des produits et batteries usagés, merci de les retourner dans les points de collecte sélective habilités conformément à la législation locale en vigueur.
En respectant les circuits de collecte sélective mis en place pour ces produits, vous contribuerez à économiser des ressources précieuses et à prévenir les impacts négatifs éventuels sur la santé humaine et l’environnement qui pourraient résulter d’une mauvaise gestion des déchets.
Pour plus d’information sur la collecte et le traitement des produits et batteries usagés, veuillez contacter votre municipalité, votre service de gestion des déchets ou le point de vente chez qui vous avez acheté ces produits.
Ces symboles ne sont valables que dans les pays de l’Union Européenne.Pour les pays n’appartenant pas à l’Union Européenne :Si vous souhaitez jeter ces articles, veuillez contacter les autorités ou revendeurs locaux pour connaître les méthodes d’élimination appropriées.
Exemples de marquagepour les batteries
Marquage pour leséquipements
CondensationSi vous transportez l’appareil sans transition d’un endroit froid vers une pièce chaude (par exemple, en hiver), ou si la température de la pièce où se trouve cet appareil augmente rapidement, des gouttelettes d’eau (condensation) peuvent se former à l’intérieur (sur des pièces et la lentille). En cas de condensation, cet appareil ne fonctionne pas correctement et la lecture n’est pas possible.Laissez l’appareil sous tension pendant 1 ou 2 heures à la température ambiante (pour que l’humidité ait le temps de s’évaporer). Les gouttelettes d’eau se dissiperont et la lecture sera de nouveau possible. De la condensation peut aussi se former en été si l’appareil est exposé à l’air d’un climatiseur. Si tel est le cas, déplacez votre appareil.
Précaution concernant les ondes radioX-EM26 uniquementCet appareil utilise comme onde radio une fréquence de 2,4 GHz, c’est-à-dire une bande utilisée par d’autres systèmes sans fil (Fours à micro-ondes, téléphones sans fil, etc.).Si des parasites apparaissent sur les images télévisées, il est possible que cet appareil (y compris ceux qu’il prend en charge) provoquent des interférences sur le connecteur d’entrée de votre téléviseur, les images vidéo, le tuner satellite, etc.Dans ce cas, augmentez la distance entre la prise d’entrée d’antenne et cet appareil (y compris les produits pris en charge par cet appareil).• Pioneer n’est pas responsable d’un mauvais
fonctionnement du produit Pioneer compatible due à une erreur/défaillance de la connexion réseau et/ou de l’appareil raccordé. Veuillez contacter votre fournisseur de service Internet ou le fabricant du périphérique du réseau.
• Un abonnement payant auprès d’un fournisseur d’accès Internet est nécessaire pour utiliser Internet.
SN29402702_X-EM16_26_Fr.book 3 ページ 2016年8月6日 土曜日 午後4時20分
4Fr
Nous vous remercions pour cet achat d’un produit Pioneer.Nous vous demandons de lire soigneusement ce mode d’emploi ; vous serez ainsi à même de faire fonctionner l’appareil correctement. Après avoir bien lu le mode d’emploi, le ranger dans un endroit sûr pour pouvoir s’y référer ultérieurement.
Table des matièresPréparatifs . . . . . . . . . . . . . . . . . . . . . . . . . . 4Les organes et leurs fonctions . . . . . . . . . 5Aperçu de l’appareil . . . . . . . . . . . . . . . . . . . . . . . . . .5Présentation de la télécommande . . . . . . . . . . . . . . .6
Connexions . . . . . . . . . . . . . . . . . . . . . . . . . 6Raccordement des enceintes . . . . . . . . . . . . . . . . . . .6Installation de l’antenne FM . . . . . . . . . . . . . . . . . . . .7Branchez le cordon d’alimentation . . . . . . . . . . . . . . .7
Pour commencer . . . . . . . . . . . . . . . . . . . . . 7Mise sous tension . . . . . . . . . . . . . . . . . . . . . . . . . . . .7Réglage de l’horloge . . . . . . . . . . . . . . . . . . . . . . . . . .7Sélection d’une source . . . . . . . . . . . . . . . . . . . . . . . .7
Lecture . . . . . . . . . . . . . . . . . . . . . . . . . . . . . 8Lecture d’un disque . . . . . . . . . . . . . . . . . . . . . . . . . . .8Lecture depuis un dispositif de stockage USB . . . . . .8Contrôle de la lecture . . . . . . . . . . . . . . . . . . . . . . . . .8
Lecture audio Bluetooth® (X-EM26 uniquement) . . . . . . . . . . . . . . . . . 9Association avec l’appareil (enregistrement initial) . . .9Écouter de la musique sur l’appareil à partir d’un périphérique sans fil Bluetooth . . . . . . . . . . . . . . . . .10
Écoute de la radio FM . . . . . . . . . . . . . . . . 11Accorder la radio sur une station FM . . . . . . . . . . . .11Programmation de stations radio . . . . . . . . . . . . . . . .11
Autres fonctions. . . . . . . . . . . . . . . . . . . . . 11Informations complémentaires . . . . . . . . 13Guide de dépannage . . . . . . . . . . . . . . . . . . . . . . . . .13Précautions d’utilisation . . . . . . . . . . . . . . . . . . . . . . .14Manipulation d’un disque . . . . . . . . . . . . . . . . . . . . . .14Spécifications. . . . . . . . . . . . . . . . . . . . . . . . . . . . . . .15
Préparatifs∫ IntroductionAvec cette chaîne, vous pouvez :
• écouter de la musique et d’autres contenus audio enregistrés sur des disques, des périphériques de stockage USB ou d’autres équipements externes
• écouter des stations radio FM• écouter de la musique à partir d’un périphérique sans fil
Bluetooth (X-EM26 uniquement)Supports lisibles :
• Disques : CD-DA, CD-R, CD-RW, MP3-CD• Fichiers : .mp3• Périphérique de stockage USB
– Compatibilité : USB 1.1/2.0 (Full Speed)– Classe supportée : MSC (Mass Storage Class)– Système de fichier : FAT16, FAT32– Nombre maximal d’albums/de dossiers : 256– Nombre maximal de morceaux/de fichiers : 999– Maximum de niveaux dans le répertoire : 8
∫ Contenu de l’emballageVérifiez et identifiez le contenu du carton d’emballage :
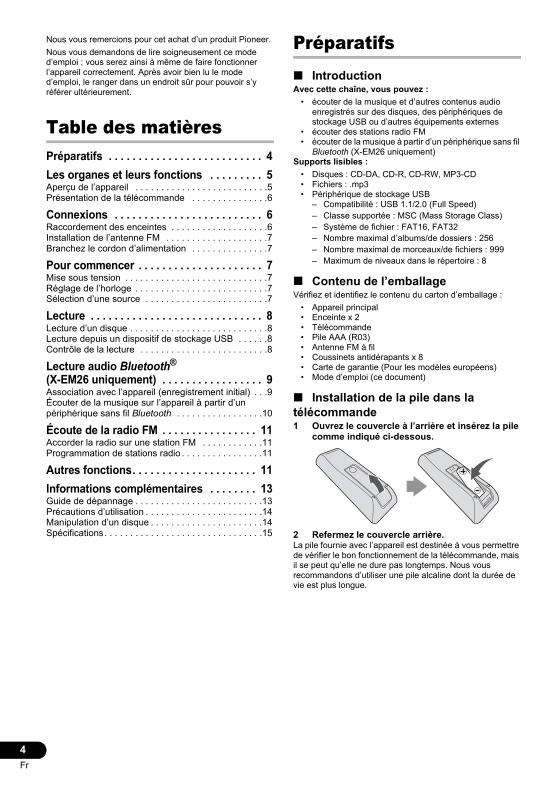
• Appareil principal• Enceinte x 2• Télécommande• Pile AAA (R03)• Antenne FM à fil• Coussinets antidérapants x 8• Carte de garantie (Pour les modèles européens)• Mode d’emploi (ce document)
∫ Installation de la pile dans la télécommande1 Ouvrez le couvercle à l’arrière et insérez la pile
comme indiqué ci-dessous.
2 Refermez le couvercle arrière.La pile fournie avec l’appareil est destinée à vous permettre de vérifier le bon fonctionnement de la télécommande, mais il se peut qu’elle ne dure pas longtemps. Nous vous recommandons d’utiliser une pile alcaline dont la durée de vie est plus longue.
SN29402702_X-EM16_26_Fr.book 4 ページ 2016年8月6日 土曜日 午後4時20分
5Fr
EnglishFrançais
EspañolDeutsch
ItalianoNederlands
Pyccкий ATTENTION
• Lors de l’installation de la pile, veillez à ne pas endommager le ressort situé sur la borne - du compartiment de pile. La pile risquerait de fuir ou de surchauffer.
• N’utilisez pas d’autre pile que celle spécifiée.• Lorsque vous insérez la pile dans la télécommande,
veillez à respecter l’orientation correcte, indiquée par les repères de polarité (+ et -).
• Ne chauffez pas la pile, ne tentez pas de la démonter et ne la jetez pas dans le feu ni dans l’eau.
• Pour évitez une fuite du liquide contenu dans la pile, retirez la pile lorsque vous prévoyez de ne pas utiliser la télécommande pendant une longue période (un mois ou plus). En cas de fuite du liquide de la pile, essuyez soigneusement l’intérieur du compartiment, puis insérez une pile neuve. Si l’électrolyte d’une pile devait couler et se répandre sur votre peau, nettoyez le liquide avec une grande quantité d’eau.
• Lorsque vous jetez une pile usagée, veuillez vous conformer aux normes et/ou règlementations environnementales en vigueur dans votre pays ou région.
• AVERTISSEMENTN’utilisez pas et ne rangez pas les piles en plein soleil ou dans un endroit excessivement chaud, comme dans une voiture ou près d’un appareil de chauffage. Les piles risqueraient de fuir, de surchauffer, d’exploser ou de s’enflammer. Leur durée de vie et/ou leur performance pourrait également être réduite.
∫ Fixation des coussinets antidérapantsInstallez les patins antidérapants sur la surface inférieure des enceintes.• Les enceintes sont normalement placées verticalement.
Fixez les coussinets antidérapants sur la surface inférieure des enceintes.
Les organes et leurs fonctionsAperçu de l’appareil
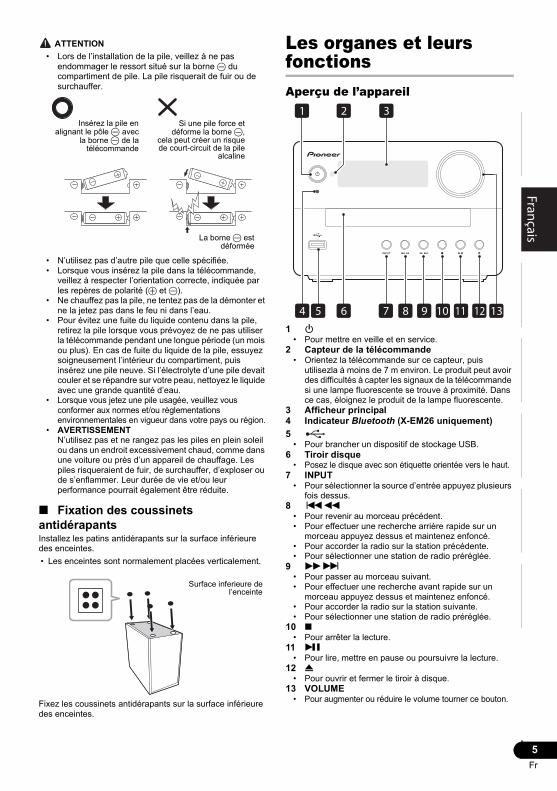
1 Í• Pour mettre en veille et en service.
2 Capteur de la télécommande• Orientez la télécommande sur ce capteur, puis
utilisezla à moins de 7 m environ. Le produit peut avoir des difficultés à capter les signaux de la télécommande si une lampe fluorescente se trouve à proximité. Dans ce cas, éloignez le produit de la lampe fluorescente.
3 Afficheur principal4 Indicateur Bluetooth (X-EM26 uniquement)5
• Pour brancher un dispositif de stockage USB.6 Tiroir disque
• Posez le disque avec son étiquette orientée vers le haut.7 INPUT
• Pour sélectionner la source d’entrée appuyez plusieurs fois dessus.
8 :6• Pour revenir au morceau précédent.• Pour effectuer une recherche arrière rapide sur un
morceau appuyez dessus et maintenez enfoncé.• Pour accorder la radio sur la station précédente.• Pour sélectionner une station de radio préréglée.
9 59• Pour passer au morceau suivant.• Pour effectuer une recherche avant rapide sur un
morceau appuyez dessus et maintenez enfoncé.• Pour accorder la radio sur la station suivante.• Pour sélectionner une station de radio préréglée.
10 ∫• Pour arrêter la lecture.
11 I• Pour lire, mettre en pause ou poursuivre la lecture.
12 <• Pour ouvrir et fermer le tiroir à disque.
13 VOLUME• Pour augmenter ou réduire le volume tourner ce bouton.
Insérez la pile enalignant le pôle - avec
la borne - de latélécommande
Si une pile force etdéforme la borne -,
cela peut créer un risquede court-circuit de la pile
alcaline
La borne - estdéformée
Surface inferieure del’enceinte
21
137 8 9 1211
3
4 5 6 10
SN29402702_X-EM16_26_Fr.book 5 ページ 2016年8月6日 土曜日 午後4時20分
6Fr
Présentation de la télécommande
1 Í• Pour mettre en veille et en service.
2 SLEEP• Pour mettre la minuterie sommeil en mode de
fonctionnement3 TIMER
• Pour le reglage de l’horloge, ainsi que pour la programmation et la verification des minuteries.
4 MODE• Pour sélectionner le mode de lecture.• Mode de syntonisation.• Pour activer ou désactiver le menu BT.
5 :/9• Pour sauter jusqu’à un morceau.• Maintenez ces touches enfoncées pour effectuer une
avance ou un retour rapide dans un morceau.• Pour syntoniser la radio sur une station.• Pour sélectionner une station de radio préréglée.
6 /• Pour sélectionner/basculer les réglages de l’appareil et
les modes.• Permet de sélectionner un dossier (album) sur un
disque MP3 ou une clé USB.• Pour sélectionner une station de radio préréglée.
7 DISPLAY• Affiche l’horloge.• Pour afficher l’état actuel ou les informations du support.• Pour afficher les informations ID3 disponibles des
pistes MP3.8 REPEAT, ST/MONO
• REPEAT: Pour sélectionner le mode de répétition de chaque source d’entrée. (page 8)
• ST/MONO: Permet de sélectionner la réception FM stéréo ou mono. (page 11)
9 MEMORY• Pour programmer les morceaux.• Pour prérégler les stations de radio en mode FM.
10 CLEAR• Pour supprimer le dernier morceau ou fichier du
programme en mode de lecture programmée.11 P.BASS
• Pour accentuer la puissance des graves.12 DIMMER
• Pour assombrir ou éclaircir l’affichage, appuyez dessus. La luminosité peut être réglée selon trois niveaux.
13 INPUT• Pour sélectionner la source d’entrée (CD, USB, BT
AUDIO (X-EM26 uniquement), FM, AUDIO IN).14
• Pour lire, mettre en pause ou poursuivre la lecture.• Pour valider vos choix.
15 ∫• Pour arrêter la lecture.
16 VOLUME +/-• Pour régler le volume.
17• Pour mettre en sourdine ou rétablir le volume.
18 EQ• Pour sélectionner le mode EQ.
[FLAT] l [POP] l [JAZZ] l [ROCK]l [CLASSIC] l (Revenir au début)
Connexions ATTENTION
• Veillez à mettre l’appareil hors tension et à débrancher le cordon d’alimentation de la prise secteur à chaque fois que vous effectuez ou que vous modifiez des connexions.
• Branchez le cordon d’alimentation une fois que toutes les connexions entre les différents équipements ont été effectuées.
Raccordement des enceintes• Chacune des deux enceintes peut être utilisée
indifféremment comme enceinte droite ou gauche.
ATTENTION• Ne raccordez à ce système aucun haut-parleur autre
que ceux qui sont fournis.
17
16
1
2
4
5
11
10
6
9
5
12
1514
18
6
7
8
13
3
AUDIO INANTENNA SPEAKERSR
FM
L
SPEAKERSR L
Enceinte droite
Enceinte gauche
Panneau arrière de cet appareil
SN29402702_X-EM16_26_Fr.book 6 ページ 2016年8月6日 土曜日 午後4時20分
7Fr
EnglishFrançais
EspañolDeutsch
ItalianoNederlands
Pyccкий• Ne raccordez pas les haut-parleurs fournis à un
amplificateur autre que celui fourni avec ce système. Une telle connexion pourrait provoquer une défaillance, voire un incendie.
• Ne fixez pas ces enceintes sur un mur ou au plafond. Ils pourraient causer des blessures en tombant.
• Insérez correctement les câbles d’enceintes dans les bornes et vérifiez que les câbles ne peuvent pas se détacher facilement.
• Il n’y a aucune différence entre les enceintes gauche (L) et droite (R).
Installation de l’antenne FM• Pour de meilleurs résultats, déroulez l’antenne FM et
fixez-la sur un mur ou sur un encadrement de porte. Tendez-la, elle ne doit pas être enroulée.
• Ne tirez jamais trop fort sur le fil d’antenne sous peine d’endommager l’antenne.
• Ce produit ne permet pas de recevoir les stations radio MW (petites ondes).
Branchez le cordon d’alimentation• Avant de brancher le cordon d’alimentation, assurez-vous
que tous les raccordements sont terminés.
Branchez le cordon d’alimentation à une prise secteur.
Pour commencer ATTENTION
• L’emploi de commandes ou de réglages ou l’exécution de procédures différant de ce qui est spécifié dans le présent document peut entraîner une exposition à des radiations dangereuses ou à un fonctionnement risqué.
Suivez toujours les instructions apparaissant dans ce chapitre, dans l’ordre.
Mise sous tension1 Appuyez sur la touche Í.Ce produit bascule sur la dernière source sélectionnée.
Réglage de l’horloge• Pendant le réglage, si vous n’effectuez aucune opération
en l’espace de 65 secondes, la chaîne sort du réglage de l’heure sans rien sauvegarder.
• Remettre l’horloge à l’heure lorsque l’alimentation est rétablie après que l’appareil ait été rebranché ou après une panne d’électricité.
1 Appuyez sur la touche Í pour mettre l’appareil sous tension.
2 Appuyez sur la touche TIMER de la télécommande.
Si [SELECT] ou [PLAY SET] apparaît, appuyez sur / pour sélectionner [CLOCK], puis appuyez sur .
3 Appuyez sur / pour régler les heures, puis appuyez sur .Les chiffres des heures se mettent à clignoter.
4 Appuyez sur / pour régler les minutes, puis appuyez sur .Les chiffres des minutes se mettent à clignoter.Pour afficher l’horloge lorsque l’appareil est désactivé :Appuyez sur DISPLAY. L’horloge s’affiche pendant environ 8 secondes.
Sélection d’une sourceAppuyez plusieurs fois de suite sur INPUT pour sélectionner une source.
• [CD] : le disque dans le tiroir à disque• [USB] : les fichiers .mp3 enregistrés sur le dispositif de
stockage USB raccordé• [BT AUDIO] : périphérique sans fil Bluetooth associé
(X-EM26 uniquement)• [FM] : la radio FM• [AUDIO IN] : le son transmis à la prise AUDIO IN
AUDIO INANTENNA SPEAKERSR
FM
L
FM
AUDIO INANTENNA SPEAKERSR
FM
L
À la prise murale
SN29402702_X-EM16_26_Fr.book 7 ページ 2016年8月6日 土曜日 午後4時20分

8Fr
Lecture
Lecture d’un disque1 Appuyez sur INPUT de la télécommande ou plusieurs fois de suite sur INPUT sur l’appareil pour basculer la source sur [CD].
2 Appuyez sur < pour éjecter le tiroir à disque.3 Insérez un disque en orientant la face imprimée vers le haut.4 Appuyez à nouveau sur < pour fermer le tiroir à disque.5 Appuyez sur .
Lecture depuis un dispositif de stockage USBCette chaîne peut lire les fichiers .mp3 copiés sur un dispositif de stockage USB (page 13).
• Pioneer ne garantit pas la compatibilité avec tous les dispositifs de stockage USB. Veuillez également noter que Pioneer décline toute responsabilité pour la perte de fichiers stockés sur des périphériques de stockage USB provoquée par une connexion à cet appareil.
1 Branchez le dispositif de stockage USB sur la prise USB.
2 Appuyez sur INPUT de la télécommande ou plusieurs fois de suite sur INPUT sur l’appareil pour basculer la source sur [USB].3 Appuyez sur .
Contrôle de la lecturePendant la lecture, procédez de la façon suivante pour contrôler la lecture.
: Pause ou reprise de la lecture.∫: Arrêt de la lecture.
:/9: Saut au morceau précédent ou suivant.Appuyez et maintenez enfoncé pour reculer ou avancer rapidement sur un morceau./: Saut à l’album précédent ou suivant en présence de plusieurs albums.REPEAT: Sélection d’un mode de lecture disponible.
• Répéter 1 morceau [REP ONE] : répétition du morceau actuel
• Tout répéter [REP ALL] : répétition de tous les morceaux
• Répéter le dossier [REP FLDR] : lit toutes les pistes présentes dans le dossier actuel. (Fonction USB uniquement)
• Arrêt répétition [REP OFF] : Coupe la lecture répétée.
∫ Changement de mode de lecture1 Appuyez sur ∫ pour arrêter la lecture.2 Appuyez plusieurs fois sur MODE.
CD : OFFSHUFFLEPROGRAMUSB : OFFFOLDERSHUFFLEFOLDER SHUFFLEPROGRAM
• Lecture normale [OFF] : les morceaux sont lus dans l’ordre normal.
• Lecture aléatoire [SHUF]: lire les morceaux dans un ordre aléatoire
• Programme [PROGRAM]: lire les morceaux dans un ordre choisi.
• Dossier* [FLDR] : Lit tous les fichiers présents dans le dossier sélectionné.
• Lecture aléatoire du dossier* [FLDRSHUF] : Lit tous les fichiers présents dans le dossier sélectionné dans un ordre aléatoire. * USB uniquement
• En mode SHUFFLE et FOLDER SHUFFLE, il est possible que la même piste soit lue en continu. De plus, la lecture ne s’arrête pas automatiquement. Pour arrêter la lecture, appuyez sur ∫.
• Lorsque le message [PLS STOP] apparaît :Vous ne pouvez pas changer le mode de lecture pendant la lecture. Arrêtez la lecture, puis changez le mode de lecture.
∫ Programmation de morceaux• Vous pouvez programmer jusqu’à 64 morceaux.1 Appuyez sur ∫ pour arrêter la lecture.
• (Pour un CD) [XX XX:XX] (XX indique le nombre total de morceaux et XX:XX indique la durée totale des morceaux) s’affiche.
• (Pour des fichiers MP3) [FILE XX] (XX indique le nombre total de morceaux) s’affiche.
2 Appuyez plusieurs fois sur MODE pour sélectionner [PROGRAM].
3 (Pour des fichiers MP3) Appuyez sur / pour sélectionner le dossier contenant les pistes ou les fichiers que vous voulez programmer.
4 Appuyez sur :/9 pour sélectionner un morceau.
5 Appuyez sur MEMORY.6 (Pour un CD) Répétez les points 4 et 5 pour
programmer d’autres morceaux.(Pour des fichiers MP3) Répétez les points 3 - 5 pour programmer d’autres morceaux.
7 Appuyez sur pour démarrer la lecture.
SN29402702_X-EM16_26_Fr.book 8 ページ 2016年8月6日 土曜日 午後4時20分
9Fr
EnglishFrançais
EspañolDeutsch
ItalianoNederlands
Pyccкий∫ Effacement du programmePour annuler la lecture de programme
• Appuyez plusieurs fois sur MODE pour sélectionner [OFF].
Pour effacer le programme• En mode [PROGRAM], appuyez sur ∫ pour arrêter, puis
appuyez sur CLEAR. Chaque fois que vous appuyez, le dernier morceau ou fichier programmé est supprimé. Une fois tous les morceaux ou fichiers supprimés, [NO STEP] s’affiche.
Lecture audio Bluetooth® (X-EM26 uniquement)
∫ Lecture de musique par la technologie sans fil Bluetooth
L’appareil peut lire de la musique stockée sur des périphériques équipés de la fonction sans fil Bluetooth (téléphones portables, lecteurs de musique numériques, etc.). Vous pouvez aussi utiliser un transmetteur audio Bluetooth (vendu séparément) pour lire de la musique à partir d’équipements non dotés de la fonction sans fil Bluetooth. Pour plus d’informations, veuillez consulter le Guide d’utilisation de votre équipement Bluetooth.
• La marque de mot et les logos Bluetooth® sont des marques déposées appartenant à Bluetooth SIG, Inc.
• Le périphérique adapté pour la technologie sans fil Bluetooth doit prendre en charge les profils A2DP.
• La connexion n’est pas garantie avec tous les dispositifs compatibles Bluetooth.
∫ Fonctionnement par télécommandeLa télécommande fourni avec cet appareil permet de faire fonctionner les dispositifs compatibles avec la technologie sans fil Bluetooth.
• Le périphérique adapté pour la technologie sans fil Bluetooth doit prendre en charge les profils AVRCP.
• Le fonctionnement de la télécommande ne peut être garanti pour tous les périphériques optimisés pour la technologie sans fil Bluetooth.
Association avec l’appareil (enregistrement initial)Pour pouvoir lire de la musique stockée sur un périphérique sans fil Bluetooth, il est tout d’abord nécessaire d’associer les deux équipements. L’association doit être effectuée lors de la première utilisation de l’appareil avec un périphérique sans fil Bluetooth, ou lorsque les données d’association ont été effacées pour une raison quelconque.L’association est une procédure nécessaire pour permettre les communications à l’aide de la technologie sans fil Bluetooth.
• L’association est effectuée seulement lorsque vous utilisez l’appareil et le périphérique sans fil Bluetooth ensemble pour la première fois.
• Afin d’autoriser les communications à l’aide de la technologie sans fil Bluetooth, l’association doit être effectuée à la fois sur l’appareil et sur le périphérique sans fil Bluetooth.
1 Appuyez sur INPUT de la télécommande ou plusieurs fois de suite sur INPUT sur l’appareil pour basculer la source sur [BT AUDIO].L’indicateur Bluetooth clignote.Si l’appareil ne contient aucune information d’association, par exemple lorsque vous utilisez un périphérique Bluetooth pour la première fois après avoir acheté l’appareil, celui-ci bascule automatiquement en mode d’association.
2 Appuyez sur la touche MODE de la télécommande.
(Pour faire fonctionner cet appareil)Maintenez enfoncée la touche INPUT jusqu’à ce que le témoin Bluetooth commence à clignoter rapidement.
• Cet appareil passe en mode jumelage et le témoin Bluetooth commence à clignoter rapidement. (Passez à l’étape 4)
3 Appuyez sur / pour sélectionner [PAIRING], puis appuyez sur .
• Cet appareil passe en mode jumelage et le témoin Bluetooth clignote rapidement.
4 Mettez le périphérique sans fil Bluetooth que vous souhaitez associer sous tension et effectuez la procédure d’association sur le périphérique.
• Cet appareil apparaîtra sous le nom « Pioneer X-EM26 » sur tous les périphériques sans fil Bluetooth que vous possédez.
La procédure d’association commence.• Placez le périphérique sans fil Bluetooth près de
l’appareil.• Pour plus d’informations sur la procédure d’association
de votre périphérique sans fil Bluetooth, veuillez consulter le Guide d’utilisation de votre périphérique.
Données musicales
Périphérique non équipé de latechnologie sans fil Bluetooth :Lecteur de musique numérique
+Émetteur audio Bluetooth®
(disponible dans le commerce)
Périphérique optimisé pour latechnologie sans fil Bluetooth :Lecteur de musique numérique
Périphérique optimisé pour latechnologie sans fil Bluetooth :
Téléphone portable
SN29402702_X-EM16_26_Fr.book 9 ページ 2016年8月6日 土曜日 午後4時20分

10Fr
• Lorsque le code PIN est demandé, entrez « 0000 ». (Cet appareil ne prend pas en charge d’autre code PIN que « 0000 ».)
5 Vérifiez que [BT AUDIO] apparaît à l’écran et que le témoin Bluetooth passe de l’état clignotant à l’état allumé fixe.
• Si l’indicateur Bluetooth ne passe pas de l’état clignotant à l’état allumé fixe, cela signifie que la procédure d’association n’a pas réussi. Dans ce cas, recommencez la procédure d’association avec l’appareil.
• Si la procédure d’association a réussi, vous n’avez pas à recommencer cette procédure.
Même les équipements déjà associés avec cet appareil ne se connecteront pas pendant le mode d’association dans les cas suivants.Si cela se produit, effacez l’historique d’association au niveau du périphérique sans fil Bluetooth et exécutez de nouveau la procédure d’association.
• Jusqu’à 8 historiques d’association peuvent être conservés sur cet appareil. En cas de connexion au-delà de huit périphériques sans fil Bluetooth, le plus ancien historique d’association est supprimé.
• Tous l’historique d’association est supprimé en cas de réinitialisation aux réglages d’usine. Pour réinitialiser l’appareil aux réglages d’usine, appuyez sans relâcher sur les touches INPUT et < de l’appareil pendant plus de 5 secondes, jusqu’à ce que “RESET” s’affiche.
Pour supprimer l’association• Appuyez sur MODE ou modifiez la source.
Pour mettre fin à la connexion Bluetooth1 Appuyez sur MODE.2 Appuyez sur / pour sélectionner
[DISCONNECT], puis appuyez sur .
Écouter de la musique sur l’appareil à partir d’un périphérique sans fil Bluetooth1 Appuyez sur INPUT de la télécommande ou plusieurs fois de suite sur INPUT sur l’appareil pour basculer la source sur [BT AUDIO].L’appareil se met en marche avec la fonction BT AUDIO et se connecte directement au périphérique sans fil Bluetooth.
2 Une connexion Bluetooth est créée entre le périphérique sans fil Bluetooth et l’appareil.La procédure de connexion vers l’appareil doit être effectuée sur le périphérique sans fil Bluetooth.
• Pour plus d’informations sur la procédure de connexion, veuillez consulter le Guide d’utilisation de votre périphérique sans fil Bluetooth.
3 Lecture de musique à partir du périphérique sans fil Bluetooth.
• Appuyez sur la touche de la télécommande ou sur la touche I de l’appareil pour lancer la lecture.Vous pouvez commander les touches et :/9.L’arrêt de la lecture et les autres fonctions peuvent être commandées à l’aide d’un appareil compatible Bluetooth.
• Lorsqu’un périphérique Bluetooth n’est pas connecté et qu’aucune opération n’a été effectuée depuis 15 minutes, l’appareil se met automatiquement à l’arrêt.
∫ Précaution concernant les ondes radioCet appareil utilise une fréquence d’ondes radio de 2,4 GHz, cette bande étant également utilisée par d’autres systèmes sans fil (consultez la liste ci-dessous). Pour éviter le brouillage ou les interruptions de communication, n’utilisez pas cet appareil à proximité de dispositifs fonctionnant sur la même bande, ou veillez à éteindre ces dispositifs lorsque vous utilisez l’adaptateur.
• Téléphones sans fil• Télécopieurs filaires• Fours à micro-ondes• Périphériques réseau sans fil (IEEE802.11b/g)• Appareil AV sans fil• Télécommandes sans fil pour jeux vidéo• Appareils paramédicaux à micro-ondes• Certains écrans de surveillance des bébés
D’autres appareils, moins courants, peuvent fonctionner sur la même fréquence :
• Systèmes antivol• Stations radio amateur (HAM)• Systèmes logistiques des grands magasins• Systèmes discriminatoires des véhicules ferroviaires ou
de secours
• Si des parasites apparaissent sur l’image du téléviseur, il se peut que le périphérique sans fil Bluetooth ou cet appareil (y compris des produits pris en charge par cet appareil) crée des interférences avec le connecteur d’antenne de votre téléviseur, ou avec votre équipement vidéo, radio satellite, etc. Dans ce cas, éloignez le connecteur d’entrée d’antenne par rapport au périphérique sans fil Bluetooth ou à cet appareil (y compris des éléments pris en charge par cet appareil).
• Si lun objet (tel qu’une porte métallique, un mur en béton ou une isolation à feuille d’étain) se trouve entre cet appareil (y compris des périphériques pris en compte par cet appareil) et le périphérique équipé de la technologie sans fil Bluetooth, il se peut que vous deviez déplacer le système pour éviter que le signal soit parasité ou interrompu.
∫ Limite de fonctionnementL’utilisation de cet équipement est limitée à un usage privé. (Selon l’environnement, les distances de transmission peuvent être réduites.)Dans les situations suivantes, le son peut être coupé ou arrêté pour cause de mauvaise réception ou de non réception des ondes radio :
• Dans des immeubles en béton armé ou à structure métallique.
• Près d’un grand meuble métallique.• Dans la foule ou près d’un bâtiment ou d’un obstacle.• Dans un emplacement exposé au champ magnétique,
à de l’électricité statique ou des parasites provenant d’équipements de communication radio, utilisant la même bande de fréquence (2,4 GHz) que cet appareil, tel qu’un périphérique LAN sans fil de 2,4 GHz (IEEE802.11b/g) ou un four à micro-ondes.
SN29402702_X-EM16_26_Fr.book 10 ページ 2016年8月6日 土曜日 午後4時20分
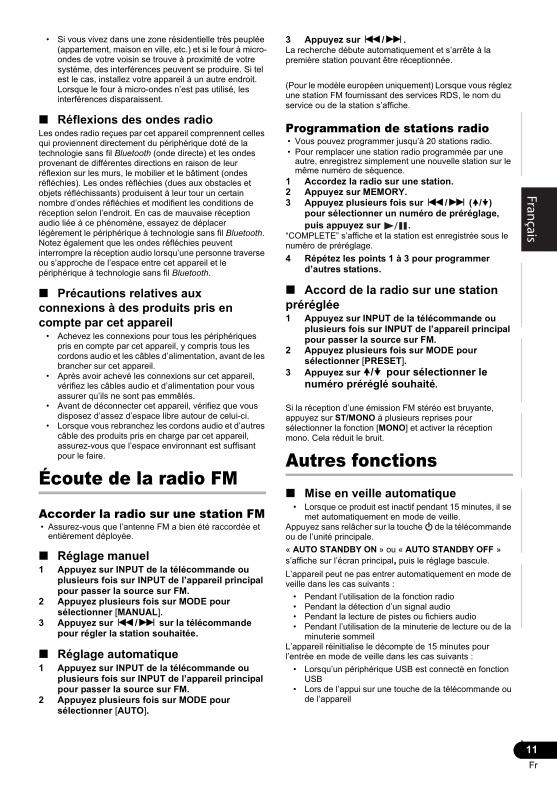
11Fr
EnglishFrançais
EspañolDeutsch
ItalianoNederlands
Pyccкий• Si vous vivez dans une zone résidentielle très peuplée
(appartement, maison en ville, etc.) et si le four à micro-ondes de votre voisin se trouve à proximité de votre système, des interférences peuvent se produire. Si tel est le cas, installez votre appareil à un autre endroit. Lorsque le four à micro-ondes n’est pas utilisé, les interférences disparaissent.
∫ Réflexions des ondes radioLes ondes radio reçues par cet appareil comprennent celles qui proviennent directement du périphérique doté de la technologie sans fil Bluetooth (onde directe) et les ondes provenant de différentes directions en raison de leur réflexion sur les murs, le mobilier et le bâtiment (ondes réfléchies). Les ondes réfléchies (dues aux obstacles et objets réfléchissants) produisent à leur tour un certain nombre d’ondes réfléchies et modifient les conditions de réception selon l’endroit. En cas de mauvaise réception audio liée à ce phénomène, essayez de déplacer légèrement le périphérique à technologie sans fil Bluetooth. Notez également que les ondes réfléchies peuvent interrompre la réception audio lorsqu’une personne traverse ou s’approche de l’espace entre cet appareil et le périphérique à technologie sans fil Bluetooth.
∫ Précautions relatives aux connexions à des produits pris en compte par cet appareil
• Achevez les connexions pour tous les périphériques pris en compte par cet appareil, y compris tous les cordons audio et les câbles d’alimentation, avant de les brancher sur cet appareil.
• Après avoir achevé les connexions sur cet appareil, vérifiez les câbles audio et d’alimentation pour vous assurer qu’ils ne sont pas emmêlés.
• Avant de déconnecter cet appareil, vérifiez que vous disposez d’assez d’espace libre autour de celui-ci.
• Lorsque vous rebranchez les cordons audio et d’autres câble des produits pris en charge par cet appareil, assurez-vous que l’espace environnant est suffisant pour le faire.
Écoute de la radio FM
Accorder la radio sur une station FM• Assurez-vous que l’antenne FM a bien été raccordée et
entièrement déployée.
∫ Réglage manuel1 Appuyez sur INPUT de la télécommande ou
plusieurs fois sur INPUT de l’appareil principal pour passer la source sur FM.
2 Appuyez plusieurs fois sur MODE pour sélectionner [MANUAL].
3 Appuyez sur :/9 sur la télécommande pour régler la station souhaitée.
∫ Réglage automatique1 Appuyez sur INPUT de la télécommande ou
plusieurs fois sur INPUT de l’appareil principal pour passer la source sur FM.
2 Appuyez plusieurs fois sur MODE pour sélectionner [AUTO].
3 Appuyez sur :/9.La recherche débute automatiquement et s’arrête à la première station pouvant être réceptionnée.
(Pour le modèle européen uniquement) Lorsque vous réglez une station FM fournissant des services RDS, le nom du service ou de la station s’affiche.
Programmation de stations radio• Vous pouvez programmer jusqu’à 20 stations radio.• Pour remplacer une station radio programmée par une
autre, enregistrez simplement une nouvelle station sur le même numéro de séquence.
1 Accordez la radio sur une station.2 Appuyez sur MEMORY.3 Appuyez plusieurs fois sur :/9 (/)
pour sélectionner un numéro de préréglage, puis appuyez sur .
“COMPLETE” s’affiche et la station est enregistrée sous le numéro de préréglage.4 Répétez les points 1 à 3 pour programmer
d’autres stations.
∫ Accord de la radio sur une station préréglée1 Appuyez sur INPUT de la télécommande ou
plusieurs fois sur INPUT de l’appareil principal pour passer la source sur FM.
2 Appuyez plusieurs fois sur MODE pour sélectionner [PRESET].
3 Appuyez sur / pour sélectionner le numéro préréglé souhaité.
Si la réception d’une émission FM stéréo est bruyante, appuyez sur ST/MONO à plusieurs reprises pour sélectionner la fonction [MONO] et activer la réception mono. Cela réduit le bruit.
Autres fonctions∫ Mise en veille automatique
• Lorsque ce produit est inactif pendant 15 minutes, il se met automatiquement en mode de veille.
Appuyez sans relâcher sur la touche Í de la télécommande ou de l’unité principale.« AUTO STANDBY ON » ou « AUTO STANDBY OFF » s’affiche sur l’écran principal, puis le réglage bascule.L’appareil peut ne pas entrer automatiquement en mode de veille dans les cas suivants :
• Pendant l’utilisation de la fonction radio• Pendant la détection d’un signal audio• Pendant la lecture de pistes ou fichiers audio• Pendant l’utilisation de la minuterie de lecture ou de la
minuterie sommeilL’appareil réinitialise le décompte de 15 minutes pour l’entrée en mode de veille dans les cas suivants :
• Lorsqu’un périphérique USB est connecté en fonction USB
• Lors de l’appui sur une touche de la télécommande ou de l’appareil
SN29402702_X-EM16_26_Fr.book 11 ページ 2016年8月6日 土曜日 午後4時20分
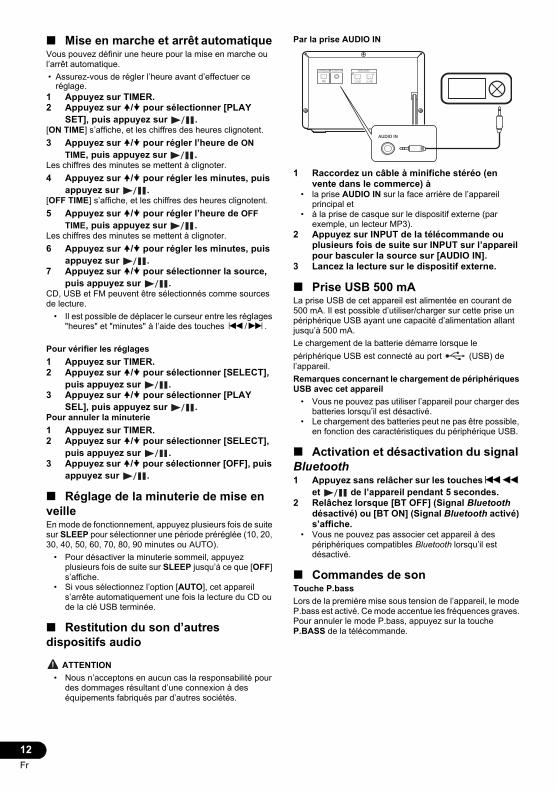
12Fr
∫ Mise en marche et arrêt automatiqueVous pouvez définir une heure pour la mise en marche ou l’arrêt automatique.• Assurez-vous de régler l’heure avant d’effectuer ce
réglage.1 Appuyez sur TIMER.2 Appuyez sur / pour sélectionner [PLAY
SET], puis appuyez sur .[ON TIME] s’affiche, et les chiffres des heures clignotent.3 Appuyez sur / pour régler l’heure de ON
TIME, puis appuyez sur .Les chiffres des minutes se mettent à clignoter.4 Appuyez sur / pour régler les minutes, puis
appuyez sur .[OFF TIME] s’affiche, et les chiffres des heures clignotent.5 Appuyez sur / pour régler l’heure de OFF
TIME, puis appuyez sur .Les chiffres des minutes se mettent à clignoter.6 Appuyez sur / pour régler les minutes, puis
appuyez sur .7 Appuyez sur / pour sélectionner la source,
puis appuyez sur .CD, USB et FM peuvent être sélectionnés comme sources de lecture.
• Il est possible de déplacer le curseur entre les réglages "heures" et "minutes" à l’aide des touches :/9.
Pour vérifier les réglages1 Appuyez sur TIMER.2 Appuyez sur / pour sélectionner [SELECT],
puis appuyez sur .3 Appuyez sur / pour sélectionner [PLAY
SEL], puis appuyez sur .Pour annuler la minuterie1 Appuyez sur TIMER.2 Appuyez sur / pour sélectionner [SELECT],
puis appuyez sur .3 Appuyez sur / pour sélectionner [OFF], puis
appuyez sur .
∫ Réglage de la minuterie de mise en veilleEn mode de fonctionnement, appuyez plusieurs fois de suite sur SLEEP pour sélectionner une période préréglée (10, 20, 30, 40, 50, 60, 70, 80, 90 minutes ou AUTO).
• Pour désactiver la minuterie sommeil, appuyez plusieurs fois de suite sur SLEEP jusqu’à ce que [OFF] s’affiche.
• Si vous sélectionnez l’option [AUTO], cet appareil s’arrête automatiquement une fois la lecture du CD ou de la clé USB terminée.
∫ Restitution du son d’autres dispositifs audio
ATTENTION• Nous n’acceptons en aucun cas la responsabilité pour
des dommages résultant d’une connexion à des équipements fabriqués par d’autres sociétés.
Par la prise AUDIO IN
1 Raccordez un câble à minifiche stéréo (en vente dans le commerce) à
• la prise AUDIO IN sur la face arrière de l’appareil principal et
• à la prise de casque sur le dispositif externe (par exemple, un lecteur MP3).
2 Appuyez sur INPUT de la télécommande ou plusieurs fois de suite sur INPUT sur l’appareil pour basculer la source sur [AUDIO IN].
3 Lancez la lecture sur le dispositif externe.
∫ Prise USB 500 mALa prise USB de cet appareil est alimentée en courant de 500 mA. Il est possible d’utiliser/charger sur cette prise un périphérique USB ayant une capacité d’alimentation allant jusqu’à 500 mA.Le chargement de la batterie démarre lorsque le périphérique USB est connecté au port (USB) de l’appareil.Remarques concernant le chargement de périphériques USB avec cet appareil
• Vous ne pouvez pas utiliser l’appareil pour charger des batteries lorsqu’il est désactivé.
• Le chargement des batteries peut ne pas être possible, en fonction des caractéristiques du périphérique USB.
∫ Activation et désactivation du signal Bluetooth1 Appuyez sans relâcher sur les touches:6
et de l’appareil pendant 5 secondes.2 Relâchez lorsque [BT OFF] (Signal Bluetooth
désactivé) ou [BT ON] (Signal Bluetooth activé) s’affiche.
• Vous ne pouvez pas associer cet appareil à des périphériques compatibles Bluetooth lorsqu’il est désactivé.
∫ Commandes de sonTouche P.bassLors de la première mise sous tension de l’appareil, le mode P.bass est activé. Ce mode accentue les fréquences graves. Pour annuler le mode P.bass, appuyez sur la touche P.BASS de la télécommande.
AUDIO INANTENNA SPEAKERSR
FM
L
SN29402702_X-EM16_26_Fr.book 12 ページ 2016年8月6日 土曜日 午後4時20分
13Fr
EnglishFrançais
EspañolDeutsch
ItalianoNederlands
PyccкийInformations complémentaires∫ Informations sur les dispositifs USB lisiblesDispositifs USB compatibles :
• Mémoire flash USB (USB1.1/2.0 (Full Speed))• Lecteurs de mémoire flash USB (USB1.1/2.0 (Full
Speed))Formats pris en charge :
• Format USB ou de mémoire de fichiers: FAT16, FAT32• Débits binaires MP3 (débits de données): entre 32 kbps
et 320 kbps et débits binaires variables.• Maximum 8 niveaux d’emboîtement : dossier ROOT
inclus• Nombre maximal de dossiers: 256 (dossier ROOT
inclus)• Nombre maximal de pistes/fichiers: 999
Nombre maximal de fichiers que cet appareil peut reconnaître dans un dossier: 999
• ID3tag: v1.0, v1.1, v1.2, v2.0, v2.2, v2.3, v2.4Selon les réglages du logiciel de codage, le type de dispositif USB, l’enregistrement et d’autres facteurs, certains fichiers audio ne pourront pas être lus.Formats non pris en charge :
• Albums vides: un album ne contenant pas de fichiers MP3
• Les fichiers de formats non pris en charge sont sautés. Par exemple, les documents Word (.doc) ou les fichiers MP3 ayant l’extension .dlf sont ignorés et ne sont donc pas lus.
• Fichiers audio sauf MP3.• Autres systèmes de fichiers (exFAT, NTFS, HFS etc.)
autres que FAT16 et FAT32.
∫ Formats de disques MP3 pris en charge
• ISO9660 Niveau 1/Niveau 2, Joliet• Nombre maximal de dossiers: 256 (dossier ROOT
inclus)• Nombre maximal de pistes/fichiers: 999
Nombre maximal de fichiers que cet appareil peut reconnaître dans un dossier: 999
• Fréquence d’échantillonnage prise en charge: 32 kHz, 44,1 kHz, 48 kHz
• Débits binaires pris en charge: entre 32 kbps et 320 kbps, débits binaires variables.
• Maximum 8 niveaux d’emboîtement: dossier ROOT inclus
Selon les réglages du logiciel de codage, le type de dispositif USB, l’enregistrement et d’autres facteurs, certains fichiers audio ne pourront pas être lus.
Guide de dépannage AVERTISSEMENT
• Ne jamais retirer le coffret de cet appareil.• Une erreur de commande est souvent prise pour une
anomalie de fonctionnement ou une panne. Si vous estimez que cet appareil ne fonctionne pas correctement, vérifiez les points ci-dessous. Parfois, le problème peut provenir d’un autre composant. Examinez les autres composants et les appareils électriques utilisés. Si le
problème ne peut pas être résolu après avoir effectué les vérifications indiquées ci-dessous, consultez le service après-vente Pioneer le plus proche pour faire réparer votre appareil.
• Si l’appareil ne fonctionne pas normalement à cause d’effets externes, comme l’électricité statique, débranchez la fiche d’alimentation de la prise murale et insérez-la de nouveau pour rétablir l’état de fonctionnement normal.
“PROTECT” apparaît à l’écran. Débranchez immédiatement le cordon d’alimentation,
et vérifiez les éléments suivants une fois que “PROTECT” a disparu.
• Assurez-vous que rien n’obstrue les trous de ventilation de l’appareil.Après avoir vérifié les éléments ci-dessus et en l’absence de problème, rebranchez le cordon d’alimentation et rallumez l’appareil. Si le problème persiste, contactez votre revendeur le plus proche.
Pas d’alimentation. Assurez-vous que le cordon d’alimentation secteur
est branché correctement. Assurez-vous que la prise secteur est sous tension. En mode veille automatique, la chaîne s’éteint
automatiquement au bout de 15 minutes d’inactivité. Aucun son ou son de mauvaise qualité.
Réglez le volume. Assurez-vous que les enceintes sont raccordées
correctement. Aucune réponse de la chaîne.
Rebranchez la fiche d’alimentation secteur et rallumez la chaîne.
La chaîne s’éteint automatiquement au bout de 15 minutes d’inactivité par mesure d’économie.
La télécommande ne fonctionne pas. Réduisez la distance entre la télécommande et
l’appareil. Insérez la pile en respectant sa polarité (signe +/–). Remplacez les piles. Dirigez la télécommande directement vers le capteur
sur la face avant de l’appareil. Aucun disque n’est détecté.
Insérez un disque. Assurez-vous que le disque a bien été posé avec
l’étiquette orientée vers le haut. Attendez qu’il n’y ait plus d’humidité condensée sur la
lentille. Changez ou nettoyez le disque. Assurez-vous que le disque enregistrable a été
finalisé et que le format est pris en charge. Le dispositif de stockage USB n’est pas pris en
charge. Assurez-vous que le dispositif de stockage USB est
compatible avec la chaîne. Le périphérique de stockage USB est-il connecté
correctement ? Vérifiez que le périphérique est correctement raccordé.
Le nom du fichier ou du dossier (nom de l’album) ne s’affiche pas correctement. Les caractères qui ne peuvent pas être affichés par
cet appareil sont les suivants :• Majuscules (de A à Z)• Chiffres (de 0 à 9)• Symboles (< >* +, [ ] _).Les autres caractères s’affichent comme ceci « _ ».
“OVER CURRENT” apparaît. Un problème relatif au niveau de courant arrivant
dans le port (USB) a été détecté. Désactivez l’appareil et débranchez le périphérique du port
X-EM16&26_TOC&Body_Fr.fm 13 ページ 2016年8月8日 月曜日 午後12時57分
14Fr
(USB) port. Vérifiez que le périphérique USB ne présente aucun problème. Si l’affichage persiste, contactez votre revendeur le plus proche.
Impossible de lire certains fichiers sur le dispositif de stockage USB. Assurez-vous que le format du fichier est pris en
charge. Assurez-vous que le nombre de fichiers ne dépasse
pas le maximum (page 13). La réception radio est de mauvaise qualité.
Augmentez la distance entre la chaîne et d’autres appareils électriques.
Déployez complètement l’antenne. La minuterie ne fonctionne pas.
Réglez l’heure correctement. Activez la minuterie.
Le réglage de l’heure/de la minuterie est effacé. L’alimentation a été coupée ou le cordon
d’alimentation secteur a été débranché. Réglez à nouveau l’heure/la minuterie.
Lorsqu’un périphérique sans fil Bluetooth est connecté ou utilisé (X-EM26 uniquement) : Le périphérique à technologie sans fil Bluetooth ne
peut pas être raccordé ou utilisé.Le son en provenance du périphérique à technologie sans fil Bluetooth n’est pas émis ou le son est interrompu. Vérifiez qu’aucun objet émettant des ondes
électromagnétiques dans la bande 2,4 GHz (four à micro-ondes, périphérique LAN sans fil ou appareil à technologie sans fil Bluetooth) ne se trouve à proximité de l’appareil. Le cas échéant, éloignez-le de cet appareil. Ou bien, n’utilisez pas l’objet émettant les ondes électromagnétiques.
Verifiez que le peripherique a technologie sans fil Bluetooth n’est pas trop eloigne de l’appareil et qu’il n’y a pas d’obstructions entre le peripherique a technologie sans fil Bluetooth et l’appareil. Placez le peripherique a technologie sans fil Bluetooth et l’appareil de facon a ce que la distance entre eux soit inferieure a 10 m* et qu’il n’y ait pas d'obstructions entre eux.
* Cette distance est indicative. La portée réelle peut varier selon les conditions propres à l’environnement d’utilisation.
Il se peut que le périphérique à technologie sans fil Bluetooth ne soit pas réglé au mode de communication prenant en charge la technologie sans fil Bluetooth. Vérifiez le réglage du dispositif sans fil Bluetooth.
Précautions d’utilisation
∫ Lors d’un déplacement de l’appareilAvant de déplacer l’appareil, vérifiez qu’aucun disque n’est chargé dans le tiroir disque. Appuyez ensuite sur Í, attendez que [STANDBY] disparaisse de l’afficheur de l’appareil, puis débranchez le cordon d’alimentation secteur. Le fait de déplacer ou de transporter l’appareil avec un disque chargé à l’intérieur ou avec un équipement raccordé à la prise USB, ou à la prise mini-jack AUDIO IN, peut causer des dommages.
∫ Emplacement d’installation• Choisissez un endroit stable près du téléviseur ou de la
chaîne stéréo, utilisés avec cet appareil.• N’installez pas cet appareil sur un téléviseur ou un
moniteur couleur. En outre, installez-le à l’écart des platines à cassettes et autres équipements pouvant être facilement affectés par les champs magnétiques.
Évitez d’installer l’appareil dans les endroits suivants :• Endroits exposés à la lumière directe du soleil• Endroits humides ou insuffisamment aérés• Endroits extrêmement chauds• Endroits exposés aux vibrations• Endroits dans lesquels il y a beaucoup de poussière ou
de fumée de cigarette• Endroits exposés à la suie, à la vapeur ou à la chaleur
(cuisines, etc.)
∫ Ne posez pas d’objets sur cet appareilNe posez pas d’objets sur le dessus de cet appareil.N’obstruez pas les orifices de ventilation.N’utilisez pas cet appareil sur une couverture, un lit, un sofa, etc. pelucheux, et ne l’enveloppez pas dans un tissu, etc. La chaleur ne pourra pas se dégager et causera des dommages.N’exposez pas l’appareil à la chaleur.Ne placez pas cet appareil au-dessus d’un amplificateur ou de tout autre équipement générant de la chaleur. En cas d’installation sur un rack, pour éviter que l’appareil ne soit exposé à la chaleur dégagée par l’amplificateur ou d’autres équipements audio, placez-le sur un rayon en-dessous de l’amplificateur.
• Mettez l’appareil à l’arrêt lorsque vous ne l’utilisez pas.• Selon l’état du signal, lorsque l’appareil est en marche,
des motifs rayés peuvent apparaître sur un écran de téléviseur à proximité de l’appareil et des parasites peuvent altérer la réception des émissions de radiodiffusion. Dans ce cas, arrêtez l’appareil.
∫ Nettoyage de lappareil• Débranchez le cordon d’alimentation de la prise secteur
avant de nettoyer cet appareil.• Nettoyez l’appareil avec un chiffon doux. En cas de
salissure importante, mouillez un chiffon doux dans une solution de détergent neutre dilué dans 5 à 6 volumes d’eau, essorez le chiffon complètement, nettoyez la saleté, puis essuyez l’appareil à l’aide d’un chiffon doux et sec.
• L’utilisation d’alcool, de diluent, de benzène, de produits insecticides, etc. risque d’effacer les inscriptions et d’abimer la peinture. Évitez aussi de laisser des produits en caoutchouc ou en vinyle très longtemps au contact de cet appareil pour ne pas endommager le coffret.
• En cas d’utilisation de chiffons/lingettes imprégnés avec des produits chimiques, etc., lisez les précautions d’emploi fournies par le fabricant.
∫ Nettoyage de la lentille• La lentille de cet appareil ne devrait pas se salir
normalement mais si, pour une raison quelconque, de la poussière ou de la saleté causait un problème, consultez un service après-vente agréé Pioneer. Bien que divers produits de nettoyage pour lentille de lecteur soient en vente dans le commerce, nous déconseillons leur utilisation, car certains d’entre eux risquent, en fait, d’endommager la lentille.
Manipulation d’un disque
∫ Rangement• Remettez toujours les disques dans leur boîtier et
rangez-les verticalement, en évitant les endroits chauds, humides, exposés directement à la lumière du soleil ou extrêmement froids.
SN29402702_X-EM16_26_Fr.book 14 ページ 2016年8月6日 土曜日 午後4時20分
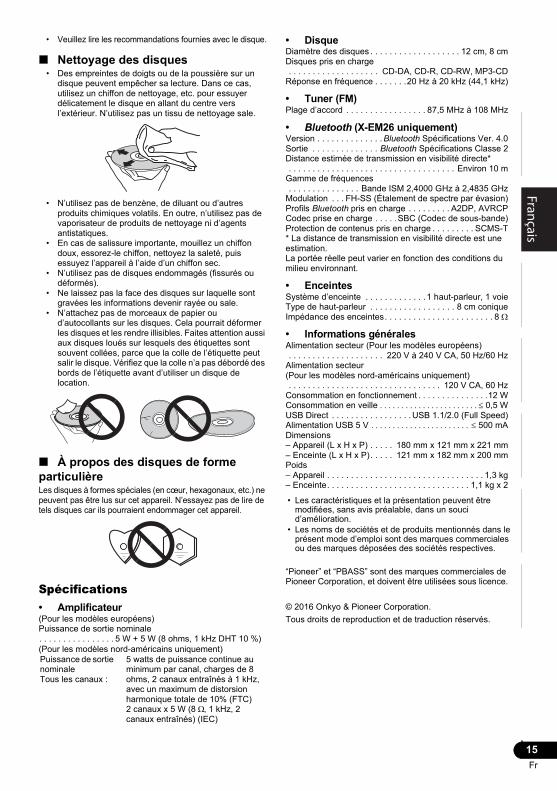
15Fr
EnglishFrançais
EspañolDeutsch
ItalianoNederlands
Pyccкий• Veuillez lire les recommandations fournies avec le disque.
∫ Nettoyage des disques• Des empreintes de doigts ou de la poussière sur un
disque peuvent empêcher sa lecture. Dans ce cas, utilisez un chiffon de nettoyage, etc. pour essuyer délicatement le disque en allant du centre vers l’extérieur. N’utilisez pas un tissu de nettoyage sale.
• N’utilisez pas de benzène, de diluant ou d’autres produits chimiques volatils. En outre, n’utilisez pas de vaporisateur de produits de nettoyage ni d’agents antistatiques.
• En cas de salissure importante, mouillez un chiffon doux, essorez-le chiffon, nettoyez la saleté, puis essuyez l’appareil à l’aide d’un chiffon sec.
• N’utilisez pas de disques endommagés (fissurés ou déformés).
• Ne laissez pas la face des disques sur laquelle sont gravées les informations devenir rayée ou sale.
• N’attachez pas de morceaux de papier ou d’autocollants sur les disques. Cela pourrait déformer les disques et les rendre illisibles. Faites attention aussi aux disques loués sur lesquels des étiquettes sont souvent collées, parce que la colle de l’étiquette peut salir le disque. Vérifiez que la colle n’a pas débordé des bords de l’étiquette avant d’utiliser un disque de location.
∫ À propos des disques de forme particulièreLes disques à formes spéciales (en cœur, hexagonaux, etc.) ne peuvent pas être lus sur cet appareil. N’essayez pas de lire de tels disques car ils pourraient endommager cet appareil.
Spécifications• Amplificateur(Pour les modèles européens)Puissance de sortie nominale. . . . . . . . . . . . . . . . 5 W + 5 W (8 ohms, 1 kHz DHT 10 %)(Pour les modèles nord-américains uniquement)
• DisqueDiamètre des disques . . . . . . . . . . . . . . . . . . . 12 cm, 8 cmDisques pris en charge . . . . . . . . . . . . . . . . . . . CD-DA, CD-R, CD-RW, MP3-CDRéponse en fréquence . . . . . . .20 Hz à 20 kHz (44,1 kHz)
• Tuner (FM)Plage d’accord . . . . . . . . . . . . . . . . . 87,5 MHz à 108 MHz
• Bluetooth (X-EM26 uniquement)Version . . . . . . . . . . . . . .Bluetooth Spécifications Ver. 4.0Sortie . . . . . . . . . . . . . . Bluetooth Spécifications Classe 2Distance estimée de transmission en visibilité directe* . . . . . . . . . . . . . . . . . . . . . . . . . . . . . . . . . . . Environ 10 mGamme de fréquences . . . . . . . . . . . . . . . Bande ISM 2,4000 GHz à 2,4835 GHzModulation . . . FH-SS (Étalement de spectre par évasion)Profils Bluetooth pris en charge . . . . . . . . . A2DP, AVRCPCodec prise en charge . . . . .SBC (Codec de sous-bande)Protection de contenus pris en charge . . . . . . . . . SCMS-T* La distance de transmission en visibilité directe est une estimation.La portée réelle peut varier en fonction des conditions du milieu environnant.
• EnceintesSystème d’enceinte . . . . . . . . . . . . . 1 haut-parleur, 1 voieType de haut-parleur . . . . . . . . . . . . . . . . . . 8 cm coniqueImpédance des enceintes. . . . . . . . . . . . . . . . . . . . . . . 8
• Informations généralesAlimentation secteur (Pour les modèles européens) . . . . . . . . . . . . . . . . . . . . 220 V à 240 V CA, 50 Hz/60 HzAlimentation secteur (Pour les modèles nord-américains uniquement) . . . . . . . . . . . . . . . . . . . . . . . . . . . . . . . . 120 V CA, 60 HzConsommation en fonctionnement . . . . . . . . . . . . . . .12 WConsommation en veille 0,5 WUSB Direct . . . . . . . . . . . . . . . . .USB 1.1/2.0 (Full Speed)Alimentation USB 5 V 500 mADimensions– Appareil (L x H x P) . . . . . 180 mm x 121 mm x 221 mm– Enceinte (L x H x P). . . . . 121 mm x 182 mm x 200 mmPoids– Appareil . . . . . . . . . . . . . . . . . . . . . . . . . . . . . . . . . 1,3 kg– Enceinte. . . . . . . . . . . . . . . . . . . . . . . . . . . . . . 1,1 kg x 2
• Les caractéristiques et la présentation peuvent être modifiées, sans avis préalable, dans un souci d’amélioration.
• Les noms de sociétés et de produits mentionnés dans le présent mode d’emploi sont des marques commerciales ou des marques déposées des sociétés respectives.
“Pioneer” et “PBASS” sont des marques commerciales de Pioneer Corporation, et doivent être utilisées sous licence.
© 2016 Onkyo & Pioneer Corporation.Tous droits de reproduction et de traduction réservés.
Puissance de sortie nominaleTous les canaux :
5 watts de puissance continue au minimum par canal, charges de 8 ohms, 2 canaux entraînés à 1 kHz, avec un maximum de distorsion harmonique totale de 10% (FTC)2 canaux x 5 W (8 , 1 kHz, 2 canaux entraînés) (IEC)
X-EM16&26_TOC&Body_Fr.fm 15 ページ 2016年8月9日 火曜日 午後3時53分
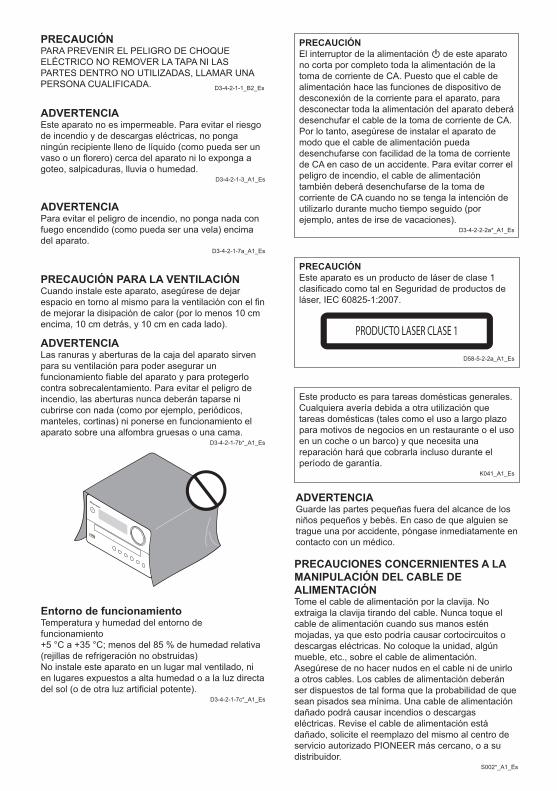
PRECAUCIÓNPARA PREVENIR EL PELIGRO DE CHOQUE ELÉCTRICO NO REMOVER LA TAPA NI LAS PARTES DENTRO NO UTILIZADAS, LLAMAR UNA PERSONA CUALIFICADA. D3-4-2-1-1_B2_Es
ADVERTENCIAEste aparato no es impermeable. Para evitar el riesgo de incendio y de descargas eléctricas, no ponga ningún recipiente lleno de líquido (como pueda ser un vaso o un florero) cerca del aparato ni lo exponga a goteo, salpicaduras, lluvia o humedad.
D3-4-2-1-3_A1_Es
ADVERTENCIAPara evitar el peligro de incendio, no ponga nada con fuego encendido (como pueda ser una vela) encima del aparato.
D3-4-2-1-7a_A1_Es
PRECAUCIÓN PARA LA VENTILACIÓNCuando instale este aparato, asegúrese de dejar espacio en torno al mismo para la ventilación con el fin de mejorar la disipación de calor (por lo menos 10 cm encima, 10 cm detrás, y 10 cm en cada lado).
ADVERTENCIALas ranuras y aberturas de la caja del aparato sirven para su ventilación para poder asegurar un funcionamiento fiable del aparato y para protegerlo contra sobrecalentamiento. Para evitar el peligro de incendio, las aberturas nunca deberán taparse ni cubrirse con nada (como por ejemplo, periódicos, manteles, cortinas) ni ponerse en funcionamiento el aparato sobre una alfombra gruesas o una cama.
D3-4-2-1-7b*_A1_Es
Entorno de funcionamientoTemperatura y humedad del entorno de funcionamiento+5 °C a +35 °C; menos del 85 % de humedad relativa (rejillas de refrigeración no obstruidas)No instale este aparato en un lugar mal ventilado, ni en lugares expuestos a alta humedad o a la luz directa del sol (o de otra luz artificial potente).
D3-4-2-1-7c*_A1_Es
PRECAUCIÓNEste aparato es un producto de láser de clase 1 clasificado como tal en Seguridad de productos de láser, IEC 60825-1:2007.
PRODUCTO LASER CLASE 1
D58-5-2-2a_A1_Es
Este producto es para tareas domésticas generales. Cualquiera avería debida a otra utilización que tareas domésticas (tales como el uso a largo plazo para motivos de negocios en un restaurante o el uso en un coche o un barco) y que necesita una reparación hará que cobrarla incluso durante el período de garantía.
K041_A1_Es
PRECAUCIONES CONCERNIENTES A LA MANIPULACIÓN DEL CABLE DE ALIMENTACIÓNTome el cable de alimentación por la clavija. No extraiga la clavija tirando del cable. Nunca toque el cable de alimentación cuando sus manos estén mojadas, ya que esto podría causar cortocircuitos o descargas eléctricas. No coloque la unidad, algún mueble, etc., sobre el cable de alimentación. Asegúrese de no hacer nudos en el cable ni de unirlo a otros cables. Los cables de alimentación deberán ser dispuestos de tal forma que la probabilidad de que sean pisados sea mínima. Una cable de alimentación dañado podrá causar incendios o descargas eléctricas. Revise el cable de alimentación está dañado, solicite el reemplazo del mismo al centro de servicio autorizado PIONEER más cercano, o a su distribuidor.
S002*_A1_Es
PRECAUCIÓNEl interruptor de la alimentación de este aparato no corta por completo toda la alimentación de la toma de corriente de CA. Puesto que el cable de alimentación hace las funciones de dispositivo de desconexión de la corriente para el aparato, para desconectar toda la alimentación del aparato deberá desenchufar el cable de la toma de corriente de CA. Por lo tanto, asegúrese de instalar el aparato de modo que el cable de alimentación pueda desenchufarse con facilidad de la toma de corriente de CA en caso de un accidente. Para evitar correr el peligro de incendio, el cable de alimentación también deberá desenchufarse de la toma de corriente de CA cuando no se tenga la intención de utilizarlo durante mucho tiempo seguido (por ejemplo, antes de irse de vacaciones).
D3-4-2-2-2a*_A1_Es
ADVERTENCIAGuarde las partes pequeñas fuera del alcance de los niños pequeños y bebés. En caso de que alguien se trague una por accidente, póngase inmediatamente en contacto con un médico.
SN29402702_X-EM16_26_Es.book 2 ページ 2016年8月6日 土曜日 午後12時58分
K058a_A1_Es
Pb
Información para los usuarios en la recogida y tratamiento de los equipos al final de su vida y de las pilas y baterías usadas.
Estos símbolos en los productos, embalaje, y/o en los documentos que los acompañan significa que los productos eléctricos y electrónicos al final de su vida, las pilas y baterías no deben mezclarse con los residuos generales de su hogar.
Para el tratamiento adecuado, recuperación y reciclado de los productos viejos y las pilas usadas, por favor deposítelos en los puntos de recogida de acuerdo con su legislación nacional.
Mediante el tratamiento correctamente de estos productos y pilas, ayudará a preservar los recursos y prevenir cualquier efecto negativo en la salud humana y el medio- ambiente que podría surgir por una inadecuada manipulación de los desperdicios.
Para más información sobre recogida y reciclado de los productos viejos, pilas y baterías, por favor contacte con su municipio, sobre localización de los puntos limpios o diríjase al punto de venta donde compró los productos.
Estos símbolos sólo son válidos en la Unión Europea.
Para países fuera de la Unión europea:Si desea eliminar estos artículos, por favor contactar con las autoridades locales o el distribuidor y pida por el método correcto de tratamiento.
Símbolo parapilas y baterías
Símbolo para equipos
CondensaciónSi la unidad se traslada repentinamente de un lugar frío a una habitación caliente (en invierno, por ejemplo) o si la temperatura de la habitación donde está instalada esta unidad sube repentinamente debido al funcionamiento de la calefacción, etc., pueden formarse gotas de agua (condensación) en el interior de la unidad (en las piezas de funcionamiento y en la lente). Cuando haya condensación, la unidadno funcionará bien y la reproducción no será posible. Deje la unidad a temperatura ambiente, sin funcionar, durante 1 o 2 horas con la alimentación conectada (el tiempo depende de la cantidad de condensación). Las gotas de agua se disiparán y será posible reproducir. La condensación se puede producir también en verano si la unidad se expone directamente a la salida de aire de un acondicionador de aire. Si esto sucede, cambie de sitio la unidad.
Advertencia para las ondas de radioSolo X-EM26Esta unidad utiliza una frecuencia de ondas de radio de 2,4 GHz, la cual es una banda utilizada por otros sistemas inalámbricos (hornos microondas, teléfonos inalámbricos, etc.).En caso de que aparezca ruido en la imagen del televisor, existirá la posibilidad de que esta unidad (incluyendo los productos compatibles con esta unidad) esté causando interferencias de la señal con el conector de entrada de antena de su televisor, vídeo, sintonizador vía satélite, etc.En este caso, aumente la distancia entre el conector de entrada de antena y esta unidad (incluyendo los productos compatibles con esta unidad).• Pioneer no se hace responsable de ningún fallo del
producto Pioneer compatible debido a un error de comunicación/fallos de funcionamiento asociados con su conexión a la red y/o su equipo conectado. Póngase en contacto con su proveedor de servicios de Internet o con el fabricante del equipo de la red.
• Para usar Internet se necesita un contrato diferente con un proveedor de servicios de Internet y abonar esos servicios.
SN29402702_X-EM16_26_Es.book 3 ページ 2016年8月6日 土曜日 午後12時58分
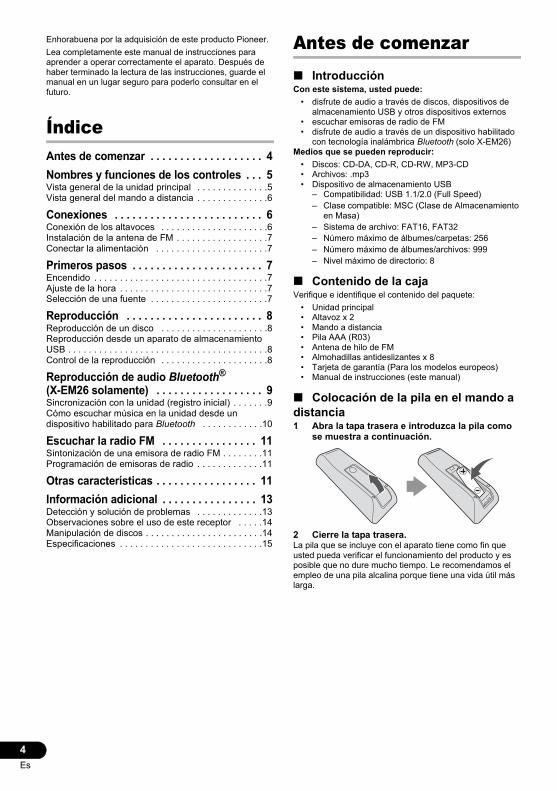
4Es
Enhorabuena por la adquisición de este producto Pioneer.Lea completamente este manual de instrucciones para aprender a operar correctamente el aparato. Después de haber terminado la lectura de las instrucciones, guarde el manual en un lugar seguro para poderlo consultar en el futuro.
ÍndiceAntes de comenzar . . . . . . . . . . . . . . . . . . . 4Nombres y funciones de los controles . . . 5Vista general de la unidad principal . . . . . . . . . . . . . .5Vista general del mando a distancia . . . . . . . . . . . . . .6
Conexiones . . . . . . . . . . . . . . . . . . . . . . . . . 6Conexión de los altavoces . . . . . . . . . . . . . . . . . . . . .6Instalación de la antena de FM . . . . . . . . . . . . . . . . . .7Conectar la alimentación . . . . . . . . . . . . . . . . . . . . . .7
Primeros pasos . . . . . . . . . . . . . . . . . . . . . . 7Encendido . . . . . . . . . . . . . . . . . . . . . . . . . . . . . . . . . .7Ajuste de la hora . . . . . . . . . . . . . . . . . . . . . . . . . . . . .7Selección de una fuente . . . . . . . . . . . . . . . . . . . . . . .7
Reproducción . . . . . . . . . . . . . . . . . . . . . . . 8Reproducción de un disco . . . . . . . . . . . . . . . . . . . . .8Reproducción desde un aparato de almacenamiento USB . . . . . . . . . . . . . . . . . . . . . . . . . . . . . . . . . . . . . . .8Control de la reproducción . . . . . . . . . . . . . . . . . . . . .8
Reproducción de audio Bluetooth® (X-EM26 solamente) . . . . . . . . . . . . . . . . . . 9Sincronización con la unidad (registro inicial) . . . . . . .9Cómo escuchar música en la unidad desde un dispositivo habilitado para Bluetooth . . . . . . . . . . . .10
Escuchar la radio FM . . . . . . . . . . . . . . . . 11Sintonización de una emisora de radio FM . . . . . . . .11Programación de emisoras de radio . . . . . . . . . . . . .11
Otras características . . . . . . . . . . . . . . . . . 11Información adicional . . . . . . . . . . . . . . . . 13Detección y solución de problemas . . . . . . . . . . . . .13Observaciones sobre el uso de este receptor . . . . .14Manipulación de discos . . . . . . . . . . . . . . . . . . . . . . .14Especificaciones . . . . . . . . . . . . . . . . . . . . . . . . . . . .15
Antes de comenzar∫ IntroducciónCon este sistema, usted puede:
• disfrute de audio a través de discos, dispositivos de almacenamiento USB y otros dispositivos externos
• escuchar emisoras de radio de FM• disfrute de audio a través de un dispositivo habilitado
con tecnología inalámbrica Bluetooth (solo X-EM26)Medios que se pueden reproducir:
• Discos: CD-DA, CD-R, CD-RW, MP3-CD• Archivos: .mp3• Dispositivo de almacenamiento USB
– Compatibilidad: USB 1.1/2.0 (Full Speed)– Clase compatible: MSC (Clase de Almacenamiento
en Masa)– Sistema de archivo: FAT16, FAT32– Número máximo de álbumes/carpetas: 256– Número máximo de álbumes/archivos: 999– Nivel máximo de directorio: 8
∫ Contenido de la cajaVerifique e identifique el contenido del paquete:
• Unidad principal• Altavoz x 2• Mando a distancia• Pila AAA (R03)• Antena de hilo de FM• Almohadillas antideslizantes x 8• Tarjeta de garantía (Para los modelos europeos)• Manual de instrucciones (este manual)
∫ Colocación de la pila en el mando a distancia1 Abra la tapa trasera e introduzca la pila como
se muestra a continuación.
2 Cierre la tapa trasera.La pila que se incluye con el aparato tiene como fin que usted pueda verificar el funcionamiento del producto y es posible que no dure mucho tiempo. Le recomendamos el empleo de una pila alcalina porque tiene una vida útil más larga.
SN29402702_X-EM16_26_Es.book 4 ページ 2016年8月6日 土曜日 午後12時58分
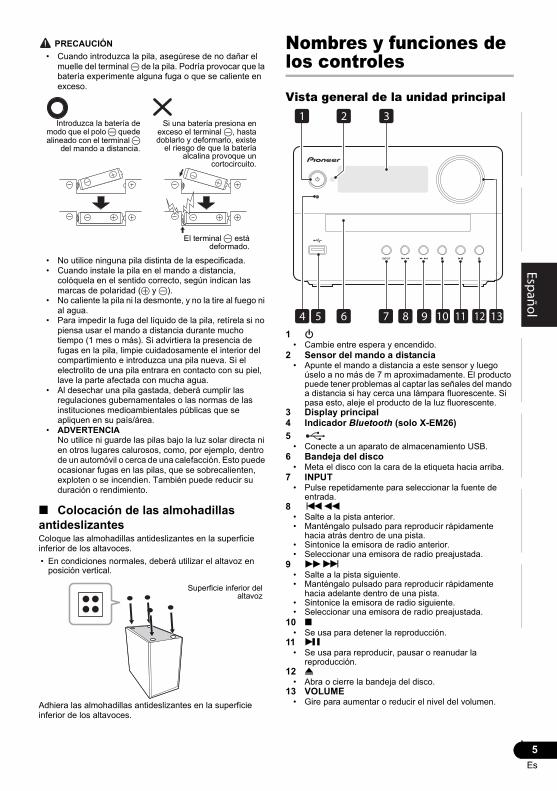
5Es
EnglishFrançais
EspañolDeutsch
ItalianoNederlands
Pyccкий PRECAUCIÓN
• Cuando introduzca la pila, asegúrese de no dañar el muelle del terminal - de la pila. Podría provocar que la batería experimente alguna fuga o que se caliente en exceso.
• No utilice ninguna pila distinta de la especificada.• Cuando instale la pila en el mando a distancia,
colóquela en el sentido correcto, según indican las marcas de polaridad (+ y -).
• No caliente la pila ni la desmonte, y no la tire al fuego ni al agua.
• Para impedir la fuga del líquido de la pila, retírela si no piensa usar el mando a distancia durante mucho tiempo (1 mes o más). Si advirtiera la presencia de fugas en la pila, limpie cuidadosamente el interior del compartimiento e introduzca una pila nueva. Si el electrolito de una pila entrara en contacto con su piel, lave la parte afectada con mucha agua.
• Al desechar una pila gastada, deberá cumplir las regulaciones gubernamentales o las normas de las instituciones medioambientales públicas que se apliquen en su país/área.
• ADVERTENCIANo utilice ni guarde las pilas bajo la luz solar directa ni en otros lugares calurosos, como, por ejemplo, dentro de un automóvil o cerca de una calefacción. Esto puede ocasionar fugas en las pilas, que se sobrecalienten, exploten o se incendien. También puede reducir su duración o rendimiento.
∫ Colocación de las almohadillas antideslizantesColoque las almohadillas antideslizantes en la superficie inferior de los altavoces.• En condiciones normales, deberá utilizar el altavoz en
posición vertical.
Adhiera las almohadillas antideslizantes en la superficie inferior de los altavoces.
Nombres y funciones de los controles
Vista general de la unidad principal
1 Í• Cambie entre espera y encendido.
2 Sensor del mando a distancia• Apunte el mando a distancia a este sensor y luego
úselo a no más de 7 m aproximadamente. El producto puede tener problemas al captar las señales del mando a distancia si hay cerca una lámpara fluorescente. Si pasa esto, aleje el producto de la luz fluorescente.
3 Display principal4 Indicador Bluetooth (solo X-EM26)5
• Conecte a un aparato de almacenamiento USB.6 Bandeja del disco
• Meta el disco con la cara de la etiqueta hacia arriba.7 INPUT
• Pulse repetidamente para seleccionar la fuente de entrada.
8 :6• Salte a la pista anterior.• Manténgalo pulsado para reproducir rápidamente
hacia atrás dentro de una pista.• Sintonice la emisora de radio anterior.• Seleccionar una emisora de radio preajustada.
9 59• Salte a la pista siguiente.• Manténgalo pulsado para reproducir rápidamente
hacia adelante dentro de una pista.• Sintonice la emisora de radio siguiente.• Seleccionar una emisora de radio preajustada.
10 ∫• Se usa para detener la reproducción.
11 I• Se usa para reproducir, pausar o reanudar la
reproducción.12 <
• Abra o cierre la bandeja del disco.13 VOLUME
• Gire para aumentar o reducir el nivel del volumen.
Introduzca la batería demodo que el polo - quedealineado con el terminal -
del mando a distancia.
Si una batería presiona enexceso el terminal -, hastadoblarlo y deformarlo, existe
el riesgo de que la bateríaalcalina provoque un
cortocircuito.
El terminal - estádeformado.
Superficie inferior delaltavoz
21
137 8 9 1211
3
4 5 6 10
SN29402702_X-EM16_26_Es.book 5 ページ 2016年8月6日 土曜日 午後12時58分
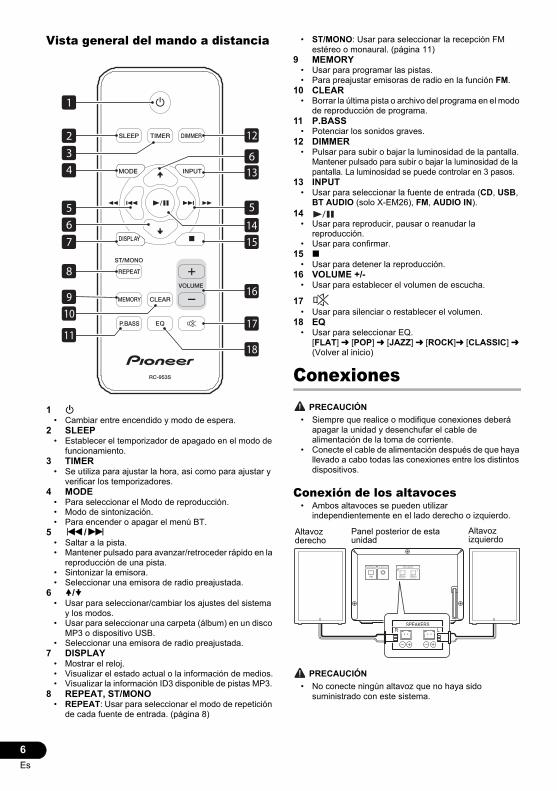
6Es
Vista general del mando a distancia
1 Í• Cambiar entre encendido y modo de espera.
2 SLEEP• Establecer el temporizador de apagado en el modo de
funcionamiento.3 TIMER
• Se utiliza para ajustar la hora, asi como para ajustar y verificar los temporizadores.
4 MODE• Para seleccionar el Modo de reproducción.• Modo de sintonización.• Para encender o apagar el menú BT.
5 :/9• Saltar a la pista.• Mantener pulsado para avanzar/retroceder rápido en la
reproducción de una pista.• Sintonizar la emisora.• Seleccionar una emisora de radio preajustada.
6 /• Usar para seleccionar/cambiar los ajustes del sistema
y los modos.• Usar para seleccionar una carpeta (álbum) en un disco
MP3 o dispositivo USB.• Seleccionar una emisora de radio preajustada.
7 DISPLAY• Mostrar el reloj.• Visualizar el estado actual o la información de medios.• Visualizar la información ID3 disponible de pistas MP3.
8 REPEAT, ST/MONO• REPEAT: Usar para seleccionar el modo de repetición
de cada fuente de entrada. (página 8)
• ST/MONO: Usar para seleccionar la recepción FM estéreo o monaural. (página 11)
9 MEMORY• Usar para programar las pistas.• Para preajustar emisoras de radio en la función FM.
10 CLEAR• Borrar la última pista o archivo del programa en el modo
de reproducción de programa.11 P.BASS
• Potenciar los sonidos graves.12 DIMMER
• Pulsar para subir o bajar la luminosidad de la pantalla. Mantener pulsado para subir o bajar la luminosidad de la pantalla. La luminosidad se puede controlar en 3 pasos.
13 INPUT• Usar para seleccionar la fuente de entrada (CD, USB,
BT AUDIO (solo X-EM26), FM, AUDIO IN).14
• Usar para reproducir, pausar o reanudar la reproducción.
• Usar para confirmar.15 ∫
• Usar para detener la reproducción.16 VOLUME +/-
• Usar para establecer el volumen de escucha.
17• Usar para silenciar o restablecer el volumen.
18 EQ• Usar para seleccionar EQ.
[FLAT] l [POP] l [JAZZ] l [ROCK]l [CLASSIC] l (Volver al inicio)
Conexiones PRECAUCIÓN
• Siempre que realice o modifique conexiones deberá apagar la unidad y desenchufar el cable de alimentación de la toma de corriente.
• Conecte el cable de alimentación después de que haya llevado a cabo todas las conexiones entre los distintos dispositivos.
Conexión de los altavoces• Ambos altavoces se pueden utilizar
independientemente en el lado derecho o izquierdo.
PRECAUCIÓN• No conecte ningún altavoz que no haya sido
suministrado con este sistema.
17
16
1
2
4
5
11
10
6
9
5
12
1514
18
6
7
8
13
3
AUDIO INANTENNA SPEAKERSR
FM
L
SPEAKERSR L
Altavoz derecho
Altavoz izquierdo
Panel posterior de esta unidad
SN29402702_X-EM16_26_Es.book 6 ページ 2016年8月6日 土曜日 午後12時58分
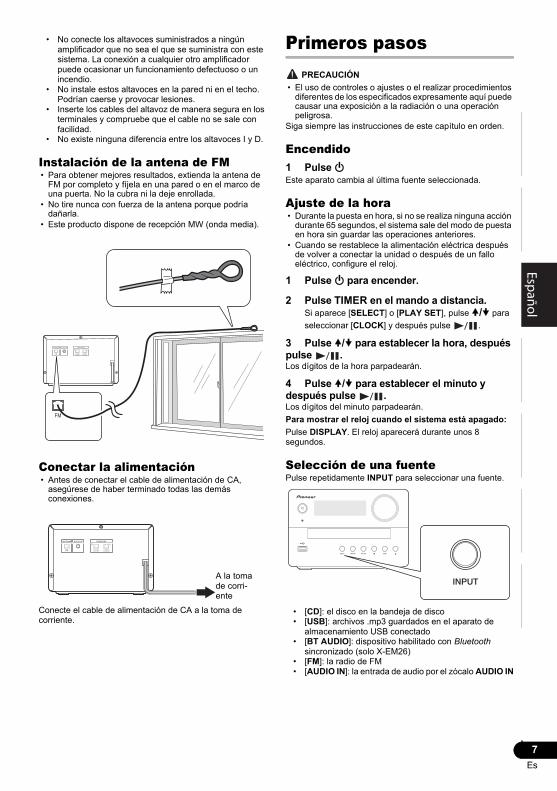
7Es
EnglishFrançais
EspañolDeutsch
ItalianoNederlands
Pyccкий• No conecte los altavoces suministrados a ningún
amplificador que no sea el que se suministra con este sistema. La conexión a cualquier otro amplificador puede ocasionar un funcionamiento defectuoso o un incendio.
• No instale estos altavoces en la pared ni en el techo. Podrían caerse y provocar lesiones.
• Inserte los cables del altavoz de manera segura en los terminales y compruebe que el cable no se sale con facilidad.
• No existe ninguna diferencia entre los altavoces I y D.
Instalación de la antena de FM• Para obtener mejores resultados, extienda la antena de
FM por completo y fíjela en una pared o en el marco de una puerta. No la cubra ni la deje enrollada.
• No tire nunca con fuerza de la antena porque podría dañarla.
• Este producto dispone de recepción MW (onda media).
Conectar la alimentación• Antes de conectar el cable de alimentación de CA,
asegúrese de haber terminado todas las demás conexiones.
Conecte el cable de alimentación de CA a la toma de corriente.
Primeros pasos PRECAUCIÓN
• El uso de controles o ajustes o el realizar procedimientos diferentes de los especificados expresamente aquí puede causar una exposición a la radiación o una operación peligrosa.
Siga siempre las instrucciones de este capítulo en orden.
Encendido1 Pulse ÍEste aparato cambia al última fuente seleccionada.
Ajuste de la hora• Durante la puesta en hora, si no se realiza ninguna acción
durante 65 segundos, el sistema sale del modo de puesta en hora sin guardar las operaciones anteriores.
• Cuando se restablece la alimentación eléctrica después de volver a conectar la unidad o después de un fallo eléctrico, configure el reloj.
1 Pulse Í para encender.
2 Pulse TIMER en el mando a distancia.Si aparece [SELECT] o [PLAY SET], pulse / para seleccionar [CLOCK] y después pulse .
3 Pulse / para establecer la hora, después pulse .Los dígitos de la hora parpadearán.
4 Pulse / para establecer el minuto y después pulse .Los dígitos del minuto parpadearán.Para mostrar el reloj cuando el sistema está apagado:Pulse DISPLAY. El reloj aparecerá durante unos 8 segundos.
Selección de una fuentePulse repetidamente INPUT para seleccionar una fuente.
• [CD]: el disco en la bandeja de disco• [USB]: archivos .mp3 guardados en el aparato de
almacenamiento USB conectado• [BT AUDIO]: dispositivo habilitado con Bluetooth
sincronizado (solo X-EM26)• [FM]: la radio de FM• [AUDIO IN]: la entrada de audio por el zócalo AUDIO IN
AUDIO INANTENNA SPEAKERSR
FM
L
FM
AUDIO INANTENNA SPEAKERSR
FM
L
A la toma de corri-ente
SN29402702_X-EM16_26_Es.book 7 ページ 2016年8月6日 土曜日 午後12時58分
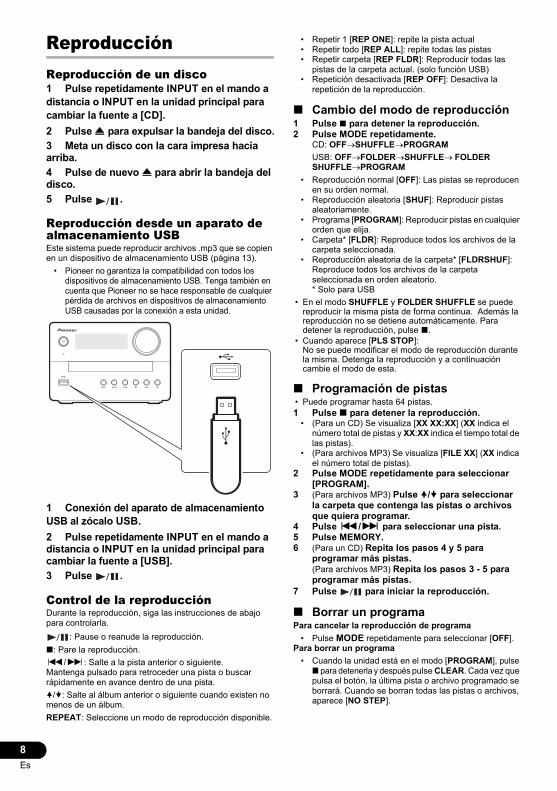
8Es
ReproducciónReproducción de un disco1 Pulse repetidamente INPUT en el mando a distancia o INPUT en la unidad principal para cambiar la fuente a [CD].2 Pulse < para expulsar la bandeja del disco.3 Meta un disco con la cara impresa hacia arriba.4 Pulse de nuevo < para abrir la bandeja del disco.5 Pulse .
Reproducción desde un aparato de almacenamiento USBEste sistema puede reproducir archivos .mp3 que se copien en un dispositivo de almacenamiento USB (página 13).
• Pioneer no garantiza la compatibilidad con todos los dispositivos de almacenamiento USB. Tenga también en cuenta que Pioneer no se hace responsable de cualquier pérdida de archivos en dispositivos de almacenamiento USB causadas por la conexión a esta unidad.
1 Conexión del aparato de almacenamiento USB al zócalo USB.2 Pulse repetidamente INPUT en el mando a distancia o INPUT en la unidad principal para cambiar la fuente a [USB].3 Pulse .
Control de la reproducciónDurante la reproducción, siga las instrucciones de abajo para controlarla.
: Pause o reanude la reproducción.∫: Pare la reproducción.:/9: Salte a la pista anterior o siguiente.Mantenga pulsado para retroceder una pista o buscar rápidamente en avance dentro de una pista./: Salte al álbum anterior o siguiente cuando existen no menos de un álbum.REPEAT: Seleccione un modo de reproducción disponible.
• Repetir 1 [REP ONE]: repite la pista actual• Repetir todo [REP ALL]: repite todas las pistas• Repetir carpeta [REP FLDR]: Reproducir todas las
pistas de la carpeta actual. (solo función USB)• Repetición desactivada [REP OFF]: Desactiva la
repetición de la reproducción.
∫ Cambio del modo de reproducción1 Pulse ∫ para detener la reproducción.2 Pulse MODE repetidamente.
CD: OFFSHUFFLEPROGRAMUSB: OFFFOLDERSHUFFLEFOLDER SHUFFLEPROGRAM
• Reproducción normal [OFF]: Las pistas se reproducen en su orden normal.
• Reproducción aleatoria [SHUF]: Reproducir pistas aleatoriamente.
• Programa [PROGRAM]: Reproducir pistas en cualquier orden que elija.
• Carpeta* [FLDR]: Reproduce todos los archivos de la carpeta seleccionada.
• Reproducción aleatoria de la carpeta* [FLDRSHUF]: Reproduce todos los archivos de la carpeta seleccionada en orden aleatorio. * Solo para USB
• En el modo SHUFFLE y FOLDER SHUFFLE se puede reproducir la misma pista de forma continua. Además la reproducción no se detiene automáticamente. Para detener la reproducción, pulse ∫.
• Cuando aparece [PLS STOP]:No se puede modificar el modo de reproducción durante la misma. Detenga la reproducción y a continuación cambie el modo de esta.
∫ Programación de pistas• Puede programar hasta 64 pistas.1 Pulse ∫ para detener la reproducción.
• (Para un CD) Se visualiza [XX XX:XX] (XX indica el número total de pistas y XX:XX indica el tiempo total de las pistas).
• (Para archivos MP3) Se visualiza [FILE XX] (XX indica el número total de pistas).
2 Pulse MODE repetidamente para seleccionar [PROGRAM].
3 (Para archivos MP3) Pulse / para seleccionar la carpeta que contenga las pistas o archivos que quiera programar.
4 Pulse :/9 para seleccionar una pista.5 Pulse MEMORY.6 (Para un CD) Repita los pasos 4 y 5 para
programar más pistas.(Para archivos MP3) Repita los pasos 3 - 5 para programar más pistas.
7 Pulse para iniciar la reproducción.
∫ Borrar un programaPara cancelar la reproducción de programa
• Pulse MODE repetidamente para seleccionar [OFF].Para borrar un programa
• Cuando la unidad está en el modo [PROGRAM], pulse ∫ para detenerla y después pulse CLEAR. Cada vez que pulsa el botón, la última pista o archivo programado se borrará. Cuando se borran todas las pistas o archivos, aparece [NO STEP].
SN29402702_X-EM16_26_Es.book 8 ページ 2016年8月6日 土曜日 午後12時58分
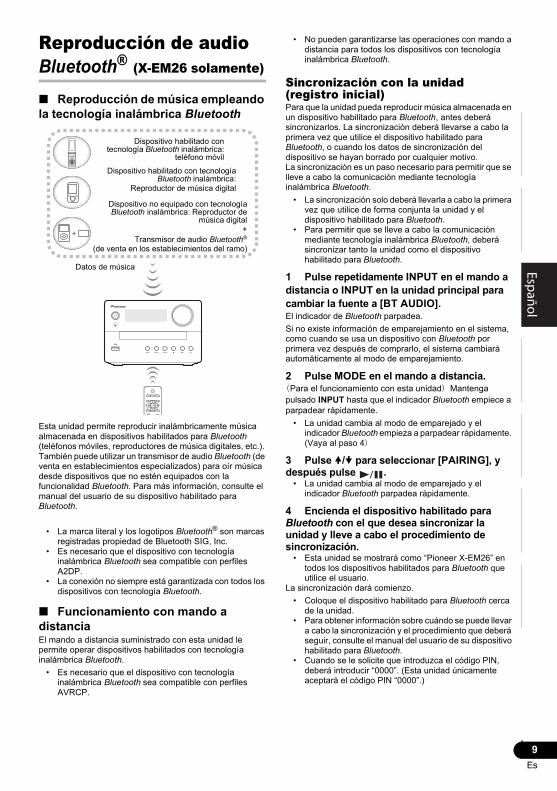
9Es
EnglishFrançais
EspañolDeutsch
ItalianoNederlands
PyccкийReproducción de audio Bluetooth® (X-EM26 solamente)
∫ Reproducción de música empleando la tecnología inalámbrica Bluetooth
Esta unidad permite reproducir inalámbricamente música almacenada en dispositivos habilitados para Bluetooth (teléfonos móviles, reproductores de música digitales, etc.). También puede utilizar un transmisor de audio Bluetooth (de venta en establecimientos especializados) para oír música desde dispositivos que no estén equipados con la funcionalidad Bluetooth. Para más información, consulte el manual del usuario de su dispositivo habilitado para Bluetooth.
• La marca literal y los logotipos Bluetooth® son marcas registradas propiedad de Bluetooth SIG, Inc.
• Es necesario que el dispositivo con tecnología inalámbrica Bluetooth sea compatible con perfiles A2DP.
• La conexión no siempre está garantizada con todos los dispositivos con tecnología Bluetooth.
∫ Funcionamiento con mando a distanciaEl mando a distancia suministrado con esta unidad le permite operar dispositivos habilitados con tecnología inalámbrica Bluetooth.
• Es necesario que el dispositivo con tecnología inalámbrica Bluetooth sea compatible con perfiles AVRCP.
• No pueden garantizarse las operaciones con mando a distancia para todos los dispositivos con tecnología inalámbrica Bluetooth.
Sincronización con la unidad (registro inicial)Para que la unidad pueda reproducir música almacenada en un dispositivo habilitado para Bluetooth, antes deberá sincronizarlos. La sincronización deberá llevarse a cabo la primera vez que utilice el dispositivo habilitado para Bluetooth, o cuando los datos de sincronización del dispositivo se hayan borrado por cualquier motivo.La sincronización es un paso necesario para permitir que se lleve a cabo la comunicación mediante tecnología inalámbrica Bluetooth.
• La sincronización solo deberá llevarla a cabo la primera vez que utilice de forma conjunta la unidad y el dispositivo habilitado para Bluetooth.
• Para permitir que se lleve a cabo la comunicación mediante tecnología inalámbrica Bluetooth, deberá sincronizar tanto la unidad como el dispositivo habilitado para Bluetooth.
1 Pulse repetidamente INPUT en el mando a distancia o INPUT en la unidad principal para cambiar la fuente a [BT AUDIO].El indicador de Bluetooth parpadea.Si no existe información de emparejamiento en el sistema, como cuando se usa un dispositivo con Bluetooth por primera vez después de comprarlo, el sistema cambiará automáticamente al modo de emparejamiento.
2 Pulse MODE en el mando a distancia.(Para el funcionamiento con esta unidad)Mantenga pulsado INPUT hasta que el indicador Bluetooth empiece a parpadear rápidamente.
• La unidad cambia al modo de emparejado y el indicador Bluetooth empieza a parpadear rápidamente. (Vaya al paso 4)
3 Pulse / para seleccionar [PAIRING], y después pulse .
• La unidad cambia al modo de emparejado y el indicador Bluetooth parpadea rápidamente.
4 Encienda el dispositivo habilitado para Bluetooth con el que desea sincronizar la unidad y lleve a cabo el procedimiento de sincronización.
• Esta unidad se mostrará como “Pioneer X-EM26” en todos los dispositivos habilitados para Bluetooth que utilice el usuario.
La sincronización dará comienzo.• Coloque el dispositivo habilitado para Bluetooth cerca
de la unidad.• Para obtener información sobre cuándo se puede llevar
a cabo la sincronización y el procedimiento que deberá seguir, consulte el manual del usuario de su dispositivo habilitado para Bluetooth.
• Cuando se le solicite que introduzca el código PIN, deberá introducir “0000”. (Esta unidad únicamente aceptará el código PIN “0000”.)
Datos de música
Dispositivo no equipado con tecnologíaBluetooth inalámbrica: Reproductor de
música digital+
Transmisor de audio Bluetooth®
(de venta en los establecimientos del ramo)
Dispositivo habilitado con tecnologíaBluetooth inalámbrica:
Reproductor de música digital
Dispositivo habilitado contecnología Bluetooth inalámbrica:
teléfono móvil
SN29402702_X-EM16_26_Es.book 9 ページ 2016年8月6日 土曜日 午後12時58分
10Es
5 Confirme que [BT AUDIO] aparezca en la pantalla y el indicador Bluetooth deje de parpadear para quedarse iluminado.
• Si la sincronización no se ha completado correctamente, el indicador de Bluetooth seguirá parpadeando y no se iluminará de manera permanente. Intente realizar una nueva sincronización con la unidad.
• Si la sincronización se ha completado correctamente, no será necesario que repita este procedimiento.
Aunque los dispositivos ya hayan sido sincronizados con esta unidad, los mismos no se conectarán durante el modo de sincronización en los siguientes casos.En tales casos, elimine el historial de sincronización del dispositivo con tecnología inalámbrica Bluetooth y lleve a cabo la sincronización de nuevo.
• Esta unidad permite grabar hasta 8 historiales de sincronización. Si conecta más de 8 unidades a un dispositivo con tecnología inalámbrica Bluetooth, el historial de sincronización más antiguo se eliminará.
• Si los ajustes se restauran al ajuste de fábrica, todo el historial de emparejamiento se borrará. Para restaurar al ajuste de fábrica, mantenga pulsado INPUT y < en la unidad durante más de 5 segundos hasta que en la pantalla aparezca “RESET”.
Para cancelar el emparejamiento• Pulse MODE o cambie la fuente.
Cancelar una conexión Bluetooth1 Pulse MODE.2 Pulse / para seleccionar [DISCONNECT], y
después pulse .
Cómo escuchar música en la unidad desde un dispositivo habilitado para Bluetooth1 Pulse repetidamente INPUT en el mando a distancia o INPUT en la unidad principal para cambiar la fuente a [BT AUDIO].La unidad comenzará a utilizar la función BT AUDIO y se conectará con un dispositivo habilitado para Bluetooth.
2 Se creará una conexión Bluetooth entre el dispositivo habilitado para Bluetooth y la unidad.Los procedimientos para efectuar la conexión con la unidad deberán llevarse a cabo desde el dispositivo habilitado para Bluetooth.
• Para una información detallada acerca de los procedimientos de conexión, consulte el manual del usuario de su dispositivo habilitado para Bluetooth.
3 Cómo reproducir música desde un dispositivo habilitado para Bluetooth.
• Pulse en el mando a distancia o I en la unidad principal para reproducir.Puede controlar y :/9.La detención de la reproducción y otras operaciones se pueden controlar a través del dispositivo con tecnología Bluetooth.
• Cuando no haya conectado ningún dispositivo habilitado para Bluetooth y no se haya llevado a cabo ninguna operación durante más de 15 minutos, la unidad se apagará automáticamente.
∫ Precaución con las ondas radioeléctricasEsta unidad emplea una frecuencia de onda de radio de 2,4 GHz, que es una banda utilizada por otros sistemas inalámbricos (consulte la lista siguiente). Para impedir ruidos o interrupciones en la comunicación no use esta unidad cerca de tales aparatos, o apague esos aparatos mientras usa esta unidad.
• Teléfono inalámbricos• Faxes inalámbricos• Hornos microondas• Dispositivos de LAN inalámbrica (IEEE802.11b/g)• Equipos AV inalámbricos• Controladores inalámbricos para sistemas de juegos• Audífonos basados en microondas• Algunos monitores para bebés
Otros equipos menos comunes que pueden funcionar en la misma frecuencia:
• Sistemas antirrobo• Emisoras de radio de aficionados (HAM)• Sistemas de administración logística de almacenes• Sistemas de discriminación para trenes o vehículos de
emergencia
• Si aparece ruido en la imagen del televisor, existirá la posibilidad de que un dispositivo habilitado con tecnología inalámbrica Bluetooth o esta unidad (incluyendo los productos compatibles con esta unidad) estén causando interferencias de la señal en el conector de entrada de antena de su televisor, vídeo, sintonizador vía satélite, etc. En este caso, incremente la distancia entre el conector de entrada de la antena y el dispositivo habilitado con tecnología inalámbrica Bluetooth o esta unidad (incluyendo los productos compatibles con esta unidad).
• Si hay algo que obstruya el paso entre esta unidad (incluyendo los productos compatibles con esta unidad) y el dispositivo habilitado con tecnología inalámbrica Bluetooth (como pueda ser una puerta metálica, un muro de hormigón o papel de aluminio aislante), es posible que tenga que cambiar la ubicación del sistema para evitar ruidos en la señal e interrupciones.
∫ Alcance de operaciónEsta unidad está diseñada para un uso doméstico. (Las distancias de transmisión pueden reducirse dependiendo del ambiente de comunicación).En los lugares siguientes, las malas condiciones o la inhabilidad de recibir ondas radioeléctricas puede ser la causa de que el sonido se interrumpa o se pare:
• En edificios de hormigón reforzado o en edificios de estructura de metal o hierro.
• Cerca de muebles metálicos grandes.• Donde hay una multitud de personas o cerca de un
edificio u obstáculo.• En un lugar expuesto a un campo magnético,
electricidad estática o interferencias de ondas de radio por parte de equipos de radiocomunicaciones que usen la misma banda de frecuencia (2,4 GHz) que esta unidad, tales como dispositivos LAN inalámbricos de 2,4 GHz (IEEE802.11b/g) u hornos de microondas.
• Si vive en un área residencial muy poblada (apartamento, casa unifamiliar construida junto a muchas otras casas, etc.) y el microondas de su vecino está próximo a su sistema, es posible que le afecten las
X-EM16&26_TOC&Body_Es.fm 10 ページ 2016年8月8日 月曜日 午後1時2分
11Es
EnglishFrançais
EspañolDeutsch
ItalianoNederlands
Pyccкийinterferencias de las ondas radioeléctricas. Si ocurre esto, traslade la unidad a un lugar diferente. Cuando no se use el microondas no habrá interferencia de ondas radioeléctricas.
∫ Reflejos de ondas radioeléctricasLas ondas de radio que recibe esta unidad incluyen la onda de radio que proviene directamente del dispositivo equipado con tecnología inalámbrica Bluetooth (onda directa) y las ondas procedentes de varias direcciones por los reflejos en paredes, muebles y edificios (ondas reflejadas). Las ondas reflejadas (debido a obstáculos y objetos reflejantes) producen además una variedad de ondas reflejadas y también una variación de condiciones de recepción que dependen de los lugares. Ni no se puede recibir el sonido correctamente debido a este fenómeno, trate de cambiar un poco la ubicación del dispositivo equipado con tecnología inalámbrica Bluetooth. Asimismo, observe que el sonido podría interrumpirse debido a las ondas reflejadas cuando una persona cruza o se acerca al espacio que hay entre esta unidad y el dispositivo equipado con tecnología inalámbrica Bluetooth.
∫ Precauciones relacionadas con los productos compatibles con esta unidad
• Complete las conexiones de todos los dispositivos compatibles con esta unidad, incluyendo todos los cables de audio y cables de alimentación antes de conectarlos a esta unidad.
• Después de haber completado las conexiones con esta unidad, compruebe los cables de audio y de alimentación y confirme que no estén enredados entre sí.
• Cuando desconecte esta unidad, confirme que dispone de suficiente espacio para trabajar en el área circundante.
• Cuando cambie conexiones de audio o de otros cables para productos compatibles con esta unidad, confirme que tenga espacio de trabajo suficiente en el área circundante.
Escuchar la radio FM
Sintonización de una emisora de radio FM• Asegúrese de que ha conectado y extendido por completo
la antena FM.
∫ Sintonización manual1 Pulse repetidamente INPUT en el mando a
distancia o INPUT en la unidad principal para cambiar la fuente a FM.
2 Pulse MODE repetidamente para seleccionar [MANUAL].
3 Pulse :/9 en el mando a distancia para sintonizar la emisora deseada.
∫ Sintonización automática1 Pulse repetidamente INPUT en el mando a
distancia o INPUT en la unidad principal para cambiar la fuente a FM.
2 Pulse MODE repetidamente para seleccionar [AUTO].
3 Pulse :/9.
El proceso de búsqueda se iniciará automáticamente y el sintonizador se detendrá en la primera emisora de radiodifusión que se reciba.
(Solo para el modelo europeo) Cuando sintoniza una emisora FM que ofrece servicios RDS, el nombre del servicio o de la emisora aparece en la pantalla.
Programación de emisoras de radio• Puede programar hasta 20 emisoras de radio
preajustadas.• Para sobreescribir una emisora de radio programada,
almacene otra con su número de secuencia.1 Sintonice una emisora de radio.2 Pulse MEMORY.3 Pulse :/9 (/) repetidamente para
seleccionar un número preajustado y después pulse .
En la pantalla aparece “COMPLETE” y la emisora de radio queda registrada con el número preajustado.4 Repita los pasos 1-3 para programar más
emisoras.
∫ Sintonización de una emisora de radio preajustada1 Pulse repetidamente INPUT en el mando a
distancia o INPUT en la unidad principal para cambiar la fuente a FM.
2 Pulse MODE repetidamente para seleccionar [PRESET].
3 Pulse / para seleccionar el número preajustado deseado.
Si se percibe ruido en la recepción de radiodifusión FM estéreo, pulse ST/MONO repetidamente para seleccionar [MONO] y pasar a la recepción monaural. Esto reduce el ruido.
Otras características∫ Modo de espera automático
• Después de que este producto esté inactivo durante 15 minutos, este pasa automáticamente al modo de espera.
Mantenga pulsado Í en el mando a distancia o en la unidad principal.“AUTO STANDBY ON” o “AUTO STANDBY OFF” aparecen en la pantalla principal, después se cambia el ajuste.Puede que el sistema puede no pase automáticamente al modo de espera en los siguientes casos:
• Mientras se usa la función de sintonizador• Mientras se está detectando una señal de audio• Durante la reproducción de pistas o archivos de audio• Mientras se está utilizando el temporizador de
reproducción o el temporizador de apagadoEl sistema reinicia la cuenta atrás de 15 minutos para pasar al modo de espera en los siguientes casos:
• Cuando se conecta un dispositivo USB en la función USB
• Cuando se pulsa un botón en el mando a distancia o en la unidad
SN29402702_X-EM16_26_Es.book 11 ページ 2016年8月6日 土曜日 午後12時58分

12Es
∫ Encendido y apagado automáticoPuede establecer una hora para el encendido y apagado automático.• Asegúrese de que ha ajustado el reloj antes de realizar
este ajuste.1 Pulse TIMER.2 Pulse / para seleccionar [PLAY SET], luego
pulse .[ON TIME] aparece y los dígitos de hora parpadean.3 Pulse / para establecer la hora de ON TIME y
después pulse .Los dígitos del minuto parpadearán.4 Pulse / para establecer el minuto y después
pulse .[OFF TIME] aparece y los dígitos de hora parpadean.5 Pulse / para establecer la hora de OFF TIME
y después pulse .Los dígitos del minuto parpadearán.6 Pulse / para establecer el minuto y después
pulse .7 Pulse / para seleccionar la fuente y después
pulse .CD, USB y FM se pueden seleccionar como la fuente de reproducción.
• Es posible mover el cursor entre los ajustes de “hora” y “minuto” con :/9.
Para comprobar el ajuste1 Pulse TIMER.2 Pulse / para seleccionar [SELECT], luego
pulse .3 Pulse / para seleccionar [PLAY SEL], luego
pulse .Para cancelar el temporizador1 Pulse TIMER.2 Pulse / para seleccionar [SELECT], luego
pulse .3 Pulse / para seleccionar [OFF], luego pulse
.
∫ Ajuste del temporizador de apagadoEn el modo de funcionamiento, pulse repetidamente SLEEP para seleccionar el periodo preestablecido (10, 20, 30, 40, 50, 60, 70, 80, 90 minutos o AUTO).
• Para desactivar el temporizador para acostarse, pulse repetidamente SLEEP hasta que se visualice [OFF].
• Si selecciona [AUTO], la unidad se apagará automáticamente una vez que termine la reproducción de un CD o dispositivo USB.
∫ Enrutamiento de audio de otros aparatos
PRECAUCIÓN• Nous n'acceptons en aucun cas la responsabilité pour
des dommages résultant d'une connexion à des équipements fabriqués par d'autres sociétés.
A través del zócalo AUDIO IN
1 Conecte un cable con miniclavija estéreo (disponible en tiendas) al
• la toma AUDIO IN en el panel trasero de la unidad principal y
• al zócalo de los auriculares en el aparato externo (un reproductor MP3 por ejemplo).
2 Pulse repetidamente INPUT en el mando a distancia o INPUT en la unidad principal para cambiar la fuente a [AUDIO IN].
3 Reproduzca en el aparato externo.
∫ Carga por USB 500 mAEl terminal USB de esta unidad tiene una salida de 500 mA. Se puede conectar y usar/cargar un dispositivo USB hasta 500 mA.La recarga de la batería se inicia cuando se conecta el dispositivo USB al puerto (USB) de la unidad.Notas sobre la recarga de dispositivos USB con este sistema
• Cuando el sistema está apagado, no puede utilizar este sistema como un cargador de batería.
• Dependiendo de las especificaciones del dispositivo USB, puede que no sea posible cargar la batería.
∫ Activar o desactivar la señal Bluetooth1 Mantenga pulsado:6 y en la unidad
principal durante 5 segundos.2 Suelte el botón cuando se muestre [BT OFF]
(señal de Bluetooth apagada) o [BT ON] (señal de Bluetooth encendida).
• Cuando esta unidad está apagada, no puede emparejarla con dispositivos habilitados con Bluetooth.
∫ Controles de sonidoControl P.bassCuando se activa la alimentación por primera vez, la unidad entrará en el modo P.bass, que enfatiza las frecuencias de bajos. Para cancelar el modo P.bass, pulse P.BASS en el mando a distancia.
AUDIO INANTENNA SPEAKERSR
FM
L
SN29402702_X-EM16_26_Es.book 12 ページ 2016年8月6日 土曜日 午後12時58分
13Es
EnglishFrançais
EspañolDeutsch
ItalianoNederlands
PyccкийInformación adicional∫ Información sobre la reproducción de USBAparatos USB compatibles:
• Memoria flash USB (USB1.1/2.0 (Full Speed))• Reproductores flash USB (USB1.1/2.0 (Full Speed))
Formatos compatibles:• Formato de archivo de memoria o USB: FAT16, FAT32• Velocidades de bits de MP3 (velocidades de datos):
32 kbps hasta 320 kbps y velocidades de bits variables• Profundidad de carpetas 8: ROOT incluida• Número máximo de carpetas: 256 (incluida ROOT)• Número máximo de pistas/archivos: 999
Número máximo de archivos que puede reconocer esta unidad en una carpeta: 999
• ID3tag: v1.0, v1.1, v1.2, v2.0, v2.2, v2.3, v2.4Los archivos de audio no se pueden reproducir dependiendo de la configuración del software de codificación, el tipo de aparato USB, la grabación y otras condiciones.Formatos incompatibles:
• Álbum vacío: un álbum que no contiene archivos MP3• Los formatos de archivos incompatibles se saltan. Por
ejemplo, los documentos de Word (.doc) o los archivos MP3 con extensión.dlf se ignoran y no se reproducen.
• Archivos de audio excepto MP3.• Otros sistemas de archivo (exFAT, NTFS, HFS, etc.)
distintos de FAT16 y FAT32.
∫ Formatos de discos MP3 compatibles• ISO9660 Level 1/Level 2, Joliet• Número máximo de carpetas: 256 (incluida ROOT)• Número máximo de pistas/archivos: 999
Número máximo de archivos que puede reconocer esta unidad en una carpeta: 999
• Frecuencias de muestreo compatibles: 32 kHz, 44,1 kHz, 48 kHz
• Tasas de bits compatibles: 32 kbps hasta 320 kbps, velocidades de bits variables
• Profundidad de carpetas 8: ROOT incluidaLos archivos de audio no se pueden reproducir dependiendo de la configuración del software de codificación, el tipo de aparato USB, la grabación y otras condiciones.
Detección y solución de problemas ADVERTENCIA
• No quite nunca la caja de este aparato.• A menudo, un manejo incorrecto se confunde con
problemas o un mal funcionamiento. Si cree que este componente tiene algún problema, compruebe los puntos siguientes. A veces el problema puede estar en otro componente. Inspeccione los otros componentes y los aparatos eléctricos que esté utilizando. Si no logra resolver el problema pese a haber comprobado los puntos que se detallan a continuación, póngase en contacto con el centro de servicio autorizado Pioneer más cercano o con su distribuidor para llevar a cabo una reparación.
• Si la unidad no funciona normalmente debido a efectos externos tales como la electricidad estática, desconecte la clavija de alimentación de la toma de corriente y vuelva a conectarla para volver a las condiciones de funcionamiento normales.
Si aparece “PROTECT” en la pantalla. Desenchufe inmediatamente el cable de alimentación
y compruebe los siguientes elementos después de que “PROTECT” desaparezca.
• Asegúrese de que nada está bloqueando los orificios de ventilación del sistema.Después de que haya comprobado los elementos anteriores y no haya encontrado ningún problema, vuelva a conectar el cable de alimentación y encienda el sistema. Si el problema persiste, contacte con su distribuidor más cercano.
No se enciende el aparato. Asegúrese de que el cable de alimentación de CA
esté bien conectado. Asegúrese de que haya corriente en la toma de CA. En el modo de espera automático, el sistema se
apaga automáticamente 15 minutos después de permanecer inactivo.
No hay sonido o éste es malo. Ajuste el volumen. Asegúrese de que los altavoces estén bien
conectados. No hay respuesta del sistema.
Vuelva a conectar la clavija de alimentación de CA, y luego vuelva a encender el sistema.
Con la función de ahorro de energía, el sistema se apaga automáticamente 15 minutos después de permanecer inactivo el sistema.
El mando a distancia no funciona. Reduzca la distancia entre el mando a distancia y la
unidad principal. Inserte la pila con sus polaridades (signos +/–)
alineados como se indica. Reemplace las pilas. Apunte el mando a distancia directamente al sensor
del panel frontal de la unidad principal. No se detecta disco.
Inserte un disco. Asegúrese de poner el disco con su etiqueta hacia
arriba. Espere a que la condensación de humedad de la
lente haya desaparecido. Sustituya o limpie el disco. Asegúrese de que el disco grabable esté finalizado y
el formato sea compatible. El aparato de almacenamiento USB no es compatible.
Asegúrese de que el aparato de almacenamiento USB sea compatible con el sistema.
El dispositivo de almacenamiento USB, ¿está conectado correctamente? Asegúrese de que el dispositivo está firmemente introducido.
El nombre del archivo o carpeta (nombre del álbum) no se muestra correctamente. Los caracteres que se pueden mostrar en esta unidad
son los siguientes:• Mayúsculas (de la A a la Z).• Números (del 0 al 9).• Símbolos (< >* +, [ ] _).Otros caracteres aparecen como “_”.
Aparece “OVER CURRENT”. Se ha detectado un problema con el nivel de corriente
eléctrica desde el puerto (USB). Apague el sistema y quite el dispositivo USB del puerto (USB). Asegúrese de que no existe ningún problema con el dispositivo USB. Si el patrón de visualización persiste, contacte con su distribuidor más cercano.
No se pueden reproducir algunos archivos del aparato de almacenamiento USB. Asegúrese de que el formato de archivo sea
compatible.
X-EM16&26_TOC&Body_Es.fm 13 ページ 2016年8月8日 月曜日 午後1時2分
14Es
Asegúrese de que la cantidad de archivos no exceda el máximo (página 13).
La recepción de radio es mala Aumente la distancia entre el sistema y otros aparatos
eléctricos. Extienda completamente la antena.
El temporizador no funciona. Ponga en hora el reloj correctamente. Encienda el temporizador.
El ajuste del reloj/temporizador se ha borrado. La alimentación se ha interrumpido o el cable de
alimentación de CA ha sido desconectado. Vuelva a ajustar el reloj/temporizador.
Cuando el dispositivo de tecnología inalámbrica Bluetooth esté conectado o se esté utilizando (solo X-EM26) El dispositivo de tecnología inalámbrica Bluetooth no
puede conectarse ni manejarse.El dispositivo de tecnología inalámbrica Bluetooth no emite sonido o el sonido se interrumpe. Compruebe que no haya ningún objeto que emita
ondas electromagnéticas en la banda de 2,4 GHz (horno microondas, dispositivo inalámbrico LAN o un aparato de tecnología inalámbrica Bluetooth) cerca de la unidad. Si hay tal objeto cerca de la unidad, separe la unidad del objeto. O deje de usar el objeto que emite las ondas electromagnéticas.
Compruebe que el dispositivo de tecnologia inalambrica Bluetooth no esta demasiado lejos de la unidad y que no hay obstaculos entre el dispositivo de tecnologia inalambrica Bluetooth y la unidad. Ajuste el dispositivo de tecnologia inalambrica Bluetooth y la unidad de modo que la distancia entre ambos sea inferior a 10 m* y no exista ningun obstaculo entre ellos.
* La distancia indicada solo se facilita con fines orientativos. La distancia admisible real entre los dispositivos podrá variar según las condiciones del entorno circundante.
Puede que el dispositivo de tecnología inalámbrica Bluetooth no esté ajustado en el modo de comunicación compatible con la tecnología inalámbrica Bluetooth. Compruebe el ajuste del aparato con tecnología inalámbrica Bluetooth.
Observaciones sobre el uso de este receptor
∫ Cuando traslade esta unidadCuando traslade esta unidad, compruebe primero que no haya ningún disco en su interior. Luego pulse Í, espere a que desaparezca [STANDBY] en la pantalla principal, y luego desenchufe el cable de alimentación. Si la unidad se transporta o se mueve cuando haya un disco en su interior o cuando haya otro dispositivo conectado al terminal USB o minitoma de AUDIO IN, pueden producirse daños.
∫ Dónde instalar el receptor• Elija un lugar estable cerca del televisor o sistema
estéreo que esté utilizándose con la unidad.• No coloque el receptor encima de un televisor o monitor
de color. Tampoco deberá colocarlo cerca de una platina ni de otros dispositivos que puedan verse fácilmente afectados por fuerzas magnéticas.
Evite colocarlo en los siguientes lugares:• Lugares expuestos a la luz directa del sol• Lugares húmedos o mal ventilados
• Lugares extremadamente calurosos• Lugares expuestos a vibraciones• Lugares en los que haya mucho polvo o humo de
cigarrillos• Lugares expuestos a hollín, vapor o calor (cocinas, etc.)
∫ No ponga objetos sobre esta unidadNo ponga ningún objeto encima de esta unidad.No obstruya los orificios de ventilación.No utilice la unidad encima de alfombras, camas, sofás, etc., ni tampoco envuelta en un paño, etc. En tal caso, el calor no se disipará y podrían producirse daños.No la exponga a ninguna fuente de calor.No coloque la unidad encima de un amplificador ni de otros componentes que generen calor. Si monta la unidad en un bastidor, colóquela en un estante debajo del amplificador a fin de evitar el calor desprendido por el mismo o por otros componentes de audio.
• Cuando no utilice esta unidad, apáguela.• Según las condiciones de la señal, cuando la unidad
esté encendida podrían aparecer líneas en la pantalla del televisor y el sonido de las emisiones de radio podría verse afectado por ruido. En tal caso, apague la unidad.
∫ Cómo limpiar el receptor• Desenchufe el cable de alimentación de la toma de
corriente cuando limpie la unidad.• Limpie la unidad con un paño blando. Para la suciedad
rebelde, utilice un paño suave, impregnado con un poco de detergente neutro, diluido en 5 o 6 partes de agua, bien escurrido. Después, séquelo con un paño suave.
• El uso de alcohol, diluyente, benceno, insecticidas, etc. podría provocar que la impresión o pintura se desprendieran. Evite también dejar productos de goma o vinilo en contacto con la unidad durante mucho tiempo porque podría dañarse la caja.
• Si utiliza toallitas impregnadas con productos químicos, etc., lea cuidadosamente las advertencias que acompañen a las mismas.
∫ Limpieza de la lente• La lente de esta unidad no debería ensuciarse en el uso
normal, pero si por alguna razón hay un fallo en su funcionamiento debido a polvo o suciedad, contacte con el centro de servicio autorizado por Pioneer más cercano. Aunque se encuentran a la venta limpiadores de lentes para reproductores, no recomendamos utilizarlos porque podrían dañarlas.
Manipulación de discos
∫ Almacenaje de los discos• Siempre deberá guardar los discos en sus cajas y en
posición vertical, evitando los lugares cálidos y húmedos, los lugares expuestos a la luz directa del sol y los lugares extremadamente fríos.
• Recuerde leer las advertencias que acompañen al disco.
SN29402702_X-EM16_26_Es.book 14 ページ 2016年8月6日 土曜日 午後12時58分
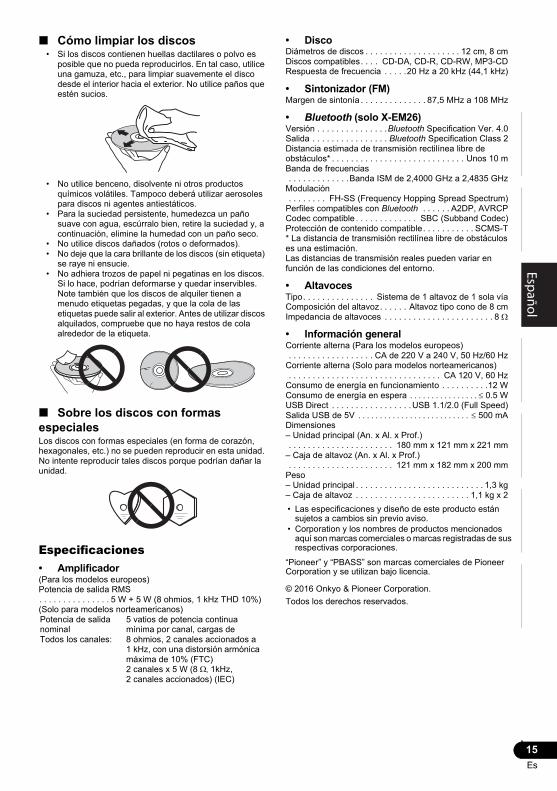
15Es
EnglishFrançais
EspañolDeutsch
ItalianoNederlands
Pyccкий∫ Cómo limpiar los discos
• Si los discos contienen huellas dactilares o polvo es posible que no pueda reproducirlos. En tal caso, utilice una gamuza, etc., para limpiar suavemente el disco desde el interior hacia el exterior. No utilice paños que estén sucios.
• No utilice benceno, disolvente ni otros productos químicos volátiles. Tampoco deberá utilizar aerosoles para discos ni agentes antiestáticos.
• Para la suciedad persistente, humedezca un paño suave con agua, escúrralo bien, retire la suciedad y, a continuación, elimine la humedad con un paño seco.
• No utilice discos dañados (rotos o deformados).• No deje que la cara brillante de los discos (sin etiqueta)
se raye ni ensucie.• No adhiera trozos de papel ni pegatinas en los discos.
Si lo hace, podrían deformarse y quedar inservibles. Note también que los discos de alquiler tienen a menudo etiquetas pegadas, y que la cola de las etiquetas puede salir al exterior. Antes de utilizar discos alquilados, compruebe que no haya restos de cola alrededor de la etiqueta.
∫ Sobre los discos con formas especialesLos discos con formas especiales (en forma de corazón, hexagonales, etc.) no se pueden reproducir en esta unidad. No intente reproducir tales discos porque podrían dañar la unidad.
Especificaciones• Amplificador(Para los modelos europeos)Potencia de salida RMS. . . . . . . . . . . . . . . 5 W + 5 W (8 ohmios, 1 kHz THD 10%)(Solo para modelos norteamericanos)
• DiscoDiámetros de discos . . . . . . . . . . . . . . . . . . . . 12 cm, 8 cmDiscos compatibles. . . . CD-DA, CD-R, CD-RW, MP3-CDRespuesta de frecuencia . . . . .20 Hz a 20 kHz (44,1 kHz)
• Sintonizador (FM)Margen de sintonía . . . . . . . . . . . . . . 87,5 MHz a 108 MHz
• Bluetooth (solo X-EM26)Versión . . . . . . . . . . . . . . .Bluetooth Specification Ver. 4.0Salida . . . . . . . . . . . . . . . . Bluetooth Specification Class 2Distancia estimada de transmisión rectilínea libre de obstáculos* . . . . . . . . . . . . . . . . . . . . . . . . . . . . Unos 10 mBanda de frecuencias . . . . . . . . . . . . .Banda ISM de 2,4000 GHz a 2,4835 GHzModulación . . . . . . . . FH-SS (Frequency Hopping Spread Spectrum)Perfiles compatibles con Bluetooth . . . . . . A2DP, AVRCPCodec compatible . . . . . . . . . . . . . SBC (Subband Codec)Protección de contenido compatible. . . . . . . . . . . SCMS-T* La distancia de transmisión rectilínea libre de obstáculos es una estimación.Las distancias de transmisión reales pueden variar en función de las condiciones del entorno.
• AltavocesTipo. . . . . . . . . . . . . . . Sistema de 1 altavoz de 1 sola víaComposición del altavoz. . . . . . Altavoz tipo cono de 8 cmImpedancia de altavoces . . . . . . . . . . . . . . . . . . . . . . . 8
• Información generalCorriente alterna (Para los modelos europeos) . . . . . . . . . . . . . . . . . . CA de 220 V a 240 V, 50 Hz/60 HzCorriente alterna (Solo para modelos norteamericanos) . . . . . . . . . . . . . . . . . . . . . . . . . . . . . . . . CA 120 V, 60 HzConsumo de energía en funcionamiento . . . . . . . . . .12 WConsumo de energía en espera 0.5 WUSB Direct . . . . . . . . . . . . . . . . .USB 1.1/2.0 (Full Speed)Salida USB de 5V 500 mADimensiones– Unidad principal (An. x Al. x Prof.) . . . . . . . . . . . . . . . . . . . . . . 180 mm x 121 mm x 221 mm– Caja de altavoz (An. x Al. x Prof.) . . . . . . . . . . . . . . . . . . . . . . 121 mm x 182 mm x 200 mmPeso– Unidad principal . . . . . . . . . . . . . . . . . . . . . . . . . . . 1,3 kg– Caja de altavoz . . . . . . . . . . . . . . . . . . . . . . . . 1,1 kg x 2• Las especificaciones y diseño de este producto están
sujetos a cambios sin previo aviso.• Corporation y los nombres de productos mencionados
aquí son marcas comerciales o marcas registradas de sus respectivas corporaciones.
“Pioneer” y “PBASS” son marcas comerciales de Pioneer Corporation y se utilizan bajo licencia.
© 2016 Onkyo & Pioneer Corporation.Todos los derechos reservados.
Potencia de salida nominalTodos los canales:
5 vatios de potencia continua mínima por canal, cargas de 8 ohmios, 2 canales accionados a 1 kHz, con una distorsión armónica máxima de 10% (FTC)2 canales x 5 W (8 , 1kHz, 2 canales accionados) (IEC)
X-EM16&26_TOC&Body_Es.fm 15 ページ 2016年8月9日 火曜日 午後3時51分

AVVERTENZAPER EVITARE IL RISCHIO DI SCOSSE ELETTRICHE, NON RIMUOVERE IL COPERCHIO (O IL RETRO). NON CI SONO PARTI INTERNE LA CUI MANUTENZIONE POSSA ESSERE EFFETTUATA DALL’UTENTE. IN CASO DI NECESSITÀ, RIVOLGERSI ESCLUSIVAMENTE A PERSONALE DI SERVIZIO QUALIFICATO. D3-4-2-1-1_B2_It
ATTENZIONEQuesto apparecchio non è impermeabile. Per prevenire pericoli di incendi o folgorazioni, non posizionare nelle vicinanze di questo apparecchio contenitori pieni di liquidi (quali vasi da fiori, o simili), e non esporre l’apparecchio a sgocciolii, schizzi, pioggia o umidità.
D3-4-2-1-3_A1_It
ATTENZIONEPer evitare il pericolo di incendi, non posizionare sull’apparecchio dispositivi con fiamme vive (ad esempio una candela accesa, o simili).
D3-4-2-1-7a_A1_It
AVVERTENZA PER LA VENTILAZIONEInstallare l’apparecchio avendo cura di lasciare un certo spazio all’intorno dello stesso per consentire una adeguata circolazione dell’aria e migliorare la dispersione del calore (almeno 10 cm sulla parte superiore, 10 cm sul retro, e 10 cm su ciascuno dei lati).
ATTENZIONEL’apparecchio è dotato di un certo numero di fessure e di aperture per la ventilazione, allo scopo di garantirne un funzionamento affidabile, e per proteggerlo dal surriscaldamento. Per prevenire possibili pericoli di incendi le aperture non devono mai venire bloccate o coperte con oggetti vari (quali giornali, tovaglie, tende o tendaggi, ecc.), e l’apparecchio non deve essere utilizzato appoggiandolo su tappeti spessi o sul letto.
D3-4-2-1-7b*_A1_It
Condizioni ambientali di funzionamentoGamma ideale della temperatura ed umidità dell’ambiente di funzionamento:da +5 °C a +35 °C, umidità relativa inferiore all‘85 % (fessure di ventilazione non bloccate)Non installare l’apparecchio in luoghi poco ventilati, o in luoghi esposti ad alte umidità o alla diretta luce del sole (o a sorgenti di luce artificiale molto forti).
D3-4-2-1-7c*_A1_It
AVVERTENZAQuesto apparecchio è un prodotto al laser di Classe 1 secondo le norme di sicurezza dei prodotti al laser IEC 60825-1:2007.
PRODOTTO LASER DI CLASSE 1
D58-5-2-2a_A1_It
Questo prodotto è destinato esclusivamente all'uso domestico. Eventuali disfunzioni dovute ad usi diversi (quali uso prolungato a scopi commerciali, in ristoranti, o uso in auto o su navi) e che richiedano particolari riparazioni, saranno a carico dell'utente, anche se nel corso del periodo di garanzia.
K041_A1_It
AVVERTIMENTO RIGUARDANTE IL FILO DI ALIMENTAZIONEPrendete sempre il filo di alimentazione per la spina. Non tiratelo mai agendo per il filo stesso e non toccate mai il filo con le mani bagnati, perchè questo potrebbe causare cortocircuiti o scosse elettriche. Non collocate l’unità, oppure dei mobili sopra il filo di alimentazione e controllate che lo stesso non sia premuto. Non annodate mai il filo di alimentazione nè collegatelo con altri fili. I fili di alimentazione devono essere collocati in tal modo che non saranno calpestati. Un filo di alimentazione danneggiato potrebbe causare incendi o scosse elettriche. Controllate il filo di alimentazione regolarmente. Quando localizzate un eventuale danno, rivolgetevi al più vicino centro assistenza autorizzato della PIONEER oppure al vostro rivenditore per la sostituzione del filo di alimentazione.
S002*_A1_It
AVVERTENZAL’interruttore principale () dell’apparecchio non stacca completamente il flusso di corrente elettrica dalla presa di corrente alternata di rete. Dal momento che il cavo di alimentazione costituisce l’unico dispositivo di distacco dell’apparecchio dalla sorgente di alimentazione, il cavo stesso deve essere staccato dalla presa di corrente alternata di rete per sospendere completamente qualsiasi flusso di corrente. Verificare quindi che l’apparecchio sia stato installato in modo da poter procedere con facilità al distacco del cavo di alimentazione dalla presa di corrente, in caso di necessità. Per prevenire pericoli di incendi, inoltre, il cavo di alimentazione deve essere staccato dalla presa di corrente alternata di rete se si pensa di non utilizzare l’apparecchio per periodi di tempo relativamente lunghi (ad esempio, durante una vacanza).
D3-4-2-2-2a*_A1_It
ATTENZIONEConservare piccole parti fuori della portata di bambini e lattanti. Se inghiottite accidentalmente, entrare immediatamente in contatto con un medico.
SN29402702_X-EM16_26_It.book 2 ページ 2016年8月6日 土曜日 午後1時10分
K058a_A1_It
Pb
Informazioni per gli utilizzatori finali sulla raccolta e lo smaltimento di vecchi dispositivi e batterie esauste
Questi simboli sui prodotti, confezioni, e/o documenti allegati significano che vecchi prodotti elettrici ed elettronici e batterie esauste non devono essere mischiati ai rifiuti urbani indifferenziati.
Per l’appropriato trattamento, recupero e riciclaggio di vecchi prodotti e batterie esauste, fate riferimento ai punti di raccolta autorizzati in conformità alla vostra legislazione nazionale.
Con il corretto smaltimento di questi prodotti e delle batterie, aiuterai a salvaguardare preziose risorse e prevenire i potenziali effetti negativi sull’ambiente e sulla salute umana che altrimenti potrebbero sorgere da una inappropriata gestione dei rifiuti.
Per maggiori informazioni sulla raccolta e il riciclaggio di vecchi prodotti e batterie esauste, contattate il vostro Comune, il Servizio di raccolta o il punto vendita dove avete acquistato l’articolo.
Questi simboli sono validi solo nell’Unione Europea.
Per i paesi al di fuori dell’unione Europea:Se volete liberarvi questi oggetti, contattate le vostre autorità locali o il punto vendita per il corretto metodo di smaltimento.
Esempi di simboliper le batterie
Simbolo peril prodotto
La condensaSe questa unità viene improvvisamente portata da un luogo freddo ad uno caldo (ad esempio d’inverno) o se la temperatura ambiente aumenta rapidamente a causa di caloriferi o altro, all’interno di questa unità (parti mobili e le lenti) potrebbe formarsi condensa (gocce d’acqua). Se della condensa si forma, questa unità non funziona bene e la riproduzione non è possibile. Lasciare riposare questa unità accesa a temperatura ambiente per 1 o 2 ore (il tempo richiesto dipende dalla quantità di condensa). La condensa evaporerà e la riproduzione ritornerà possibile. La condensa può anche formarsi d’estate se questa unità viene investita dall’aria di un climatizzatore. In tal caso, spostare l’unità in un luogo differente.
Avvertenza sulle onde radioSolo X-EM26Questa unità usa frequenze radio da 2,4 GHz di frequenza, una banda usata anche da altri sistemi wireless (ad esempio forni a microonde e telefoni senza fili).Se sullo schermo del televisore appare del rumore, è possibile che questa unità (o unità da essa supportate) stia causando interferenze con i segnali provenienti dal connettore di ingresso dell’antenna del televisore, apparecchio video, sintonizzatore satellitare, ecc.In tal caso, aumentare la distanza fra il connettore di ingresso dell’antenna e questa unità (compresi i prodotti da essa supportati).• Pioneer non è responsabile di malfunzionamenti del
prodotto Pioneer compatibile dovuti ad errori / malfunzionamenti associati alla propria connessione di rete e / o alle attrezzature cui si è collegati. Entrare in contatto con il proprio provider Internet o fabbricante di prodotti per rete.
• Per poter usare Internet è anche necessario avere un contratto con un Internet service provider (ISP).
SN29402702_X-EM16_26_It.book 3 ページ 2016年8月6日 土曜日 午後1時10分
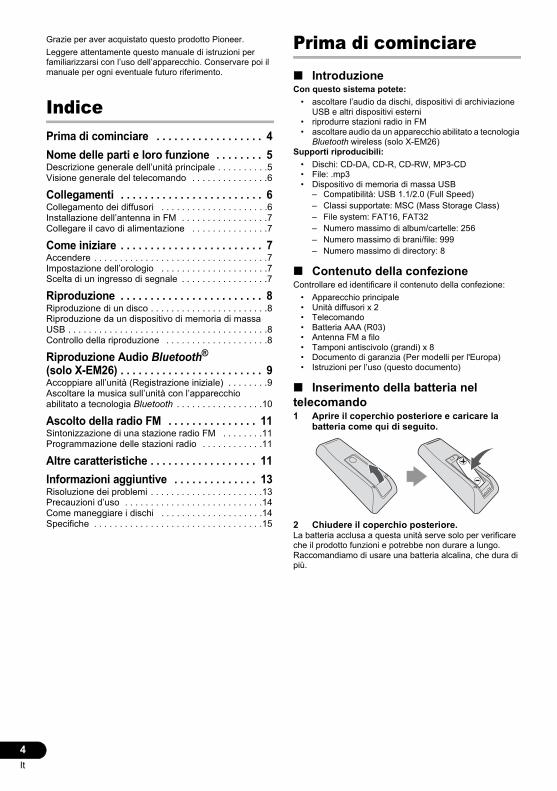
4It
Grazie per aver acquistato questo prodotto Pioneer.Leggere attentamente questo manuale di istruzioni per familiarizzarsi con l’uso dell’apparecchio. Conservare poi il manuale per ogni eventuale futuro riferimento.
IndicePrima di cominciare . . . . . . . . . . . . . . . . . . 4Nome delle parti e loro funzione . . . . . . . . 5Descrizione generale dell’unità principale . . . . . . . . . .5Visione generale del telecomando . . . . . . . . . . . . . . .6
Collegamenti . . . . . . . . . . . . . . . . . . . . . . . . 6Collegamento dei diffusori . . . . . . . . . . . . . . . . . . . . .6Installazione dell’antenna in FM . . . . . . . . . . . . . . . . .7Collegare il cavo di alimentazione . . . . . . . . . . . . . . .7
Come iniziare . . . . . . . . . . . . . . . . . . . . . . . . 7Accendere . . . . . . . . . . . . . . . . . . . . . . . . . . . . . . . . . .7Impostazione dell’orologio . . . . . . . . . . . . . . . . . . . . .7Scelta di un ingresso di segnale . . . . . . . . . . . . . . . . .7
Riproduzione . . . . . . . . . . . . . . . . . . . . . . . . 8Riproduzione di un disco . . . . . . . . . . . . . . . . . . . . . . .8Riproduzione da un dispositivo di memoria di massa USB . . . . . . . . . . . . . . . . . . . . . . . . . . . . . . . . . . . . . . .8Controllo della riproduzione . . . . . . . . . . . . . . . . . . . .8
Riproduzione Audio Bluetooth® (solo X-EM26) . . . . . . . . . . . . . . . . . . . . . . . . 9Accoppiare all’unità (Registrazione iniziale) . . . . . . . .9Ascoltare la musica sull’unità con l’apparecchio abilitato a tecnologia Bluetooth . . . . . . . . . . . . . . . . .10
Ascolto della radio FM . . . . . . . . . . . . . . . 11Sintonizzazione di una stazione radio FM . . . . . . . .11Programmazione delle stazioni radio . . . . . . . . . . . .11
Altre caratteristiche . . . . . . . . . . . . . . . . . . 11Informazioni aggiuntive . . . . . . . . . . . . . . 13Risoluzione dei problemi . . . . . . . . . . . . . . . . . . . . . .13Precauzioni d’uso . . . . . . . . . . . . . . . . . . . . . . . . . . .14Come maneggiare i dischi . . . . . . . . . . . . . . . . . . . .14Specifiche . . . . . . . . . . . . . . . . . . . . . . . . . . . . . . . . .15
Prima di cominciare∫ IntroduzioneCon questo sistema potete:
• ascoltare l’audio da dischi, dispositivi di archiviazione USB e altri dispositivi esterni
• riprodurre stazioni radio in FM• ascoltare audio da un apparecchio abilitato a tecnologia
Bluetooth wireless (solo X-EM26)Supporti riproducibili:
• Dischi: CD-DA, CD-R, CD-RW, MP3-CD• File: .mp3• Dispositivo di memoria di massa USB
– Compatibilità: USB 1.1/2.0 (Full Speed)– Classi supportate: MSC (Mass Storage Class)– File system: FAT16, FAT32– Numero massimo di album/cartelle: 256– Numero massimo di brani/file: 999– Numero massimo di directory: 8
∫ Contenuto della confezioneControllare ed identificare il contenuto della confezione:
• Apparecchio principale• Unità diffusori x 2• Telecomando• Batteria AAA (R03)• Antenna FM a filo• Tamponi antiscivolo (grandi) x 8• Documento di garanzia (Per modelli per l'Europa)• Istruzioni per l’uso (questo documento)
∫ Inserimento della batteria nel telecomando1 Aprire il coperchio posteriore e caricare la
batteria come qui di seguito.
2 Chiudere il coperchio posteriore.La batteria acclusa a questa unità serve solo per verificare che il prodotto funzioni e potrebbe non durare a lungo. Raccomandiamo di usare una batteria alcalina, che dura di più.
SN29402702_X-EM16_26_It.book 4 ページ 2016年8月6日 土曜日 午後1時10分
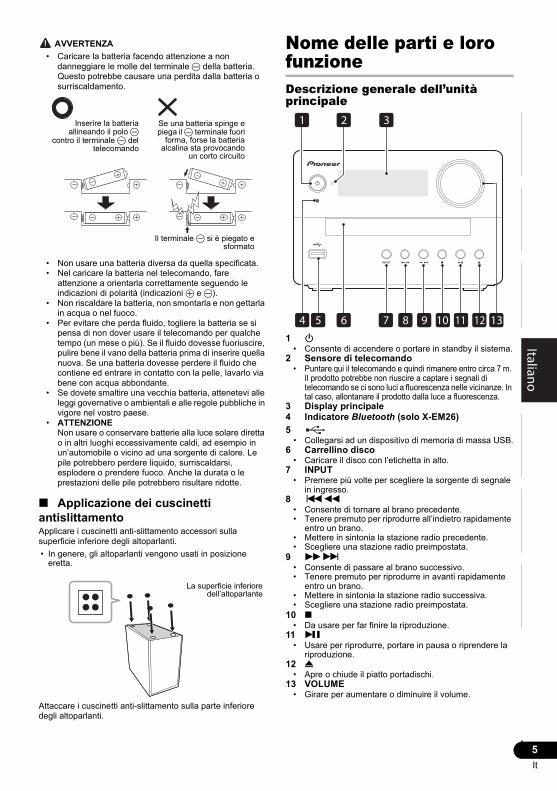
5It
EnglishFrançais
EspañolDeutsch
ItalianoNederlands
Pyccкий AVVERTENZA
• Caricare la batteria facendo attenzione a non danneggiare le molle del terminale - della batteria. Questo potrebbe causare una perdita dalla batteria o surriscaldamento.
• Non usare una batteria diversa da quella specificata.• Nel caricare la batteria nel telecomando, fare
attenzione a orientarla correttamente seguendo le indicazioni di polarità (indicazioni + e -).
• Non riscaldare la batteria, non smontarla e non gettarla in acqua o nel fuoco.
• Per evitare che perda fluido, togliere la batteria se si pensa di non dover usare il telecomando per qualche tempo (un mese o più). Se il fluido dovesse fuoriuscire, pulire bene il vano della batteria prima di inserire quella nuova. Se una batteria dovesse perdere il fluido che contiene ed entrare in contatto con la pelle, lavarlo via bene con acqua abbondante.
• Se dovete smaltire una vecchia batteria, attenetevi alle leggi governative o ambientali e alle regole pubbliche in vigore nel vostro paese.
• ATTENZIONENon usare o conservare batterie alla luce solare diretta o in altri luoghi eccessivamente caldi, ad esempio in un’automobile o vicino ad una sorgente di calore. Le pile potrebbero perdere liquido, surriscaldarsi, esplodere o prendere fuoco. Anche la durata o le prestazioni delle pile potrebbero risultare ridotte.
∫ Applicazione dei cuscinetti antislittamentoApplicare i cuscinetti anti-slittamento accessori sulla superficie inferiore degli altoparlanti.• In genere, gli altoparlanti vengono usati in posizione
eretta.
Attaccare i cuscinetti anti-slittamento sulla parte inferiore degli altoparlanti.
Nome delle parti e loro funzioneDescrizione generale dell’unità principale
1 Í• Consente di accendere o portare in standby il sistema.
2 Sensore di telecomando• Puntare qui il telecomando e quindi rimanere entro circa 7 m.
Il prodotto potrebbe non riuscire a captare i segnali di telecomando se ci sono luci a fluorescenza nelle vicinanze. In tal caso, allontanare il prodotto dalla luce a fluorescenza.
3 Display principale4 Indicatore Bluetooth (solo X-EM26)5
• Collegarsi ad un dispositivo di memoria di massa USB.6 Carrellino disco
• Caricare il disco con l’etichetta in alto.7 INPUT
• Premere più volte per scegliere la sorgente di segnale in ingresso.
8 :6• Consente di tornare al brano precedente.• Tenere premuto per riprodurre all’indietro rapidamente
entro un brano.• Mettere in sintonia la stazione radio precedente.• Scegliere una stazione radio preimpostata.
9 59• Consente di passare al brano successivo.• Tenere premuto per riprodurre in avanti rapidamente
entro un brano.• Mettere in sintonia la stazione radio successiva.• Scegliere una stazione radio preimpostata.
10 ∫• Da usare per far finire la riproduzione.
11 I• Usare per riprodurre, portare in pausa o riprendere la
riproduzione.12 <
• Apre o chiude il piatto portadischi.13 VOLUME
• Girare per aumentare o diminuire il volume.
Inserire la batteriaallineando il polo -
contro il terminale - deltelecomando
Se una batteria spinge epiega il - terminale fuori
forma, forse la batteriaalcalina sta provocando
un corto circuito
Il terminale - si è piegato esformato
La superficie inferioredell’altoparlante
21
137 8 9 1211
3
4 5 6 10
SN29402702_X-EM16_26_It.book 5 ページ 2016年8月6日 土曜日 午後1時10分
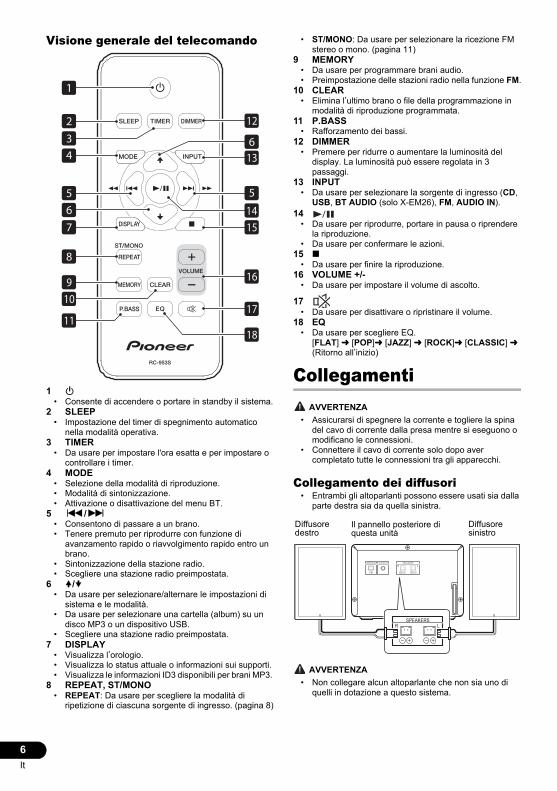
6It
Visione generale del telecomando
1 Í• Consente di accendere o portare in standby il sistema.
2 SLEEP• Impostazione del timer di spegnimento automatico
nella modalità operativa.3 TIMER
• Da usare per impostare l'ora esatta e per impostare o controllare i timer.
4 MODE• Selezione della modalità di riproduzione.• Modalità di sintonizzazione.• Attivazione o disattivazione del menu BT.
5 :/9• Consentono di passare a un brano.• Tenere premuto per riprodurre con funzione di
avanzamento rapido o riavvolgimento rapido entro un brano.
• Sintonizzazione della stazione radio.• Scegliere una stazione radio preimpostata.
6 /• Da usare per selezionare/alternare le impostazioni di
sistema e le modalità.• Da usare per selezionare una cartella (album) su un
disco MP3 o un dispositivo USB.• Scegliere una stazione radio preimpostata.
7 DISPLAY• Visualizza l’orologio.• Visualizza lo status attuale o informazioni sui supporti.• Visualizza le informazioni ID3 disponibili per brani MP3.
8 REPEAT, ST/MONO• REPEAT: Da usare per scegliere la modalità di
ripetizione di ciascuna sorgente di ingresso. (pagina 8)
• ST/MONO: Da usare per selezionare la ricezione FM stereo o mono. (pagina 11)
9 MEMORY• Da usare per programmare brani audio.• Preimpostazione delle stazioni radio nella funzione FM.
10 CLEAR• Elimina l’ultimo brano o file della programmazione in
modalità di riproduzione programmata.11 P.BASS
• Rafforzamento dei bassi.12 DIMMER
• Premere per ridurre o aumentare la luminosità del display. La luminosità può essere regolata in 3 passaggi.
13 INPUT• Da usare per selezionare la sorgente di ingresso (CD,
USB, BT AUDIO (solo X-EM26), FM, AUDIO IN).14
• Da usare per riprodurre, portare in pausa o riprendere la riproduzione.
• Da usare per confermare le azioni.15 ∫
• Da usare per finire la riproduzione.16 VOLUME +/-
• Da usare per impostare il volume di ascolto.
17• Da usare per disattivare o ripristinare il volume.
18 EQ• Da usare per scegliere EQ.
[FLAT] l [POP]l [JAZZ] l [ROCK]l [CLASSIC] l (Ritorno all’inizio)
Collegamenti AVVERTENZA
• Assicurarsi di spegnere la corrente e togliere la spina del cavo di corrente dalla presa mentre si eseguono o modificano le connessioni.
• Connettere il cavo di corrente solo dopo aver completato tutte le connessioni tra gli apparecchi.
Collegamento dei diffusori• Entrambi gli altoparlanti possono essere usati sia dalla
parte destra sia da quella sinistra.
AVVERTENZA• Non collegare alcun altoparlante che non sia uno di
quelli in dotazione a questo sistema.
17
16
1
2
4
5
11
10
6
9
5
12
1514
18
6
7
8
13
3
AUDIO INANTENNA SPEAKERSR
FM
L
SPEAKERSR L
Diffusore destro
Diffusore sinistro
Il pannello posteriore di questa unità
SN29402702_X-EM16_26_It.book 6 ページ 2016年8月6日 土曜日 午後1時10分
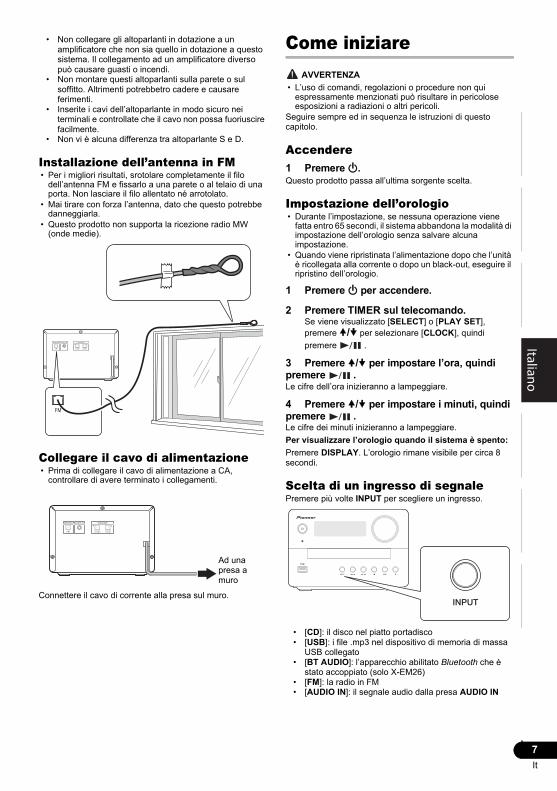
7It
EnglishFrançais
EspañolDeutsch
ItalianoNederlands
Pyccкий• Non collegare gli altoparlanti in dotazione a un
amplificatore che non sia quello in dotazione a questo sistema. Il collegamento ad un amplificatore diverso può causare guasti o incendi.
• Non montare questi altoparlanti sulla parete o sul soffitto. Altrimenti potrebbetro cadere e causare ferimenti.
• Inserite i cavi dell’altoparlante in modo sicuro nei terminali e controllate che il cavo non possa fuoriuscire facilmente.
• Non vi è alcuna differenza tra altoparlante S e D.
Installazione dell’antenna in FM• Per i migliori risultati, srotolare completamente il filo
dell’antenna FM e fissarlo a una parete o al telaio di una porta. Non lasciare il filo allentato né arrotolato.
• Mai tirare con forza l’antenna, dato che questo potrebbe danneggiarla.
• Questo prodotto non supporta la ricezione radio MW (onde medie).
Collegare il cavo di alimentazione• Prima di collegare il cavo di alimentazione a CA,
controllare di avere terminato i collegamenti.
Connettere il cavo di corrente alla presa sul muro.
Come iniziare AVVERTENZA
• L’uso di comandi, regolazioni o procedure non qui espressamente menzionati può risultare in pericolose esposizioni a radiazioni o altri pericoli.
Seguire sempre ed in sequenza le istruzioni di questo capitolo.
Accendere1 Premere Í.Questo prodotto passa all’ultima sorgente scelta.
Impostazione dell’orologio• Durante l’impostazione, se nessuna operazione viene
fatta entro 65 secondi, il sistema abbandona la modalità di impostazione dell’orologio senza salvare alcuna impostazione.
• Quando viene ripristinata l’alimentazione dopo che l’unità è ricollegata alla corrente o dopo un black-out, eseguire il ripristino dell’orologio.
1 Premere Í per accendere.
2 Premere TIMER sul telecomando.Se viene visualizzato [SELECT] o [PLAY SET], premere / per selezionare [CLOCK], quindi premere .
3 Premere / per impostare l’ora, quindi premere .Le cifre dell’ora inizieranno a lampeggiare.
4 Premere / per impostare i minuti, quindi premere .Le cifre dei minuti inizieranno a lampeggiare.Per visualizzare l’orologio quando il sistema è spento:Premere DISPLAY. L’orologio rimane visibile per circa 8 secondi.
Scelta di un ingresso di segnalePremere più volte INPUT per scegliere un ingresso.
• [CD]: il disco nel piatto portadisco• [USB]: i file .mp3 nel dispositivo di memoria di massa
USB collegato• [BT AUDIO]: l’apparecchio abilitato Bluetooth che è
stato accoppiato (solo X-EM26)• [FM]: la radio in FM• [AUDIO IN]: il segnale audio dalla presa AUDIO IN
AUDIO INANTENNA SPEAKERSR
FM
L
FM
AUDIO INANTENNA SPEAKERSR
FM
L
Ad una presa a muro
SN29402702_X-EM16_26_It.book 7 ページ 2016年8月6日 土曜日 午後1時10分
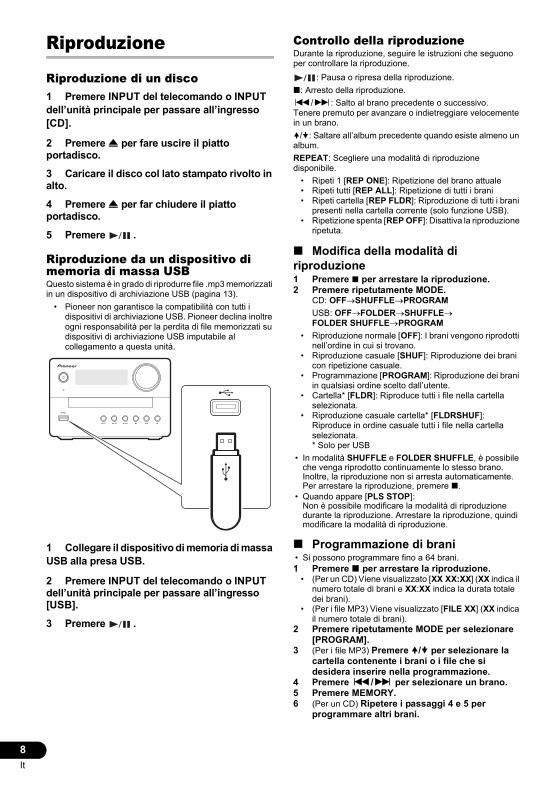
8It
Riproduzione
Riproduzione di un disco1 Premere INPUT del telecomando o INPUT dell’unità principale per passare all’ingresso [CD].
2 Premere < per fare uscire il piatto portadisco.3 Caricare il disco col lato stampato rivolto in alto.4 Premere < per far chiudere il piatto portadisco.5 Premere .
Riproduzione da un dispositivo di memoria di massa USBQuesto sistema è in grado di riprodurre file .mp3 memorizzati in un dispositivo di archiviazione USB (pagina 13).
• Pioneer non garantisce la compatibilità con tutti i dispositivi di archiviazione USB. Pioneer declina inoltre ogni responsabilità per la perdita di file memorizzati su dispositivi di archiviazione USB imputabile al collegamento a questa unità.
1 Collegare il dispositivo di memoria di massa USB alla presa USB.
2 Premere INPUT del telecomando o INPUT dell’unità principale per passare all’ingresso [USB].3 Premere .
Controllo della riproduzioneDurante la riproduzione, seguire le istruzioni che seguono per controllare la riproduzione.
: Pausa o ripresa della riproduzione.∫: Arresto della riproduzione.:/9: Salto al brano precedente o successivo.Tenere premuto per avanzare o indietreggiare velocemente in un brano./: Saltare all’album precedente quando esiste almeno un album.REPEAT: Scegliere una modalità di riproduzione disponibile.
• Ripeti 1 [REP ONE]: Ripetizione del brano attuale• Ripeti tutti [REP ALL]: Ripetizione di tutti i brani• Ripeti cartella [REP FLDR]: Riproduzione di tutti i brani
presenti nella cartella corrente (solo funzione USB).• Ripetizione spenta [REP OFF]: Disattiva la riproduzione
ripetuta.
∫ Modifica della modalità di riproduzione1 Premere ∫ per arrestare la riproduzione.2 Premere ripetutamente MODE.
CD: OFFSHUFFLEPROGRAMUSB: OFFFOLDERSHUFFLEFOLDER SHUFFLEPROGRAM
• Riproduzione normale [OFF]: I brani vengono riprodotti nell’ordine in cui si trovano.
• Riproduzione casuale [SHUF]: Riproduzione dei brani con ripetizione casuale.
• Programmazione [PROGRAM]: Riproduzione dei brani in qualsiasi ordine scelto dall’utente.
• Cartella* [FLDR]: Riproduce tutti i file nella cartella selezionata.
• Riproduzione casuale cartella* [FLDRSHUF]: Riproduce in ordine casuale tutti i file nella cartella selezionata. * Solo per USB
• In modalità SHUFFLE e FOLDER SHUFFLE, è possibile che venga riprodotto continuamente lo stesso brano. Inoltre, la riproduzione non si arresta automaticamente. Per arrestare la riproduzione, premere ∫.
• Quando appare [PLS STOP]:Non è possibile modificare la modalità di riproduzione durante la riproduzione. Arrestare la riproduzione, quindi modificare la modalità di riproduzione.
∫ Programmazione di brani• Si possono programmare fino a 64 brani.1 Premere ∫ per arrestare la riproduzione.
• (Per un CD) Viene visualizzato [XX XX:XX] (XX indica il numero totale di brani e XX:XX indica la durata totale dei brani).
• (Per i file MP3) Viene visualizzato [FILE XX] (XX indica il numero totale di brani).
2 Premere ripetutamente MODE per selezionare [PROGRAM].
3 (Per i file MP3) Premere / per selezionare la cartella contenente i brani o i file che si desidera inserire nella programmazione.
4 Premere :/9 per selezionare un brano.5 Premere MEMORY.6 (Per un CD) Ripetere i passaggi 4 e 5 per
programmare altri brani.
SN29402702_X-EM16_26_It.book 8 ページ 2016年8月6日 土曜日 午後1時10分

9It
EnglishFrançais
EspañolDeutsch
ItalianoNederlands
Pyccкий(Per i file MP3) Ripetere i passaggi 3 - 5 per programmare altri brani.
7 Premere per avviare la riproduzione.
∫ Cancellazione della programmazionePer annullare una programmazione di riproduzione
• Premere ripetutamente MODE per selezionare [OFF].Per cancellare la programmazione
• In modalità [PROGRAM], premere ∫ per arrestare, quindi premere CLEAR. Ad ogni pressione di questo tasto, l’ultimo brano o file programmato viene eliminato. Quando tutti i brani o file programmati sono stati eliminati, compare [NO STEP].
Riproduzione Audio Bluetooth® (solo X-EM26)
∫ Riproduzione con tecnologia wireless Bluetooth
L’unità è in grado di riprodurre la musica salvata sugli apparecchi wireless abilitati a tecnologia Bluetooth (telefono cellulare, lettori musica digitale ecc.). Si può usare un trasmettitore audio Bluetooth (venduto separatamente) per ascoltare musica da apparecchi che non hanno la funzionalità Bluetooth. Per maggiori informazioni, riferirsi al manuale di istruzioni dell’apparecchio abilitato a tecnologia Bluetooth.
• Il marchio nominale e il logo Bluetooth® sono marchi registrati di proprietà di Bluetooth SIG, Inc.
• I dispositivi dotati di tecnologia wireless Bluetooth devono supportare i profili A2DP.
• La connessione non è sempre garantita con tutti i dispositivi abilitati Bluetooth.
∫ Funzionamento del telecomandoIl telecomando in dotazione con questa unità consente il funzionamento dei dispositivi abilitati per la tecnologia wireless Bluetooth.
• I dispositivi dotati di tecnologia wireless Bluetooth devono supportare i profili AVRCP.
• Le operazioni del telecomando non possono essere garantite per tutti i dispositivi dotati di tecnologia wireless Bluetooth.
Accoppiare all’unità (Registrazione iniziale)Per riprodurre musica salvata su un apparecchio abilitato a tecnologia Bluetooth, bisogna innanzitutto eseguire l’accoppiamento. L’accoppiamento deve essere eseguito quando si usa per la prima volta l’apparecchio abilitato a tecnologia Bluetooth o quando i dati di accoppiamento sull’apparecchio sono stati cancellati per un qualsiasi motivo.L’accoppiamento è un passaggio richiesto per permettere che la comunicazione tramite tecnologia wireless Bluetooth venga attivata.
• L’accoppiamento viene eseguito solo la prima volta che si usano insieme l’unità e l’apparecchio abilitato a tecnologia Bluetooth.
• Per permettere la comunicazione tramite tecnologia Bluetooth wireless di attivarsi, l’accoppiamento deve essere eseguito sia sull’unità che sull’apparecchio abilitato a tecnologia Bluetooth.
1 Premere INPUT del telecomando o INPUT dell’unità principale per passare all’ingresso [BT AUDIO].L’indicatore Bluetooth lampeggia.Se nel sistema non sono presenti informazioni di abbinamento, ad esempio quando si utilizza un dispositivo Bluetooth per la prima volta dopo l’acquisto del sistema, il sistema passa automaticamente alla modalità di abbinamento.
2 Premere MODE sul telecomando.(Per l’utilizzo con questa unità)Tenere premuto INPUT fino a quando l’indicatore Bluetooth inizia a lampeggiare velocemente.
• Questa unità passa alla modalità abbinamento e l’indicatore Bluetooth inizia a lampeggiare velocemente. (Procedere al passaggio 4)
3 Premere / per selezionare [PAIRING], e quindi premere .
• Questa unità passa alla modalità abbinamento e l’indicatore Bluetooth lampeggia velocemente.
4 Accendere la corrente dell’apparecchio abilitato a tecnologia Bluetooth con il quale si desidera eseguire l’accoppiamento ed effettuare la procedura di accoppiamento su di esso.
• Questa unità sarà visualizzata come “Pioneer X-EM26” su tutti gli apparecchi abilitati a tecnologia Bluetooth che possedete.
L’accoppiamento si avvierà.
Dati musicali
Dispositivo non dotato di tecnologiawireless Bluetooth: Lettore di musica
digitale+
Trasmettitore audio Bluetooth®
(da acquistare separatamente)
Dispositivo con tecnologia wirelessBluetooth: Lettore di musica digitale
Dispositivo con tecnologia wirelessBluetooth: Telefono cellulare
SN29402702_X-EM16_26_It.book 9 ページ 2016年8月6日 土曜日 午後1時10分
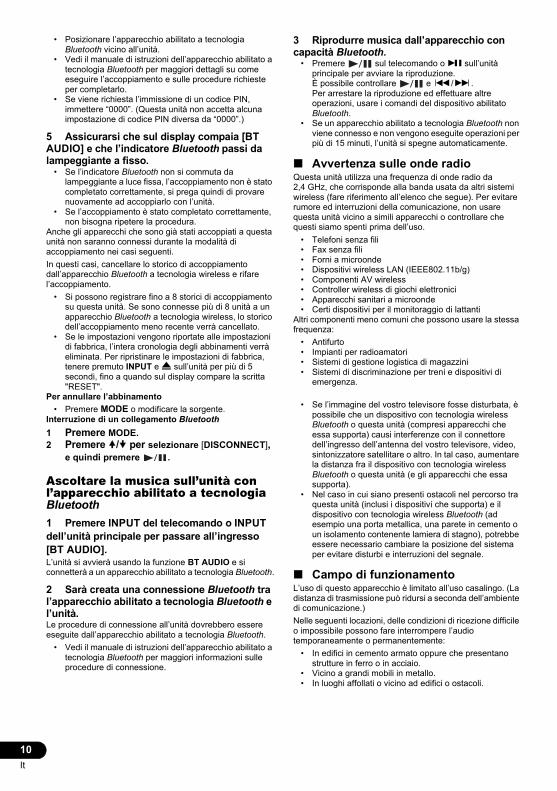
10It
• Posizionare l’apparecchio abilitato a tecnologia Bluetooth vicino all’unità.
• Vedi il manuale di istruzioni dell’apparecchio abilitato a tecnologia Bluetooth per maggiori dettagli su come eseguire l’accoppiamento e sulle procedure richieste per completarlo.
• Se viene richiesta l’immissione di un codice PIN, immettere “0000”. (Questa unità non accetta alcuna impostazione di codice PIN diversa da “0000”.)
5 Assicurarsi che sul display compaia [BT AUDIO] e che l’indicatore Bluetooth passi da lampeggiante a fisso.
• Se l’indicatore Bluetooth non si commuta da lampeggiante a luce fissa, l’accoppiamento non è stato completato correttamente, si prega quindi di provare nuovamente ad accoppiarlo con l’unità.
• Se l’accoppiamento è stato completato correttamente, non bisogna ripetere la procedura.
Anche gli apparecchi che sono già stati accoppiati a questa unità non saranno connessi durante la modalità di accoppiamento nei casi seguenti.In questi casi, cancellare lo storico di accoppiamento dall’apparecchio Bluetooth a tecnologia wireless e rifare l’accoppiamento.
• Si possono registrare fino a 8 storici di accoppiamento su questa unità. Se sono connesse più di 8 unità a un apparecchio Bluetooth a tecnologia wireless, lo storico dell’accoppiamento meno recente verrà cancellato.
• Se le impostazioni vengono riportate alle impostazioni di fabbrica, l’intera cronologia degli abbinamenti verrà eliminata. Per ripristinare le impostazioni di fabbrica, tenere premuto INPUT e < sull’unità per più di 5 secondi, fino a quando sul display compare la scritta "RESET".
Per annullare l’abbinamento• Premere MODE o modificare la sorgente.
Interruzione di un collegamento Bluetooth1 Premere MODE.2 Premere / per selezionare [DISCONNECT],
e quindi premere .
Ascoltare la musica sull’unità con l’apparecchio abilitato a tecnologia Bluetooth1 Premere INPUT del telecomando o INPUT dell’unità principale per passare all’ingresso [BT AUDIO].L’unità si avvierà usando la funzione BT AUDIO e si connetterà a un apparecchio abilitato a tecnologia Bluetooth.
2 Sarà creata una connessione Bluetooth tra l’apparecchio abilitato a tecnologia Bluetooth e l’unità.Le procedure di connessione all’unità dovrebbero essere eseguite dall’apparecchio abilitato a tecnologia Bluetooth.
• Vedi il manuale di istruzioni dell’apparecchio abilitato a tecnologia Bluetooth per maggiori informazioni sulle procedure di connessione.
3 Riprodurre musica dall’apparecchio con capacità Bluetooth.
• Premere sul telecomando o I sull’unità principale per avviare la riproduzione.È possibile controllare e :/9.Per arrestare la riproduzione ed effettuare altre operazioni, usare i comandi del dispositivo abilitato Bluetooth.
• Se un apparecchio abilitato a tecnologia Bluetooth non viene connesso e non vengono eseguite operazioni per più di 15 minuti, l’unità si spegne automaticamente.
∫ Avvertenza sulle onde radioQuesta unità utilizza una frequenza di onde radio da 2,4 GHz, che corrisponde alla banda usata da altri sistemi wireless (fare riferimento all’elenco che segue). Per evitare rumore ed interruzioni della comunicazione, non usare questa unità vicino a simili apparecchi o controllare che questi siamo spenti prima dell’uso.
• Telefoni senza fili• Fax senza fili• Forni a microonde• Dispositivi wireless LAN (IEEE802.11b/g)• Componenti AV wireless• Controller wireless di giochi elettronici• Apparecchi sanitari a microonde• Certi dispositivi per il monitoraggio di lattanti
Altri componenti meno comuni che possono usare la stessa frequenza:
• Antifurto• Impianti per radioamatori• Sistemi di gestione logistica di magazzini• Sistemi di discriminazione per treni e dispositivi di
emergenza.
• Se l’immagine del vostro televisore fosse disturbata, è possibile che un dispositivo con tecnologia wireless Bluetooth o questa unità (compresi apparecchi che essa supporta) causi interferenze con il connettore dell’ingresso dell’antenna del vostro televisore, video, sintonizzatore satellitare o altro. In tal caso, aumentare la distanza fra il dispositivo con tecnologia wireless Bluetooth o questa unità (e gli apparecchi che essa supporta).
• Nel caso in cui siano presenti ostacoli nel percorso tra questa unità (inclusi i dispositivi che supporta) e il dispositivo con tecnologia wireless Bluetooth (ad esempio una porta metallica, una parete in cemento o un isolamento contenente lamiera di stagno), potrebbe essere necessario cambiare la posizione del sistema per evitare disturbi e interruzioni del segnale.
∫ Campo di funzionamentoL’uso di questo apparecchio è limitato all’uso casalingo. (La distanza di trasmissione può ridursi a seconda dell’ambiente di comunicazione.)Nelle seguenti locazioni, delle condizioni di ricezione difficile o impossibile possono fare interrompere l’audio temporaneamente o permanentemente:
• In edifici in cemento armato oppure che presentano strutture in ferro o in acciaio.
• Vicino a grandi mobili in metallo.• In luoghi affollati o vicino ad edifici o ostacoli.
SN29402702_X-EM16_26_It.book 10 ページ 2016年8月6日 土曜日 午後1時10分

11It
EnglishFrançais
EspañolDeutsch
ItalianoNederlands
Pyccкий• In un luogo esposto a campi magnetici, elettricità statica
o interferenze radio provenienti da apparecchiature radio che utilizzano la stessa banda di frequenze (2,4 GHz) di questa unità, ad esempio un dispositivo wireless LAN da 2,4 GHz (IEEE802.11b/g) o un forno a microonde.
• Chi vive in aree densamente popolate (appartamenti, caseggiati, ecc.) può subire interferenze causate dal forno a microonde del vicino. Se questo accade, spostare questa unità. Se il forno a microonde non è in uso, non ci saranno interferenze.
∫ Onde radio riflesseLe onde radio ricevute da questa unità comprendono l’onda radio che proviene direttamente dal dispositivo dotato di tecnologia wireless Bluetooth (onda diretta) e le onde che provengono da varie direzioni e riflesse da pareti, mobili ed edifici (onde riflesse). Le onde riflesse (da ostacoli o oggetti riflettenti) producono altre onde riflesse e variazioni nelle condizioni di ricezione a seconda della posizione. Nel caso in cui la ricezione audio risulti inappropriata a causa di questo fenomeno, tentare di modificare leggermente la posizione del dispositivo dotato di tecnologia wireless Bluetooth. Si noti inoltre che l’audio potrebbe essere interrotto anche a causa delle onde riflesse a causa del passaggio di una persona nello spazio tra questa unità e il dispositivo dotato di tecnologia wireless Bluetooth.
∫ Precauzioni riguardanti i collegamenti fra prodotti supportati da questa unità
• Prima di collegarli a questa unità, completare i collegamenti, compresi i cavi audio e di alimentazione, di tutti i dispositivi da essa supportati.
• Completati i collegamenti di questa unità, controllare che i cavi audio e di alimentazione non siano attorcigliati l’uno all’altro.
• Prima di scollegare questa unità, controllare di avere spazio sufficiente per lavorare.
• Prima di cambiare i collegamenti audio o di altri cavi di prodotto supportati da questa unità, controllare di avere spazio sufficiente per il lavoro.
Ascolto della radio FM
Sintonizzazione di una stazione radio FM• Assicurarsi che l’antenna FM sia collegata e
completamente estesa.
∫ Sintonizzazione manuale1 Premere ripetutamente INPUT sul telecomando
o INPUT sull’unità principale per cambiare la sorgente in FM.
2 Premere MODE ripetutamente per selezionare [MANUAL].
3 Premere :/9 sul telecomando per sintonizzare la stazione desiderata.
∫ Sintonizzazione automatica1 Premere ripetutamente INPUT sul telecomando
o INPUT sull’unità principale per cambiare la sorgente in FM.
2 Premere MODE ripetutamente per selezionare [AUTO].
3 Premere :/9.La scansione verrà avviata automaticamente e il sintonizzatore si fermerà sulla prima stazione radio ricevibile.
(Solo per il modello europeo) Quando si sintonizza una stazione FM che fornisce servizi RDS, il nome del servizio viene visualizzato sul display.
Programmazione delle stazioni radio• È possibile programmare fino a 20 stazioni radio
preimpostate.• Per sovrascrivere una stazione radio programmata,
memorizzarne un’altra con lo stesso numero di sequenza.1 Sintonizzare una stazione radio.2 Premere MEMORY.3 Premere ripetutamente :/9 (/) per
selezionare un numero preimpostato, quindi premere .
Sul display compare la scritta "COMPLETE" e la stazione radio viene registrata con il numero preimpostato.4 Ripetere i passaggi da 1 a 3 per programmare
altre stazioni.
∫ Sintonizzazione di una stazione radio preimpostata1 Premere ripetutamente INPUT sul telecomando
o INPUT sull’unità principale per cambiare la sorgente in FM.
2 Premere MODE ripetutamente per selezionare [PRESET].
3 Premere / per selezionare il numero preimpostato desiderato.
Se la ricezione di una trasmissione FM stereo è disturbata, premere ripetutamente ST/MONO per selezionare [MONO] e passare alla ricezione mono. Ciò consente di ridurre il rumore.
Altre caratteristiche∫ Modalità standby automatica
• Se rimane inattivo per 15 minuti, questo sistema passa automaticamente alla modalità standby.
Tenere premuto Í sul telecomando o sull’unità principale.Sul display principale viene visualizzato "AUTO STANDBY ON" o "AUTO STANDBY OFF", quindi il sistema cambia impostazione.Nei casi seguenti, il sistema potrebbe non accedere automaticamente alla modalità standby:
• Durante l’utilizzo della funzione del sintonizzatore• Quando viene rilevato un segnale audio• Durante la riproduzione di brani o file audio• Durante l’utilizzo del timer di riproduzione o del timer di
spegnimento automaticoIl sistema resetta il conto alla rovescia dei 15 minuti per l’accesso alla modalità standby nei seguenti casi:
• Quando viene collegato un dispositivo USB con la funzione USB
SN29402702_X-EM16_26_It.book 11 ページ 2016年8月6日 土曜日 午後1時10分
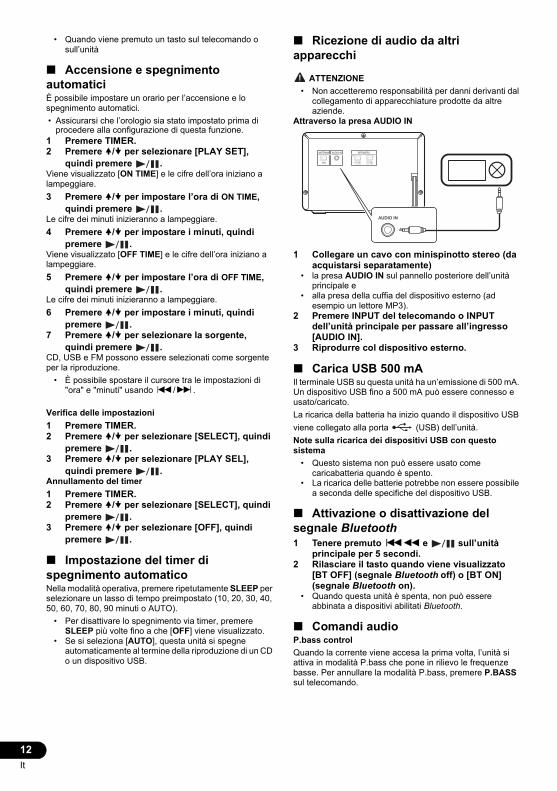
12It
• Quando viene premuto un tasto sul telecomando o sull’unità
∫ Accensione e spegnimento automaticiÈ possibile impostare un orario per l’accensione e lo spegnimento automatici.• Assicurarsi che l’orologio sia stato impostato prima di
procedere alla configurazione di questa funzione.1 Premere TIMER.2 Premere / per selezionare [PLAY SET],
quindi premere .Viene visualizzato [ON TIME] e le cifre dell’ora iniziano a lampeggiare.3 Premere / per impostare l’ora di ON TIME,
quindi premere .Le cifre dei minuti inizieranno a lampeggiare.4 Premere / per impostare i minuti, quindi
premere .Viene visualizzato [OFF TIME] e le cifre dell’ora iniziano a lampeggiare.5 Premere / per impostare l’ora di OFF TIME,
quindi premere .Le cifre dei minuti inizieranno a lampeggiare.6 Premere / per impostare i minuti, quindi
premere .7 Premere / per selezionare la sorgente,
quindi premere .CD, USB e FM possono essere selezionati come sorgente per la riproduzione.
• È possibile spostare il cursore tra le impostazioni di "ora" e "minuti" usando :/9.
Verifica delle impostazioni1 Premere TIMER.2 Premere / per selezionare [SELECT], quindi
premere .3 Premere / per selezionare [PLAY SEL],
quindi premere .Annullamento del timer1 Premere TIMER.2 Premere / per selezionare [SELECT], quindi
premere .3 Premere / per selezionare [OFF], quindi
premere .
∫ Impostazione del timer di spegnimento automaticoNella modalità operativa, premere ripetutamente SLEEP per selezionare un lasso di tempo preimpostato (10, 20, 30, 40, 50, 60, 70, 80, 90 minuti o AUTO).
• Per disattivare lo spegnimento via timer, premere SLEEP più volte fino a che [OFF] viene visualizzato.
• Se si seleziona [AUTO], questa unità si spegne automaticamente al termine della riproduzione di un CD o un dispositivo USB.
∫ Ricezione di audio da altri apparecchi
ATTENZIONE• Non accetteremo responsabilità per danni derivanti dal
collegamento di apparecchiature prodotte da altre aziende.
Attraverso la presa AUDIO IN
1 Collegare un cavo con minispinotto stereo (da acquistarsi separatamente)
• la presa AUDIO IN sul pannello posteriore dell’unità principale e
• alla presa della cuffia del dispositivo esterno (ad esempio un lettore MP3).
2 Premere INPUT del telecomando o INPUT dell’unità principale per passare all’ingresso [AUDIO IN].
3 Riprodurre col dispositivo esterno.
∫ Carica USB 500 mAIl terminale USB su questa unità ha un’emissione di 500 mA. Un dispositivo USB fino a 500 mA può essere connesso e usato/caricato.La ricarica della batteria ha inizio quando il dispositivo USB viene collegato alla porta (USB) dell’unità.Note sulla ricarica dei dispositivi USB con questo sistema
• Questo sistema non può essere usato come caricabatteria quando è spento.
• La ricarica delle batterie potrebbe non essere possibile a seconda delle specifiche del dispositivo USB.
∫ Attivazione o disattivazione del segnale Bluetooth1 Tenere premuto :6 e sull’unità
principale per 5 secondi.2 Rilasciare il tasto quando viene visualizzato
[BT OFF] (segnale Bluetooth off) o [BT ON] (segnale Bluetooth on).
• Quando questa unità è spenta, non può essere abbinata a dispositivi abilitati Bluetooth.
∫ Comandi audioP.bass controlQuando la corrente viene accesa la prima volta, l’unità si attiva in modalità P.bass che pone in rilievo le frequenze basse. Per annullare la modalità P.bass, premere P.BASS sul telecomando.
AUDIO INANTENNA SPEAKERSR
FM
L
SN29402702_X-EM16_26_It.book 12 ページ 2016年8月6日 土曜日 午後1時10分
13It
EnglishFrançais
EspañolDeutsch
ItalianoNederlands
PyccкийInformazioni aggiuntive∫ Informazioni sulla riproducibilità di sorgenti USBDispositivi USB compatibili:
• Memorie flash USB (USB 1.1/2.0 (Full Speed))• Lettori flash USB (USB 1.1/2.0 (Full Speed))
Formati supportati:• USB o file system: FAT16, FAT32• Bit rate MP3 (velocità dati): da 32 kbps a 320 kbps e bit
rate variabili• Livelli cartelle 8: compresa ROOT• Numero massimo di cartelle: 256 (compresa ROOT)• Numero massimo di brani/file: 999
Numero massimo di file riconoscibili da questa unità in una cartella: 999
• ID3tag: v1.0, v1.1, v1.2, v2.0, v2.2, v2.3, v2.4I file audio possono non essere riproducibili a seconda delle impostazioni del software di codifica, del dispositivo USB usato, della registrazione e di altri parametri.Formati non supportati:
• Album vuoti: un album che non contiene file MP3• I file di formato non supportato vengono saltati. Ad
esempio, i file di Word (.doc) o MP3 di estensione .dlf vengono ignorati e non riprodotti.
• File audio ad eccezione di MP3.• Altri file system (exFAT, NTFS, HFS, ecc.) diversi da
FAT16 e FAT32.
∫ Formato disco MP3 supportati• ISO9660 Level 1/Level 2, Joliet• Numero massimo di cartelle: 256 (compresa ROOT)• Numero massimo di brani/file: 999
Numero massimo di file riconoscibili da questa unità in una cartella: 999
• Frequenze di campionamento supportate: 32 kHz, 44,1 kHz, 48 kHz
• Velocità di trasmissione supportate: da 32 kbps a 320 kbps, bit rate variabili
• Livelli cartelle 8: compresa ROOTI file audio possono non essere riproducibili a seconda delle impostazioni del software di codifica, del dispositivo USB usato, della registrazione e di altri parametri.
Risoluzione dei problemi ATTENZIONE
• Mai aprire il cabinet dell’apparecchio.• L’uso scorretto dell’apparecchio viene spesso scambiato
per un guasto. Qualora si ritenga che questo componente non funzioni nel modo corretto, verificare quanto elencato di seguito. Il problema potrebbe essere causato da un altro componente. Controllare tutti i componenti ed apparecchi elettronici usati. Se il disturbo non venisse corretto anche dopo aver controllato i punti qui sotto, richiedere all’assistenza autorizzata Pioneer più vicino o al rivenditore di eseguire la riparazione.
• Se l’unità non funziona bene a causa di influenze esterne come l’elettricità statica, per riportarla alla normalità scollegare la spina dalla presa di corrente e reinserirla.
Se sul display appare "PROTECT". Scollegare immediatamente il cavo di alimentazione e
verificare i seguenti elementi dopo che la scritta "PROTECT" sarà scomparsa.
• Accertarsi che non vi siano ostruzioni nei fori di areazione del sistema.Una volta verificati gli elementi indicati sopra senza che siano stati riscontrati problemi, ricollegare il cavo di alimentazione e accendere il sistema. Se il problema persiste, contattare il rivenditore più vicino.
Manca la corrente. Controllare che il cavo di alimentazione CA sia ben
collegato. Controllare che la presa di corrente eroghi corrente. Nella modalità standby automatica, il sistema si
spegne automaticamente dopo che il sistema è rimasto inattivo per 15 minuti.
Audio assente o scadente. Regolare il volume. Verificare che le cuffie siano collegate correttamente.
Il sistema non risponde. Scollegare, ricollegare la spina di alimentazione CA
ed accendere il sistema. Il sistema di risparmio energetico spegne
automaticamente l’unità dopo 15 minuti di inattività del sistema.
Il telecomando non funziona. Ridurre la distanza fra telecomando ed unità principale. Inserire le batterie con le polarità (segni + e –)
disposte nel modo indicato. Sostituire le batterie. Puntare il telecomando direttamente sul sensore del
pannello anteriore dell’untà principale. Non viene trovato un disco.
Inserire un disco. Controllare che il disco sia caricato con l’etichetta
rivolta in alto. Attendere che la condensa sulla lente sia evaporata. Sostituire o pulire il disco. Controllare che il disco registrato sia finalizzato e di
formato compatibile. Il dispositivo di memoria USB usato non è supportato.
Controllare che il dispositivo di memoria USB sia compatibile col sistema.
Il dispositivo di archiviazione USB è stato connesso correttamente? Assicurarsi che il dispositivo sia inserito saldamente.
Il nome del file o della cartella (titolo album) non viene visualizzato in modo corretto. I codici carattere visualizzabili da questa unità sono i
seguenti:• Lettere maiuscole (A - Z).• Numeri (0 - 9).• Simboli (< >* +, [ ] _).Gli altri caratteri appaiono come "_".
Compare la scritta "OVER CURRENT". È stato rilevato un problema con il livello della
corrente elettrica dalla porta (USB). Spegnere il sistema e scollegare il dispositivo USB dalla porta
(USB). Assicurarsi che non vi siano problemi con il dispositivo USB. Se la visualizzazione non scompare, contattare il rivenditore più vicino.
Alcuni file del dispositivo di memoria USB non vengono riprodotti. Controllare che i file siano di formato supportato. Verificare che il numero massimo di file non sia stato
superato (pagina 13). La ricezione radio è scadente.
Allontanare il sistema da altri apparecchi elettrici. Estendere del tutto l’antenna.
Il timer non funziona. Impostare correttamente l’orologio. Accendere il timer.
X-EM16&26_TOC&Body_It.fm 13 ページ 2016年8月8日 月曜日 午後1時8分
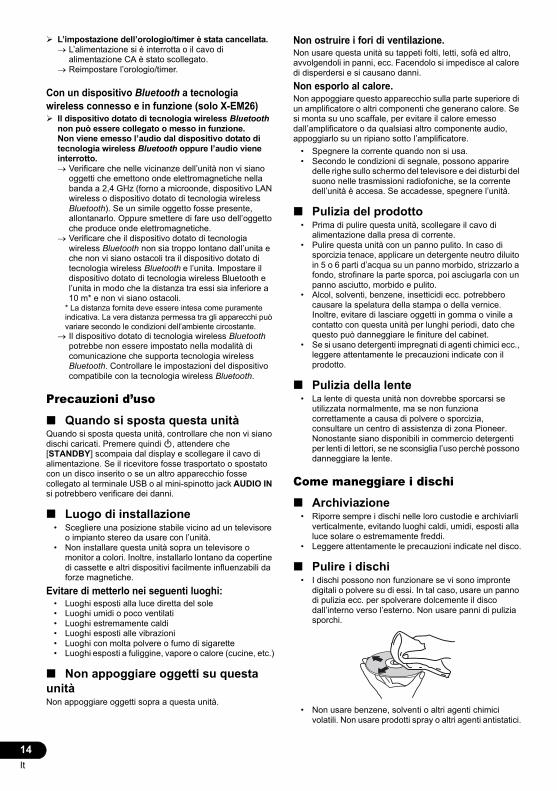
14It
L’impostazione dell’orologio/timer è stata cancellata. L’alimentazione si è interrotta o il cavo di
alimentazione CA è stato scollegato. Reimpostare l’orologio/timer.
Con un dispositivo Bluetooth a tecnologia wireless connesso e in funzione (solo X-EM26) Il dispositivo dotato di tecnologia wireless Bluetooth
non può essere collegato o messo in funzione. Non viene emesso l’audio dal dispositivo dotato di tecnologia wireless Bluetooth oppure l’audio viene interrotto. Verificare che nelle vicinanze dell’unità non vi siano
oggetti che emettono onde elettromagnetiche nella banda a 2,4 GHz (forno a microonde, dispositivo LAN wireless o dispositivo dotato di tecnologia wireless Bluetooth). Se un simile oggetto fosse presente, allontanarlo. Oppure smettere di fare uso dell’oggetto che produce onde elettromagnetiche.
Verificare che il dispositivo dotato di tecnologia wireless Bluetooth non sia troppo lontano dall’unita e che non vi siano ostacoli tra il dispositivo dotato di tecnologia wireless Bluetooth e l’unita. Impostare il dispositivo dotato di tecnologia wireless Bluetooth e l’unita in modo che la distanza tra essi sia inferiore a 10 m* e non vi siano ostacoli.
* La distanza fornita deve essere intesa come puramente indicativa. La vera distanza permessa tra gli apparecchi può variare secondo le condizioni dell’ambiente circostante.
Il dispositivo dotato di tecnologia wireless Bluetooth potrebbe non essere impostato nella modalità di comunicazione che supporta tecnologia wireless Bluetooth. Controllare le impostazioni del dispositivo compatibile con la tecnologia wireless Bluetooth.
Precauzioni d’uso
∫ Quando si sposta questa unitàQuando si sposta questa unità, controllare che non vi siano dischi caricati. Premere quindi Í, attendere che [STANDBY] scompaia dal display e scollegare il cavo di alimentazione. Se il ricevitore fosse trasportato o spostato con un disco inserito o se un altro apparecchio fosse collegato al terminale USB o al mini-spinotto jack AUDIO IN si potrebbero verificare dei danni.
∫ Luogo di installazione• Scegliere una posizione stabile vicino ad un televisore
o impianto stereo da usare con l’unità.• Non installare questa unità sopra un televisore o
monitor a colori. Inoltre, installarlo lontano da copertine di cassette e altri dispositivi facilmente influenzabili da forze magnetiche.
Evitare di metterlo nei seguenti luoghi:• Luoghi esposti alla luce diretta del sole• Luoghi umidi o poco ventilati• Luoghi estremamente caldi• Luoghi esposti alle vibrazioni• Luoghi con molta polvere o fumo di sigarette• Luoghi esposti a fuliggine, vapore o calore (cucine, etc.)
∫ Non appoggiare oggetti su questa unitàNon appoggiare oggetti sopra a questa unità.
Non ostruire i fori di ventilazione.Non usare questa unità su tappeti folti, letti, sofà ed altro, avvolgendoli in panni, ecc. Facendolo si impedisce al calore di disperdersi e si causano danni.Non esporlo al calore.Non appoggiare questo apparecchio sulla parte superiore di un amplificatore o altri componenti che generano calore. Se si monta su uno scaffale, per evitare il calore emesso dall’amplificatore o da qualsiasi altro componente audio, appoggiarlo su un ripiano sotto l’amplificatore.
• Spegnere la corrente quando non si usa.• Secondo le condizioni di segnale, possono apparire
delle righe sullo schermo del televisore e dei disturbi del suono nelle trasmissioni radiofoniche, se la corrente dell’unità è accesa. Se accadesse, spegnere l’unità.
∫ Pulizia del prodotto• Prima di pulire questa unità, scollegare il cavo di
alimentazione dalla presa di corrente.• Pulire questa unità con un panno pulito. In caso di
sporcizia tenace, applicare un detergente neutro diluito in 5 o 6 parti d’acqua su un panno morbido, strizzarlo a fondo, strofinare la parte sporca, poi asciugarla con un panno asciutto, morbido e pulito.
• Alcol, solventi, benzene, insetticidi ecc. potrebbero causare la spelatura della stampa o della vernice. Inoltre, evitare di lasciare oggetti in gomma o vinile a contatto con questa unità per lunghi periodi, dato che questo può danneggiare le finiture del cabinet.
• Se si usano detergenti impregnati di agenti chimici ecc., leggere attentamente le precauzioni indicate con il prodotto.
∫ Pulizia della lente• La lente di questa unità non dovrebbe sporcarsi se
utilizzata normalmente, ma se non funziona correttamente a causa di polvere o sporcizia, consultare un centro di assistenza di zona Pioneer. Nonostante siano disponibili in commercio detergenti per lenti di lettori, se ne sconsiglia l’uso perché possono danneggiare la lente.
Come maneggiare i dischi
∫ Archiviazione• Riporre sempre i dischi nelle loro custodie e archiviarli
verticalmente, evitando luoghi caldi, umidi, esposti alla luce solare o estremamente freddi.
• Leggere attentamente le precauzioni indicate nel disco.
∫ Pulire i dischi• I dischi possono non funzionare se vi sono impronte
digitali o polvere su di essi. In tal caso, usare un panno di pulizia ecc. per spolverare dolcemente il disco dall’interno verso l’esterno. Non usare panni di pulizia sporchi.
• Non usare benzene, solventi o altri agenti chimici volatili. Non usare prodotti spray o altri agenti antistatici.
SN29402702_X-EM16_26_It.book 14 ページ 2016年8月6日 土曜日 午後1時10分
15It
EnglishFrançais
EspañolDeutsch
ItalianoNederlands
Pyccкий• Quando lo sporco è resistente, inumidire un panno
morbido, strizzarlo a fondo e strofinare via lo sporco, poi rimuovere l’umidità con un panno asciutto.
• Non usare dischi danneggiati (rotti o piegati).• Non lasciate che la superficie del segnale dei dischi si
graffi o si sporchi.• Non attaccare pezzi di carta o adesivi sui dischi. Farlo
potrebbe far curvare i dischi, rendendo impossibile la loro lettura. Tenere anche presente che i dischi affittati possono portare adesivi e che la colla di questi può fuoriuscire. Controllare che non vi sia colla intorno ai bordi delle etichette prima di usare dischi a noleggio.
∫ Dischi con forma particolareI dischi non circolari (a cuore, esagonali, ecc.) non possono venire riprodotti con questa unità. Non tentare di riprodurre simili dischi, dato che possono danneggiare questa unità.
Specifiche• Amplificatore(Per modelli per l’Europa)Potenza uscita RMS . . . . . . . . . . . . . . . . . . . . . 5 W + 5 W
(8 ohm, 1 kHz distorsione armonica totale 10%)(Solo per i modelli per il Nord America)
• DiscoDiametro del disco . . . . . . . . . . . . . . . . . . . . . 12 cm, 8 cmDischi supportati . . . . . . CD-DA, CD-R, CD-RW, MP3-CDRisposta in frequenza . . . . . Da 20 Hz a 20 kHz (44,1 kHz)
• Sintonizzatore (FM)Gamma di sintonia . . . . . . . . . . . Da 87,5 MHz a 108 MHz
• Bluetooth (solo X-EM26)Versione . . . . . . . . . . . . . . . .Specifiche Bluetooth Ver. 4.0Uscita . . . . . . . . . . . . . . . . . Specifiche Bluetooth Classe 2Distanza stimata di trasmissione in linea retta* . . . . . . . . . . . . . . . . . . . . . . . . . . . . . . . . . . . . . Circa 10 mGamma di frequenza . . . . . . . . . . . . .Banda ISM da 2,4000 GHz a 2,4835 GHzModulazione . . . . . . . . FH-SS (Frequency Hopping Spread Spectrum)Profili Bluetooth supportati . . . . . . . . . . . . . A2DP, AVRCPCodec supportati. . . . . . . . . . . . . . SBC (Subband Codec)Sistema di protezione dei contenuti . . . . . . . . . . . SCMS-T* La distanza di trasmissione in linea retta è una stima.Le vere distanze di trasmissione supportate possono differire secondo le condizioni circostanti.
• DiffusoriTipo. . . . . . . . . . . . . . . . . . . . . Sistema altoparlanti a 1 viaComposizione altoparlanti . . . . . . . . . . . . . 8 cm tipo conoImpedenza dei diffusori. . . . . . . . . . . . . . . . . . . . . . . . . 8
• Informazioni generaliAlimentazione a CA (Per modelli per l’Europa) . . . . . . . . . . . . . . . . . .Da 220 V a 240 V CA, 50 Hz/60 HzAlimentazione a CA (Solo per i modelli per il Nord America). . . . . . . . . . . . . . . . . . . . . . . . . . . . . . . . . . . 120 V CA, 60 HzConsumo in funzione . . . . . . . . . . . . . . . . . . . . . . . . .12 WConsumo in standby 0,5 WUSB Direct . . . . . . . . . . . . . . . . .USB 1.1/2.0 (Full Speed)Corrente USB 5V500 mADimensioni– Unità principale (L x A x P) . . 180 mm x 121 mm x 221 mm– Diffusori (L x A x P) . . . . . 121 mm x 182 mm x 200 mmPeso– Apparecchio principale . . . . . . . . . . . . . . . . . . . . . 1,3 kg– Diffusore . . . . . . . . . . . . . . . . . . . . . . . . . . . . . 1,1 kg x 2• I dati tecnici ed il design di questo prodotto sono soggetti
a modifiche senza preavviso.• I nomi aziendali o di prodotti menzionati in questo
documento sono marchi commerciali o marchi commerciali registrati delle rispettive aziende.
“Pioneer” e “PBASS” sono marchi di Pioneer Corporation, e sono utilizzati su licenza.
© 2016 Onkyo & Pioneer Corporation.Tutti i diritti riservati.
Potenza nominale di uscitaTutti i canali:
5 watt di potenza minima continua per canale, carichi da 8 ohm, 2 canali pilotati a 1 kHz, con una distorsione armonica totale massima 10% (FTC)2 canali x 5 W (8 , 1 kHz, 2 canali pilotati) (IEC)
X-EM16&26_TOC&Body_It.fm 15 ページ 2016年8月9日 火曜日 午後3時55分
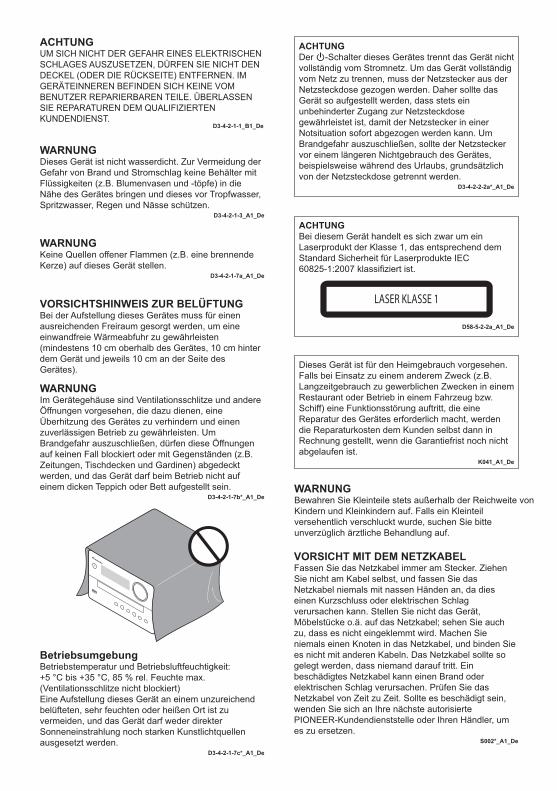
ACHTUNGUM SICH NICHT DER GEFAHR EINES ELEKTRISCHEN SCHLAGES AUSZUSETZEN, DÜRFEN SIE NICHT DEN DECKEL (ODER DIE RÜCKSEITE) ENTFERNEN. IM GERÄTEINNEREN BEFINDEN SICH KEINE VOM BENUTZER REPARIERBAREN TEILE. ÜBERLASSEN SIE REPARATUREN DEM QUALIFIZIERTEN KUNDENDIENST.
D3-4-2-1-1_B1_De
WARNUNGDieses Gerät ist nicht wasserdicht. Zur Vermeidung der Gefahr von Brand und Stromschlag keine Behälter mit Flüssigkeiten (z.B. Blumenvasen und -töpfe) in die Nähe des Gerätes bringen und dieses vor Tropfwasser, Spritzwasser, Regen und Nässe schützen.
D3-4-2-1-3_A1_De
WARNUNGKeine Quellen offener Flammen (z.B. eine brennende Kerze) auf dieses Gerät stellen.
D3-4-2-1-7a_A1_De
VORSICHTSHINWEIS ZUR BELÜFTUNGBei der Aufstellung dieses Gerätes muss für einen ausreichenden Freiraum gesorgt werden, um eine einwandfreie Wärmeabfuhr zu gewährleisten (mindestens 10 cm oberhalb des Gerätes, 10 cm hinter dem Gerät und jeweils 10 cm an der Seite des Gerätes).
WARNUNGIm Gerätegehäuse sind Ventilationsschlitze und andere Öffnungen vorgesehen, die dazu dienen, eine Überhitzung des Gerätes zu verhindern und einen zuverlässigen Betrieb zu gewährleisten. Um Brandgefahr auszuschließen, dürfen diese Öffnungen auf keinen Fall blockiert oder mit Gegenständen (z.B. Zeitungen, Tischdecken und Gardinen) abgedeckt werden, und das Gerät darf beim Betrieb nicht auf einem dicken Teppich oder Bett aufgestellt sein.
D3-4-2-1-7b*_A1_De
BetriebsumgebungBetriebstemperatur und Betriebsluftfeuchtigkeit:+5 °C bis +35 °C, 85 % rel. Feuchte max. (Ventilationsschlitze nicht blockiert)Eine Aufstellung dieses Gerät an einem unzureichend belüfteten, sehr feuchten oder heißen Ort ist zu vermeiden, und das Gerät darf weder direkter Sonneneinstrahlung noch starken Kunstlichtquellen ausgesetzt werden.
D3-4-2-1-7c*_A1_De
ACHTUNGDer -Schalter dieses Gerätes trennt das Gerät nicht vollständig vom Stromnetz. Um das Gerät vollständig vom Netz zu trennen, muss der Netzstecker aus der Netzsteckdose gezogen werden. Daher sollte das Gerät so aufgestellt werden, dass stets ein unbehinderter Zugang zur Netzsteckdose gewährleistet ist, damit der Netzstecker in einer Notsituation sofort abgezogen werden kann. Um Brandgefahr auszuschließen, sollte der Netzstecker vor einem längeren Nichtgebrauch des Gerätes, beispielsweise während des Urlaubs, grundsätzlich von der Netzsteckdose getrennt werden.
D3-4-2-2-2a*_A1_De
ACHTUNGBei diesem Gerät handelt es sich zwar um ein Laserprodukt der Klasse 1, das entsprechend dem Standard Sicherheit für Laserprodukte IEC 60825-1:2007 klassifiziert ist.
LASER KLASSE 1
D58-5-2-2a_A1_De
Dieses Gerät ist für den Heimgebrauch vorgesehen. Falls bei Einsatz zu einem anderem Zweck (z.B. Langzeitgebrauch zu gewerblichen Zwecken in einem Restaurant oder Betrieb in einem Fahrzeug bzw. Schiff) eine Funktionsstörung auftritt, die eine Reparatur des Gerätes erforderlich macht, werden die Reparaturkosten dem Kunden selbst dann in Rechnung gestellt, wenn die Garantiefrist noch nicht abgelaufen ist.
K041_A1_De
VORSICHT MIT DEM NETZKABELFassen Sie das Netzkabel immer am Stecker. Ziehen Sie nicht am Kabel selbst, und fassen Sie das Netzkabel niemals mit nassen Händen an, da dies einen Kurzschluss oder elektrischen Schlag verursachen kann. Stellen Sie nicht das Gerät, Möbelstücke o.ä. auf das Netzkabel; sehen Sie auch zu, dass es nicht eingeklemmt wird. Machen Sie niemals einen Knoten in das Netzkabel, und binden Sie es nicht mit anderen Kabeln. Das Netzkabel sollte so gelegt werden, dass niemand darauf tritt. Ein beschädigtes Netzkabel kann einen Brand oder elektrischen Schlag verursachen. Prüfen Sie das Netzkabel von Zeit zu Zeit. Sollte es beschädigt sein, wenden Sie sich an Ihre nächste autorisierte PIONEER-Kundendienststelle oder Ihren Händler, um es zu ersetzen.
S002*_A1_De
WARNUNGBewahren Sie Kleinteile stets außerhalb der Reichweite vonKindern und Kleinkindern auf. Falls ein Kleinteilversehentlich verschluckt wurde, suchen Sie bitteunverzüglich ärztliche Behandlung auf.
SN29402702_X-EM16_26_De.book 2 ページ 2016年8月6日 土曜日 午後4時30分

K058a_A1_De
Pb
Informationen für Anwender zur Sammlung und Entsorgung von Altgeräten und gebrauchten Batterien
Diese Symbole auf den Produkten, der Verpackung und/oder Begleitdokumenten bedeuten, dass gebrauchte elektrische und elektronische Produkte und Batterien nicht über den Haushaltsmüll entsorgt werden dürfen.
Zur richtigen Handhabung, Rückgewinnung und Wiederverwertung von Altprodukten und gebrauchten Batterien bringen Sie diese bitte zu den gemäß der nationalen Gesetzgebung dafür zuständigen Sammelstellen.
Mit der korrekten Entsorgung dieser Produkte und Batterien helfen Sie dabei, wertvolle Ressourcen zu schonen und vermeiden mögliche negative Auswirkungen auf die Gesundheit und die Umwelt, die durch eine unsachgemäße Behandlung des Abfalls entstehen könnten.
Weitere Informationen zur Sammlung und Wiederverwertung von Altprodukten und Batterien erhalten Sie von Ihrer örtlichen Gemeindeverwaltung, Ihrem Müllentsorger oder dem Verkaufsort, an dem Sie die Waren erworben haben.
Diese Symbole gelten ausschließlich in der Europäischen Union.
Für Länder außerhalb der Europäischen Union:Wenn Sie diese Gegenstände entsorgen wollen, wenden Sie sich bitte an Ihre lokalen Behörden oder Händler und fragen Sie dort nach der korrekten Entsorungsweise.
Symbolbeispielefür Batterien
Symbol für Geräte
Hinweise zu KondensatbildungWenn dieses Gerät plötzlich von einem kalten Ort in einenwarmen Raum gebracht wird (z. B. im Winter) oder dieTemperatur im Raum, in dem das Gerät aufgestellt ist,plötzlich aufgrund eines in Betrieb befindlichen Heizgerätesusw. ansteigt, können sich Wassertröpfchen (Kondensat) imGeräteinneren (auf Betriebsteilen und Abtasterlinse) bilden.Wenn es zu Kondensatbildung gekommen ist, arbeitet dasGerät nicht mehr ordnungsgemäß, und Wiedergabe ist nichtmöglich. Lassen Sie das Gerät 1 bis 2 Stunden lang beiRaumtemperatur eingeschaltet (die erforderliche Dauerhängt vom Ausmaß der Kondensatbildung ab). DieWassertropfen verdampfen und die Wiedergabe ist wiedermöglich. Auch im Sommer kann es zu Kondensatbildungkommen, wenn das Gerät direkt dem Luftstrom einerKlimaanlage ausgesetzt ist. Stellen Sie das Gerät in einemsolchen Fall an einem anderen Ort auf.
Warnhinweis Funkwellennur X-EM26Diese Einheit nutzt eine 2,4 GHz-Funkwellenfrequenz, ein Band, welches auch von anderen kabellosen Systemen genutzt wird (Mikrowellenherde und Schnurlostelefone usw.).Falls das Fernsehbild durch Rauschen gestört wird, besteht die Möglichkeit, dass dieses Gerät (einschließlich von Produkten, die von diesem Gerät unterstützt werden) Signalinterferenzen mit dem Antenneneingang des Fernsehgerätes, Videogerätes, Satellitentuners usw. verursacht.In diesem Fall vergrößern Sie den Abstand zwischen dem Antenneneingangsanschluss und dieser Einheit (einschließlich von dieser Einheit unterstützte Produkte).• Pioneer übernimmt keine Verantwortung für jegliche
Fehlfunktionen am kompatiblen Pioneer-Produkt aufgrund von Fehlern/Fehlfunktionen, die mit der Netzwerkverbindung und/oder Ihren anderen angeschlossenen Geräten zusammenhängen. Bitte wenden Sie sich an Ihren Internetprovider oder den Hersteller des Netzwerkgeräts.
• Ein separater Vertrag mit/Bezahlung für einen Internetanbieter ist zur Verwendung des Internets
SN29402702_X-EM16_26_De.book 3 ページ 2016年8月6日 土曜日 午後4時30分
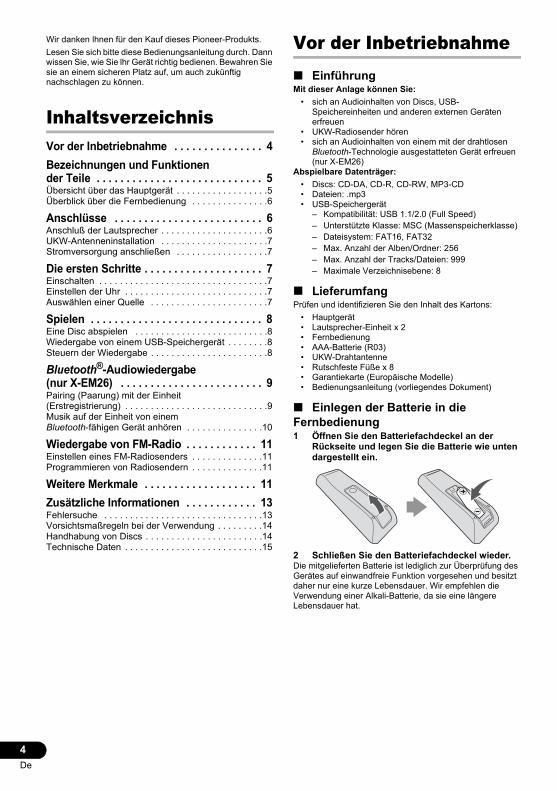
4De
Wir danken lhnen für den Kauf dieses Pioneer-Produkts.Lesen Sie sich bitte diese Bedienungsanleitung durch. Dann wissen Sie, wie Sie lhr Gerät richtig bedienen. Bewahren Sie sie an einem sicheren Platz auf, um auch zukünftig nachschlagen zu können.
InhaltsverzeichnisVor der Inbetriebnahme . . . . . . . . . . . . . . . 4Bezeichnungen und Funktionen der Teile . . . . . . . . . . . . . . . . . . . . . . . . . . . . 5Übersicht über das Hauptgerät . . . . . . . . . . . . . . . . . .5Überblick über die Fernbedienung . . . . . . . . . . . . . . .6
Anschlüsse . . . . . . . . . . . . . . . . . . . . . . . . . 6Anschluß der Lautsprecher . . . . . . . . . . . . . . . . . . . . .6UKW-Antenneninstallation . . . . . . . . . . . . . . . . . . . . .7Stromversorgung anschließen . . . . . . . . . . . . . . . . . .7
Die ersten Schritte . . . . . . . . . . . . . . . . . . . . 7Einschalten . . . . . . . . . . . . . . . . . . . . . . . . . . . . . . . . .7Einstellen der Uhr . . . . . . . . . . . . . . . . . . . . . . . . . . . .7Auswählen einer Quelle . . . . . . . . . . . . . . . . . . . . . . .7
Spielen . . . . . . . . . . . . . . . . . . . . . . . . . . . . . 8Eine Disc abspielen . . . . . . . . . . . . . . . . . . . . . . . . . .8Wiedergabe von einem USB-Speichergerät . . . . . . . .8Steuern der Wiedergabe . . . . . . . . . . . . . . . . . . . . . . .8
Bluetooth®-Audiowiedergabe (nur X-EM26) . . . . . . . . . . . . . . . . . . . . . . . . 9Pairing (Paarung) mit der Einheit (Erstregistrierung) . . . . . . . . . . . . . . . . . . . . . . . . . . . .9Musik auf der Einheit von einem Bluetooth-fähigen Gerät anhören . . . . . . . . . . . . . . .10
Wiedergabe von FM-Radio . . . . . . . . . . . . 11Einstellen eines FM-Radiosenders . . . . . . . . . . . . . .11Programmieren von Radiosendern . . . . . . . . . . . . . .11
Weitere Merkmale . . . . . . . . . . . . . . . . . . . 11Zusätzliche Informationen . . . . . . . . . . . . 13Fehlersuche . . . . . . . . . . . . . . . . . . . . . . . . . . . . . . .13Vorsichtsmaßregeln bei der Verwendung . . . . . . . . .14Handhabung von Discs . . . . . . . . . . . . . . . . . . . . . . .14Technische Daten . . . . . . . . . . . . . . . . . . . . . . . . . . .15
Vor der Inbetriebnahme∫ EinführungMit dieser Anlage können Sie:
• sich an Audioinhalten von Discs, USB-Speichereinheiten und anderen externen Geräten erfreuen
• UKW-Radiosender hören• sich an Audioinhalten von einem mit der drahtlosen
Bluetooth-Technologie ausgestatteten Gerät erfreuen (nur X-EM26)
Abspielbare Datenträger:• Discs: CD-DA, CD-R, CD-RW, MP3-CD• Dateien: .mp3• USB-Speichergerät
– Kompatibilität: USB 1.1/2.0 (Full Speed)– Unterstützte Klasse: MSC (Massenspeicherklasse)– Dateisystem: FAT16, FAT32– Max. Anzahl der Alben/Ordner: 256– Max. Anzahl der Tracks/Dateien: 999– Maximale Verzeichnisebene: 8
∫ LieferumfangPrüfen und identifizieren Sie den Inhalt des Kartons:
• Hauptgerät• Lautsprecher-Einheit x 2• Fernbedienung• AAA-Batterie (R03)• UKW-Drahtantenne• Rutschfeste Füße x 8• Garantiekarte (Europäische Modelle)• Bedienungsanleitung (vorliegendes Dokument)
∫ Einlegen der Batterie in die Fernbedienung1 Öffnen Sie den Batteriefachdeckel an der
Rückseite und legen Sie die Batterie wie unten dargestellt ein.
2 Schließen Sie den Batteriefachdeckel wieder.Die mitgelieferten Batterie ist lediglich zur Überprüfung des Gerätes auf einwandfreie Funktion vorgesehen und besitzt daher nur eine kurze Lebensdauer. Wir empfehlen die Verwendung einer Alkali-Batterie, da sie eine längere Lebensdauer hat.
SN29402702_X-EM16_26_De.book 4 ページ 2016年8月6日 土曜日 午後4時30分
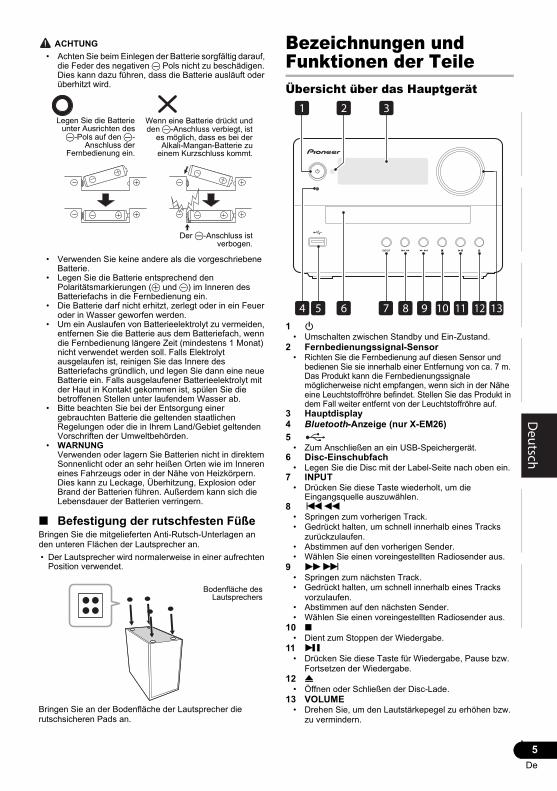
5De
EnglishFrançais
EspañolDeutsch
ItalianoNederlands
Pyccкий ACHTUNG
• Achten Sie beim Einlegen der Batterie sorgfältig darauf, die Feder des negativen - Pols nicht zu beschädigen. Dies kann dazu führen, dass die Batterie ausläuft oder überhitzt wird.
• Verwenden Sie keine andere als die vorgeschriebene Batterie.
• Legen Sie die Batterie entsprechend den Polaritätsmarkierungen (+ und -) im Inneren des Batteriefachs in die Fernbedienung ein.
• Die Batterie darf nicht erhitzt, zerlegt oder in ein Feuer oder in Wasser geworfen werden.
• Um ein Auslaufen von Batterieelektrolyt zu vermeiden, entfernen Sie die Batterie aus dem Batteriefach, wenn die Fernbedienung längere Zeit (mindestens 1 Monat) nicht verwendet werden soll. Falls Elektrolyt ausgelaufen ist, reinigen Sie das Innere des Batteriefachs gründlich, und legen Sie dann eine neue Batterie ein. Falls ausgelaufener Batterieelektrolyt mit der Haut in Kontakt gekommen ist, spülen Sie die betroffenen Stellen unter laufendem Wasser ab.
• Bitte beachten Sie bei der Entsorgung einer gebrauchten Batterie die geltenden staatlichen Regelungen oder die in Ihrem Land/Gebiet geltenden Vorschriften der Umweltbehörden.
• WARNUNGVerwenden oder lagern Sie Batterien nicht in direktem Sonnenlicht oder an sehr heißen Orten wie im Inneren eines Fahrzeugs oder in der Nähe von Heizkörpern. Dies kann zu Leckage, Überhitzung, Explosion oder Brand der Batterien führen. Außerdem kann sich die Lebensdauer der Batterien verringern.
∫ Befestigung der rutschfesten FüßeBringen Sie die mitgelieferten Anti-Rutsch-Unterlagen an den unteren Flächen der Lautsprecher an.• Der Lautsprecher wird normalerweise in einer aufrechten
Position verwendet.
Bringen Sie an der Bodenfläche der Lautsprecher die rutschsicheren Pads an.
Bezeichnungen und Funktionen der TeileÜbersicht über das Hauptgerät
1 Í• Umschalten zwischen Standby und Ein-Zustand.
2 Fernbedienungssignal-Sensor• Richten Sie die Fernbedienung auf diesen Sensor und
bedienen Sie sie innerhalb einer Entfernung von ca. 7 m. Das Produkt kann die Fernbedienungssignale möglicherweise nicht empfangen, wenn sich in der Nähe eine Leuchtstoffröhre befindet. Stellen Sie das Produkt in dem Fall weiter entfernt von der Leuchtstoffröhre auf.
3 Hauptdisplay4 Bluetooth-Anzeige (nur X-EM26)5
• Zum Anschließen an ein USB-Speichergerät.6 Disc-Einschubfach
• Legen Sie die Disc mit der Label-Seite nach oben ein.7 INPUT
• Drücken Sie diese Taste wiederholt, um die Eingangsquelle auszuwählen.
8 :6• Springen zum vorherigen Track.• Gedrückt halten, um schnell innerhalb eines Tracks
zurückzulaufen.• Abstimmen auf den vorherigen Sender.• Wählen Sie einen voreingestellten Radiosender aus.
9 59• Springen zum nächsten Track.• Gedrückt halten, um schnell innerhalb eines Tracks
vorzulaufen.• Abstimmen auf den nächsten Sender.• Wählen Sie einen voreingestellten Radiosender aus.
10 ∫• Dient zum Stoppen der Wiedergabe.
11 I• Drücken Sie diese Taste für Wiedergabe, Pause bzw.
Fortsetzen der Wiedergabe.12 <
• Öffnen oder Schließen der Disc-Lade.13 VOLUME
• Drehen Sie, um den Lautstärkepegel zu erhöhen bzw. zu vermindern.
Legen Sie die Batterieunter Ausrichten des--Pols auf den --
Anschluss derFernbedienung ein.
Wenn eine Batterie drückt undden --Anschluss verbiegt, ist
es möglich, dass es bei derAlkali-Mangan-Batterie zu
einem Kurzschluss kommt.
Der --Anschluss istverbogen.
Bodenfläche desLautsprechers
21
137 8 9 1211
3
4 5 6 10
SN29402702_X-EM16_26_De.book 5 ページ 2016年8月6日 土曜日 午後4時30分
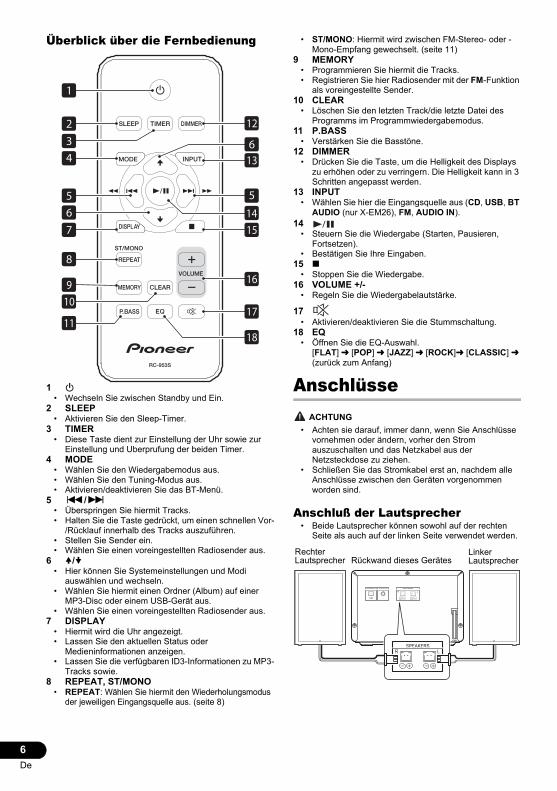
6De
Überblick über die Fernbedienung
1 Í• Wechseln Sie zwischen Standby und Ein.
2 SLEEP• Aktivieren Sie den Sleep-Timer.
3 TIMER• Diese Taste dient zur Einstellung der Uhr sowie zur
Einstellung und Uberprufung der beiden Timer.4 MODE
• Wählen Sie den Wiedergabemodus aus.• Wählen Sie den Tuning-Modus aus.• Aktivieren/deaktivieren Sie das BT-Menü.
5 :/9• Überspringen Sie hiermit Tracks.• Halten Sie die Taste gedrückt, um einen schnellen Vor-
/Rücklauf innerhalb des Tracks auszuführen.• Stellen Sie Sender ein.• Wählen Sie einen voreingestellten Radiosender aus.
6 /• Hier können Sie Systemeinstellungen und Modi
auswählen und wechseln.• Wählen Sie hiermit einen Ordner (Album) auf einer
MP3-Disc oder einem USB-Gerät aus.• Wählen Sie einen voreingestellten Radiosender aus.
7 DISPLAY• Hiermit wird die Uhr angezeigt.• Lassen Sie den aktuellen Status oder
Medieninformationen anzeigen.• Lassen Sie die verfügbaren ID3-Informationen zu MP3-
Tracks sowie.8 REPEAT, ST/MONO
• REPEAT: Wählen Sie hiermit den Wiederholungsmodus der jeweiligen Eingangsquelle aus. (seite 8)
• ST/MONO: Hiermit wird zwischen FM-Stereo- oder -Mono-Empfang gewechselt. (seite 11)
9 MEMORY• Programmieren Sie hiermit die Tracks.• Registrieren Sie hier Radiosender mit der FM-Funktion
als voreingestellte Sender.10 CLEAR
• Löschen Sie den letzten Track/die letzte Datei des Programms im Programmwiedergabemodus.
11 P.BASS• Verstärken Sie die Basstöne.
12 DIMMER• Drücken Sie die Taste, um die Helligkeit des Displays
zu erhöhen oder zu verringern. Die Helligkeit kann in 3 Schritten angepasst werden.
13 INPUT• Wählen Sie hier die Eingangsquelle aus (CD, USB, BT
AUDIO (nur X-EM26), FM, AUDIO IN).14
• Steuern Sie die Wiedergabe (Starten, Pausieren, Fortsetzen).
• Bestätigen Sie Ihre Eingaben.15 ∫
• Stoppen Sie die Wiedergabe.16 VOLUME +/-
• Regeln Sie die Wiedergabelautstärke.
17• Aktivieren/deaktivieren Sie die Stummschaltung.
18 EQ• Öffnen Sie die EQ-Auswahl.
[FLAT] l [POP] l [JAZZ] l [ROCK]l [CLASSIC] l (zurück zum Anfang)
Anschlüsse ACHTUNG
• Achten sie darauf, immer dann, wenn Sie Anschlüsse vornehmen oder ändern, vorher den Strom auszuschalten und das Netzkabel aus der Netzsteckdose zu ziehen.
• Schließen Sie das Stromkabel erst an, nachdem alle Anschlüsse zwischen den Geräten vorgenommen worden sind.
Anschluß der Lautsprecher• Beide Lautsprecher können sowohl auf der rechten
Seite als auch auf der linken Seite verwendet werden.
17
16
1
2
4
5
11
10
6
9
5
12
1514
18
6
7
8
13
3
AUDIO INANTENNA SPEAKERSR
FM
L
SPEAKERSR L
Rechter Lautsprecher
Linker LautsprecherRückwand dieses Gerätes
SN29402702_X-EM16_26_De.book 6 ページ 2016年8月6日 土曜日 午後4時30分
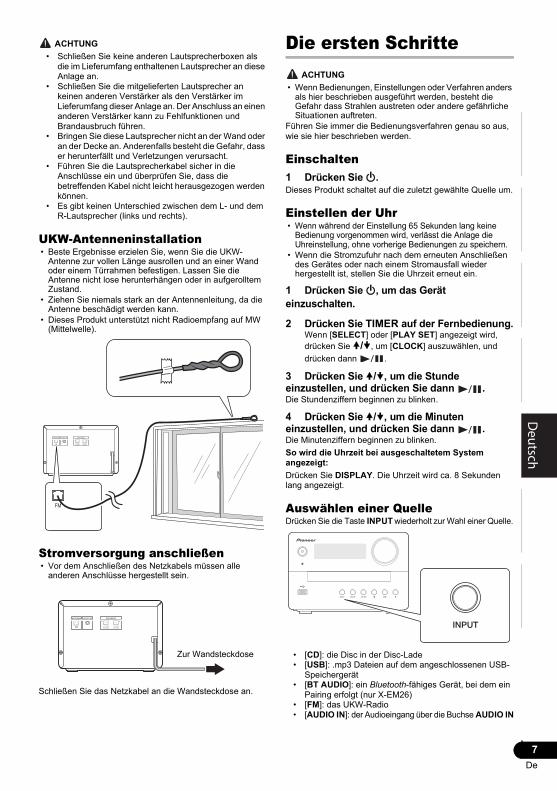
7De
EnglishFrançais
EspañolDeutsch
ItalianoNederlands
Pyccкий ACHTUNG
• Schließen Sie keine anderen Lautsprecherboxen als die im Lieferumfang enthaltenen Lautsprecher an diese Anlage an.
• Schließen Sie die mitgelieferten Lautsprecher an keinen anderen Verstärker als den Verstärker im Lieferumfang dieser Anlage an. Der Anschluss an einen anderen Verstärker kann zu Fehlfunktionen und Brandausbruch führen.
• Bringen Sie diese Lautsprecher nicht an der Wand oder an der Decke an. Anderenfalls besteht die Gefahr, dass er herunterfällt und Verletzungen verursacht.
• Führen Sie die Lautsprecherkabel sicher in die Anschlüsse ein und überprüfen Sie, dass die betreffenden Kabel nicht leicht herausgezogen werden können.
• Es gibt keinen Unterschied zwischen dem L- und dem R-Lautsprecher (links und rechts).
UKW-Antenneninstallation• Beste Ergebnisse erzielen Sie, wenn Sie die UKW-
Antenne zur vollen Länge ausrollen und an einer Wand oder einem Türrahmen befestigen. Lassen Sie die Antenne nicht lose herunterhängen oder in aufgerolltem Zustand.
• Ziehen Sie niemals stark an der Antennenleitung, da die Antenne beschädigt werden kann.
• Dieses Produkt unterstützt nicht Radioempfang auf MW (Mittelwelle).
Stromversorgung anschließen• Vor dem Anschließen des Netzkabels müssen alle
anderen Anschlüsse hergestellt sein.
Schließen Sie das Netzkabel an die Wandsteckdose an.
Die ersten Schritte ACHTUNG
• Wenn Bedienungen, Einstellungen oder Verfahren anders als hier beschrieben ausgeführt werden, besteht die Gefahr dass Strahlen austreten oder andere gefährliche Situationen auftreten.
Führen Sie immer die Bedienungsverfahren genau so aus, wie sie hier beschrieben werden.
Einschalten1 Drücken Sie Í.Dieses Produkt schaltet auf die zuletzt gewählte Quelle um.
Einstellen der Uhr• Wenn während der Einstellung 65 Sekunden lang keine
Bedienung vorgenommen wird, verlässt die Anlage die Uhreinstellung, ohne vorherige Bedienungen zu speichern.
• Wenn die Stromzufuhr nach dem erneuten Anschließen des Gerätes oder nach einem Stromausfall wieder hergestellt ist, stellen Sie die Uhrzeit erneut ein.
1 Drücken Sie Í, um das Gerät einzuschalten.
2 Drücken Sie TIMER auf der Fernbedienung.Wenn [SELECT] oder [PLAY SET] angezeigt wird, drücken Sie /, um [CLOCK] auszuwählen, und drücken dann .
3 Drücken Sie /, um die Stunde einzustellen, und drücken Sie dann .Die Stundenziffern beginnen zu blinken.
4 Drücken Sie /, um die Minuten einzustellen, und drücken Sie dann .Die Minutenziffern beginnen zu blinken.So wird die Uhrzeit bei ausgeschaltetem System angezeigt:Drücken Sie DISPLAY. Die Uhrzeit wird ca. 8 Sekunden lang angezeigt.
Auswählen einer QuelleDrücken Sie die Taste INPUT wiederholt zur Wahl einer Quelle.
• [CD]: die Disc in der Disc-Lade• [USB]: .mp3 Dateien auf dem angeschlossenen USB-
Speichergerät• [BT AUDIO]: ein Bluetooth-fähiges Gerät, bei dem ein
Pairing erfolgt (nur X-EM26)• [FM]: das UKW-Radio• [AUDIO IN]: der Audioeingang über die Buchse AUDIO IN
AUDIO INANTENNA SPEAKERSR
FM
L
FM
AUDIO INANTENNA SPEAKERSR
FM
L
Zur Wandsteckdose
SN29402702_X-EM16_26_De.book 7 ページ 2016年8月6日 土曜日 午後4時30分
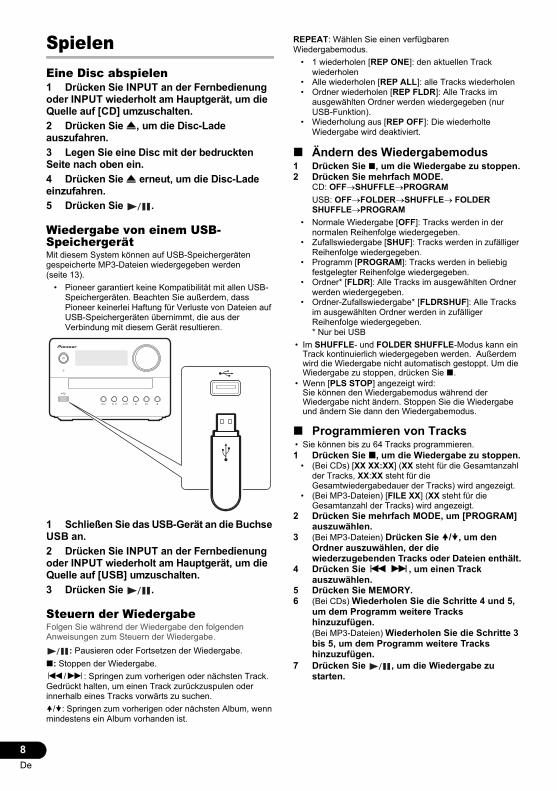
8De
SpielenEine Disc abspielen1 Drücken Sie INPUT an der Fernbedienung oder INPUT wiederholt am Hauptgerät, um die Quelle auf [CD] umzuschalten.2 Drücken Sie <, um die Disc-Lade auszufahren.3 Legen Sie eine Disc mit der bedruckten Seite nach oben ein.4 Drücken Sie < erneut, um die Disc-Lade einzufahren.5 Drücken Sie .
Wiedergabe von einem USB-SpeichergerätMit diesem System können auf USB-Speichergeräten gespeicherte MP3-Dateien wiedergegeben werden (seite 13).
• Pioneer garantiert keine Kompatibilität mit allen USB-Speichergeräten. Beachten Sie außerdem, dass Pioneer keinerlei Haftung für Verluste von Dateien auf USB-Speichergeräten übernimmt, die aus der Verbindung mit diesem Gerät resultieren.
1 Schließen Sie das USB-Gerät an die Buchse USB an.2 Drücken Sie INPUT an der Fernbedienung oder INPUT wiederholt am Hauptgerät, um die Quelle auf [USB] umzuschalten.3 Drücken Sie .
Steuern der WiedergabeFolgen Sie während der Wiedergabe den folgenden Anweisungen zum Steuern der Wiedergabe.
: Pausieren oder Fortsetzen der Wiedergabe.∫: Stoppen der Wiedergabe.:/9: Springen zum vorherigen oder nächsten Track. Gedrückt halten, um einen Track zurückzuspulen oder innerhalb eines Tracks vorwärts zu suchen./: Springen zum vorherigen oder nächsten Album, wenn mindestens ein Album vorhanden ist.
REPEAT: Wählen Sie einen verfügbaren Wiedergabemodus.
• 1 wiederholen [REP ONE]: den aktuellen Track wiederholen
• Alle wiederholen [REP ALL]: alle Tracks wiederholen• Ordner wiederholen [REP FLDR]: Alle Tracks im
ausgewählten Ordner werden wiedergegeben (nur USB-Funktion).
• Wiederholung aus [REP OFF]: Die wiederholte Wiedergabe wird deaktiviert.
∫ Ändern des Wiedergabemodus1 Drücken Sie ∫, um die Wiedergabe zu stoppen.2 Drücken Sie mehrfach MODE.
CD: OFFSHUFFLEPROGRAMUSB: OFFFOLDERSHUFFLEFOLDER SHUFFLEPROGRAM
• Normale Wiedergabe [OFF]: Tracks werden in der normalen Reihenfolge wiedergegeben.
• Zufallswiedergabe [SHUF]: Tracks werden in zufälliger Reihenfolge wiedergegeben.
• Programm [PROGRAM]: Tracks werden in beliebig festgelegter Reihenfolge wiedergegeben.
• Ordner* [FLDR]: Alle Tracks im ausgewählten Ordner werden wiedergegeben.
• Ordner-Zufallswiedergabe* [FLDRSHUF]: Alle Tracks im ausgewählten Ordner werden in zufälliger Reihenfolge wiedergegeben. * Nur bei USB
• Im SHUFFLE- und FOLDER SHUFFLE-Modus kann ein Track kontinuierlich wiedergegeben werden. Außerdem wird die Wiedergabe nicht automatisch gestoppt. Um die Wiedergabe zu stoppen, drücken Sie ∫.
• Wenn [PLS STOP] angezeigt wird:Sie können den Wiedergabemodus während der Wiedergabe nicht ändern. Stoppen Sie die Wiedergabe und ändern Sie dann den Wiedergabemodus.
∫ Programmieren von Tracks• Sie können bis zu 64 Tracks programmieren.1 Drücken Sie ∫, um die Wiedergabe zu stoppen.
• (Bei CDs) [XX XX:XX] (XX steht für die Gesamtanzahl der Tracks, XX:XX steht für die Gesamtwiedergabedauer der Tracks) wird angezeigt.
• (Bei MP3-Dateien) [FILE XX] (XX steht für die Gesamtanzahl der Tracks) wird angezeigt.
2 Drücken Sie mehrfach MODE, um [PROGRAM] auszuwählen.
3 (Bei MP3-Dateien) Drücken Sie /, um den Ordner auszuwählen, der die wiederzugebenden Tracks oder Dateien enthält.
4 Drücken Sie : 9, um einen Track auszuwählen.
5 Drücken Sie MEMORY.6 (Bei CDs) Wiederholen Sie die Schritte 4 und 5,
um dem Programm weitere Tracks hinzuzufügen.(Bei MP3-Dateien) Wiederholen Sie die Schritte 3 bis 5, um dem Programm weitere Tracks hinzuzufügen.
7 Drücken Sie , um die Wiedergabe zu starten.
SN29402702_X-EM16_26_De.book 8 ページ 2016年8月6日 土曜日 午後4時30分
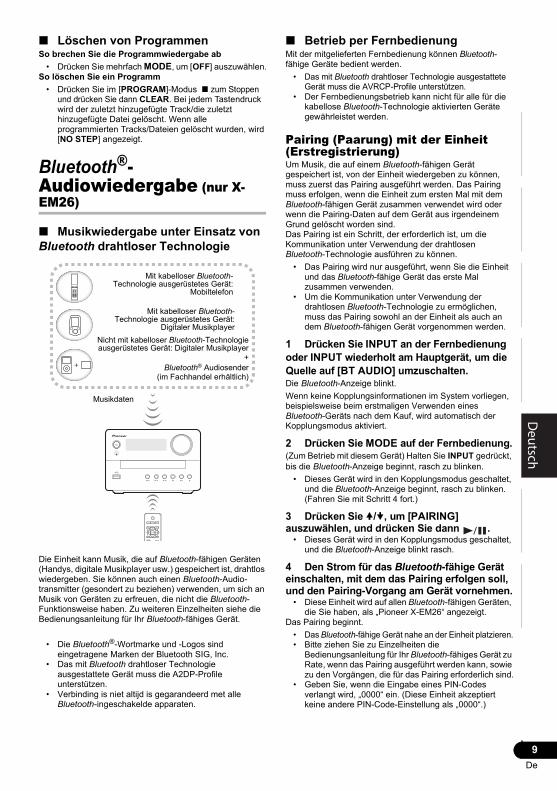
9De
EnglishFrançais
EspañolDeutsch
ItalianoNederlands
Pyccкий∫ Löschen von ProgrammenSo brechen Sie die Programmwiedergabe ab
• Drücken Sie mehrfach MODE, um [OFF] auszuwählen.So löschen Sie ein Programm
• Drücken Sie im [PROGRAM]-Modus ∫ zum Stoppen und drücken Sie dann CLEAR. Bei jedem Tastendruck wird der zuletzt hinzugefügte Track/die zuletzt hinzugefügte Datei gelöscht. Wenn alle programmierten Tracks/Dateien gelöscht wurden, wird [NO STEP] angezeigt.
Bluetooth®-Audiowiedergabe (nur X-EM26)
∫ Musikwiedergabe unter Einsatz von Bluetooth drahtloser Technologie
Die Einheit kann Musik, die auf Bluetooth-fähigen Geräten (Handys, digitale Musikplayer usw.) gespeichert ist, drahtlos wiedergeben. Sie können auch einen Bluetooth-Audio-transmitter (gesondert zu beziehen) verwenden, um sich an Musik von Geräten zu erfreuen, die nicht die Bluetooth-Funktionsweise haben. Zu weiteren Einzelheiten siehe die Bedienungsanleitung für Ihr Bluetooth-fähiges Gerät.
• Die Bluetooth®-Wortmarke und -Logos sind eingetragene Marken der Bluetooth SIG, Inc.
• Das mit Bluetooth drahtloser Technologie ausgestattete Gerät muss die A2DP-Profile unterstützen.
• Verbinding is niet altijd is gegarandeerd met alle Bluetooth-ingeschakelde apparaten.
∫ Betrieb per FernbedienungMit der mitgelieferten Fernbedienung können Bluetooth-fähige Geräte bedient werden.
• Das mit Bluetooth drahtloser Technologie ausgestattete Gerät muss die AVRCP-Profile unterstützen.
• Der Fernbedienungsbetrieb kann nicht für alle für die kabellose Bluetooth-Technologie aktivierten Geräte gewährleistet werden.
Pairing (Paarung) mit der Einheit (Erstregistrierung)Um Musik, die auf einem Bluetooth-fähigen Gerät gespeichert ist, von der Einheit wiedergeben zu können, muss zuerst das Pairing ausgeführt werden. Das Pairing muss erfolgen, wenn die Einheit zum ersten Mal mit dem Bluetooth-fähigen Gerät zusammen verwendet wird oder wenn die Pairing-Daten auf dem Gerät aus irgendeinem Grund gelöscht worden sind.Das Pairing ist ein Schritt, der erforderlich ist, um die Kommunikation unter Verwendung der drahtlosen Bluetooth-Technologie ausführen zu können.
• Das Pairing wird nur ausgeführt, wenn Sie die Einheit und das Bluetooth-fähige Gerät das erste Mal zusammen verwenden.
• Um die Kommunikation unter Verwendung der drahtlosen Bluetooth-Technologie zu ermöglichen, muss das Pairing sowohl an der Einheit als auch an dem Bluetooth-fähigen Gerät vorgenommen werden.
1 Drücken Sie INPUT an der Fernbedienung oder INPUT wiederholt am Hauptgerät, um die Quelle auf [BT AUDIO] umzuschalten.Die Bluetooth-Anzeige blinkt.Wenn keine Kopplungsinformationen im System vorliegen, beispielsweise beim erstmaligen Verwenden eines Bluetooth-Geräts nach dem Kauf, wird automatisch der Kopplungsmodus aktiviert.
2 Drücken Sie MODE auf der Fernbedienung.(Zum Betrieb mit diesem Gerät) Halten Sie INPUT gedrückt, bis die Bluetooth-Anzeige beginnt, rasch zu blinken.
• Dieses Gerät wird in den Kopplungsmodus geschaltet, und die Bluetooth-Anzeige beginnt, rasch zu blinken. (Fahren Sie mit Schritt 4 fort.)
3 Drücken Sie /, um [PAIRING] auszuwählen, und drücken Sie dann .
• Dieses Gerät wird in den Kopplungsmodus geschaltet, und die Bluetooth-Anzeige blinkt rasch.
4 Den Strom für das Bluetooth-fähige Gerät einschalten, mit dem das Pairing erfolgen soll, und den Pairing-Vorgang am Gerät vornehmen.
• Diese Einheit wird auf allen Bluetooth-fähigen Geräten, die Sie haben, als „Pioneer X-EM26“ angezeigt.
Das Pairing beginnt.• Das Bluetooth-fähige Gerät nahe an der Einheit platzieren.• Bitte ziehen Sie zu Einzelheiten die
Bedienungsanleitung für Ihr Bluetooth-fähiges Gerät zu Rate, wenn das Pairing ausgeführt werden kann, sowie zu den Vorgängen, die für das Pairing erforderlich sind.
• Geben Sie, wenn die Eingabe eines PIN-Codes verlangt wird, „0000“ ein. (Diese Einheit akzeptiert keine andere PIN-Code-Einstellung als „0000“.)
Musikdaten
Nicht mit kabelloser Bluetooth-Technologieausgerüstetes Gerät: Digitaler Musikplayer
+Bluetooth® Audiosender
(im Fachhandel erhältlich)
Mit kabelloser Bluetooth-Technologie ausgerüstetes Gerät:
Digitaler Musikplayer
Mit kabelloser Bluetooth-Technologie ausgerüstetes Gerät:
Mobiltelefon
SN29402702_X-EM16_26_De.book 9 ページ 2016年8月6日 土曜日 午後4時30分
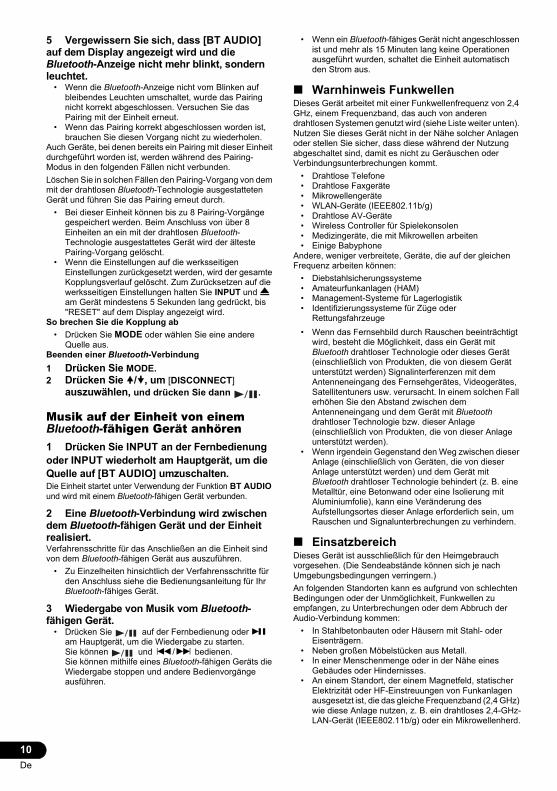
10De
5 Vergewissern Sie sich, dass [BT AUDIO] auf dem Display angezeigt wird und die Bluetooth-Anzeige nicht mehr blinkt, sondern leuchtet.
• Wenn die Bluetooth-Anzeige nicht vom Blinken auf bleibendes Leuchten umschaltet, wurde das Pairing nicht korrekt abgeschlossen. Versuchen Sie das Pairing mit der Einheit erneut.
• Wenn das Pairing korrekt abgeschlossen worden ist, brauchen Sie diesen Vorgang nicht zu wiederholen.
Auch Geräte, bei denen bereits ein Pairing mit dieser Einheit durchgeführt worden ist, werden während des Pairing-Modus in den folgenden Fällen nicht verbunden.Löschen Sie in solchen Fällen den Pairing-Vorgang von dem mit der drahtlosen Bluetooth-Technologie ausgestatteten Gerät und führen Sie das Pairing erneut durch.
• Bei dieser Einheit können bis zu 8 Pairing-Vorgänge gespeichert werden. Beim Anschluss von über 8 Einheiten an ein mit der drahtlosen Bluetooth-Technologie ausgestattetes Gerät wird der älteste Pairing-Vorgang gelöscht.
• Wenn die Einstellungen auf die werksseitigen Einstellungen zurückgesetzt werden, wird der gesamte Kopplungsverlauf gelöscht. Zum Zurücksetzen auf die werksseitigen Einstellungen halten Sie INPUT und < am Gerät mindestens 5 Sekunden lang gedrückt, bis "RESET" auf dem Display angezeigt wird.
So brechen Sie die Kopplung ab• Drücken Sie MODE oder wählen Sie eine andere
Quelle aus.Beenden einer Bluetooth-Verbindung1 Drücken Sie MODE.2 Drücken Sie /, um [DISCONNECT]
auszuwählen, und drücken Sie dann .
Musik auf der Einheit von einem Bluetooth-fähigen Gerät anhören1 Drücken Sie INPUT an der Fernbedienung oder INPUT wiederholt am Hauptgerät, um die Quelle auf [BT AUDIO] umzuschalten.Die Einheit startet unter Verwendung der Funktion BT AUDIO und wird mit einem Bluetooth-fähigen Gerät verbunden.
2 Eine Bluetooth-Verbindung wird zwischen dem Bluetooth-fähigen Gerät und der Einheit realisiert.Verfahrensschritte für das Anschließen an die Einheit sind von dem Bluetooth-fähigen Gerät aus auszuführen.
• Zu Einzelheiten hinsichtlich der Verfahrensschritte für den Anschluss siehe die Bedienungsanleitung für Ihr Bluetooth-fähiges Gerät.
3 Wiedergabe von Musik vom Bluetooth-fähigen Gerät.
• Drücken Sie auf der Fernbedienung oder I am Hauptgerät, um die Wiedergabe zu starten.Sie können und :/9 bedienen.Sie können mithilfe eines Bluetooth-fähigen Geräts die Wiedergabe stoppen und andere Bedienvorgänge ausführen.
• Wenn ein Bluetooth-fähiges Gerät nicht angeschlossen ist und mehr als 15 Minuten lang keine Operationen ausgeführt wurden, schaltet die Einheit automatisch den Strom aus.
∫ Warnhinweis FunkwellenDieses Gerät arbeitet mit einer Funkwellenfrequenz von 2,4 GHz, einem Frequenzband, das auch von anderen drahtlosen Systemen genutzt wird (siehe Liste weiter unten). Nutzen Sie dieses Gerät nicht in der Nähe solcher Anlagen oder stellen Sie sicher, dass diese während der Nutzung abgeschaltet sind, damit es nicht zu Geräuschen oder Verbindungsunterbrechungen kommt.
• Drahtlose Telefone• Drahtlose Faxgeräte• Mikrowellengeräte• WLAN-Geräte (IEEE802.11b/g)• Drahtlose AV-Geräte• Wireless Controller für Spielekonsolen• Medizingeräte, die mit Mikrowellen arbeiten• Einige Babyphone
Andere, weniger verbreitete, Geräte, die auf der gleichen Frequenz arbeiten können:
• Diebstahlsicherungssysteme• Amateurfunkanlagen (HAM)• Management-Systeme für Lagerlogistik• Identifizierungssysteme für Züge oder
Rettungsfahrzeuge• Wenn das Fernsehbild durch Rauschen beeinträchtigt
wird, besteht die Möglichkeit, dass ein Gerät mit Bluetooth drahtloser Technologie oder dieses Gerät (einschließlich von Produkten, die von diesem Gerät unterstützt werden) Signalinterferenzen mit dem Antenneneingang des Fernsehgerätes, Videogerätes, Satellitentuners usw. verursacht. In einem solchen Fall erhöhen Sie den Abstand zwischen dem Antenneneingang und dem Gerät mit Bluetooth drahtloser Technologie bzw. dieser Anlage (einschließlich von Produkten, die von dieser Anlage unterstützt werden).
• Wenn irgendein Gegenstand den Weg zwischen dieser Anlage (einschließlich von Geräten, die von dieser Anlage unterstützt werden) und dem Gerät mit Bluetooth drahtloser Technologie behindert (z. B. eine Metalltür, eine Betonwand oder eine Isolierung mit Aluminiumfolie), kann eine Veränderung des Aufstellungsortes dieser Anlage erforderlich sein, um Rauschen und Signalunterbrechungen zu verhindern.
∫ EinsatzbereichDieses Gerät ist ausschließlich für den Heimgebrauch vorgesehen. (Die Sendeabstände können sich je nach Umgebungsbedingungen verringern.)An folgenden Standorten kann es aufgrund von schlechten Bedingungen oder der Unmöglichkeit, Funkwellen zu empfangen, zu Unterbrechungen oder dem Abbruch der Audio-Verbindung kommen:
• In Stahlbetonbauten oder Häusern mit Stahl- oder Eisenträgern.
• Neben großen Möbelstücken aus Metall.• In einer Menschenmenge oder in der Nähe eines
Gebäudes oder Hindernisses.• An einem Standort, der einem Magnetfeld, statischer
Elektrizität oder HF-Einstreuungen von Funkanlagen ausgesetzt ist, die das gleiche Frequenzband (2,4 GHz) wie diese Anlage nutzen, z. B. ein drahtloses 2,4-GHz-LAN-Gerät (IEEE802.11b/g) oder ein Mikrowellenherd.
SN29402702_X-EM16_26_De.book 10 ページ 2016年8月6日 土曜日 午後4時30分
11De
EnglishFrançais
EspañolDeutsch
ItalianoNederlands
Pyccкий• Wenn Sie in einem dichtbesiedelten Wohngebiet
(Appartement, Stadthaus usw.) wohnen und das Mikrowellengerät Ihres Nachbarn sich in der Nähe Ihrer Anlage befindet, kann es sein, dass dies zu Funkwellenstörungen führt. Sollte dies eintreten, stellen Sie die Anlage an einem anderen Ort auf. Ist das Mikrowellengerät nicht in Betrieb, gibt es keine Funkwellenstörung geben.
∫ FunkwellenreflektionenDiese Anlage empfängt sowohl die direkt von einem Gerät mit Bluetooth drahtloser Technologie übermittelten Wellen (direkten Wellen) als auch Wellen, die aufgrund von Reflektionen an Wänden, Möbelstücken und Gebäudeteilen aus verschiedenen Richtungen eintreffenden Wellen (reflektierten Wellen). Die (aufgrund von Hindernissen und reflektierenden Objekten) reflektierten Wellen erzeugen wiederum verschiedene reflektierte Wellen und auch Veränderungen in den Empfangsverhältnissen, und zwar je nach Standort. Wenn die Audiosignale aufgrund dieses Phänomens nicht einwandfrei empfangen werden können, verändern Sie probeweise den Aufstellungsort des Gerätes mit Bluetooth drahtloser Technologie geringfügig. Bitte beachten Sie außerdem, dass der Empfang von Audiosignalen auch durch reflektierte Wellen unterbrochen werden kann, wenn sich eine Person dem Raum zwischen dieser Anlage und dem Gerät mit Bluetooth drahtloser Technologie nähert oder diesen kreuzt.
∫ Vorsichtshinweise zum Anschließen von Produkten, die von dieser Anlage unterstützt werden
• Stellen Sie die erforderlichen Anschlüsse an allen von dieser Anlage unterstützten Geräten komplett her, einschließlich von Audio- und Netzkabeln, bevor Sie die Geräte an diese Anlage anschließen.
• Nachdem Sie die Anschlüsse an diese Anlage hergestellt haben, prüfen Sie nach, dass Audiokabel nicht gebündelt mit Netzkabeln verlegt worden sind.
• Stellen Sie vor dem Abtrennen dieser Anlage sicher, dass ausreichend freier Arbeitsplatz im Umfeld vorhanden ist.
• Wenn Sie Anschlüsse von Audio- oder anderen Kabeln für Geräte ändern, die von diesem Gerät unterstützt werden, vergewissern Sie sich, dass Sie ausreichend Platz haben.
Wiedergabe von FM-Radio
Einstellen eines FM-Radiosenders• Vergewissern Sie sich, dass Sie die FM-Antenne
angeschlossen und vollständig ausgefahren haben.
∫ Manuelles Einstellen1 Drücken Sie INPUT auf der Fernbedienung oder
mehrfach INPUT am Hauptgerät, um FM als Quelle auszuwählen.
2 Drücken Sie mehrfach MODE, um [MANUAL] auszuwählen.
3 Drücken Sie :/9 auf der Fernbedienung, um den gewünschten Sender einzustellen.
∫ Automatisches Einstellen1 Drücken Sie INPUT auf der Fernbedienung oder
mehrfach INPUT am Hauptgerät, um FM als Quelle auszuwählen.
2 Drücken Sie mehrfach MODE, um [AUTO] auszuwählen.
3 Drücken Sie :/9.Die Sendersuche beginnt automatisch und wird beendet, wenn ein Sender gefunden wird, der empfangen werden kann.
(Nur Modelle für Europa) Wenn Sie einen FM-Sender einstellen, der RDS-Dienste anbietet, wird der Name des Senders oder Diensts auf dem Display angezeigt.
Programmieren von Radiosendern• Sie können bis zu 20 voreingestellte Radiosender
programmieren.• Zum Überschreiben eines programmierten Radiosenders
speichern Sie einen anderen mit der gleichen Sequenznummer.
1 Stellen Sie einen Radiosender ein.2 Drücken Sie MEMORY.3 Drücken Sie mehrfach :/9 (/), um eine
voreingestellte Nummer auszuwählen, und drücken Sie dann .
Auf dem Display wird "COMPLETE" angezeigt, und der Radiosender wird unter der voreingestellten Nummer registriert.4 Wiederholen Sie die Schritte 1 bis 3, um dem
Programm weitere Radiosender hinzuzufügen.
∫ Einstellen eines voreingestellten Radiosenders1 Drücken Sie INPUT auf der Fernbedienung oder
mehrfach INPUT am Hauptgerät, um FM als Quelle auszuwählen.
2 Drücken Sie mehrfach MODE, um [PRESET] auszuwählen.
3 Drücken Sie / , um die gewünschte voreingestellte Nummer auszuwählen.
Wenn beim Empfang einer FM-Stereo-Übertragung Störgeräusche auftreten, drücken Sie mehrfach ST/MONO, um [MONO] (Mono-Empfang) auszuwählen. So lassen sich die Störgeräusche verringern.
Weitere Merkmale∫ Automatischer Standby-Modus
• Dieses Produkt wird nach 15 Minuten Inaktivität automatisch in den Standby-Modus geschaltet.
Halten Sie Í auf der Fernbedienung oder am Hauptgerät gedrückt."AUTO STANDBY ON" oder "AUTO STANDBY OFF" wird auf dem Hauptdisplay angezeigt, dann wird die Einstellung gewechselt.In den folgenden Fällen wird das System möglicherweise nicht automatisch in den Standby-Modus geschaltet:
• Wenn die Tuner-Funktion verwendet wird• Wenn Audiosignale erkannt werden• Während der Wiedergabe von Audiotracks oder
Dateien• Wenn der Play- oder der Sleep-Timer verwendet wird
SN29402702_X-EM16_26_De.book 11 ページ 2016年8月6日 土曜日 午後4時30分
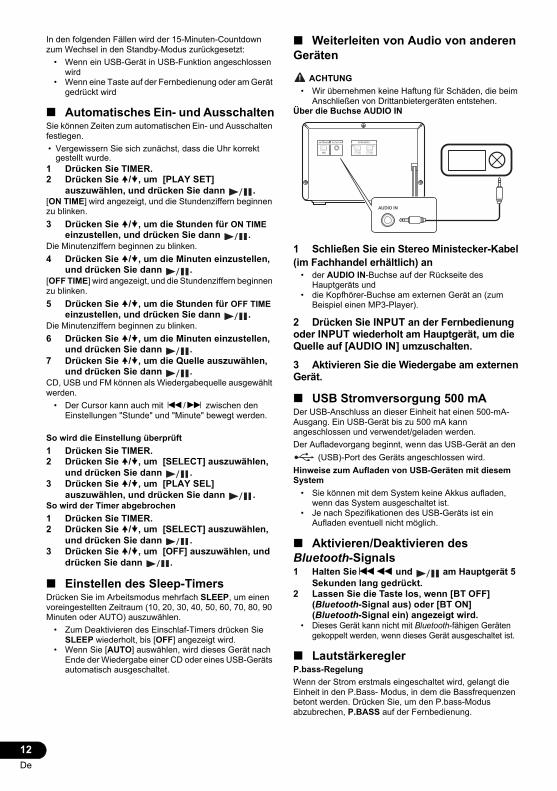
12De
In den folgenden Fällen wird der 15-Minuten-Countdown zum Wechsel in den Standby-Modus zurückgesetzt:
• Wenn ein USB-Gerät in USB-Funktion angeschlossen wird
• Wenn eine Taste auf der Fernbedienung oder am Gerät gedrückt wird
∫ Automatisches Ein- und AusschaltenSie können Zeiten zum automatischen Ein- und Ausschalten festlegen.• Vergewissern Sie sich zunächst, dass die Uhr korrekt
gestellt wurde.1 Drücken Sie TIMER.2 Drücken Sie /, um [PLAY SET]
auszuwählen, und drücken Sie dann .[ON TIME] wird angezeigt, und die Stundenziffern beginnen zu blinken.3 Drücken Sie /, um die Stunden für ON TIME
einzustellen, und drücken Sie dann .Die Minutenziffern beginnen zu blinken.4 Drücken Sie /, um die Minuten einzustellen,
und drücken Sie dann .[OFF TIME] wird angezeigt, und die Stundenziffern beginnen zu blinken.5 Drücken Sie /, um die Stunden für OFF TIME
einzustellen, und drücken Sie dann .Die Minutenziffern beginnen zu blinken.6 Drücken Sie /, um die Minuten einzustellen,
und drücken Sie dann .7 Drücken Sie /, um die Quelle auszuwählen,
und drücken Sie dann .CD, USB und FM können als Wiedergabequelle ausgewählt werden.
• Der Cursor kann auch mit :/9 zwischen den Einstellungen "Stunde" und "Minute" bewegt werden.
So wird die Einstellung überprüft1 Drücken Sie TIMER.2 Drücken Sie /, um [SELECT] auszuwählen,
und drücken Sie dann .3 Drücken Sie /, um [PLAY SEL]
auszuwählen, und drücken Sie dann .So wird der Timer abgebrochen1 Drücken Sie TIMER.2 Drücken Sie /, um [SELECT] auszuwählen,
und drücken Sie dann .3 Drücken Sie /, um [OFF] auszuwählen, und
drücken Sie dann .
∫ Einstellen des Sleep-TimersDrücken Sie im Arbeitsmodus mehrfach SLEEP, um einen voreingestellten Zeitraum (10, 20, 30, 40, 50, 60, 70, 80, 90 Minuten oder AUTO) auszuwählen.
• Zum Deaktivieren des Einschlaf-Timers drücken Sie SLEEP wiederholt, bis [OFF] angezeigt wird.
• Wenn Sie [AUTO] auswählen, wird dieses Gerät nach Ende der Wiedergabe einer CD oder eines USB-Geräts automatisch ausgeschaltet.
∫ Weiterleiten von Audio von anderen Geräten
ACHTUNG• Wir übernehmen keine Haftung für Schäden, die beim
Anschließen von Drittanbietergeräten entstehen.Über die Buchse AUDIO IN
1 Schließen Sie ein Stereo Ministecker-Kabel (im Fachhandel erhältlich) an
• der AUDIO IN-Buchse auf der Rückseite des Hauptgeräts und
• die Kopfhörer-Buchse am externen Gerät an (zum Beispiel einen MP3-Player).
2 Drücken Sie INPUT an der Fernbedienung oder INPUT wiederholt am Hauptgerät, um die Quelle auf [AUDIO IN] umzuschalten.3 Aktivieren Sie die Wiedergabe am externen Gerät.
∫ USB Stromversorgung 500 mADer USB-Anschluss an dieser Einheit hat einen 500-mA-Ausgang. Ein USB-Gerät bis zu 500 mA kann angeschlossen und verwendet/geladen werden.Der Aufladevorgang beginnt, wenn das USB-Gerät an den
(USB)-Port des Geräts angeschlossen wird.Hinweise zum Aufladen von USB-Geräten mit diesem System
• Sie können mit dem System keine Akkus aufladen, wenn das System ausgeschaltet ist.
• Je nach Spezifikationen des USB-Geräts ist ein Aufladen eventuell nicht möglich.
∫ Aktivieren/Deaktivieren des Bluetooth-Signals1 Halten Sie:6 und am Hauptgerät 5
Sekunden lang gedrückt.2 Lassen Sie die Taste los, wenn [BT OFF]
(Bluetooth-Signal aus) oder [BT ON] (Bluetooth-Signal ein) angezeigt wird.
• Dieses Gerät kann nicht mit Bluetooth-fähigen Geräten gekoppelt werden, wenn dieses Gerät ausgeschaltet ist.
∫ LautstärkereglerP.bass-RegelungWenn der Strom erstmals eingeschaltet wird, gelangt die Einheit in den P.Bass- Modus, in dem die Bassfrequenzen betont werden. Drücken Sie, um den P.bass-Modus abzubrechen, P.BASS auf der Fernbedienung.
AUDIO INANTENNA SPEAKERSR
FM
L
SN29402702_X-EM16_26_De.book 12 ページ 2016年8月6日 土曜日 午後4時30分
13De
EnglishFrançais
EspañolDeutsch
ItalianoNederlands
PyccкийZusätzliche Informationen∫ Informationen über USB-AbspielbarkeitKompatible USB-Geräte:
• USB-Flash-Speicher (USB1.1/2.0 (Full Speed))• USB-Flash-Player (USB1.1/2.0 (Full Speed))
Unterstützte Formate:• USB- oder Speicherdateiformat: FAT16, FAT32• MP3-Bitraten (Datenraten): 32 kbps bis 320 kbps und
variable Bitraten• Ordnertiefe 8: einschließlich ROOT• Maximale Anzahl von Ordnern: 256 (einschließlich
ROOT)• Maximale Anzahl von Tracks/Dateien: 999
Maximale Anzahl von Dateien, die in einem Ordner erkannt werden können: 999
• ID3tag: v1.0, v1.1, v1.2, v2.0, v2.2, v2.3, v2.4Audiodateien können je nach den Einstellungen der Codierungssoftware, dem USB-Gerätetyp, der Aufnahme und anderen Bedingungen nicht abgespielt werden.Nicht unterstützte Formate:
• Leere Alben: ein Album, das keine MP3-Dateien enthält• Nicht unterstützte Dateiformate werden übersprungen.
Zum Beispiel Word-Dokumente (.doc) oder MP3-Dateien mit der Erweiterung .dlf werden ignoriert und nicht abgespielt.
• Audiodateien außer MP3.• Andere Dateisysteme als FAT16 und FAT32 (exFAT,
NTFS, HFS usw.).
∫ Unterstützte MP3-Discformate• ISO9660 Level 1/Level 2, Joliet• Maximale Anzahl von Ordnern: 256 (einschließlich
ROOT)• Maximale Anzahl von Tracks/Dateien: 999
Maximale Anzahl von Dateien, die in einem Ordner erkannt werden können: 999
• Unterstützte Abtastfrequenzen: 32 kHz, 44,1 kHz, 48 kHz
• Unterstützte Bitraten: 32 kbps bis 320 kbps, variable Bitraten
• Ordnertiefe 8: einschließlich ROOTAudiodateien können je nach den Einstellungen der Codierungssoftware, dem USB-Gerätetyp, der Aufnahme und anderen Bedingungen nicht abgespielt werden.
Fehlersuche WARNUNG
• Öffnen Sie niemals das Gehäuse dieses Geräts.• Bedienungsfehler werden oft irrtümlich für Störungen oder
Ausfälle gehalten. Wenn Sie den Eindruck haben, dass diese Komponente nicht ordnungsgemäß funktioniert, überprüfen Sie bitte die unten aufgeführten Punkte. Manchmal liegt das Problem bei einer anderen Komponente. Überprüfen Sie die anderen verwendeten Komponenten und elektrischen Geräte. Wenn die Störung auch nach der Überprüfung der unten angegebenen Punkte nicht behoben werden kann, dann bitten Sie Ihren nächstes autorisiertes Service-Center von Pioneer oder Ihren Händler, die Reparaturarbeiten auszuführen.
• Wenn das Gerät infolge von äußeren Einflüssen wie statischer Elektrizität nicht ordnungsgemäß arbeitet, ziehen Sie den Netzstecker, und stecken Sie ihn wieder ein, um das Problem zu beheben.
Wenn "PROTECT" auf dem Display angezeigt wird Entfernen Sie sofort das Netzkabel aus der Steckdose
und überprüfen Sie die folgenden Elemente, wenn "PROTECT" nicht mehr angezeigt wird.
•Vergewissern Sie sich, dass die Belüftungsöffnungen des Systems nicht blockiert sind.Wenn Sie die genannten Punkte überprüft und keine Probleme festgestellt haben, schließen Sie das Netzkabel wieder an und schalten das System ein. Wenn das Problem weiterhin besteht, wenden Sie sich an einen Händler in Ihrer Nähe.
Kein Strom. Stellen Sie sicher, dass das Netzkabel richtig
angeschlossen ist. Stellen Sie sicher, dass die Netzsteckdose Strom
führt. Im automatischen Standby-Modus wird das System
nach 15 Minuten Inaktivität automatisch ausgeschaltet.
Kein oder schlechter Ton. Stellen Sie die Lautstärke ein. Vergewissern Sie sich, dass die Lautsprecher richtig
angeschlossen sind. Keine Reaktion von der Anlage.
Schließen Sie den Netzstecker wieder an und schalten Sie die Anlage erneut ein.
Mit einer Energiesparfunktion schaltet die Anlage automatisch aus, wenn sie 15 Minuten lang nicht bedient wird.
Fernbedienung funktioniert nicht. Verringern Sie den Abstand zwischen der
Fernbedienung und dem Hauptgerät. Setzen Sie die Batterie mit richtiger Polung
entsprechend den Markierungen (+/– Zeichen) ein. Wechseln Sie die Batterien aus. Richten Sie die Fernbedienung direkt auf den Sensor
auf der Frontplatte am Hauptgerät. Es wird keine Disc erkannt.
Eine Disc einlegen. Vergewissern Sie sich, dass die Disc mit der
Beschriftungsseite nach oben weisend eingelegt wird. Warten Sie, bis jegliche Kondensation von der Linse
verschwunden ist. Ersetzen oder reinigen Sie die Disc. Stellen Sie sicher, dass die bespielbare Disc finalisiert
ist und dass das Format unterstützt ist. USB-Speichergerät ist nicht unterstützt.
Vergewissern Sie sich, dass das USB-Speichergerät mit dieser Anlage kompatibel ist.
Ist die USB-Speichereinheit richtig angeschlossen? Überzeugen Sie sich, dass die Einheit fest angeschlossen worden ist.
Der Datei- oder Ordnername (Albumname) wird nicht korrekt angezeigt. Auf diesem Gerät können die folgenden Zeichen
dargestellt werden:• Großbuchstaben (A bis Z).• Ziffern (0 bis 9).• Symbole (< >* +, [ ] _).Andere Zeichen werden als "_" dargestellt.
"OVER CURRENT" wird angezeigt. Es wurde ein Problem bei der elektrischen
Stromstärke am (USB)-Port festgestellt. Schalten Sie das System aus und entfernen Sie das USB-Gerät vom (USB)-Port. Vergewissern Sie sich, dass kein Problem beim USB-Gerät vorliegt.
X-EM16&26_TOC&Body_De.fm 13 ページ 2016年8月8日 月曜日 午後1時12分
14De
Wenn die Anzeige weiterhin erscheint, wenden Sie sich an einen Händler in Ihrer Nähe.
Kann einige Dateien auf dem USB-Speichergerät nicht abspielen. Vergewissern Sie sich, dass das Dateiformat unterstützt ist. Vergewissern Sie sich, dass die Anzahl der Dateien
nicht das Maximum überschreitet. (seite 13) Rundfunkempfang ist schlecht.
Den Abstand zwischen dieser Anlage und anderen elektrischen Gerät vergrößern.
Die Antenne vollständig ausstrecken. Timer arbeitet nicht.
Die Uhr richtig einstellen. Den Timer einschalten.
Uhr-/Timer-Einstellung ist gelöscht. Stromausfall oder abgetrenntes Netzkabel. Uhr/Timer zurücksetzen.
Wenn das mit der drahtlosen Bluetooth-Technologie ausgestattete Gerät angeschlossen ist oder betrieben wird (nur X-EM26) Ein Gerät mit Bluetooth drahtloser Technologie kann
nicht angeschlossen oder betätigt werden. Das Gerät mit Bluetooth drahtloser Technologie gibt keinen Ton aus, oder Tonunterbrechungen treten auf. Prüfen Sie nach, dass sich kein Gerät in der Nähe dieser
Anlage befindet, das elektromagnetische Wellen auf dem 2,4-GHz-Band abgibt (z. B. ein Mikrowellenherd, ein drahtloses LAN-Gerät oder ein Gerät mit Bluetooth drahtloser Technologie). Wenn ein solches Objekt sich neben dem Gerät befindet, stellen Sie das Gerät weiter entfernt davon auf. Oder schalten Sie das Gerät, das elektromagnetische Wellen aussendet, aus.
Prufen Sie nach, dass sich das Gerat mit Bluetooth drahtloser Technologie nicht in einem zu grosen Abstand von dieser Anlage befindet, und dass sich keine Hindernisse auf dem Ubertragungsweg zwischen dem Gerat mit Bluetooth drahtloser Technologie und dieser Anlage befinden. Stellen Sie das Gerat mit Bluetooth drahtloser Technologie in einem Abstand von weniger 10 m* von dieser Anlage so auf, dass sich keine Hindernisse auf dem Ubertragungsweg befinden.
* Die angegebene Entfernung ist als ein grober Richtwert zu betrachten. Die tatsächlich mögliche Entfernung zwischen den Geräten kann in Abhängigkeit von der Umgebung variieren.
Das Gerät mit Bluetooth drahtloser Technologie ist möglicherweise nicht auf einen Kommunikationsmodus eingestellt, der die Bluetooth drahtlose Technologie unterstützt. Prüfen Sie die Einstellungen des Geräts mit Bluetooth-Wireless-Technologie.
Vorsichtsmaßregeln bei der Verwendung
∫ Transport dieses GerätesVergewissern Sie sich vor einer Fortbewegung dieses Gerätes zunächst, dass keine Disc eingelegt ist. Drücken Sie dann Í, warten Sie, bis [STANDBY] auf dem Hauptdisplay erlischt, und ziehen Sie dann den Netzstecker ab. Wenn die Einheit mit einer eigelegten Disc transportiert oder fortbewegt wird oder wenn ein anderes Gerät an den USB-Anschluss oder die Ministecker-Buchse AUDIO IN angeschlossen ist, kann es zu einer Beschädigung kommen.
∫ Installationsort• Wählen Sie einen stabilen Ort in der Nähe des
Fernsehgerätes oder der Hi-Fi-Anlage, das bzw. die gemeinsam mit diesem Gerät verwendet werden soll.
• Stellen Sie dieses Gerät nicht auf einem Fernsehgerät oder Farbmonitor auf. Installieren Sie den Receiver auch in ausreichender Entfernung von Kassettenlaufwerken und anderen Geräten, die leicht von Magnetkräften beeinflusst werden.
Vermeiden Sie die folgenden Örtlichkeiten:• Orte, die direktem Sonnenlicht ausgesetzt sind• Feuchte oder schlecht belüftete Orte• Sehr heiße Orte• Orte, die Vibrationen ausgesetzt sind• Orte, an denen sehr viel Staub und Zigarettenrauch
vorhanden ist• Orte, die dem Auftreten von Ruß, Dampf oder Hitze
ausgesetzt sind (Küche usw.)
∫ Stellen Sie keine Gegenstände auf dieses GerätStellen Sie keine Gegenstände oben auf dieses Gerät.Verstopfen Sie nicht die Lüftungsöffnungen.Verwenden Sie dieses Gerät nicht auf zotteligen Teppichen, einem Bett, Sofa usw., oder während es in ein Tuch, eine Decke usw. eingewickelt ist. Anderenfalls besteht die Gefahr einer Beschädigung durch Überhitzung.Setzen Sie den Receiver nicht der Hitze aus.Platzieren Sie diese Einheit nicht auf einem Verstärker oder auf anderen Geräten, die Wärme entwickeln. Bei einer Regal-Montage sollte die Einheit in einem Fach unter dem Verstärker platziert werden, um die vom Verstärker oder von anderen Geräten abgegebene Wärme zu vermeiden.
• Schalten Sie den Strom für diese Einheit aus, wenn Sie sie nicht verwenden.
• Je nach den Signalbedingungen kann es, wenn der Strom dieser Einheit eingeschaltet ist, auf dem Fernsehbildschirm zu Streifenmustern und bei Radiosendungen zu Tongeräuschen kommen. Wenn dies geschieht, dann schalten Sie den Strom für diese Einheit aus.
∫ Reinigen des Produkts• Trennen Sie vor einer Reinigung des Gerätes
grundsätzlich den Netzstecker von der Netzsteckdose.• Reinigen Sie die Außenflächen mit einem weichen Tuch.
Tränken Sie bei hartnäckigem Schmutz ein weiches Tuch mit einer Lösung aus einem neutralen Spülmittel, das mit 5 bis 6 Teilen Wasser verdünnt ist, wringen Sie es gründlich aus, wischen Sie den Schmutz mit dem Tuch weg und wischen Sie dann mit einem weichen, trockenen Tuch nach.
• Alkohol, Verdünner, Benzin, Insektizide usw. könnten dazu führen, dass der Druck oder die Farbe abgehen. Vermeiden Sie außerdem einen längeren Kontakt von Gegenständen aus Gummi oder Vinyl mit dem Gerät, da diese Substanzen das Gehäuse beschädigen können.
• Bei der Verwendung von mit Chemikalien imprägnierten Wischtüchern usw. lesen Sie bitte sorgfältig die den Wischtüchern beiliegenden Vorsichtsmaßregeln.
∫ Reinigen der Abtasterlinse• Die Linse dieses Geräts verschmutzt bei normalem
Gebrauch praktisch nicht. Sollte sie dennoch auf Grund von Staub oder Schmutz versagen, wenden Sie sich an die nächste Pioneer-Kundendienstvertretung. Vom Gebrauch von handelsüblichen Linsenreinigern wird abgeraten, da derartige Reiniger die Abtasterlinse beschädigen können.
Handhabung von Discs∫ Aufbewahren
• Platzieren Sie Discs stets in Ihren Hüllen und bewahren Sie sie vertikal auf. Vermeiden Sie für den Aufbewahrungsort Hitze, Feuchtigkeit, direktes Sonnenlicht und extreme Kälte.
• Lesen Sie unbedingt die mit der Disc mitgelieferten Behandlungshinweise.
SN29402702_X-EM16_26_De.book 14 ページ 2016年8月6日 土曜日 午後4時30分
15De
EnglishFrançais
EspañolDeutsch
ItalianoNederlands
Pyccкий∫ Reinigen der Discs
• Fingerabdrücke oder Staub auf den Discs können dazu führen, dass die Discs nicht abgespielt werden können. Verwenden Sie in diesem Falle zum Reinigen ein Tuch usw., mit dem Sie die Disc vorsichtig von der Innenseite zur Außenseite hin abwischen. Verwenden Sie zum Reinigen keine verschmutzten Tücher.
• Verwenden Sie zum Reinigen kein Benzin, keinen Verdünner und keine anderen leicht flüchtigen Chemikalien. Verwenden Sie auch keine Sprays und keine antistatischen Mittel.
• Verwenden Sie bei hartnäckigem Schmutz etwas Wasser auf einem weichen Tuch, wringen Sie dieses Tuch gründlich aus, wischen Sie den Schmutz weg und wischen Sie dann die Feuchtigkeit mit einem trockenen Tuch weg.
• Verwenden Sie auf keinen Fall beschädigte Discs (Discs mit Rissen oder verzogene Discs).
• Lassen Sie auf keinen Fall die Signal-Oberfläche der Disc zerkratzt oder schmutzig werden.
• Bringen Sie kein Papier und keine Sticker auf der Oberfläche der Discs an. Wenn Sie dies tun, könnten sich die betreffenden Discs verziehen, so dass es unmöglich wird, sie abzuspielen. Beachten Sie auch, dass Leih- Discs häufig Aufkleber tragen, an deren Rändern Klebstoff austreten kann. Überzeugen Sie sich vor der Verwendung der geliehenen Discs, dass sich rund um die Kanten solcher Etiketten kein Klebstoff befindet.
∫ Speziell geformte DiscsSpeziell geformte Discs (herzförmig, sechseckig usw.) können nicht mit diesem Gerät abgespielt werden. Verwenden Sie keine derartigen Discs, da diese das Gerät beschädigen können.
Technische Daten• Verstärker(Europäische Modelle)RMS-Ausgangsleistung. . . . . . . . . . . . . . . . 5 W + 5 W (8 Ohm, 1 kHz, THD 10 %)
(Nur bei Modellen für Nordamerika)
• DiscDisc-Durchmesser . . . . . . . . . . . . . . . . . . . . . 12 cm, 8 cmUnterstützte Discs . . . . . . . . . . . . . . . . . . . CD-DA, CD-R, CD-RW, MP3-CDFrequenzgang. . . . . . . . . . . . 20 Hz bis 20 kHz (44,1 kHz)
• Tuner (UKW)Abstimmbereich . . . . . . . . . . . . . . .87,5 MHz bis 108 MHz
• Bluetooth (nur X-EM26)Version . . . . . . . . . . . . . . .Bluetooth-Spezifikation Ver. 4.0Ausgang . . . . . . . . . . . . . Bluetooth-Spezifikation Klasse 2Geschätzter Sendeabstand (Sichtlinie)* . . . . . . Etwa 10 mFrequenzbereich. . . ISM-Band 2,4000 GHz - 2,4835 GHzModulation . . . . . . . . FH-SS (Frequency Hopping Spread Spectrum)Unterstützte Bluetooth-Profile. . . . . . . . . . . A2DP, AVRCPUnterstützter Codec . . . . . . . . . . . SBC (Subband Codec)Unterstützter Kopierschutz . . . . . . . . . . . . . . . . . . SCMS-T* Der Sendeabstand ist ein Schätzwert.Die tatsächlichen Übertragungsdistanzen können je nach den Umgebungsbedingungen unterschiedlich sein.
• LautsprecherTyp . . . . . . . . . . . . . . . . . . 1-Weg-1-Lautsprecher-SystemLautsprecher-Gestaltung . . . . . . . . . .Typ mit 8-cm-KonusLautsprecherimpedanz . . . . . . . . . . . . . . . . . . . . . . . . . 8
• Allgemeine InformationenNetzleistung (Europäische Modelle) . . . . . . . . . . . . . . . . . . . . . . 220 V bis 240 V, 50 Hz/60 HzNetzleistung (Nur bei Modellen für Nordamerika) . . . . . . . . . . . . . . . . . . . . . . . . . . . . . . . . . . . 120 V, 60 HzLeistungsaufnahme im Betrieb . . . . . . . . . . . . . . . . . .12 WStandby-Leistungsaufnahme 0,5 WUSB Direct . . . . . . . . . . . . . . . . .USB 1.1/2.0 (Full Speed)USB-Spannung 5 V500 mAAbmessungen– Hauptgerät (B x H x T). . . 180 mm x 121 mm x 221 mm– Lautsprecherbox (B x H x T) . . . . . . . . . . . . . . . . . . . . . . 121 mm x 182 mm x 200 mmGewicht– Hauptgerät . . . . . . . . . . . . . . . . . . . . . . . . . . . . . . . 1,3 kg– Lautsprecherbox . . . . . . . . . . . . . . . . . . . . . . . 1,1 kg x 2• Änderungen der technischen Daten und das Design dieses
Geräts ohne vorherige Ankündigung bleiben vorbehalten.• Firmen- und Produktnamen, die in der vorliegenden
Bedienungsanleitung verwendet werden, sind Warenzeichen oder eingetragene Warenzeichen der betreffenden Firmen.
"Pioneer" und "PBASS" sind Warenzeichen von Pioneer Corporation und werden unter Lizenz verwendet.
© 2016 Onkyo & Pioneer Corporation.Alle Rechte vorbehalten.
Ausgangsnennleistung Alle Kanäle:
Min. 5 W kontinuierliche Leistung/Kanal, 8 Ohm Last,2 Kanäle angetrieben bei 1 kHz und max. harmonischer Gesamtverzerrung von 10 % (FTC)2-Kanal x 5 W (8 , 1 kHz, 2-Kanal angetrieben) (IEC)
X-EM16&26_TOC&Body_De.fm 15 ページ 2016年8月9日 火曜日 午後3時50分
LET OPOM HET GEVAAR VOOR EEN ELEKTRISCHE SHOCK TE VOORKOMEN, DEKSEL (OF RUG) NIET VERWIJDEREN. AAN DE BINNENZIJDE BEVINDEN ZICH GEEN ELEMENTEN DIE DOOR DE GEBRUIKER KUNNEN BEDIEND WORDEN. ENKEL DOOR GEKWALIFICEERD PERSONEEL TE BEDIENEN.
D3-4-2-1-1_B2_Nl
WAARSCHUWINGDit apparaat is niet waterdicht. Om brand of een elektrische schok te voorkomen, mag u geen voorwerp dat vloeistof bevat in de buurt van het apparaat zetten (bijvoorbeeld een bloemenvaas) of het apparaat op andere wijze blootstellen aan waterdruppels, opspattend water, regen of vocht.
D3-4-2-1-3_A1_Nl
WAARSCHUWINGOm brand te voorkomen, mag u geen open vuur (zoals een brandende kaars) op de apparatuur zetten.
D3-4-2-1-7a_A1_Nl
BELANGRIJKE INFORMATIE BETREFFENDE DE VENTILATIELet er bij het installeren van het apparaat op dat er voldoende vrije ruimte rondom het apparaat is om een goede doorstroming van lucht te waarborgen (tenminste 10 cm boven, 10 cm achter en 10 cm aan de zijkanten van het apparaat).
WAARSCHUWINGDe gleuven en openingen in de behuizing van het apparaat zijn aangebracht voor de ventilatie, zodat een betrouwbare werking van het apparaat wordt verkregen en oververhitting wordt voorkomen. Om brand te voorkomen, moet u ervoor zorgen dat deze openingen nooit geblokkeerd worden of dat ze afgedekt worden door voorwerpen (kranten, tafelkleed, gordijn e.d.) of door gebruik van het apparaat op een dik tapijt of een bed.
D3-4-2-1-7b*_A1_Nl
GebruiksomgevingTemperatuur en vochtigheidsgraad op de plaats van gebruik:+5 °C tot +35 °C, minder dan 85 % RH (ventilatieopeningen niet afgedekt)Zet het apparaat niet op een slecht geventileerde plaats en stel het apparaat ook niet bloot aan hoge vochtigheid of direct zonlicht (of sterke kunstmatige verlichting).
D3-4-2-1-7c*_A1_Nl
LET OPDit apparaat is geclassificeerd als een klasse 1 laserproduct onder de veiligheidsnormen voor laserproducten, IEC 60825-1:2007.
KLASSE 1 LASERPRODUCT
D58-5-2-2a_A1_Nl
Dit apparaat is bestemd voor normaal huishoudelijk gebruik. Indien het apparaat voor andere doeleinden of op andere plaatsen wordt gebruikt (bijvoorbeeld langdurig gebruik in een restaurant voor zakelijke doeleinden, of gebruik in een auto of boot) en als gevolg hiervan defect zou raken, zullen de reparaties in rekening gebracht worden, ook als het apparaat nog in de garantieperiode is.
K041_A1_Nl
WAARSCHUWING NETSNOERPak het netsnoer beet bij de stekker. Trek de stekker er niet uit door aan het snoer te trekken en trek nooit aan het netsnoer met natte handen aangezien dit kortsluiting of een elektrische schok tot gevolg kan hebben. Plaats geen toestel, meubelstuk o.i.d. op het netsnoer, en klem het niet vast. Maak er nooit een knoop in en en verbind het evenmin met andere snoeren. De netsnoeren dienen zo te worden geleid dat er niet per ongeluk iemand op gaat staan. Een beschadigd netsnoer kan brand of een elektrische schok veroorzaken. Kontroleer het netsnoer af en toe. Wanneer u de indruk krijgt dat het beschadigd is, dient u bij uw dichtstbijzijnde erkende PIONEER onderhoudscentrum of uw dealer een nieuw snoer te kopen.
S002*_A1_Nl
LET OPDe schakelaar van dit apparaat koppelt het apparaat niet volledig los van het lichtnet. Aangezien er na het uitschakelen van het apparaat nog een kleine hoeveelheid stroom blijft lopen, moet u de stekker uit het stopcontact halen om het apparaat volledig van het lichtnet los te koppelen. Plaats het apparaat zodanig dat de stekker in een noodgeval gemakkelijk uit het stopcontact kan worden gehaald. Om brand te voorkomen, moet u de stekker uit het stopcontact halen wanneer u het apparaat langere tijd niet denkt te gebruiken (bijv. wanneer u op vakantie gaat).
D3-4-2-2-2a*_A1_Nl
WAARSCHUWINGBerg kleine onderdelen buiten het bereik van kinderen en baby’s op. Neem direct contact op met een dokter bij per ongeluk inslikken.
SN29402702_X-EM16_26_Nl.book 2 ページ 2016年8月6日 土曜日 午後4時35分
K058a_A1_Nl
Pb
Gebruikersinformatie voor het verzamelen en verwijderen van oude producten en batterijen
De symbolen op producten, verpakkingen en bijbehorende documenten geven aan dat de gebruikte elektronische producten en batterijen niet met het gewone huishoudelijk afval kunnen worden samengevoegd.
Er bestaat een speciaal wettelijk voorgeschreven verzamelsysteem voor de juiste behandling, het opnieuw bruikbaar maken en de recyclage van gebruikte producten en batterijen.
Door een correcte verzamelhandeling zorgt u ervoor dat het verwijderde product en/of batterij op de juiste wijze wordt behandeld, opnieuw bruikbaar wordt gemaakt, wordt gerecycleerd en het niet schadelijk is voor de gezondheid en het milieu.
Voor verdere informatie betreffende de juiste behandling, het opnieuw bruikbaar maken en de recyclage van gebruikte producten en batterijen kunt u contact opnemen met de plaatselijke overheid of een verkooppunt.
Deze symbolen zijn enkel geldig in de landen van de europese unie.
Indien u zich in een ander dan bovengenoemde landen bevindt kunt u contact opnemen met de plaatselijke overheid voor meer informatie over de juiste verwijdering van het product.
Symbolenvoor batterijen
Symbool voortoestellen
Over condensvochtAls het apparaat direct van een koude omgeving in een warme kamer wordt geplaatst (’s winters bijvoorbeeld), of als de kamer waarin het apparaat staat plotseling snel wordt verwarmd, kan ervocht uit de lucht in het inwendige van het apparaat condenseren (als druppeltjes op de lens enz.). Na dergelijke condensatie zal het apparaat niet goed werken, zodat u geen discs kunt afspelen. Laathet apparaat dan 1 tot 2 uur lang (afhankelijk van de hoeveelheid condensatie) ongebruikt aan staan, totdat het condensvocht verdampt is. Wanneer alle condens is verdampt, zal het apparaat weer normaal werken. Condensatie kan ook ’s zomers optreden, als het apparaat direct in de koude luchtstroom van eenairconditioning staat. Wanneer dit gebeurt, verplaatst u het apparaat naar een andere plek.
Waarschuwing radiogolvenalleen X-EM26Dit toestel maakt gebruik van radiogolven met een frequentie van 2,4 GHz, een band die ook gebruikt wordt door andere draadloze systemen (draadloze telefoons, magnetronovens enz.).In dit geval verschijnt er ruis in het televisiebeeld en is het mogelijk dat dit apparaat (en ook de producten die door die apparaat worden ondersteund) signaalinterferentie veroorzaakt in de antenne-ingangsaansluiting van uw televisie, video-apparaat, satelliettuner enz.Vergroot in een dergelijk geval de afstand tussen de ingangsaansluiting voor de antenne en dit toestel (inclusief door dit toestel ondersteunde apparatuur).• Pioneer kan niet aansprakelijk worden gesteld voor
storingen of foutieve werking van het geschikte Pioneer product door communicatiefouten/storingen die samenhangen met uw netwerkverbinding en/of de aangesloten apparatuur. Raadpleeg uw Internet-provider of de fabrikant van uw netwerkapparatuur.
• Er is een aparte overeenkomst/betaling vereist met/aan een internet service provider om gebruik te kunnen maken van het internet.
SN29402702_X-EM16_26_Nl.book 3 ページ 2016年8月6日 土曜日 午後4時35分
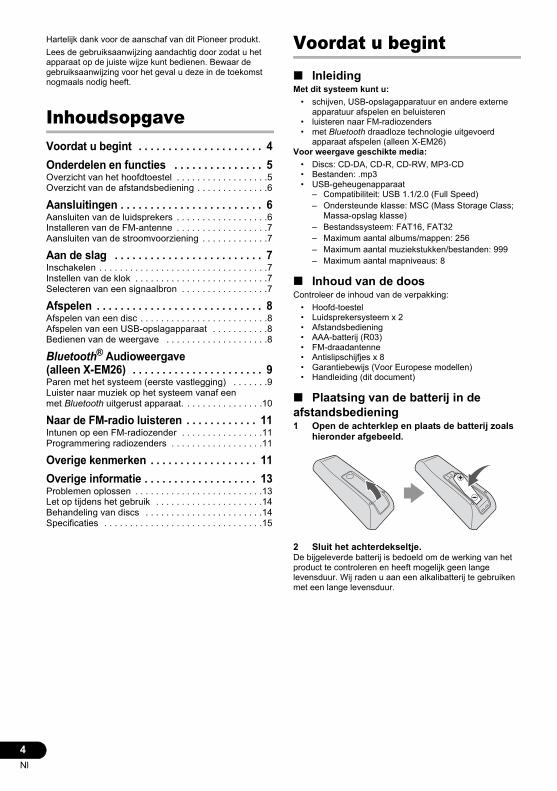
4Nl
Hartelijk dank voor de aanschaf van dit Pioneer produkt.Lees de gebruiksaanwijzing aandachtig door zodat u het apparaat op de juiste wijze kunt bedienen. Bewaar de gebruiksaanwijzing voor het geval u deze in de toekomst nogmaals nodig heeft.
InhoudsopgaveVoordat u begint . . . . . . . . . . . . . . . . . . . . . 4Onderdelen en functies . . . . . . . . . . . . . . . 5Overzicht van het hoofdtoestel . . . . . . . . . . . . . . . . . .5Overzicht van de afstandsbediening . . . . . . . . . . . . . .6
Aansluitingen . . . . . . . . . . . . . . . . . . . . . . . . 6Aansluiten van de luidsprekers . . . . . . . . . . . . . . . . . .6Installeren van de FM-antenne . . . . . . . . . . . . . . . . . .7Aansluiten van de stroomvoorziening . . . . . . . . . . . . .7
Aan de slag . . . . . . . . . . . . . . . . . . . . . . . . . 7Inschakelen . . . . . . . . . . . . . . . . . . . . . . . . . . . . . . . . .7Instellen van de klok . . . . . . . . . . . . . . . . . . . . . . . . . .7Selecteren van een signaalbron . . . . . . . . . . . . . . . . .7
Afspelen . . . . . . . . . . . . . . . . . . . . . . . . . . . . 8Afspelen van een disc . . . . . . . . . . . . . . . . . . . . . . . . .8Afspelen van een USB-opslagapparaat . . . . . . . . . . .8Bedienen van de weergave . . . . . . . . . . . . . . . . . . . .8
Bluetooth® Audioweergave (alleen X-EM26) . . . . . . . . . . . . . . . . . . . . . . 9Paren met het systeem (eerste vastlegging) . . . . . . .9Luister naar muziek op het systeem vanaf een met Bluetooth uitgerust apparaat. . . . . . . . . . . . . . . .10
Naar de FM-radio luisteren . . . . . . . . . . . . 11Intunen op een FM-radiozender . . . . . . . . . . . . . . . .11Programmering radiozenders . . . . . . . . . . . . . . . . . .11
Overige kenmerken . . . . . . . . . . . . . . . . . . 11Overige informatie . . . . . . . . . . . . . . . . . . . 13Problemen oplossen . . . . . . . . . . . . . . . . . . . . . . . . .13Let op tijdens het gebruik . . . . . . . . . . . . . . . . . . . . .14Behandeling van discs . . . . . . . . . . . . . . . . . . . . . . .14Specificaties . . . . . . . . . . . . . . . . . . . . . . . . . . . . . . .15
Voordat u begint∫ InleidingMet dit systeem kunt u:
• schijven, USB-opslagapparatuur en andere externe apparatuur afspelen en beluisteren
• luisteren naar FM-radiozenders• met Bluetooth draadloze technologie uitgevoerd
apparaat afspelen (alleen X-EM26)Voor weergave geschikte media:
• Discs: CD-DA, CD-R, CD-RW, MP3-CD• Bestanden: .mp3• USB-geheugenapparaat
– Compatibiliteit: USB 1.1/2.0 (Full Speed)– Ondersteunde klasse: MSC (Mass Storage Class;
Massa-opslag klasse)– Bestandssysteem: FAT16, FAT32– Maximum aantal albums/mappen: 256– Maximum aantal muziekstukken/bestanden: 999– Maximum aantal mapniveaus: 8
∫ Inhoud van de doosControleer de inhoud van de verpakking:
• Hoofd-toestel• Luidsprekersysteem x 2• Afstandsbediening• AAA-batterij (R03)• FM-draadantenne• Antislipschijfjes x 8• Garantiebewijs (Voor Europese modellen)• Handleiding (dit document)
∫ Plaatsing van de batterij in de afstandsbediening1 Open de achterklep en plaats de batterij zoals
hieronder afgebeeld.
2 Sluit het achterdekseltje.De bijgeleverde batterij is bedoeld om de werking van het product te controleren en heeft mogelijk geen lange levensduur. Wij raden u aan een alkalibatterij te gebruiken met een lange levensduur.
SN29402702_X-EM16_26_Nl.book 4 ページ 2016年8月6日 土曜日 午後4時35分
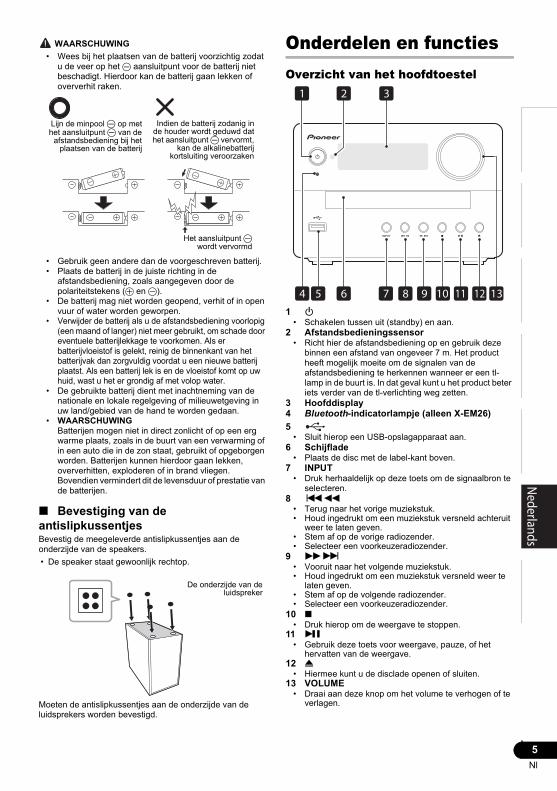
5Nl
EnglishFrançais
EspañolDeutsch
ItalianoNederlands
Pyccкий WAARSCHUWING
• Wees bij het plaatsen van de batterij voorzichtig zodat u de veer op het - aansluitpunt voor de batterij niet beschadigt. Hierdoor kan de batterij gaan lekken of oververhit raken.
• Gebruik geen andere dan de voorgeschreven batterij.• Plaats de batterij in de juiste richting in de
afstandsbediening, zoals aangegeven door de polariteitstekens (+ en -).
• De batterij mag niet worden geopend, verhit of in open vuur of water worden geworpen.
• Verwijder de batterij als u de afstandsbediening voorlopig (een maand of langer) niet meer gebruikt, om schade door eventuele batterijlekkage te voorkomen. Als er batterijvloeistof is gelekt, reinig de binnenkant van het batterijvak dan zorgvuldig voordat u een nieuwe batterij plaatst. Als een batterij lek is en de vloeistof komt op uw huid, wast u het er grondig af met volop water.
• De gebruikte batterij dient met inachtneming van de nationale en lokale regelgeving of milieuwetgeving in uw land/gebied van de hand te worden gedaan.
• WAARSCHUWINGBatterijen mogen niet in direct zonlicht of op een erg warme plaats, zoals in de buurt van een verwarming of in een auto die in de zon staat, gebruikt of opgeborgen worden. Batterijen kunnen hierdoor gaan lekken, oververhitten, exploderen of in brand vliegen. Bovendien vermindert dit de levensduur of prestatie van de batterijen.
∫ Bevestiging van de antislipkussentjesBevestig de meegeleverde antislipkussentjes aan de onderzijde van de speakers.• De speaker staat gewoonlijk rechtop.
Moeten de antislipkussentjes aan de onderzijde van de luidsprekers worden bevestigd.
Onderdelen en functiesOverzicht van het hoofdtoestel
1 Í• Schakelen tussen uit (standby) en aan.
2 Afstandsbedieningssensor• Richt hier de afstandsbediening op en gebruik deze
binnen een afstand van ongeveer 7 m. Het product heeft mogelijk moeite om de signalen van de afstandsbediening te herkennen wanneer er een tl-lamp in de buurt is. In dat geval kunt u het product beter iets verder van de tl-verlichting weg zetten.
3 Hoofddisplay4 Bluetooth-indicatorlampje (alleen X-EM26)5
• Sluit hierop een USB-opslagapparaat aan.6 Schijflade
• Plaats de disc met de label-kant boven.7 INPUT
• Druk herhaaldelijk op deze toets om de signaalbron te selecteren.
8 :6• Terug naar het vorige muziekstuk.• Houd ingedrukt om een muziekstuk versneld achteruit
weer te laten geven.• Stem af op de vorige radiozender.• Selecteer een voorkeuzeradiozender.
9 59• Vooruit naar het volgende muziekstuk.• Houd ingedrukt om een muziekstuk versneld weer te
laten geven.• Stem af op de volgende radiozender.• Selecteer een voorkeuzeradiozender.
10 ∫• Druk hierop om de weergave te stoppen.
11 I• Gebruik deze toets voor weergave, pauze, of het
hervatten van de weergave.12 <
• Hiermee kunt u de disclade openen of sluiten.13 VOLUME
• Draai aan deze knop om het volume te verhogen of te verlagen.
Lijn de minpool - op methet aansluitpunt - van de
afstandsbediening bij hetplaatsen van de batterij
Indien de batterij zodanig inde houder wordt geduwd dathet aansluitpunt - vervormt,
kan de alkalinebatterijkortsluiting veroorzaken
Het aansluitpunt -wordt vervormd
De onderzijde van deluidspreker
21
137 8 9 1211
3
4 5 6 10
SN29402702_X-EM16_26_Nl.book 5 ページ 2016年8月6日 土曜日 午後4時35分

6Nl
Overzicht van de afstandsbediening
1 Í• Schakel tussen stand-by en aan.
2 SLEEP• Stel de slaaptimer in de werkingsmodus in.
3 TIMER• Gebruik deze toets om de klok in te stellen en ook om
de timers in te stellen en te controleren.4 MODE
• Aspeelmodus selecteren.• Tuning Mode.• BT-menu aan- of uitzetten.
5 :/9• Spring naar het nummer.• Ingedrukt houden om snel binnen een nummer vooruit/
achteruit te spoelen.• Tune in op het station.• Selecteer een voorkeuzeradiozender.
6 /• Gebruiken om systeeminstellingen en modussen te
selecteren/ te schakelen.• Gebruik om een map (album) te selecteren op een
MP3-disc of USB-apparaat.• Selecteer een voorkeuzeradiozender.
7 DISPLAY• Geef de klok weer.• Beeld de huidige status of media-informatie af.• Beeld de beschikbare ID3-informatie van MP3-
nummers af.8 REPEAT, ST/MONO
• REPEAT: Gebruik om de herhaalmodus van elke invoerbron te selecteren. (pagina 8)
• ST/MONO: Gebruik om FM-stereo of mono-ontvangst te selecteren. (pagina 11)
9 MEMORY• Gebruiken om de nummers te programmeren.• Radiozenders in FM functie voorkiezen.
10 CLEAR• Wis het laatste nummer of bestand van het programma
in Programma-afspeelmodus.11 P.BASS
• Verhoog lage tonen.12 DIMMER
• Indrukken om de display te dimmen of helderder te maken. De helderheid kan in 3 stappen bediend worden.
13 INPUT• Gebruik om de invoerbron (CD, USB, BT AUDIO
(alleen X-EM26), FM, AUDIO IN) te selecteren.14
• Gebruik om af te spelen, te pauzeren of afspelen te hervatten.
• Gebruik om handelingen te bevestigen.15 ∫
• Gebruik om het afspelen te stoppen.16 VOLUME +/-
• Gebruik om het luistervolume in te stellen.
17• Gebruik om het volume uit te zetten of te herstellen.
18 EQ• Gebruik om EQ.
[FLAT] l [POP] l [JAZZ] l [ROCK]l [CLASSIC] l (Terug naar begin) te selecteren
Aansluitingen WAARSCHUWING
• Zorg er te allen tijde voor dat het apparaat is uitgeschakeld en verwijder het netsnoer van het stopcontact als u aansluitingen doet of wijzigt.
• Sluit het netsnoer aan nadat alle aansluitingen tussen de diverse apparaten zijn voltooid.
Aansluiten van de luidsprekers• Beide luidsprekers kunnen aan de rechter- of linkerzijde
worden gebruikt.
WAARSCHUWING• Sluit geen andere luidsprekers aan dan die bij dit
systeem worden geleverd.
17
16
1
2
4
5
11
10
6
9
5
12
1514
18
6
7
8
13
3
AUDIO INANTENNA SPEAKERSR
FM
L
SPEAKERSR L
Rechterluid-spreker
Linkerluid-spreker
Het achterpaneel van dit apparaat
SN29402702_X-EM16_26_Nl.book 6 ページ 2016年8月6日 土曜日 午後4時35分
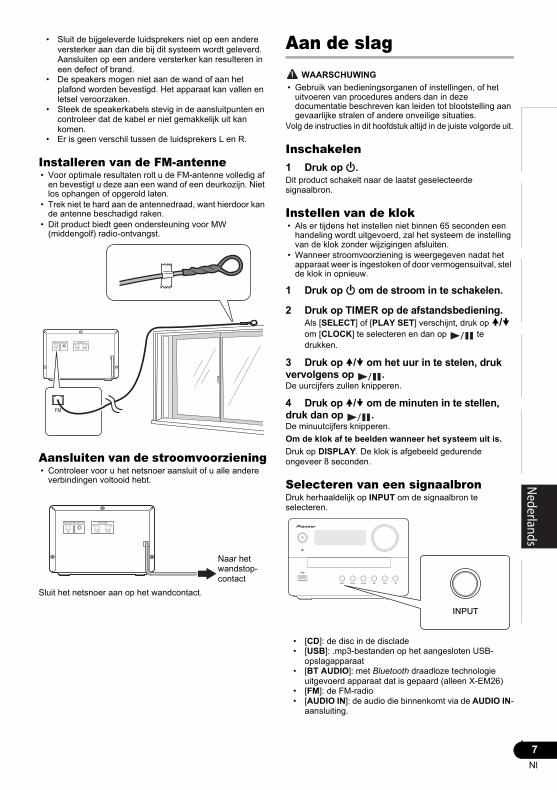
7Nl
EnglishFrançais
EspañolDeutsch
ItalianoNederlands
Pyccкий• Sluit de bijgeleverde luidsprekers niet op een andere
versterker aan dan die bij dit systeem wordt geleverd. Aansluiten op een andere versterker kan resulteren in een defect of brand.
• De speakers mogen niet aan de wand of aan het plafond worden bevestigd. Het apparaat kan vallen en letsel veroorzaken.
• Steek de speakerkabels stevig in de aansluitpunten en controleer dat de kabel er niet gemakkelijk uit kan komen.
• Er is geen verschil tussen de luidsprekers L en R.
Installeren van de FM-antenne• Voor optimale resultaten rolt u de FM-antenne volledig af
en bevestigt u deze aan een wand of een deurkozijn. Niet los ophangen of opgerold laten.
• Trek niet te hard aan de antennedraad, want hierdoor kan de antenne beschadigd raken.
• Dit product biedt geen ondersteuning voor MW (middengolf) radio-ontvangst.
Aansluiten van de stroomvoorziening• Controleer voor u het netsnoer aansluit of u alle andere
verbindingen voltooid hebt.
Sluit het netsnoer aan op het wandcontact.
Aan de slag WAARSCHUWING
• Gebruik van bedieningsorganen of instellingen, of het uitvoeren van procedures anders dan in deze documentatie beschreven kan leiden tot blootstelling aan gevaarlijke stralen of andere onveilige situaties.
Volg de instructies in dit hoofdstuk altijd in de juiste volgorde uit.
Inschakelen1 Druk op Í.Dit product schakelt naar de laatst geselecteerde signaalbron.
Instellen van de klok• Als er tijdens het instellen niet binnen 65 seconden een
handeling wordt uitgevoerd, zal het systeem de instelling van de klok zonder wijzigingen afsluiten.
• Wanneer stroomvoorziening is weergegeven nadat het apparaat weer is ingestoken of door vermogensuitval, stel de klok in opnieuw.
1 Druk op Í om de stroom in te schakelen.
2 Druk op TIMER op de afstandsbediening.Als [SELECT] of [PLAY SET] verschijnt, druk op / om [CLOCK] te selecteren en dan op te drukken.
3 Druk op / om het uur in te stelen, druk vervolgens op .De uurcijfers zullen knipperen.
4 Druk op / om de minuten in te stellen, druk dan op .De minuutcijfers knipperen.Om de klok af te beelden wanneer het systeem uit is.Druk op DISPLAY. De klok is afgebeeld gedurende ongeveer 8 seconden.
Selecteren van een signaalbronDruk herhaaldelijk op INPUT om de signaalbron te selecteren.
• [CD]: de disc in de disclade• [USB]: .mp3-bestanden op het aangesloten USB-
opslagapparaat• [BT AUDIO]: met Bluetooth draadloze technologie
uitgevoerd apparaat dat is gepaard (alleen X-EM26)• [FM]: de FM-radio• [AUDIO IN]: de audio die binnenkomt via de AUDIO IN-
aansluiting.
AUDIO INANTENNA SPEAKERSR
FM
L
FM
AUDIO INANTENNA SPEAKERSR
FM
L
Naar het wandstop-contact
SN29402702_X-EM16_26_Nl.book 7 ページ 2016年8月6日 土曜日 午後4時35分

8Nl
Afspelen
Afspelen van een disc1 Druk op INPUT op de afstandsbediening of herhaaldelijk op INPUT op het hoofdtoestel om de signaalbron over te schakelen naar [CD].
2 Druk op < om de disclade te openen.3 Doe een disc in het toestel met de bedrukte zijde naar boven.4 Druk nog eens op < om de disclade te sluiten.5 Druk op .
Afspelen van een USB-opslagapparaatDit systeem kan .mp3-bestanden afspelen die gekopieerd zijn op een USB-opslagapparaat (pagina 13).
• Pioneer garandeert geen compatibiliteit met alle USB-opslagapparaten, Weet verder dat Pioneer geen verantwoordelijkheid zal accepteren ongeacht het verlies van bestanden op USB-opslagapparaat, veroorzaakt door verbinding met dit toestel.
1 Sluit het USB-apparaat aan op de USB-aansluiting.
2 Druk op INPUT op de afstandsbediening of herhaaldelijk op INPUT op het hoofdtoestel om de signaalbron over te schakelen naar [USB].3 Druk op .
Bedienen van de weergaveVolg tijdens het afspelen de instructies hieronder om de weergave te bedienen.
: Pauzeren of hervatten weergave.∫: Weergave stoppen.:/9: Springen naar het vorige of volgende muziekstuk.Houd ingedrukt om een muziekstuk terug te spoelen of snel vooruit te spelen.
/: Springen naar een vorig of volgend album wanneer er meer dan één album is.REPEAT: Selecteer een beschikbare weergavefunctie.
• 1 Herhalen [REP ONE]: herhaalt het huidige muziekstuk
• Alles herhalen [REP ALL]: herhaalt alle muziekstukken• Herhaal map [REP FLDR]: Speelt all nummers in de
huidige map af. (alleen USB-functie)• Herhalen uit [REP OFF]: Zet herhalen afspelen uit.
∫ De afspeelmodus veranderen1 Druk op ∫ om afspelen te stoppen.2 Druk herhaaldelijk op MODE.
CD: OFFSHUFFLEPROGRAMUSB: OFFFOLDERSHUFFLEFOLDER SHUFFLEPROGRAM
• Normaal afspelen [OFF]: Nummers worden in hun gewone volgorde afgespeeld.
• Shuffle [SHUF]: Nummers in shuffle afspelen• Programma [PROGRAM]: Speel nummers in elke
gekozen volgorde af.• Map* [FLDR]: Speel alle bestanden in de geselecteerde
map af.• Map shuffle* [FLDRSHUF]: Speel alle bestanden in de
geselecteerde map willekeurig af. * Alleen voor USB
• In SHUFFLE en FOLDER SHUFFLE modus, is er de mogelijkheid dat hetzelfde nummer continu afspeelt. Tevens stopt afspelen niet automatisch. Om afspelen te stoppen, druk op ∫.
• Wanneer [PLS STOP] verschijnt:U kunt de afspeelmodus niet veranderen tijdens afspelen. Stop afspelen, verander vervolgens de afspeelmodus.
∫ Programmeren van muziekstukken• U kunt maximaal 64 muziekstukken programmeren.1 Druk op ∫ om afspelen te stoppen.
• (Voor een CD) [XX XX:XX] (XX geeft het totaalaantal nummers aan en XX:XX geeft de totaaltijd aan van nummers) wordt afgebeeld.
• (Voor MP3-bestanden) [FILE XX] (XX geeft het totaalaantal nummers aan) wordt afgebeeld.
2 Druk herhaaldelijk op MODE om [PROGRAM] te selecteren.
3 (Voor MP3-bestanden) Druk op / om de map die de nummers of bestanden die u wilt programmeren bevat.
4 Druk op :/9 om een nummer te selecteren.
5 Druk op MEMORY.6 (Voor een CD) Herhaal stappen 4 en 5 om meer
nummers te programmeren.(Voor MP3-bestanden) Herhaal stappen 3 - 5 om meer nummers te programmeren.
7 Druk op om afspelen te starten.
SN29402702_X-EM16_26_Nl.book 8 ページ 2016年8月6日 土曜日 午後4時35分

9Nl
EnglishFrançais
EspañolDeutsch
ItalianoNederlands
Pyccкий∫ Programma wissenOm programma afspelen te wissen
• Druk herhaaldelijk op MODE om [OFF] te selecteren.Om het programma te wissen
• Wanneer in [PROGRAM] modus, druk op ∫ om te stoppen, vervolgens op CLEAR drukken. Elke keer dat u op de knop drukt, zal het laatst geprogrammeerde nummer of het laatst geprogrammeerde bestand gewist worden. Wanneer alle geprogrammeerde nummers of bestanden gewist zijn, verschijnt [NO STEP].
Bluetooth® Audioweergave (alleen X-EM26)
∫ Muziek weergeven met behulp van Bluetooth draadloze technologie
Op het systeem kan muziek worden afgespeeld die draadloos op met Bluetooth uitgeruste apparatuur (mobiele telefoon, digitale muziekspelers, enz.) is opgeslagen. Tevens kan een Bluetooth audiotransmitter (afzonderlijk in de handel verkrijgbaar) worden gebruikt, zodat muziek van apparatuur kan worden afgespeeld die de Bluetooth-functionaliteit niet heeft. Raadpleeg de gebruikershandleiding voor het met Bluetooth uitgeruste apparaat voor meer gegevens.
• Het merk Bluetooth® en de logo’s daarvan zijn gedeponeerde handelsmerken van Bluetooth SIG, Inc.
• Het apparaat dat is voorzien van Bluetooth draadloze technologie moet A2DP-profielen ondersteunen.
• Verbinding is niet altijd is gegarandeerd met alle Bluetooth ingeschakelde apparaten.
∫ Gebruik van de afstandsbedieningDe afstandsbediening die geleverd wordt met dit toestel laat het u toe Bluetooth draadloze technologie-actieve apparaten te bedienen.
• Het apparaat dat is voorzien van Bluetooth draadloze technologie moet AVRCP-profielen ondersteunen.
• Bewerkingen van afstandsbedieningen kunnen niet worden gegarandeerd voor alle apparaten die zijn voorzien van Bluetooth draadloze technologie.
Paren met het systeem (eerste vastlegging)De paring dient te worden uitgevoerd om muziek, die op een met Bluetooth uitgerust apparaat is opgeslagen, af te spelen. De paring moet worden uitgevoerd als het systeem voor het eerst met het met Bluetooth uitgeruste apparaat wordt gebruikt, of als de paringsgegevens van het apparaat om de een of andere reden zijn gewist.De paring moet worden uitgevoerd zodat er communicatie kan plaatsvinden via Bluetooth draadloze technologie.
• De paring wordt alleen de eerste maal dat het systeem en het met Bluetooth uitgeruste apparaat samen worden gebruikt, uitgevoerd.
• Om communicatie via de Bluetooth draadloze technologie te laten plaatsvinden dient de paring zowel op het systeem als het met Bluetooth uitgeruste apparaat te worden uitgevoerd.
1 Druk op INPUT op de afstandsbediening of herhaaldelijk op INPUT op het hoofdtoestel om de signaalbron over te schakelen naar [BT AUDIO].Het Bluetooth-indicatorlampje gaat knipperen.Als er geen pairing-informatie in het systeem is, zoals wanneer er een Bluetooth-apparaat voor het eerst gebruikt wordt na het aanschaffen van het systeem, zal het systeem automatisch naar pairing-modus schakelen.
2 Druk op MODE op de afstandsbediening.(Voor te werk gaan met dit toestel)Houd INPUT ingedrukt totdat het Bluetooth-controlelampje snel begint te knipperen.
• Dit toestel schakelt naar pairing-modus en het Bluetooth-controlelampje begint snel te knipperen. (Ga naar stap 4)
3 Druk op / om [PAIRING] te selecteren, en druk dan op .
• Dit toestel schakelt naar pairing-modus en het Bluetooth-controlelampje knippert snel.
4 Schakel het met Bluetooth uitgeruste apparaat waarmee gepaard moet worden in en voer de paringsprocedure uit.
• Dit apparaat wordt getoond als “X-EM26” op alle bij u beschikbare met Bluetooth uitgevoerde apparatuur.
De paring gaat van start.• Plaats het met Bluetooth uitgeruste apparaat dichtbij
het systeem.• Raadpleeg de gebruikershandleiding van het met
Bluetooth uitgeruste apparaat voor gegevens over wanneer de paring kan worden uitgevoerd en de procedures die voor de paring vereist zijn.
• Als de pincode-ingang wordt gevraagd, moet “0000” worden ingevoerd. (Dit apparaat kan uitsluitend met de pincode “0000” worden ingesteld.)
Muziekgegevens
Apparaat zonder Bluetooth draadlozetechnologie: Digitale muziekspeler
+Bluetooth® audiozender
(los verkrijgbaar)
Apparaat met Bluetooth draadlozetechnologie: Digitale muziekspeler
Apparaat met Bluetooth draadlozetechnologie: Mobiele telefoon
SN29402702_X-EM16_26_Nl.book 9 ページ 2016年8月6日 土曜日 午後4時35分
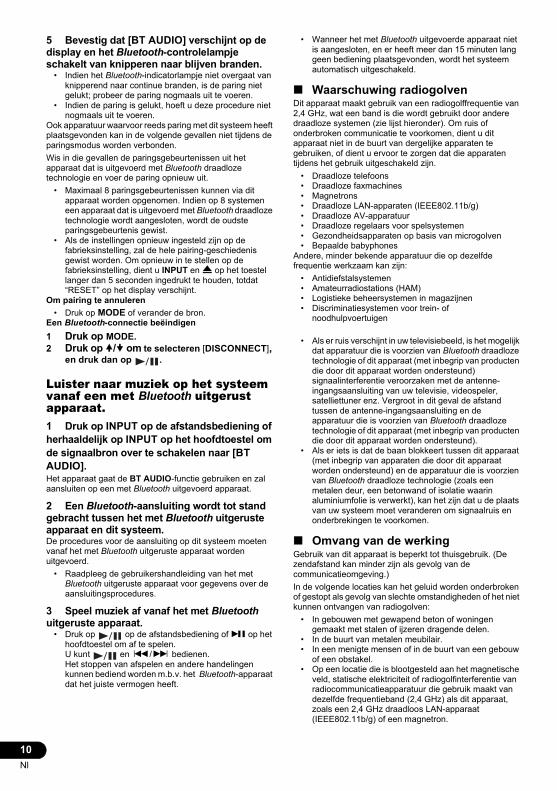
10Nl
5 Bevestig dat [BT AUDIO] verschijnt op de display en het Bluetooth-controlelampje schakelt van knipperen naar blijven branden.
• Indien het Bluetooth-indicatorlampje niet overgaat van knipperend naar continue branden, is de paring niet gelukt; probeer de paring nogmaals uit te voeren.
• Indien de paring is gelukt, hoeft u deze procedure niet nogmaals uit te voeren.
Ook apparatuur waarvoor reeds paring met dit systeem heeft plaatsgevonden kan in de volgende gevallen niet tijdens de paringsmodus worden verbonden.Wis in die gevallen de paringsgebeurtenissen uit het apparaat dat is uitgevoerd met Bluetooth draadloze technologie en voer de paring opnieuw uit.
• Maximaal 8 paringsgebeurtenissen kunnen via dit apparaat worden opgenomen. Indien op 8 systemen een apparaat dat is uitgevoerd met Bluetooth draadloze technologie wordt aangesloten, wordt de oudste paringsgebeurtenis gewist.
• Als de instellingen opnieuw ingesteld zijn op de fabrieksinstelling, zal de hele pairing-geschiedenis gewist worden. Om opnieuw in te stellen op de fabrieksinstelling, dient u INPUT en < op het toestel langer dan 5 seconden ingedrukt te houden, totdat “RESET” op het display verschijnt.
Om pairing te annuleren• Druk op MODE of verander de bron.
Een Bluetooth-connectie beëindigen1 Druk op MODE.2 Druk op / om te selecteren [DISCONNECT],
en druk dan op .
Luister naar muziek op het systeem vanaf een met Bluetooth uitgerust apparaat.1 Druk op INPUT op de afstandsbediening of herhaaldelijk op INPUT op het hoofdtoestel om de signaalbron over te schakelen naar [BT AUDIO].Het apparaat gaat de BT AUDIO-functie gebruiken en zal aansluiten op een met Bluetooth uitgevoerd apparaat.
2 Een Bluetooth-aansluiting wordt tot stand gebracht tussen het met Bluetooth uitgeruste apparaat en dit systeem.De procedures voor de aansluiting op dit systeem moeten vanaf het met Bluetooth uitgeruste apparaat worden uitgevoerd.
• Raadpleeg de gebruikershandleiding van het met Bluetooth uitgeruste apparaat voor gegevens over de aansluitingsprocedures.
3 Speel muziek af vanaf het met Bluetooth uitgeruste apparaat.
• Druk op op de afstandsbediening of I op het hoofdtoestel om af te spelen.U kunt en :/9 bedienen.Het stoppen van afspelen en andere handelingen kunnen bediend worden m.b.v. het Bluetooth-apparaat dat het juiste vermogen heeft.
• Wanneer het met Bluetooth uitgevoerde apparaat niet is aangesloten, en er heeft meer dan 15 minuten lang geen bediening plaatsgevonden, wordt het systeem automatisch uitgeschakeld.
∫ Waarschuwing radiogolvenDit apparaat maakt gebruik van een radiogolffrequentie van 2,4 GHz, wat een band is die wordt gebruikt door andere draadloze systemen (zie lijst hieronder). Om ruis of onderbroken communicatie te voorkomen, dient u dit apparaat niet in de buurt van dergelijke apparaten te gebruiken, of dient u ervoor te zorgen dat die apparaten tijdens het gebruik uitgeschakeld zijn.
• Draadloze telefoons• Draadloze faxmachines• Magnetrons• Draadloze LAN-apparaten (IEEE802.11b/g)• Draadloze AV-apparatuur• Draadloze regelaars voor spelsystemen• Gezondheidsapparaten op basis van microgolven• Bepaalde babyphones
Andere, minder bekende apparatuur die op dezelfde frequentie werkzaam kan zijn:
• Antidiefstalsystemen• Amateurradiostations (HAM)• Logistieke beheersystemen in magazijnen• Discriminatiesystemen voor trein- of
noodhulpvoertuigen
• Als er ruis verschijnt in uw televisiebeeld, is het mogelijk dat apparatuur die is voorzien van Bluetooth draadloze technologie of dit apparaat (met inbegrip van producten die door dit apparaat worden ondersteund) signaalinterferentie veroorzaken met de antenne-ingangsaansluiting van uw televisie, videospeler, satelliettuner enz. Vergroot in dit geval de afstand tussen de antenne-ingangsaansluiting en de apparatuur die is voorzien van Bluetooth draadloze technologie of dit apparaat (met inbegrip van producten die door dit apparaat worden ondersteund).
• Als er iets is dat de baan blokkeert tussen dit apparaat (met inbegrip van apparaten die door dit apparaat worden ondersteund) en de apparatuur die is voorzien van Bluetooth draadloze technologie (zoals een metalen deur, een betonwand of isolatie waarin aluminiumfolie is verwerkt), kan het zijn dat u de plaats van uw systeem moet veranderen om signaalruis en onderbrekingen te voorkomen.
∫ Omvang van de werkingGebruik van dit apparaat is beperkt tot thuisgebruik. (De zendafstand kan minder zijn als gevolg van de communicatieomgeving.)In de volgende locaties kan het geluid worden onderbroken of gestopt als gevolg van slechte omstandigheden of het niet kunnen ontvangen van radiogolven:
• In gebouwen met gewapend beton of woningen gemaakt met stalen of ijzeren dragende delen.
• In de buurt van metalen meubilair.• In een menigte mensen of in de buurt van een gebouw
of een obstakel.• Op een locatie die is blootgesteld aan het magnetische
veld, statische elektriciteit of radiogolfinterferentie van radiocommunicatieapparatuur die gebruik maakt van dezelfde frequentieband (2,4 GHz) als dit apparaat, zoals een 2,4 GHz draadloos LAN-apparaat (IEEE802.11b/g) of een magnetron.
SN29402702_X-EM16_26_Nl.book 10 ページ 2016年8月6日 土曜日 午後4時35分

11Nl
EnglishFrançais
EspañolDeutsch
ItalianoNederlands
Pyccкий• Wanneer u in een dichtbevolkt woongebied woont
(appartement, rijtjeshuis enz.) en de magnetron van uw buren in de buurt van uw systeem is geplaatst, kunt u last hebben van radiogolfinterferentie. Wanneer dit gebeurt, verplaatst u het apparaat naar een andere plek. Wanneer de magnetron niet wordt gebruikt, is er geen radiogolfinterferentie.
∫ Weerkaatsingen van radiogolvenDe radiogolven die door dit apparaat worden ontvangen zijn de radiogolven die rechtstreeks afkomstig zijn van het apparaat dat is voorzien van Bluetooth draadloze technologie (directe golven) en de golven die vanuit verschillende richtingen komen als gevolg van de weerkaatsingen tegen muren, meubilair en gebouw (weerkaatste golven). De weerkaatste golven (als gevolg van obstakels en reflecterende voorwerpen) produceren daarnaast opnieuw een verscheidenheid aan weerkaatste golven alsmede een variatie in ontvangstomstandigheden, afhankelijk van de locaties. Wanneer de audio als gevolg van dit verschijnsel niet meer correct kan worden ontvangen, kunt u proberen de locatie van het apparaat dat is voorzien van Bluetooth draadloze technologie iets te veranderen. Het geluid kan tevens worden onderbroken als gevolg van de weerkaatste golven wanneer een persoon door de ruimte tussen dit apparaat en het apparaat dat is voorzien van Bluetooth draadloze technologie loopt of deze nadert.
∫ Voorzorgsmaatregelen betreffende de aansluiting op producten die door dit apparaat worden ondersteund
• Zorg dat de aansluitingen voor alle apparatuur die door dit apparaat wordt ondersteund, inclusief alle audiosnoeren en netsnoeren, is voltooid voordat u de verbinding met dit apparaat maakt.
• Nadat de aansluitingen op dit apparaat zijn voltooid, moet u controleren of de audiosnoeren en netsnoeren niet samen zijn gebundeld.
• Controleer bij het loskoppelen van het apparaat of er voldoende werkruimte rondom het apparaat is.
• Wanneer u de aansluiting wijzigt van de audiosnoeren of andere snoeren voor producten die door dit apparaat worden ondersteund, moet u controleren of er voldoende werkruimte rondom het apparaat is.
Naar de FM-radio luisteren
Intunen op een FM-radiozender• Zorg ervoor dat u een verbinding gemaakt hebt en de FM-
antenne helemaal uitgetrokken heeft.
∫ Handmatig afstemmen1 Druk op INPUT op de afstandsbediening of
herhaaldelijk op INPUT op het hoofdtoestel om de bron te schakelen naar FM.
2 Druk herhaaldelijk op MODE om [MANUAL] te selecteren.
3 Druk op :/9 op de afstandsbediening om in te tunen op de gewenste zender.
∫ Automatisch intunen1 Druk op INPUT op de afstandsbediening of
herhaaldelijk op INPUT op het hoofdtoestel om de bron te schakelen naar FM.
2 Druk herhaaldelijk op MODE om [AUTO] te selecteren.
3 Druk op :/9.Scanning zal automatisch starten en de tuner zal stoppen bij het eerste ontvangbare uitzendstation.
(Alleen voor Europees model) Wanneer u in tunet op een FM-zender die RDS-diensten biedt, verschijnt de servicenaam of de zendernaam op het.
Programmering radiozenders• U kunt maximaal 20 voorgekozen radiozenders
programmeren.• Om over een geprogrammeerde radiozender te schrijven,
een andere zender opslaan met zijn opeenvolgingsnummer.
1 Intunen op een radiozender.2 Druk op MEMORY.3 Druk herhaaldelijk op:/9 (/) om een
voorgekozen nummer te selecteren en druk vervolgens op .
“COMPLETE” verschijnt op het display en de radiozender is geregistreerd met het voorgekozen nummer.4 Herhaal stappen 1-3 om meer zenders te
programmeren.
∫ Intunen op een voorgekozen radiozender1 Druk op INPUT op de afstandsbediening of
herhaaldelijk op INPUT op het hoofdtoestel om de bron te schakelen naar FM.
2 Druk herhaaldelijk op MODE om [PRESET] te selecteren.
3 Druk op / om het gewenste voorgekozen nummer te selecteren.
Als de ontvangst van een FM-stereo-uitzending luidruchtig is, druk herhaaldelijk op ST/MONO om [MONO] te selecteren om mono-ontvangst te ontvangen. Dit lawaai reduceert geluid.
Overige kenmerken∫ Automatische stand-bymodus
• Nadat dit product inactief gehouden is gedurende 15 minuten, schakelt het automatisch naar de stand-by modus.
Houd Í ingedrukt op de afstandbediening of op het hoofdtoestel.“AUTO STANDBY ON” of “AUTO STANDBY OFF” wordt afgebeeld op het hoofddisplay, vervolgens schakelt de instelling.Het systeem zou niet automatisch in de stand-by kunnen komen in de volgende gevallen:
• Terwijl de tunerfunctie gebruikt wordt• Terwijl er een geluidssignaal gevonden wordt• Tijdens afspelen van audio-nummers of bestanden
SN29402702_X-EM16_26_Nl.book 11 ページ 2016年8月6日 土曜日 午後4時35分
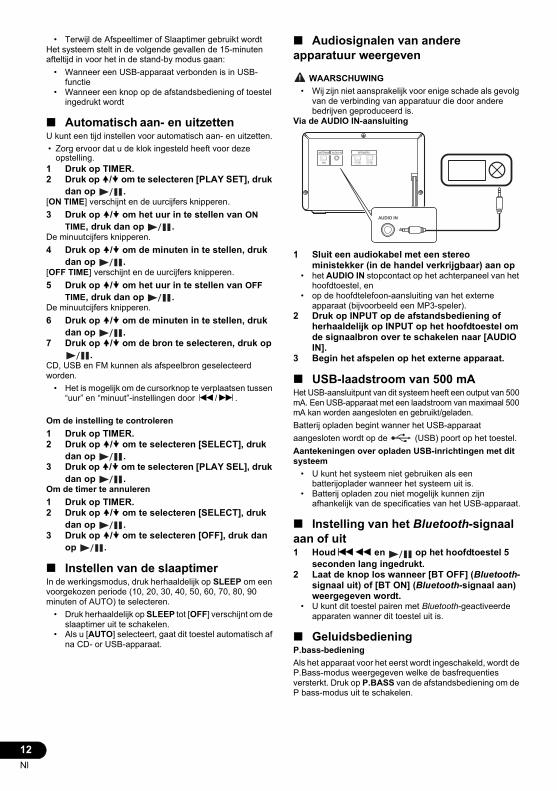
12Nl
• Terwijl de Afspeeltimer of Slaaptimer gebruikt wordtHet systeem stelt in de volgende gevallen de 15-minuten afteltijd in voor het in de stand-by modus gaan:
• Wanneer een USB-apparaat verbonden is in USB-functie
• Wanneer een knop op de afstandsbediening of toestel ingedrukt wordt
∫ Automatisch aan- en uitzettenU kunt een tijd instellen voor automatisch aan- en uitzetten.• Zorg ervoor dat u de klok ingesteld heeft voor deze
opstelling.1 Druk op TIMER.2 Druk op / om te selecteren [PLAY SET], druk
dan op .[ON TIME] verschijnt en de uurcijfers knipperen.3 Druk op / om het uur in te stellen van ON
TIME, druk dan op .De minuutcijfers knipperen.4 Druk op / om de minuten in te stellen, druk
dan op .[OFF TIME] verschijnt en de uurcijfers knipperen.5 Druk op / om het uur in te stellen van OFF
TIME, druk dan op .De minuutcijfers knipperen.6 Druk op / om de minuten in te stellen, druk
dan op .7 Druk op / om de bron te selecteren, druk op
.CD, USB en FM kunnen als afspeelbron geselecteerd worden.
• Het is mogelijk om de cursorknop te verplaatsen tussen “uur” en “minuut”-instellingen door :/9.
Om de instelling te controleren1 Druk op TIMER.2 Druk op / om te selecteren [SELECT], druk
dan op .3 Druk op / om te selecteren [PLAY SEL], druk
dan op .Om de timer te annuleren1 Druk op TIMER.2 Druk op / om te selecteren [SELECT], druk
dan op .3 Druk op / om te selecteren [OFF], druk dan
op .
∫ Instellen van de slaaptimerIn de werkingsmodus, druk herhaaldelijk op SLEEP om een voorgekozen periode (10, 20, 30, 40, 50, 60, 70, 80, 90 minuten of AUTO) te selecteren.
• Druk herhaaldelijk op SLEEP tot [OFF] verschijnt om de slaaptimer uit te schakelen.
• Als u [AUTO] selecteert, gaat dit toestel automatisch af na CD- or USB-apparaat.
∫ Audiosignalen van andere apparatuur weergeven
WAARSCHUWING• Wij zijn niet aansprakelijk voor enige schade als gevolg
van de verbinding van apparatuur die door andere bedrijven geproduceerd is.
Via de AUDIO IN-aansluiting
1 Sluit een audiokabel met een stereo ministekker (in de handel verkrijgbaar) aan op
• het AUDIO IN stopcontact op het achterpaneel van het hoofdtoestel, en
• op de hoofdtelefoon-aansluiting van het externe apparaat (bijvoorbeeld een MP3-speler).
2 Druk op INPUT op de afstandsbediening of herhaaldelijk op INPUT op het hoofdtoestel om de signaalbron over te schakelen naar [AUDIO IN].
3 Begin het afspelen op het externe apparaat.
∫ USB-laadstroom van 500 mAHet USB-aansluitpunt van dit systeem heeft een output van 500 mA. Een USB-apparaat met een laadstroom van maximaal 500 mA kan worden aangesloten en gebruikt/geladen.Batterij opladen begint wanner het USB-apparaat aangesloten wordt op de (USB) poort op het toestel.Aantekeningen over opladen USB-inrichtingen met dit systeem
• U kunt het systeem niet gebruiken als een batterijoplader wanneer het systeem uit is.
• Batterij opladen zou niet mogelijk kunnen zijn afhankelijk van de specificaties van het USB-apparaat.
∫ Instelling van het Bluetooth-signaal aan of uit1 Houd:6 en op het hoofdtoestel 5
seconden lang ingedrukt.2 Laat de knop los wanneer [BT OFF] (Bluetooth-
signaal uit) of [BT ON] (Bluetooth-signaal aan) weergegeven wordt.
• U kunt dit toestel pairen met Bluetooth-geactiveerde apparaten wanner dit toestel uit is.
∫ GeluidsbedieningP.bass-bedieningAls het apparaat voor het eerst wordt ingeschakeld, wordt de P.Bass-modus weergegeven welke de basfrequenties versterkt. Druk op P.BASS van de afstandsbediening om de P bass-modus uit te schakelen.
AUDIO INANTENNA SPEAKERSR
FM
L
SN29402702_X-EM16_26_Nl.book 12 ページ 2016年8月6日 土曜日 午後4時35分
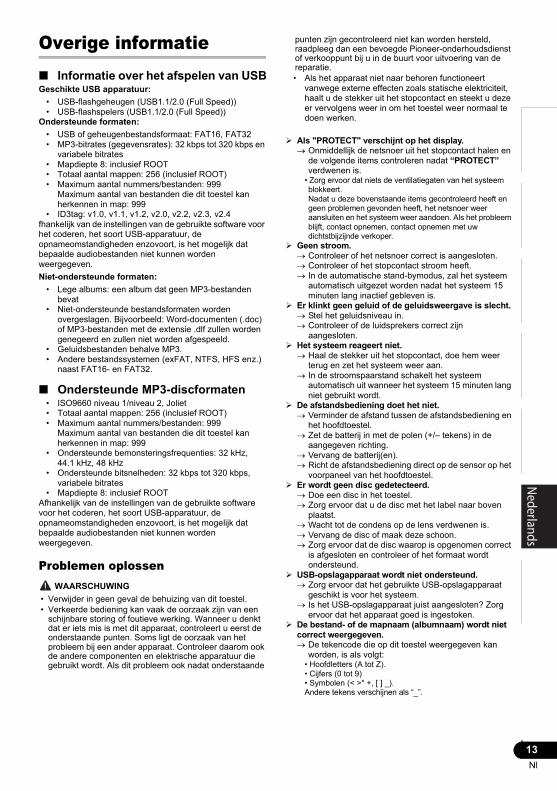
13Nl
EnglishFrançais
EspañolDeutsch
ItalianoNederlands
PyccкийOverige informatie∫ Informatie over het afspelen van USBGeschikte USB apparatuur:
• USB-flashgeheugen (USB1.1/2.0 (Full Speed))• USB-flashspelers (USB1.1/2.0 (Full Speed))
Ondersteunde formaten:• USB of geheugenbestandsformaat: FAT16, FAT32• MP3-bitrates (gegevensrates): 32 kbps tot 320 kbps en
variabele bitrates• Mapdiepte 8: inclusief ROOT• Totaal aantal mappen: 256 (inclusief ROOT)• Maximum aantal nummers/bestanden: 999
Maximum aantal van bestanden die dit toestel kan herkennen in map: 999
• ID3tag: v1.0, v1.1, v1.2, v2.0, v2.2, v2.3, v2.4fhankelijk van de instellingen van de gebruikte software voor het coderen, het soort USB-apparatuur, de opnameomstandigheden enzovoort, is het mogelijk dat bepaalde audiobestanden niet kunnen worden weergegeven.Niet-ondersteunde formaten:
• Lege albums: een album dat geen MP3-bestanden bevat
• Niet-ondersteunde bestandsformaten worden overgeslagen. Bijvoorbeeld: Word-documenten (.doc) of MP3-bestanden met de extensie .dlf zullen worden genegeerd en zullen niet worden afgespeeld.
• Geluidsbestanden behalve MP3.• Andere bestandssystemen (exFAT, NTFS, HFS enz.)
naast FAT16- en FAT32.
∫ Ondersteunde MP3-discformaten• ISO9660 niveau 1/niveau 2, Joliet• Totaal aantal mappen: 256 (inclusief ROOT)• Maximum aantal nummers/bestanden: 999
Maximum aantal van bestanden die dit toestel kan herkennen in map: 999
• Ondersteunde bemonsteringsfrequenties: 32 kHz, 44.1 kHz, 48 kHz
• Ondersteunde bitsnelheden: 32 kbps tot 320 kbps, variabele bitrates
• Mapdiepte 8: inclusief ROOTAfhankelijk van de instellingen van de gebruikte software voor het coderen, het soort USB-apparatuur, de opnameomstandigheden enzovoort, is het mogelijk dat bepaalde audiobestanden niet kunnen worden weergegeven.
Problemen oplossen WAARSCHUWING
• Verwijder in geen geval de behuizing van dit toestel.• Verkeerde bediening kan vaak de oorzaak zijn van een
schijnbare storing of foutieve werking. Wanneer u denkt dat er iets mis is met dit apparaat, controleert u eerst de onderstaande punten. Soms ligt de oorzaak van het probleem bij een ander apparaat. Controleer daarom ook de andere componenten en elektrische apparatuur die gebruikt wordt. Als dit probleem ook nadat onderstaande
punten zijn gecontroleerd niet kan worden hersteld, raadpleeg dan een bevoegde Pioneer-onderhoudsdienst of verkooppunt bij u in de buurt voor uitvoering van de reparatie.• Als het apparaat niet naar behoren functioneert
vanwege externe effecten zoals statische elektriciteit, haalt u de stekker uit het stopcontact en steekt u deze er vervolgens weer in om het toestel weer normaal te doen werken.
Als "PROTECT" verschijnt op het display. Onmiddellijk de netsnoer uit het stopcontact halen en
de volgende items controleren nadat “PROTECT” verdwenen is.
• Zorg ervoor dat niets de ventilatiegaten van het systeem blokkeert.Nadat u deze bovenstaande items gecontroleerd heeft en geen problemen gevonden heeft, het netsnoer weer aansluiten en het systeem weer aandoen. Als het probleem blijft, contact opnemen, contact opnemen met uw dichtstbijzijnde verkoper.
Geen stroom. Controleer of het netsnoer correct is aangesloten. Controleer of het stopcontact stroom heeft. In de automatische stand-bymodus, zal het systeem
automatisch uitgezet worden nadat het systeem 15 minuten lang inactief gebleven is.
Er klinkt geen geluid of de geluidsweergave is slecht. Stel het geluidsniveau in. Controleer of de luidsprekers correct zijn
aangesloten. Het systeem reageert niet.
Haal de stekker uit het stopcontact, doe hem weer terug en zet het systeem weer aan.
In de stroomspaarstand schakelt het systeem automatisch uit wanneer het systeem 15 minuten lang niet gebruikt wordt.
De afstandsbediening doet het niet. Verminder de afstand tussen de afstandsbediening en
het hoofdtoestel. Zet de batterij in met de polen (+/– tekens) in de
aangegeven richting. Vervang de batterij(en). Richt de afstandsbediening direct op de sensor op het
voorpaneel van het hoofdtoestel. Er wordt geen disc gedetecteerd.
Doe een disc in het toestel. Zorg ervoor dat u de disc met het label naar boven
plaatst. Wacht tot de condens op de lens verdwenen is. Vervang de disc of maak deze schoon. Zorg ervoor dat de disc waarop is opgenomen correct
is afgesloten en controleer of het formaat wordt ondersteund.
USB-opslagapparaat wordt niet ondersteund. Zorg ervoor dat het gebruikte USB-opslagapparaat
geschikt is voor het systeem. Is het USB-opslagapparaat juist aangesloten? Zorg
ervoor dat het apparaat goed is ingestoken. De bestand- of de mapnaam (albumnaam) wordt niet
correct weergegeven. De tekencode die op dit toestel weergegeven kan
worden, is als volgt:• Hoofdletters (A tot Z).• Cijfers (0 tot 9)• Symbolen (< >* +, [ ] _).Andere tekens verschijnen als “_”.
X-EM16&26_TOC&Body_Nl.fm 13 ページ 2016年8月8日 月曜日 午後1時19分

14Nl
“OVER CURRENT” verschijnt. Er is een probleem gevonden met het niveau van
stroom vanaf de (USB) poort. Zet het systeem uit en verwijder het USB-apparaat van de (USB) poort. Zorg ervoor dat er geen probleem is met het USB-apparaat. Als het displaypatroon blijft, contact opnemen, contact opnemen met uw dichtstbijzijnde verkoper.
Kan bepaalde bestanden op het USB-opslagapparaat niet afspelen. Controleer of het bestandsformaat wordt ondersteund. Zorg ervoor dat het aantal bestanden het maximum
niet overschrijdt (pagina 13). De radio-ontvangst is slecht.
Vergroot de afstand tussen het systeem en andere elektrische apparatuur.
Strek de antenne volledig uit. De timer werkt niet.
Stel de klok correct in. Schakel de timer in.
De klok/timer-instelling is gewist. De stroom is uitgevallen, of het netsnoer is los geweest. Stel de klok/timer opnieuw in.
Wanneer het apparaat dat is uitgevoerd met Bluetooth draadloze technologie wordt aangesloten of bediend (alleen X-EM26) Het apparaat dat is voorzien van Bluetooth draadloze
technologie kan niet worden aangesloten of bediend.Er komt geen geluid uit het apparaat dat is voorzien van Bluetooth draadloze technologie of het geluid is onderbroken. Controleer of er geen voorwerp dat
elektromagnetische straling uitzendt in de 2,4 GHz band (magnetrons, draadloze LAN-apparatuur of draadloze apparatuur die is voorzien van Bluetooth draadloze technologie) in de buurt van dit apparaat staat. Als een dergelijk apparaat bij de receiver staat, moet u het verder weg zetten. U kunt het apparaat dat de elektromagnetische golven uitzendt ook uitzetten.
Controleer of het apparaat dat is voorzien van Bluetooth draadloze technologie niet te ver van dit apparaat staat en of er geen obstakels tussen het apparaat dat is voorzien van Bluetooth draadloze technologie en dit apparaat staan. Stel het apparaat dat is voorzien van Bluetooth draadloze technologie en dit apparaat zo in dat de onderlinge afstand kleiner is dan 10 m* en dat er geen voorwerpen tussen staan.
* De vermelde afstand dient als globale richtlijn. De feitelijk toelaatbare afstand tussen apparaten kan afhankelijk van de omstandigheden in de omgeving variëren.
Het apparaat dat is voorzien van Bluetooth draadloze technologie is mogelijk niet ingesteld op de communicatiemodus die de Bluetooth draadloze technologie ondersteunt. Controleer de instelling van het apparaat voorzien van Bluetooth draadloze technologie.
Let op tijdens het gebruik
∫ Wanneer het apparaat wordt verplaatstControleer of er geen schijf is geladen voordat u het apparaat verplaatst. Druk vervolgens op Í, wacht tot [STANDBY] verdwijnt van het hoofddisplay ten teken dat het toestel uit staat en haal dan pas de stekker uit het stopcontact. Er kan schade ontstaan indien het systeem wordt vervoerd of verschoven terwijl een schijf is geladen, of indien een ander apparaat op het USB-aansluitpunt of op de AUDIO IN-ministekker is aangesloten.
∫ Plaats van installatie• Kies een stabiele plaats in de buurt van de TV of de
stereo-installatie waarmee u het apparaat gebruikt.
• Plaats het apparaat niet bovenop een TV of kleurenmonitor. Installeer de receiver ook niet in de buurt van een cassettedeck en overige apparatuur die voor magnetische krachten gevoelig is.
Vermijd de volgende locaties:• Plaatsen die aan direct zonlicht zijn blootgesteld.• Vochtige of slecht geventileerde plaatsen• Zeer warme plaatsen• Plaatsen die aan trillingen onderhevig zijn• Plaatsen met veel stof of tabaksrook• Plaatsen die blootstaan aan roet, stoom of hitte (van
bijv. keukens)
∫ Plaats nooit een voorwerp bovenop het apparaatPlaats nooit enig voorwerp bovenop het apparaat.Zorg ervoor dat de ventilatiegaten vrij zijn.Plaats het apparaat niet op een wollig kleedje of deken, op een bed of sofa, en leg er nooit een doek overheen. Bij onvoldoende ventilatie kunnen de inwendige onderdelen oververhit en beschadigd raken.Niet aan hitte blootstellen.Plaats dit systeem niet bovenop een versterker of andere componenten die hitte genereren. Wanneer het op een rek wordt bevestigd, moet het op een plank onder de versterker worden geplaatst om de hitte die door de versterker of andere audiocomponenten wordt afgegeven te vermijden.
• Schakel het systeem uit wanneer het niet wordt gebruikt.• Afhankelijk van de toestand van de signalen, is het
mogelijk dat een gestreept patroon op het televisiescherm verschijnt en er ruis door het geluid van radiouitzendingen heen komt als het systeem is ingeschakeld. Schakel het systeem uit indien dit zich voordoet.
∫ Reiniging van het product• Trek altijd eerst de stekker uit het stopcontact, voordat
u het apparaat gaat reinigen.• Veeg het apparaat schoon met een zachte doek. Breng
ingeval van hardnekkig vuil wat neutraal reinigingsmiddel verdund met 5 of 6 delen water aan op een zachte doek, en wring het goed uit, verwijder het vuil, en veeg dan nogmaals met een zachte droge doek af.
• Door gebruik van alcoholverdunners, wasbenzine, insecticiden, enz. kan de bedrukking of de lak loskomen. Laat ook niet langdurig plastic of rubber voorwerpen tegen het apparaat aan liggen, want ook dat kan de afwerking aantasten.
• Als een chemisch geïmpregneerde reinigingsdoek wordt gebruikt, lees dan zorgvuldig de waarschuwingen die bij de doek worden gegeven.
∫ Reinigen van het disc-lensje• Bij normaal gebruik hoort het lensje van dit toestel niet vuil
te worden, maar als er toch stof of vuil op is gekomen en het toestel daardoor een storing vertoont, raadpleegt u dan uw dichtstbijzijnde erkende Pioneer onderhoudsdienst. Lensreinigers voor spelers zijn in de handel verkrijgbaar, maar sommige kunnen schade aan het lensje veroorzaken, dus we raden het gebruik ervan af.
Behandeling van discs
∫ Bewaren• Plaats schijven altijd in hun cover en bewaar ze rechtop,
waarbij hitte, vocht, plaatsen die blootstaan aan direct zonlicht en zeer koude plaatsen dienen te worden vermeden.
SN29402702_X-EM16_26_Nl.book 14 ページ 2016年8月6日 土曜日 午後4時35分
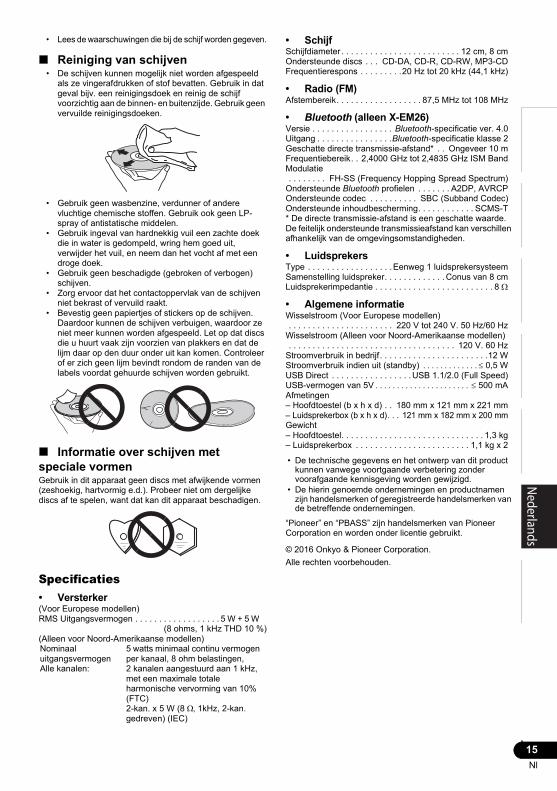
15Nl
EnglishFrançais
EspañolDeutsch
ItalianoNederlands
Pyccкий• Lees de waarschuwingen die bij de schijf worden gegeven.
∫ Reiniging van schijven• De schijven kunnen mogelijk niet worden afgespeeld
als ze vingerafdrukken of stof bevatten. Gebruik in dat geval bijv. een reinigingsdoek en reinig de schijf voorzichtig aan de binnen- en buitenzijde. Gebruik geen vervuilde reinigingsdoeken.
• Gebruik geen wasbenzine, verdunner of andere vluchtige chemische stoffen. Gebruik ook geen LP-spray of antistatische middelen.
• Gebruik ingeval van hardnekkig vuil een zachte doek die in water is gedompeld, wring hem goed uit, verwijder het vuil, en neem dan het vocht af met een droge doek.
• Gebruik geen beschadigde (gebroken of verbogen) schijven.
• Zorg ervoor dat het contactoppervlak van de schijven niet bekrast of vervuild raakt.
• Bevestig geen papiertjes of stickers op de schijven. Daardoor kunnen de schijven verbuigen, waardoor ze niet meer kunnen worden afgespeeld. Let op dat discs die u huurt vaak zijn voorzien van plakkers en dat de lijm daar op den duur onder uit kan komen. Controleer of er zich geen lijm bevindt rondom de randen van de labels voordat gehuurde schijven worden gebruikt.
∫ Informatie over schijven met speciale vormenGebruik in dit apparaat geen discs met afwijkende vormen (zeshoekig, hartvormig e.d.). Probeer niet om dergelijke discs af te spelen, want dat kan dit apparaat beschadigen.
Specificaties• Versterker(Voor Europese modellen)RMS Uitgangsvermogen . . . . . . . . . . . . . . . . . . 5 W + 5 W
(8 ohms, 1 kHz THD 10 %)(Alleen voor Noord-Amerikaanse modellen)
• SchijfSchijfdiameter . . . . . . . . . . . . . . . . . . . . . . . . . 12 cm, 8 cmOndersteunde discs . . . CD-DA, CD-R, CD-RW, MP3-CDFrequentierespons . . . . . . . . .20 Hz tot 20 kHz (44,1 kHz)
• Radio (FM)Afstembereik. . . . . . . . . . . . . . . . . . 87,5 MHz tot 108 MHz
• Bluetooth (alleen X-EM26)Versie . . . . . . . . . . . . . . . . . Bluetooth-specificatie ver. 4.0Uitgang . . . . . . . . . . . . . . . .Bluetooth-specificatie klasse 2Geschatte directe transmissie-afstand* . . Ongeveer 10 mFrequentiebereik. . 2,4000 GHz tot 2,4835 GHz ISM BandModulatie . . . . . . . . FH-SS (Frequency Hopping Spread Spectrum)Ondersteunde Bluetooth profielen . . . . . . . A2DP, AVRCPOndersteunde codec . . . . . . . . . . SBC (Subband Codec)Ondersteunde inhoudbescherming. . . . . . . . . . . . SCMS-T* De directe transmissie-afstand is een geschatte waarde.De feitelijk ondersteunde transmissieafstand kan verschillen afhankelijk van de omgevingsomstandigheden.
• LuidsprekersType . . . . . . . . . . . . . . . . . .Eenweg 1 luidsprekersysteemSamenstelling luidspreker. . . . . . . . . . . . . Conus van 8 cmLuidsprekerimpedantie . . . . . . . . . . . . . . . . . . . . . . . . . 8
• Algemene informatieWisselstroom (Voor Europese modellen) . . . . . . . . . . . . . . . . . . . . . . 220 V tot 240 V. 50 Hz/60 HzWisselstroom (Alleen voor Noord-Amerikaanse modellen) . . . . . . . . . . . . . . . . . . . . . . . . . . . . . . . . . . . 120 V. 60 HzStroomverbruik in bedrijf . . . . . . . . . . . . . . . . . . . . . . .12 WStroomverbruik indien uit (standby) 0,5 WUSB Direct . . . . . . . . . . . . . . . . .USB 1.1/2.0 (Full Speed)USB-vermogen van 5V500 mAAfmetingen– Hoofdtoestel (b x h x d) . . 180 mm x 121 mm x 221 mm– Luidsprekerbox (b x h x d). . . 121 mm x 182 mm x 200 mmGewicht– Hoofdtoestel. . . . . . . . . . . . . . . . . . . . . . . . . . . . . . 1,3 kg– Luidsprekerbox . . . . . . . . . . . . . . . . . . . . . . . . 1,1 kg x 2
• De technische gegevens en het ontwerp van dit product kunnen vanwege voortgaande verbetering zonder voorafgaande kennisgeving worden gewijzigd.
• De hierin genoemde ondernemingen en productnamen zijn handelsmerken of geregistreerde handelsmerken van de betreffende ondernemingen.
“Pioneer” en “PBASS” zijn handelsmerken van Pioneer Corporation en worden onder licentie gebruikt.
© 2016 Onkyo & Pioneer Corporation.Alle rechten voorbehouden.
Nominaal uitgangsvermogenAlle kanalen:
5 watts minimaal continu vermogen per kanaal, 8 ohm belastingen,2 kanalen aangestuurd aan 1 kHz, met een maximale totale harmonische vervorming van 10% (FTC)2-kan. x 5 W (8 , 1kHz, 2-kan. gedreven) (IEC)
X-EM16&26_TOC&Body_Nl.fm 15 ページ 2016年8月9日 火曜日 午後3時57分
ВНИМАНИЕВО ИЗБЕЖАНИЕ ПОРАЖЕНИЯ ЭЛЕКТРИЧЕСКИМ ТОКОМ НЕ СНИМАЙТЕ КРЫШКУ (ИЛИ ЗАДНЮЮ СТЕНКУ). ВНУТРИ НЕ СОДЕРЖАТСЯ ДЕАТЛИ, ПРЕДНАЗНАЧЕННЫЕ ДЛЯ РЕМОНТА ПОЛЬЗОВАТЕЛЕМ. ДЛЯ ОБСЛУЖИВАНИЯ ОБРАТИТЕСЬ К КВАЛИФИЦИРОВАННОМУ СОТРУДНИКУ СЕРВИСНОЙ СЛУЖБЫ.
D3-4-2-1-1_B1_Ru
ПРЕДУПРЕЖДЕНИЕДанное оборудование не является водонепроницаемым. Во избежание пожара или поражения электрическим током не помещайте рядом с оборудованием емкости с жидкостями (например, вазы, цветочные горшки) и не допускайте попадания на него капель, брызг, дождя или влаги.
D3-4-2-1-3_A1_Ru
ОБЯЗАТЕЛЬНАЯ ВЕНТИЛЯЦИЯПри установке устройства обеспечьте достаточное пространство для вентиляции во избежание повышения температуры внутри устройства (не менее 10 см сверху, 10 см сзади и по 10 см слева и справа).
ПРЕДУПРЕЖДЕНИЕВ корпусе устройства имеются щели и отверстия для вентиляции, обеспечивающие надежную работу изделия и защищающие его от перегрева. Во избежание пожара эти отверстия ни в коем случае не следует закрывать или заслонять другими предметами (газетами, скатертями и шторами) или устанавливать оборудование на толстом ковре или постели.
D3-4-2-1-7b*_A1_Ru
Условия эксплуатацииИзделие эксплуатируется при следующих температуре и влажности:+5 °C до +35 °C; влажность менее 85 % (не заслоняйте охлаждающие вентиляторы)Не устанавливайте изделие в плохо проветриваемом помещении или в месте с высокой влажностью, открытом для прямого солнечного света (или сильного искусственного света).
D3-4-2-1-7c*_A1_Ru
ВНИМАНИЕДанное изделие является лазерным изделием класса 1 согласно классификации по Безопасности лазерных изделий, IEC 60825-1:2007.
ЛАЗЕРНЫЙ ПРОДУКТ КЛАСС 1
D58-5-2-2a_A1_Ru
K041_A1_Ru
МЕРЫ ПРЕДОСТОРОЖНОСТИ ПРИ ОБРАЩЕНИИ С СЕТЕВЫМ ШНУРОМДержите сетевой шнур за вилку. Не вытаскивайте вилку, взявшись за шнур, и никогда не касайтесь сетевого шнура, если Ваши руки влажные, так как это может привести к короткому замыканию или поражению электрическим током. Не ставьте аппарат, предметы мебели и т.д. на сетевой шнур, не зажимайте его. Не завязывайте узлов на шнуре и не связывайте его с другими шнурами. Сетевые шнуры должны лежать так, чтобы на них нельзя было наступить. Поврежденный сетевой шнур может стать причиной возникновения пожара или поразить Вас электрическим током. Время от времени проверяйте сетевой шнур. В случае обнаружения повреждения обратитесь за заменой в ближайший официальный сервисный центр фирмы PIONEER или к Вашему дилеру.
S002*_A1_Ru
ПРЕДУПРЕЖДЕНИЕВо избежание пожара не приближайте к оборудованию источники открытого огня (например, зажженные свечи).
D3-4-2-1-7a_A1_Ru
ВНИМАНИЕВыключатель данного устройства не полностью отключает его от электросети. Чтобы полностью отключить питание устройства, вытащите вилку кабеля питания из электророзетки. Поэтому устройство следует устанавливать так, чтобы вилку кабеля питания можно было легко вытащить из розетки в чрезвычайных обстоятельствах. Во избежание пожара следует извлекать вилку кабеля питания из розетки, если устройство не будет использоваться в течение долгого времени (например, если вы уезжаете в отпуск).
D3-4-2-2-2a*_A1_Ru
ПРЕДУПРЕЖДЕНИЕХраните маленькие детали в недоступном для детей месте. В случае случайного проглатывания немедленно обратитесь к врачу.
SN29402702_X-EM16_26_Ru.book 2 ページ 2016年8月6日 土曜日 午後1時44分
K058a_A1_Ru
Pb
Информация для пользователей по сбору и утилизации бывшего в эксплуатации оборудования и отработавших элементов питания
Эти обозначения на продукции, упаковке, и/или сопроводительных документах означают, что бывшая в эксплуатации электротехническая и электронная продукция и отработанные элементы питания не должны выбрасываться вместе с обычным бытовым мусором.
Для того чтобы данная бывшая в употреблении продукция и отработанные элементы питания были соответствующим образом обработаны, утилизированы и переработаны, пожалуйста, передайте их в соответствующий пункт сбора использованных электронных изделий в соответствии с местным законодательством.
Утилизируя данные устройства и элементы питания правильно, Вы помогаете сохранить ценные ресурсы и предотвратить возможные негативные последствия для здоровья людей и окружающей среды, которые могут возникнуть в результате несоответствующего удаления отходов.
Для получения дополнительной информации о правильных способах сбора и утилизации отработавшего оборудования и использованных элементов питания обращайтесь в соответствующие местные органы самоуправления, в центры утилизации отходов или по месту покупки данного изделия.
Данные обозначения утверждены только для Европейского Союза.
Для стран, которые не входят в состав Европейского Союза:Если Вы желаете утилизировать данные изделия, обратитесь в соответствующие местные учреждения или к дилерам для получения информации о правильных способах утилизации.
Обозначения для элементов питания
Обозначение для оборудования
О конденсацииПри быстром перемещении данного устройства из холодного места в теплое помещение (например, зимой) или при резком повышении под воздействием работы обогревателя и т. п.температуры в помещении, в котором установлено устройство, внутри устройства (на рабочих деталях и линзе) могут образовываться капли воды (конденсация). При наличииконденсации данное устройство не будет работать надлежащим образом, и воспроизведение будет невозможно.Оставьте устройство при комнатной температуре на 1 или 2 часа с включенным питанием (время зависит от степени конденсации). Капли воды испарятся, и воспроизведение станет возможным. Конденсация может также образовываться летом, если устройство открыто воздействию прямых потоков воздуха от кондиционера воздуха. Если это произойдет, переместите данное устройство в другое место.
Предупреждение по радиоволнамтолько X-EM26Данный аппарат использует радиоволновую частоту 2,4 ГГц, являющуюся диапазоном, используемым другими беспроводными системами (микроволновыми печами и радиотелефонами, др.).В случае появления искажений на изображении на телевизоре, существует возможность того, что данное устройство (включая изделия, поддерживаемые данным устройством) создают интерференцию сигналов с входным разъемом антенны телевизора, видеодеки, спутникового тюнера и т. п.В таком случае увеличьте расстояние между входным гнездом антенны и данным аппаратом (включая изделия, поддерживаемые данным аппаратом).• Pioneer не несет ответственности за любые сбои на
совместимых изделиях Pioneer по причине ошибок/сбоев связи, связанных с подключением к сети и/или подключенным оборудованием. Пожалуйста, свяжитесь с провайдером Интернет услуги или производителем сетевого устройства.
• Для использования Интернет требуется составить отдельный контракт/произвести оплату провайдеру Интернет услуги.
X-EM16_26_Cover_Anki_ru.fm 3 ページ 2016年8月6日 土曜日 午後3時44分
4Ru
Благодарим вас за покупку этого изделия марки Pioneer.Полностью прочтите настоящие инструкции по эксплуатации, чтобы знать, как правильно обращаться с этой моделью. Прочитав инструкции, сохраните их в надежном месте для использования в будущем.
СодержаниеПеред началом работы . . . . . . . . . . . . . . . 4Названия частей и функции . . . . . . . . . . . 5Обзор основного блока . . . . . . . . . . . . . . . . . . . . . . .5Обзор пульта ДУ . . . . . . . . . . . . . . . . . . . . . . . . . . . .6
Подключения. . . . . . . . . . . . . . . . . . . . . . . . 6Подключение громкоговорителей. . . . . . . . . . . . . . .6Установка FM-антенны . . . . . . . . . . . . . . . . . . . . . . .7Подключение питания . . . . . . . . . . . . . . . . . . . . . . . .7
Начало работы . . . . . . . . . . . . . . . . . . . . . . 7Включение . . . . . . . . . . . . . . . . . . . . . . . . . . . . . . . . .7Настройка часов. . . . . . . . . . . . . . . . . . . . . . . . . . . . .7Выбор источника . . . . . . . . . . . . . . . . . . . . . . . . . . . .7
Воспроизведение . . . . . . . . . . . . . . . . . . . . 8Воспроизведение диска. . . . . . . . . . . . . . . . . . . . . . .8Воспроизведение с устройства хранения USB . . . .8Управление воспроизведением . . . . . . . . . . . . . . . .8
Воспроизведение аудиосигнала через Bluetooth® (только X-EM26) . . . . . . . . . . . 9Спаривание с аппаратом (Первичная регистрация) . . . . . . . . . . . . . . . . . . . . .9Прослушивание музыки на аппарате с устройством с поддержкой Bluetooth. . . . . . . . . . . . . . . . . . . . . . . .10
Прослушивание радио в диапазоне FM . . . . . . . . . . . . . . . . . . . . . . . . . . . . . . . . 11Настройка на FM-радиостанцию. . . . . . . . . . . . . . .11Программирование радиостанций . . . . . . . . . . . . .11
Другие функции . . . . . . . . . . . . . . . . . . . . 11Дополнительная информация. . . . . . . . 13Устранение неполадок. . . . . . . . . . . . . . . . . . . . . . .13Меры предосторожности при эксплуатации . . . . .14Обращение с дисками . . . . . . . . . . . . . . . . . . . . . . .14Спецификации . . . . . . . . . . . . . . . . . . . . . . . . . . . . .15
Перед началом работы∫ ВведениеДанная система позволяет:
• прослушивайте музыку с дисков, запоминающих устройств USB и других внешних устройств
• прослушивать FM-радиостанции• прослушивайте музыку с устройства, оснащенного
беспроводной технологией Bluetooth (только X-EM26)Воспроизводимые носители:
• Диски: CD-DA, CD-R, CD-RW, MP3-CD• Файлы: .mp3• Запоминающее устройство USB
– Совместимость: USB 1.1/2.0 (Full Speed)– Поддержка класса: MSC (Mass Storage Class)– Файловая система: FAT16, FAT32– Максимальное количество альбомов/папок: 256– Максимальное количество дорожек/файлов: 999– Максимальный уровень директорий: 8
∫ Комплект поставкиПроверьте и убедитесь в наличии следующих аксессуаров в упаковке:
• Основной блок• Громкоговоритель x 2• Пульт ДУ• Батарейка AAA (R03)• Проволочная антенна FM• Подкладки противоскольжения x 8• Гарантийный сертификат (Модели для Европы) • Инструкции по эксплуатации (данный документ)
∫ Установка батарейки в пульт ДУ1 Откройте заднюю крышку и установите
батарейку, как показано ниже.
2 Закройте заднюю крышку.Батарейка, прилагаемая в комплекте поставки устройства, предназначена для проверки работы изделия, и ее срок службы может оказаться коротким. Рекомендуется использовать щелочную батарейку, имеющую более длительный срок службы.
SN29402702_X-EM16_26_Ru.book 4 ページ 2016年8月6日 土曜日 午後1時44分

5Ru
EnglishFrançais
EspañolDeutsch
ItalianoNederlands
PyccкийВНИМАНИЕ
• Вставляя батарейку, будьте внимательны, чтобы не повредить пружину на - разъеме для батарейки. Это может вызвать течь батарейки или перегрев.
• Не используйте любые другие типы батарейки, кроме указанных типов.
• При установке батарейки в пульт ДУ, вставляйте ее в соответствующем направлении, указанным обозначениями полярности (+ и -).
• Не нагревайте батарейку, не разбирайте ее и не кидайте ее в огонь или воду.
• Во избежание протекания электролита батарейки, извлеките батарейку, если не собираетесь использовать пульт ДУ в течение продолжительного периода времени (1 месяц или более). При протекании электролита, тщательно протрите внутреннюю сторону отделения для батарейки, затем установите новую батарейку. В случае протекания батарейки и попадания электролита на кожу, смойте его большим количеством воды.
• При утилизации использованной батарейки, пожалуйста, следуйте действующим в вашей стране/регионе распоряжениям правительства или правилами, принятыми общественными природоохранными организациями.
• ПРЕДУПРЕЖДЕНИЕНе используйте и не храните батарейки под прямыми лучами солнечного света или в местах с повышенной температурой, например в салоне автомобиля или вблизи обогревателя. Это может вызвать протекание, перегрев, микровзрыв или возгорание батареек. Кроме того, это может привести к сокращению срока службы или производительности батареек.
∫ Прикрепление нескользящих подкладокПрикрепите дополнительные нескользящие подкладки к нижним поверхностям громкоговорителей.
• Громкоговоритель обычно используется в вертикальном положении.
положении прикрепите нескользящие подкладки к нижним поверхностям громкоговорителей.
Названия частей и функцииОбзор основного блока
1 Í• Переключение режима ожидания и рабочего режима.
2 Датчик дистанционного управления• Направляйте сюда пульт ДУ и затем управляйте им в
пределах 7 м. Если рядом имеется источник флуоресцентного освещения, это может вызывать сбои при приеме изделием сигналов от пульта ДУ. В таком случает, отодвиньте изделие подальше от источника флуоресцентного освещения.
3 Главный дисплей4 Индикатор Bluetooth (только X-EM26)5
• Сюда подключается устройство хранения USB.6 Лоток для дисков
• Вставьте диск этикеточной стороной вверх.7 INPUT
• Повторно нажимая, выберите источник входа.8 :6
• Переход на предыдущую дорожку.• Нажмите и удерживайте нажатой для ускоренного
воспроизведения назад внутри дорожки.• Настройка на предыдущую радиостанцию.• Выбор предустановленной радиостанции.
9 59• Переход на следующую дорожку.• Нажмите и удерживайте нажатой для ускоренного
воспроизведения вперед внутри дорожки.• Настройка на следующую радиостанцию.• Выбор предустановленной радиостанции.
10 ∫• Остановка воспроизведения.
11 I• Воспроизведение, пауза или возобновление
воспроизведения.12 <
• Открывает и закрывает лоток диска.13 VOLUME
• При вращении повышается или понижается уровень громкости.
Вставьте батарейку, совместив полюс - с разъемом пульта ДУ -
Если батарейка сдвигает и деформирует разъем -, может произойти короткое замыкание щелочной батарейки
Разъем - деформирован
Нижняя поверхностьгромкоговорителя
21
137 8 9 1211
3
4 5 6 10
SN29402702_X-EM16_26_Ru.book 5 ページ 2016年8月6日 土曜日 午後1時44分
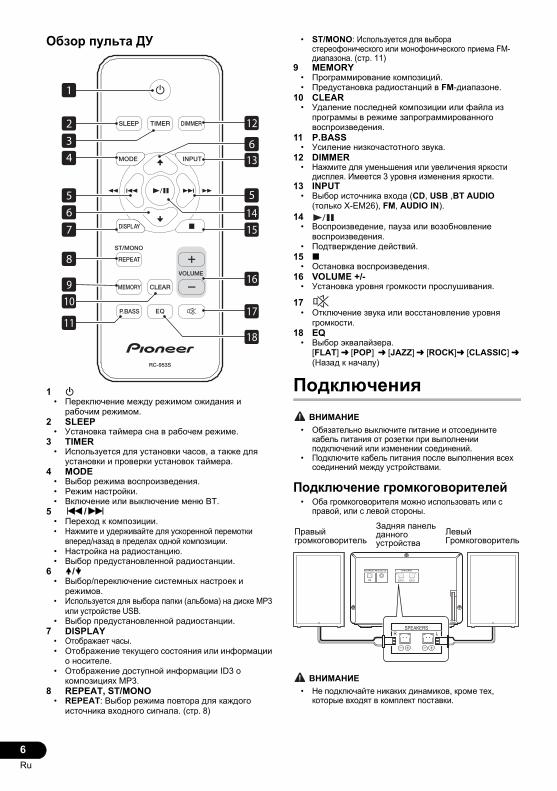
6Ru
Обзор пульта ДУ
1 Í• Переключение между режимом ожидания и
рабочим режимом.2 SLEEP
• Установка таймера сна в рабочем режиме.3 TIMER
• Используется для установки часов, а также для установки и проверки установок таймера.
4 MODE• Выбор режима воспроизведения.• Режим настройки. • Включение или выключение меню BT.
5 :/9• Переход к композиции. • Нажмите и удерживайте для ускоренной перемотки
вперед/назад в пределах одной композиции.• Настройка на радиостанцию.• Выбор предустановленной радиостанции.
6 /• Выбор/переключение системных настроек и
режимов.• Используется для выбора папки (альбома) на диске MP3
или устройстве USB.• Выбор предустановленной радиостанции.
7 DISPLAY• Отображает часы.• Отображение текущего состояния или информации
о носителе.• Отображение доступной информации ID3 о
композициях MP3.8 REPEAT, ST/MONO
• REPEAT: Выбор режима повтора для каждого источника входного сигнала. (стр. 8)
• ST/MONO: Используется для выбора стереофонического или монофонического приема FM-диапазона. (стр. 11)
9 MEMORY• Программирование композиций.• Предустановка радиостанций в FM-диапазоне.
10 CLEAR• Удаление последней композиции или файла из
программы в режиме запрограммированного воспроизведения.
11 P.BASS• Усиление низкочастотного звука.
12 DIMMER• Нажмите для уменьшения или увеличения яркости
дисплея. Имеется 3 уровня изменения яркости.13 INPUT
• Выбор источника входа (CD, USB ,BT AUDIO (только X-EM26), FM, AUDIO IN).
14• Воспроизведение, пауза или возобновление
воспроизведения.• Подтверждение действий.
15 ∫• Остановка воспроизведения.
16 VOLUME +/-• Установка уровня громкости прослушивания.
17• Отключение звука или восстановление уровня
громкости.18 EQ
• Выбор эквалайзера.[FLAT] l [POP] l [JAZZ] l [ROCK]l [CLASSIC] l (Назад к началу)
Подключения ВНИМАНИЕ
• Обязательно выключите питание и отсоедините кабель питания от розетки при выполнении подключений или изменении соединений.
• Подключите кабель питания после выполнения всех соединений между устройствами.
Подключение громкоговорителей• Оба громкоговорителя можно использовать или с
правой, или с левой стороны.
ВНИМАНИЕ• Не подключайте никаких динамиков, кроме тех,
которые входят в комплект поставки.
17
16
1
2
4
5
11
10
6
9
5
12
1514
18
6
7
8
13
3
Правый громкоговоритель
Задняя панель данного устройства
Левый Громкоговоритель
AUDIO INANTENNA SPEAKERSR
FM
L
SPEAKERSR L
SN29402702_X-EM16_26_Ru.book 6 ページ 2016年8月6日 土曜日 午後1時44分
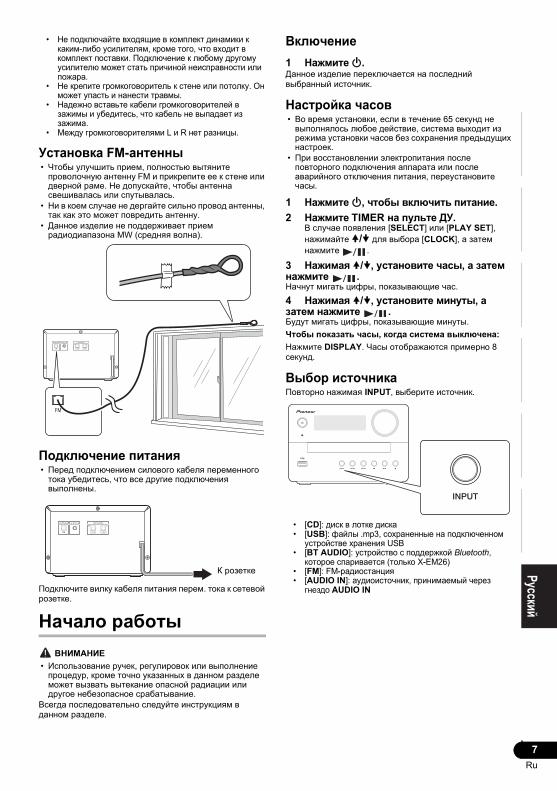
7Ru
EnglishFrançais
EspañolDeutsch
ItalianoNederlands
Pyccкий• Не подключайте входящие в комплект динамики к
каким-либо усилителям, кроме того, что входит в комплект поставки. Подключение к любому другому усилителю может стать причиной неисправности или пожара.
• Не крепите громкоговоритель к стене или потолку. Он может упасть и нанести травмы.
• Надежно вставьте кабели громкоговорителей в зажимы и убедитесь, что кабель не выпадает из зажима.
• Между громкоговорителями L и R нет разницы.
Установка FM-антенны• Чтобы улучшить прием, полностью вытяните
проволочную антенну FM и прикрепите ее к стене или дверной раме. Не допускайте, чтобы антенна свешивалась или спутывалась.
• Ни в коем случае не дергайте сильно провод антенны, так как это может повредить антенну.
• Данное изделие не поддерживает прием радиодиапазона MW (средняя волна).
Подключение питания• Перед подключением силового кабеля переменного
тока убедитесь, что все другие подключения выполнены.
Подключите вилку кабеля питания перем. тока к сетевой розетке.
Начало работы ВНИМАНИЕ
• Использование ручек, регулировок или выполнение процедур, кроме точно указанных в данном разделе может вызвать вытекание опасной радиации или другое небезопасное срабатывание.
Всегда последовательно следуйте инструкциям в данном разделе.
Включение1 Нажмите Í.Данное изделие переключается на последний выбранный источник.
Настройка часов• Во время установки, если в течение 65 секунд не
выполнялось любое действие, система выходит из режима установки часов без сохранения предыдущих настроек.
• При восстановлении электропитания после повторного подключения аппарата или после аварийного отключения питания, переустановите часы.
1 Нажмите Í, чтобы включить питание.2 Нажмите TIMER на пульте ДУ.
В случае появления [SELECT] или [PLAY SET], нажимайте / для выбора [CLOCK], а затем нажмите .
3 Нажимая /, установите часы, а затем нажмите .Начнут мигать цифры, показывающие час.4 Нажимая /, установите минуты, а затем нажмите .Будут мигать цифры, показывающие минуты.Чтобы показать часы, когда система выключена:Нажмите DISPLAY. Часы отображаются примерно 8 секунд.
Выбор источникаПовторно нажимая INPUT, выберите источник.
• [CD]: диск в лотке диска• [USB]: файлы .mp3, сохраненные на подключенном
устройстве хранения USB• [BT AUDIO]: устройство с поддержкой Bluetooth,
которое спаривается (только X-EM26)• [FM]: FM-радиостанция• [AUDIO IN]: аудиоисточник, принимаемый через
гнездо AUDIO IN
AUDIO INANTENNA SPEAKERSR
FM
L
FM
AUDIO INANTENNA SPEAKERSR
FM
L
К розетке
SN29402702_X-EM16_26_Ru.book 7 ページ 2016年8月6日 土曜日 午後1時44分

8Ru
ВоспроизведениеВоспроизведение диска1 Нажмите INPUT на пульте ДУ или повторно нажимая INPUT на основном блоке, переключите источник на [CD].2 Нажмите < и извлеките лоток диска.3 Загрузите диск этикеточной стороной вверх.4 Снова нажмите < и закройте лоток диска.5 Нажмите .
Воспроизведение с устройства хранения USBДанная система может воспроизводить файлы .mp3, скопированные на устройство памяти USB (стр. 13).
• Компания Pioneer не гарантирует совместимость со всеми устройствами памяти USB. Также обратите внимание, что компания Pioneer не несет никакой ответственности за утрату файлов на устройстве памяти USB, произошедшую в результате подключения к данному аппарату.
1 Подключите устройство хранения USB к гнезду USB.2 Нажмите INPUT на пульте ДУ или повторно нажимая INPUT на основном блоке, переключите источник на [USB].3 Нажмите .
Управление воспроизведениемВо время воспроизведения управляйте воспроизведением следуя инструкциям ниже.
: Пауза или возобновление воспроизведения.∫: Остановка воспроизведения.:/9: Переход на предыдущую или следующую дорожку.Нажмите и удерживайте нажатой для перемотки дорожки назад или для ускоренного поиска вперед внутри дорожки./: Переход на предыдущий или следующий альбом, если имеется не менее одного альбома.
REPEAT: Выбор доступного режима воспроизведения.• Повторное воспроизведение 1 [REP ONE]: повторное
воспроизведение текущей дорожки• Повторное воспроизведение всех [REP ALL]:
повторное воспроизведение всех дорожек• Повторное воспроизведение папки [REP FLDR]:
воспроизведение всех композиций в текущей папке. (Только для функции USB)
• Выключение повтора [REP OFF]: Выключение режима повторного воспроизведения.
∫ Изменение режима воспроизведения1 Нажмите ∫, чтобы остановить
воспроизведение.2 Нажимайте кнопку MODE.
CD: OFFSHUFFLEPROGRAMUSB: OFFFOLDERSHUFFLEFOLDER SHUFFLEPROGRAM
• Обычное воспроизведение [OFF]: композиции воспроизводятся в обычном порядке.
• В случайном порядке [SHUF]: композиции воспроизводятся в случайном порядке.
• Программа [PROGRAM]: композиции воспроизводятся в заданном порядке.
• Папка* [FLDR]: Воспроизведение всех файлов в выбранной папке.
• Случайный порядок в папке* [FLDRSHUF]: Воспроизведение всех файлов в выбранной папке в случайном порядке. * Только для USB
• В режиме SHUFFLE и FOLDER SHUFFLE одна и та же композиция может воспроизводиться непрерывно. Воспроизведение также не останавливается автоматически. Для остановки воспроизведения нажмите ∫.
• При отображении [PLS STOP]:Нельзя изменить режим воспроизведения во время воспроизведения. Остановите воспроизведение, затем измените режим воспроизведения.
∫ Программирование дорожек• Можно запрограммировать до 64 дорожек.1 Нажмите ∫, чтобы остановить
воспроизведение.• (Для компакт-дисков) Отображается [XX XX:XX] (XX
означает общее количество композиций, а XX:XX означает общее время композиций).
• (Для файлов MP3) Отображается [FILE XX] (XX означает общее количество композиций).
2 Несколько раз нажмите MODE, чтобы выбрать [PROGRAM].
3 (Для файлов MP3) Нажмите / для выбора папки с композициями или файлами, которые вы желаете запрограммировать.
4 Нажимая :/9, выберите композицию.5 Нажмите MEMORY.6 (Для компакт-дисков) Для программирования
других композиций повторите шаги 4 и 5.(Для файлов MP3) Для программирования других композиций повторите шаги 3 - 5.
7 Нажмите для запуска воспроизведения.
∫ Удаление программыКак отменить запрограммированное воспроизведение
• Несколько раз нажмите MODE, чтобы выбрать [OFF].
SN29402702_X-EM16_26_Ru.book 8 ページ 2016年8月6日 土曜日 午後1時44分
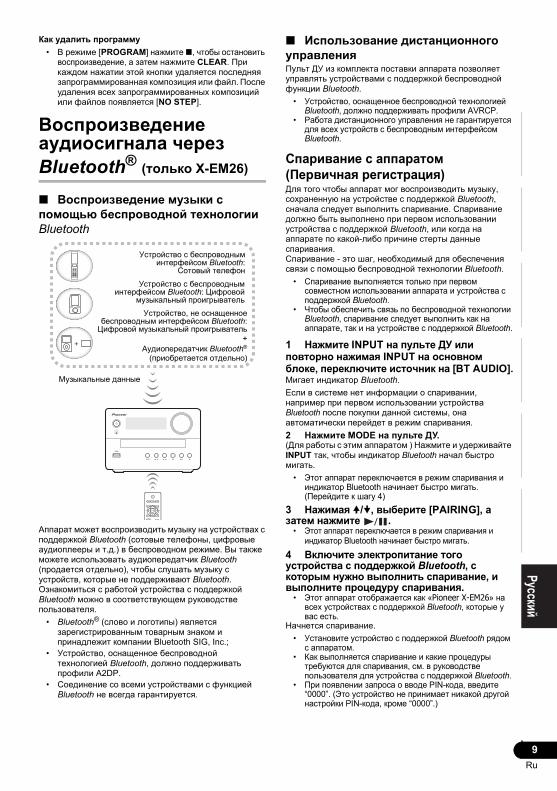
9Ru
EnglishFrançais
EspañolDeutsch
ItalianoNederlands
PyccкийКак удалить программу
• В режиме [PROGRAM] нажмите ∫, чтобы остановить воспроизведение, а затем нажмите CLEAR. При каждом нажатии этой кнопки удаляется последняя запрограммированная композиция или файл. После удаления всех запрограммированных композиций или файлов появляется [NO STEP].
Воспроизведение аудиосигнала через Bluetooth® (только X-EM26)
∫ Воспроизведение музыки с помощью беспроводной технологии Bluetooth
Аппарат может воспроизводить музыку на устройствах с поддержкой Bluetooth (сотовые телефоны, цифровые аудиоплееры и т.д.) в беспроводном режиме. Вы также можете использовать аудиопередатчик Bluetooth (продается отдельно), чтобы слушать музыку с устройств, которые не поддерживают Bluetooth. Ознакомиться с работой устройства с поддержкой Bluetooth можно в соответствующем руководстве пользователя.
• Bluetooth® (слово и логотипы) является зарегистрированным товарным знаком и принадлежит компании Bluetooth SIG, Inc.;
• Устройство, оснащенное беспроводной технологией Bluetooth, должно поддерживать профили A2DP.
• Соединение со всеми устройствами с функцией Bluetooth не всегда гарантируется.
∫ Использование дистанционного управленияПульт ДУ из комплекта поставки аппарата позволяет управлять устройствами с поддержкой беспроводной функции Bluetooth.
• Устройство, оснащенное беспроводной технологией Bluetooth, должно поддерживать профили AVRCP.
• Работа дистанционного управления не гарантируется для всех устройств с беспроводным интерфейсом Bluetooth.
Спаривание с аппаратом (Первичная регистрация)Для того чтобы аппарат мог воспроизводить музыку, сохраненную на устройстве с поддержкой Bluetooth, сначала следует выполнить спаривание. Спаривание должно быть выполнено при первом использовании устройства с поддержкой Bluetooth, или когда на аппарате по какой-либо причине стерты данные спаривания.Спаривание - это шаг, необходимый для обеспечения связи с помощью беспроводной технологии Bluetooth.
• Спаривание выполняется только при первом совместном использовании аппарата и устройства с поддержкой Bluetooth.
• Чтобы обеспечить связь по беспроводной технологии Bluetooth, спаривание следует выполнить как на аппарате, так и на устройстве с поддержкой Bluetooth.
1 Нажмите INPUT на пульте ДУ или повторно нажимая INPUT на основном блоке, переключите источник на [BT AUDIO].Мигает индикатор Bluetooth.Если в системе нет информации о спаривании, например при первом использовании устройства Bluetooth после покупки данной системы, она автоматически перейдет в режим спаривания.2 Нажмите MODE на пульте ДУ.(Для работы с этим аппаратом ) Нажмите и удерживайте INPUT так, чтобы индикатор Bluetooth начал быстро мигать.
• Этот аппарат переключается в режим спаривания и индикатор Bluetooth начинает быстро мигать. (Перейдите к шагу 4)
3 Нажимая /, выберите [PAIRING], а затем нажмите .
• Этот аппарат переключается в режим спаривания и индикатор Bluetooth начинает быстро мигать.
4 Включите электропитание того устройства с поддержкой Bluetooth, с которым нужно выполнить спаривание, и выполните процедуру спаривания.
• Этот аппарат отображается как «Pioneer X-EM26» на всех устройствах с поддержкой Bluetooth, которые у вас есть.
Начнется спаривание.• Установите устройство с поддержкой Bluetooth рядом
с аппаратом.• Как выполняется спаривание и какие процедуры
требуются для спаривания, см. в руководстве пользователя для устройства с поддержкой Bluetooth.
• При появлении запроса о вводе PIN-кода, введите “0000”. (Это устройство не принимает никакой другой настройки PIN-кода, кроме “0000”.)
Музыкальные данные
Устройство, не оснащенноебеспроводным интерфейсом Bluetooth:
Цифровой музыкальный проигрыватель+
Аудиопередатчик Bluetooth®
(приобретается отдельно)
Устройство с беспроводныминтерфейсом Bluetooth: Цифровой
музыкальный проигрыватель
Устройство с беспроводныминтерфейсом Bluetooth:
Сотовый телефон
SN29402702_X-EM16_26_Ru.book 9 ページ 2016年8月6日 土曜日 午後1時44分
10Ru
5 Убедитесь, что на дисплее отображается [BT AUDIO] и индикатор Bluetooth перестал мигать и горит постоянно.
• Если индикатор Bluetooth не переключится с мигания на постоянное горение, значит спаривание выполнено неправильно, поэтому попытайтесь снова выполнить спаривание с устройством.
• Если спаривание выполнено правильно, не нужно повторять эту процедуру.
Даже устройства, которые уже были спарены с данной микросистемой, не будут подключаться во время режима спаривания в следующих случаях.В таких случаях удалите историю спаривания из устройства с беспроводным интерфейсом Bluetooth и снова выполните спаривание.
• С данной микросистемой может быть записано до 8 спариваний. Если у устройству с поддержкой Bluetooth подключается больше 8 микросистем, будет удаляться самая старая история спаривания.
• Если настройки сбрасываются на заводские, вся история спаривания удаляется. Чтобы сбросить настройки на заводские, нажмите и удерживайте кнопки INPUT и < на аппарате в течение более 5 секунд, пока на дисплее не появится “RESET”.
Отмена спаривания• Нажмите MODE или измените источник.
Отключение соединения Bluetooth1 Нажмите MODE.2 Нажимая /, выберите [DISCONNECT], а
затем нажмите .
Прослушивание музыки на аппарате с устройством с поддержкой Bluetooth1 Нажмите INPUT на пульте ДУ или повторно нажимая INPUT на основном блоке, переключите источник на [BT AUDIO].Микросистема будет запускаться с помощью функции BT AUDIO и подключаться к устройству с поддержкой Bluetooth.2 Между устройством с поддержкой Bluetooth и аппаратом будет создано подключение Bluetooth.Процедуры для подключения к аппарату должны выполняться с устройства с поддержкой Bluetooth.
• Подробности о процедурах подключения см. в руководстве пользователя устройства с поддержкой Bluetooth.
3 Воспроизведение музыки с устройства с поддержкой Bluetooth.
• Нажмите на пульте ДУ или I на аппарате для воспроизведения.Можно управлять и :/9.Остановка воспроизведения и прочие операции при помощи устройств с функцией Bluetooth.
• Когда устройство с поддержкой Bluetooth не работает, и в течение более чем 15 минут не выполняется никаких действий, устройство автоматически выключится.
∫ Предостережение по радиоволнамДанное устройство работает на радиочастоте 2,4 ГГц, которая может использоваться другими беспроводными системами (см. список ниже). Во избежание шума или прерывания связи, не используйте уданный аппарат возле таких устройств, или убедитесь, что такие устройства отключены во время использования.
• Беспроводные телефоны• Беспроводные факсимильные аппараты• Микроволновые печи• Беспроводные устройства (IEEE802.11b/g)• Беспроводное аудио-видео оборудование• Беспроводные контроллеры для игровых систем• Медикаментозные средства, основанные на
микроволнах• Некоторые радионяни
Другое малораспространенное оборудование, которое может работать на одинаковой частоте:
• Противоугонные системы• Любительские радиостанции (HAM)• Системы управления складской логистикой• Отличительные системы для поездов или спецмашин
• В случае появления помех на телевизионном изображении существует вероятность того, что устройство, оснащенное беспроводной технологией Bluetooth, или данное устройство (включая приборы, поддерживаемые данным устройством) создают интерференцию сигналов с входным разъемом антенны телевизора, видеодеки, спутникового тюнера и т. п. В этом случае увеличьте расстояние между входным разъемом антенны и устройством, оснащенным беспроводной технологией Bluetooth, или данным устройством (включая аппараты, поддерживаемые данным устройством).
• Если между данным устройством (включая аппараты, поддерживаемые данным устройством) и устройством, оснащенным беспроводной технологией Bluetooth, имеются какие-либо препятствия (например, металлическая дверь, бетонная стена или изолятор из фольги), то, чтобы избежать появления помех и шумов, а также прерывания сигнала, может потребоваться изменить место установки системы.
∫ Рамки действияДанное устройство предназначено только для домашнего использования. (В зависимости от среды связи, расстояния передачи могут снижаться.) В следующих местах, плохой прием или невозможность приема радиоволн может вызывать прерывание или остановку звучания:
• В зданиях из железобетона или армированных панелей.
• Возле большой металлической мебели.• В толпе людей или возде здания или препятствия.• В условиях воздействия магнитного поля, статического
электричества, высокочастотных радиопомех от устройств, работающих на той же частоте, что и данное устройство (2,4 ГГц), такие как устройства беспроводных локальных сетей 2,4 ГГц (IEEE802.11b/g) или микроволновые печи.
• При проживании в густонаселенном жилом квартале (квартира, индивидуальный дом, др.) и если микроволновая печь соседа размещена рядом с вашей системой, могут иметь место радиопомехи. В таком случае, переместите ваш аппарат в другое место. Когда микроволновая печь не используется, тогда не будет и радиопомех.
SN29402702_X-EM16_26_Ru.book 10 ページ 2016年8月6日 土曜日 午後1時44分
11Ru
EnglishFrançais
EspañolDeutsch
ItalianoNederlands
Pyccкий∫ Отражения радиоволнНа данное устройство воздействуют прямые волны, исходящие от устройства, оснащенного беспроводной технологией Bluetooth, а также волны, отраженные от стен, предметов мебели и стен помещения. Отраженные волны (из-за препятствий и отражающих предметов) далее создают различные виды отраженных волн, а также различия в условиях приема, в зависимости от месторасположения. Если это является причиной ухудшения качества звука, попробуйте немного изменить расположение устройства, оснащенного беспроводной технологией Bluetooth. Следует также помнить, что звук может прерываться под влиянием отраженных волн, возникающих от передвижения человека в пространстве между данным устройством и устройством, оснащенным беспроводной технологией Bluetooth.
∫ Меры предосторожности, касающиеся соединений с аппаратами, поддерживаемыми данным устройством
• Выполните все соединения для всех аппаратов, поддерживаемых данным устройством, включая аудиокабели и кабели питания, перед тем как подсоединять их к данному устройству.
• После завершения соединений к данному устройству проверьте аудиокабели и кабели питания, чтобы убедиться в том, что они не перекрутились между собой.
• При отсоединении данного устройства убедитесь в том, что вокруг аппарата имеется достаточное пространство для выполнения работ.
• При изменении подключений аудио или других кабелей для изделий, поддерживаемых данным аппаратом, убедитесь, что вокруг имеется достаточно свободного рабочего пространства.
Прослушивание радио в диапазоне FMНастройка на FM-радиостанцию• Убедитесь, что FM-антенна подключена и полностью
вытянута.
∫ Ручная настройка1 Несколько раз нажмите INPUT на пульте ДУ
или кнопку INPUT на основном блоке, чтобы переключить источник на FM.
2 Несколько раз нажмите MODE, чтобы выбрать [MANUAL].
3 Нажимая :/9 на пульте ДУ, настройтесь на нужную радиостанцию.
∫ Автоматическая настройка1 Несколько раз нажмите INPUT на пульте ДУ
или кнопку INPUT на основном блоке, чтобы переключить источник на FM.
2 Несколько раз нажмите MODE, чтобы выбрать [AUTO].
3 Нажмите :/9.Сканирование начнется автоматически и тюнер остановится на первой принимаемой радиостанции.
(Только для модели для Европы) При настройке на FM-радиостанцию, предоставляющую услуги RDS, на дисплее появляется название службы или радиостанции.
Программирование радиостанций• Можно запрограммировать до 20 предустановленных
радиостанций.• Чтобы перезаписать запрограммированную
радиостанцию, сохраните другую радиостанцию под ее порядковым номером.
1 Настройтесь на радиостанцию.2 Нажмите MEMORY.3 Несколько раз нажмите :/9(/), чтобы
выбрать номер предустановки, а затем нажмите .
На дисплее появляется “COMPLETE”, и радиостанция регистрируется с номером предустановки.4 Для программирования других
радиостанций повторите шаги 1–3.
∫ Настройка на предустановленную радиостанцию1 Несколько раз нажмите INPUT на пульте ДУ
или кнопку INPUT на основном блоке, чтобы переключить источник на FM.
2 Несколько раз нажмите MODE, чтобы выбрать [PRESET].
3 Нажимая /, выберите нужный номер предустановки.
Если стереоприем в FM-диапазоне сопровождается шумом, нажмите ST/MONO несколько раз для выбора [MONO], выбирая монофонический прием. Это позволяет снизить шум.
Другие функции∫ Автоматическое переключение в режим ожидания
• Если на данном аппарате не выполняется никаких операций в течение 15 минут, он автоматически переключается в режим ожидания.
Нажмите и удерживайте Í на пульте ДУ или основном блоке.На главном дисплее появится “AUTO STANDBY ON” или “AUTO STANDBY OFF”, затем настройка переключится.Система может не переключаться автоматически в режим ожидания в следующих случаях:
• При использовании функции тюнера• Во время обнаружения аудиосигнала• Во время воспроизведения звуковых композиций
или файлов• При использовании таймера будильника или
таймера снаСистема сбрасывает 15-минутный обратный отсчет для перехода в режим ожидания в следующих случаях:
• При подключении устройства USB для функции USB
• При нажатии какой-либо кнопки на пульте ДУ или аппарате
SN29402702_X-EM16_26_Ru.book 11 ページ 2016年8月6日 土曜日 午後1時44分
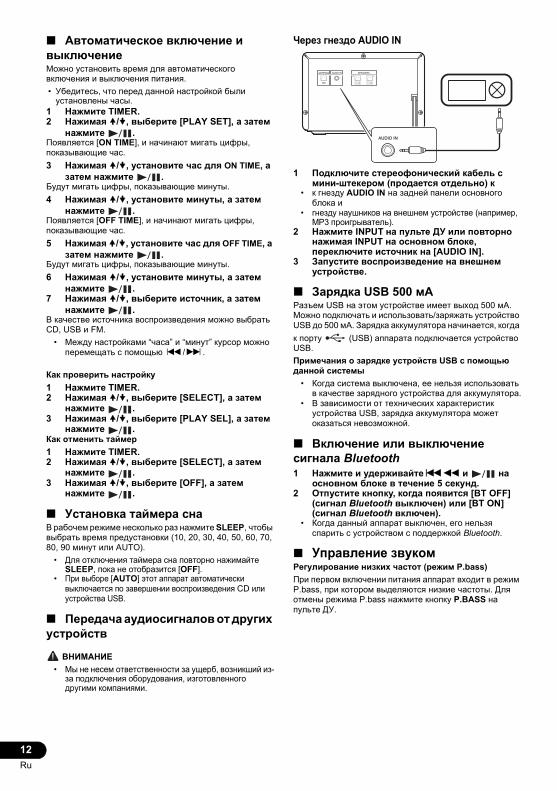
12Ru
∫ Автоматическое включение и выключениеМожно установить время для автоматического включения и выключения питания.• Убедитесь, что перед данной настройкой были
установлены часы.1 Нажмите TIMER.2 Нажимая /, выберите [PLAY SET], а затем
нажмите .Появляется [ON TIME], и начинают мигать цифры, показывающие час.3 Нажимая /, установите час для ON TIME, а
затем нажмите .Будут мигать цифры, показывающие минуты.4 Нажимая /, установите минуты, а затем
нажмите .Появляется [OFF TIME], и начинают мигать цифры, показывающие час.5 Нажимая /, установите час для OFF TIME, а
затем нажмите .Будут мигать цифры, показывающие минуты.6 Нажимая /, установите минуты, а затем
нажмите .7 Нажимая /, выберите источник, а затем
нажмите .В качестве источника воспроизведения можно выбрать CD, USB и FM.
• Между настройками “часа” и “минут” курсор можно перемещать с помощью :/9.
Как проверить настройку1 Нажмите TIMER.2 Нажимая /, выберите [SELECT], а затем
нажмите .3 Нажимая /, выберите [PLAY SEL], а затем
нажмите .Как отменить таймер1 Нажмите TIMER.2 Нажимая /, выберите [SELECT], а затем
нажмите .3 Нажимая /, выберите [OFF], а затем
нажмите .
∫ Установка таймера снаВ рабочем режиме несколько раз нажмите SLEEP, чтобы выбрать время предустановки (10, 20, 30, 40, 50, 60, 70, 80, 90 минут или AUTO).
• Для отключения таймера сна повторно нажимайте SLEEP, пока не отобразится [OFF].
• При выборе [AUTO] этот аппарат автоматически выключается по завершении воспроизведения CD или устройства USB.
∫ Передача аудиосигналов от других устройств
ВНИМАНИЕ• Мы не несем ответственности за ущерб, возникший из-
за подключения оборудования, изготовленного другими компаниями.
Через гнездо AUDIO IN
1 Подключите стереофонический кабель с мини-штекером (продается отдельно) к
• к гнезду AUDIO IN на задней панели основного блока и
• гнезду наушников на внешнем устройстве (например, MP3 проигрыватель).
2 Нажмите INPUT на пульте ДУ или повторно нажимая INPUT на основном блоке, переключите источник на [AUDIO IN].
3 Запустите воспроизведение на внешнем устройстве.
∫ Зарядка USB 500 мАРазъем USB на этом устройстве имеет выход 500 мА. Можно подключать и использовать/заряжать устройство USB до 500 мА. Зарядка аккумулятора начинается, когда к порту (USB) аппарата подключается устройство USB.Примечания о зарядке устройств USB с помощью данной системы
• Когда система выключена, ее нельзя использовать в качестве зарядного устройства для аккумулятора.
• В зависимости от технических характеристик устройства USB, зарядка аккумулятора может оказаться невозможной.
∫ Включение или выключение сигнала Bluetooth1 Нажмите и удерживайте:6 и на
основном блоке в течение 5 секунд.2 Отпустите кнопку, когда появится [BT OFF]
(сигнал Bluetooth выключен) или [BT ON] (сигнал Bluetooth включен).
• Когда данный аппарат выключен, его нельзя спарить с устройством с поддержкой Bluetooth.
∫ Управление звукомРегулирование низких частот (режим P.bass)При первом включении питания аппарат входит в режим P.bass, при котором выделяются низкие частоты. Для отмены режима P.bass нажмите кнопку P.BASS на пульте ДУ.
AUDIO INANTENNA SPEAKERSR
FM
L
SN29402702_X-EM16_26_Ru.book 12 ページ 2016年8月6日 土曜日 午後1時44分
13Ru
EnglishFrançais
EspañolDeutsch
ItalianoNederlands
PyccкийДополнительная информация∫ Информация по воспроизведению USBСовместимые устройства USB:
• Флэш-память USB (USB1.1/2.0 (Full Speed))• Флэш-проигрыватели USB (USB1.1/2.0 (Full Speed))
Поддерживаемые форматы:• Формат файлов USB или устройств памяти: FAT16, FAT32• Битовые скорости MP3 (скорости передачи данных):
от 32 кбит/с до 320 кбит/с и переменные скорости• Глубина вложения папок: 8 уровней, включая ROOT• Максимальное число папок: 256 (включая ROOT)• Максимальное число композиций/файлов: 999
Максимальное число файлов, которое данный аппарат может распознать в папке: 999
• ID3tag: v1.0, v1.1, v1.2, v2.0, v2.2, v2.3, v2.4Аудиофайлы не могут воспроизводиться в зависимости от настроек программного обеспечения кодировки, типа устройства USB, записи и других условий.Неподдерживаемые форматы:
• Пустые альбомы: альбом, в котором отсутствуют файлы MP3
• Неподдерживаемые форматы файлов пропускаются. Например, документы Word (.doc) или файлы MP3 с расширением .dlf игнорируются и не воспроизводятся.
• Аудиофайлы за исключением MP3.• Другие файловые системы (напр., FAT, NTFS, HFS и пр.),
отличные от FAT16 и FAT32.
∫ Поддерживаемые форматы MP3 дисков• ISO9660 Level 1/Level 2, Joliet• Максимальное число папок: 256 (включая ROOT)• Максимальное число композиций/файлов: 999
Максимальное число файлов, которое данный аппарат может распознать в папке: 999
• Поддерживаемые частоты дискретизации: 32 кГц, 44,1 кГц, 48 кГц
• Поддерживаемые скорости передачи данных: от 32 кбит/с до 320 кбит/с, переменные скорости
• Глубина вложения папок: 8 уровней, включая ROOTАудиофайлы не могут воспроизводиться в зависимости от настроек программного обеспечения кодировки, типа устройства USB, записи и других условий.
Устранение неполадок ПРЕДУПРЕЖДЕНИЕ
• Ни в коем случае не снимайте корпус данного аппарата.• Зачастую неверные действия ошибочно принимаются за
неполадки или неисправности. Если вам кажется, что этот компонент неисправен, пожалуйста, сначала ознакомьтесь с приведенными ниже пояснениями. Иногда проблема может быть связана с другим компонентом. Проверьте другие используемые компоненты и электронные устройства. Если неполадку не удастся устранить даже после выполнения указанных ниже пунктов, обратитесь в ближайший сервисный центр, уполномоченный компанией Pioneer, или к своему дилеру для выполнения ремонта.
• Если аппарат не работает как обычно из-за внешних причин как статическое электричество, отсоедините вилку питания от розетки и снова подключите ее к розетке для восстановления обычного рабочего состояния.
Если на дисплее отображается сообщение “PROTECT”. Немедленно извлеките шнур питания из розетки и
после исчезновения сообщения “PROTECT” проверьте следующее.
• Убедитесь, что вентиляционные отверстия системы ничем не загорожены.Если вы не обнаружили проблем после указанной выше проверки, снова подключите шнур питания и включите систему. Если проблема не исчезла, обратитесь в ближайший пункт продажи.
Отсутствует питание. Убедитесь, что силовой кабель переменного тока
подключен надлежащим образом. Убедитесь в наличии тока в розетке переменного тока. В автоматическом режиме ожидания система
автоматически выключается после 15 минут отсутствия каких-либо действий на системе.
Отсутствует звучание или слабое звучание. Отрегулируйте громкость. В Убедитесь, что громкоговорители правильно подключены.
Система не отвечает. Повторно подключите вилку питания переменного
тока и снова включите систему. режиме энергосбережения система автоматически
отключается, если в система не использовалась в течение 15 минут.
Не работает пульт ДУ. Уменьшите расстояние между пультом ДУ и
основным блоком. Вставьте батарейку в соответствии с
обозначениями полярности (знаки +/–). Замените батарейки. Направляйте пульт ДУ прямо на сенсор на
передней панели основного блока. Диск не обнаружен.
Вставьте диск. Убедитесь, что диск установлен этикеточной
стороной вверх. Подождите, пока не испарится конденсация влаги
на линзе. Замените или почистите диск. Убедитесь, что записываемый диск закрыт для
записи и что его формат поддерживается. Не поддерживается устройство хранения USB.
Убедитесь, что устройство хранения USB совместимо с системой.
Правильно ли подключено запоминающее устройство USB? Убедитесь, что устройство крепко вставлено.
Неправильно отображается название файла или папки (название альбома). На этом аппарате могут отображаться следующие коды
символов:• Верхний регистр (от A до Z).• Цифры (от 0 до 9).• Символы (< >* +, [ ] _).Другие знаки отображаются как “_”.
Отображается сообщение “OVER CURRENT”. Обнаружена проблема с уровнем электрического
тока из порта (USB). Выключите систему и извлеките устройство USB из порта (USB). Убедитесь в отсутствии проблемы с устройством USB. Если сообщение не исчезло с дисплея, обратитесь в ближайший пункт продажи.
Невозможно воспроизвести некоторые файлы на устройстве хранения USB. Убедитесь, что формат файла поддерживается. Убедитесь, что количество файлов не превышает
максимальное количество (стр. 13). Плохой радиоприем.
Увеличьте расстояние между системой и другими электроприборами.
X-EM16&26_TOC&Body_Ru.fm 13 ページ 2016年8月8日 月曜日 午後1時23分
14Ru
Полностью вытяните антенну. Не работает таймер.
Правильно установите часы. Включите таймер.
Настройка часов/таймера удалена. Было прервано питание или был отсоединен
силовой кабель переменного тока. Переустановите часы/таймер.
Когда подключено или работает устройство с беспроводным интерфейсом Bluetooth (только X-EM26) Устройство, оснащенное беспроводной технологией
Bluetooth, не подключается или не работает.Не воспроизводится или прерывается звук с устройства, оснащенного беспроводной технологией Bluetooth. Проверьте, нет ли рядом с устройством
источников электромагнитного излучения в диапазоне 2,4 ГГц (микроволновые печи, устройства беспроводной локальной сети или оснащенного беспроводной технологией Bluetooth). Если такой предмет имеется возле аппарата, передвиньте аппарат подальше от него. Или, прекратите использование предмета, издающего электромагнитные волны.
Проверьте, не слишком ли далеко находится устройство, оснащенное беспроводной технологией Bluetooth, от данного устройства и нет ли между устройством, оснащенным беспроводной технологией Bluetooth, и данным устройством каких-либо препятствий. Расположите устройство, оснащенное беспроводной технологией Bluetooth, и данное устройство так, чтобы расстояние между ними не превышало 10 м*, и между ними не было препятствий.
* Данное расстояние используется в качестве ориентира. Фактическое допустимое расстояние между устройствами может варьироваться в зависимости от условий окружающей среды.
Устройство, оснащенное беспроводной технологией Bluetooth, может быть не переключено в режим поддержки беспроводной технологии Bluetooth. Проверьте настройку устройства, оборудованного беспроводной технологией Bluetooth.
Меры предосторожности при эксплуатации
∫ При перемещении устройстваПри перемещении данного аппарата в первую очередь убедитесь, что не загружен диск. Затем нажмите Í, подождите, пока на основном дисплее перестанет отображаться [STANDBY] до отключения аппарата, затем отсоедините силовой кабель. Если аппарат транспортируется или перемещается со вставленным диском или иным устройством, подключенным к разъему USB или к мини-разъему AUDIO IN.
∫ Место установки• Выберите устойчивое место возле телевизора или
стереофонической системы, которые используются совместно с данным устройством.
• Не размещайте данное устройство сверху на телевизоре или цветном мониторе. Также устанавливайте ресивер дальше от кассетных магнитофонов и иных устройств, на которые может повлиять магнитное поле.
Избегайте следующих мест:• Места, подвергаемые прямому солнечному свету• Сырые или плохо вентилируемые места• Места со слишком высокой температурой• Места, подвергаемые вибрациям• Места с большим содержанием пыли или сигаретного
дыма• Места, подвергаемые воздействию сажи, пара или
тепла (кухни и т.п.)
∫ Не размещайте предметы на устройствеНе размещайте какие-либо предметы на устройстве сверху.Не закрывайте вентиляционные отверстия.Не используйте данное устройство на ворсистых коврах, кроватях, диванах и т. д. или завернутым в ткань и т. д. Это может помешать рассеиванию тепла, что может привести к поломке.Не подвергайте ресивер воздействию тепла.Не ставьте данный аппарат на верхнюю часть усилителя или иного компонента, который генерирует тепло. При установке в стойку, чтобы избежать воздействия тепла, отводимого от усилителя или иных аудиокомпонентов, устанавливайте аппарат на полку ниже усилителя.
• Выключайте питание данного аппарата, когда он не используется.
• В зависимости от характеристик сигнала, на экране телевизора может появиться чересполосица, а в радиопередачах помехи, когда включается питание данного аппарата. Если такое происходит, выключите питание данного аппарата.
∫ Чистка изделия• Перед тем как приступить к очистке данного
устройства, отсоедините кабель питания от розетки.• Для чистки данного устройства используйте мягкую
ткань. Для прилипшей пыли смочите мягкую ткань некоторым количеством нейтрального моющего средства, разбавленного 5 до 6 частями воды, тщательно выжмите ткань, сотрите пыль и затем вытрите поверхность мягкой, сухой тканью.
• Спирт, растворитель, бензин, инсектициды и т.п. могут вызвать расслаивание печати или краски. Также избегайте длительного контакта резиновых или виниловых изделий с данным устройством, так как это может испортить корпус.
• При использовании чистящих тканей, смоченных химреактивами и т.п., внимательно прочтите инструкции по их применению.
∫ Чистка линзы• При обычном использовании линза данного аппарата
не должна загрязниться, но если она по какой-то причине запылится или загрязнится и начнутся сбои, обратитесь в ближайший авторизованный Pioneer сервисный центр. Хотя в продаже имеются средства очистки линз для проигрывателей, использовать их не рекомендуется, так как некоторые средства могут повредить линзу.
Обращение с дисками
∫ Хранение• Всегда помещайте диски в их коробки и храните их в
вертикальном положении, избегая горячих, сырых мест, подверженных воздействию прямых солнечных лучей и слишком низких температур.
• Прочитайте меры предосторожности, вложенные вместе с диском.
SN29402702_X-EM16_26_Ru.book 14 ページ 2016年8月6日 土曜日 午後1時44分
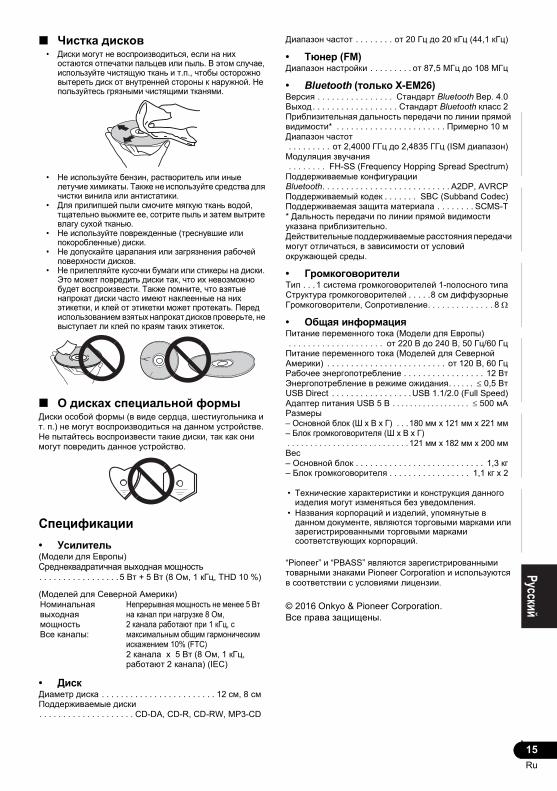
15Ru
EnglishFrançais
EspañolDeutsch
ItalianoNederlands
Pyccкий∫ Чистка дисков
• Диски могут не воспроизводиться, если на них остаются отпечатки пальцев или пыль. В этом случае, используйте чистящую ткань и т.п., чтобы осторожно вытереть диск от внутренней стороны к наружной. Не пользуйтесь грязными чистящими тканями.
• Не используйте бензин, растворитель или иные летучие химикаты. Также не используйте средства для чистки винила или антистатики.
• Для прилипшей пыли смочите мягкую ткань водой, тщательно выжмите ее, сотрите пыль и затем вытрите влагу сухой тканью.
• Не используйте поврежденные (треснувшие или покоробленные) диски.
• Не допускайте царапания или загрязнения рабочей поверхности дисков.
• Не прилепляйте кусочки бумаги или стикеры на диски. Это может повредить диски так, что их невозможно будет воспроизвести. Также помните, что взятые напрокат диски часто имеют наклеенные на них этикетки, и клей от этикетки может протекать. Перед использованием взятых напрокат дисков проверьте, не выступает ли клей по краям таких этикеток.
∫ О дисках специальной формыДиски особой формы (в виде сердца, шестиугольника и т. п.) не могут воспроизводиться на данном устройстве. Не пытайтесь воспроизвести такие диски, так как они могут повредить данное устройство.
Спецификации• Усилитель(Модели для Европы) Среднеквадратичная выходная мощность. . . . . . . . . . . . . . . . . 5 Вт + 5 Вт (8 Ом, 1 кГц, THD 10 %)
(Моделей для Северной Америки)
• ДискДиаметр диска . . . . . . . . . . . . . . . . . . . . . . . . 12 см, 8 смПоддерживаемые диски. . . . . . . . . . . . . . . . . . . . CD-DA, CD-R, CD-RW, MP3-CD
Диапазон частот . . . . . . . . от 20 Гц до 20 кГц (44,1 кГц)
• Тюнер (FM)Диапазон настройки . . . . . . . . . от 87,5 МГц до 108 МГц
• Bluetooth (только X-EM26)Версия . . . . . . . . . . . . . . . . Стандарт Bluetooth Вер. 4.0Выход. . . . . . . . . . . . . . . . . . Стандарт Bluetooth класс 2Приблизительная дальность передачи по линии прямой видимости* . . . . . . . . . . . . . . . . . . . . . . . Примерно 10 мДиапазон частот . . . . . . . . . от 2,4000 ГГц до 2,4835 ГГц (ISM диапазон)Модуляция звучания . . . . . . . . FH-SS (Frequency Hopping Spread Spectrum)Поддерживаемые конфигурации Bluetooth. . . . . . . . . . . . . . . . . . . . . . . . . . . A2DP, AVRCPПоддерживаемый кодек . . . . . . . SBC (Subband Codec)Поддерживаемая защита материала . . . . . . . . SCMS-T* Дальность передачи по линии прямой видимости указана приблизительно.Действительные поддерживаемые расстояния передачи могут отличаться, в зависимости от условий окружающей среды.
• ГромкоговорителиТип . . . 1 система громкоговорителей 1-полосного типаСтруктура громкоговорителей . . . . .8 см диффузорныеГромкоговорители, Сопротивление. . . . . . . . . . . . . . 8
• Общая информацияПитание переменного тока (Модели для Европы) . . . . . . . . . . . . . . . . . . . . от 220 В до 240 В, 50 Гц/60 ГцПитание переменного тока (Моделей для Северной Америки) . . . . . . . . . . . . . . . . . . . . . . . . . от 120 В, 60 ГцРабочее энергопотребление . . . . . . . . . . . . . . . . . 12 ВтЭнергопотребление в режиме ожидания 0,5 ВтUSB Direct . . . . . . . . . . . . . . . . .USB 1.1/2.0 (Full Speed)Адаптер питания USB 5 В 500 мАРазмеры– Основной блок (Ш x В x Г) . . .180 мм x 121 мм x 221 мм– Блок громкоговорителя (Ш x В x Г). . . . . . . . . . . . . . . . . . . . . . . . . . . 121 мм x 182 мм x 200 ммВес– Основной блок . . . . . . . . . . . . . . . . . . . . . . . . . . . 1,3 кг– Блок громкоговорителя . . . . . . . . . . . . . . . . . 1,1 кг x 2
• Технические характеристики и конструкция данного изделия могут изменяться без уведомления.
• Названия корпораций и изделий, упомянутые в данном документе, являются торговыми марками или зарегистрированными торговыми марками соответствующих корпораций.
“Pioneer” и “PBASS” являются зарегистрированными товарными знаками Pioneer Corporation и используются в соответствии с условиями лицензии.
© 2016 Onkyo & Pioneer Corporation.Все права защищены.
Номинальная выходная мощностьВсе каналы:
Непрерывная мощность не менее 5 Вт на канал при нагрузке 8 Ом,2 канала работают при 1 кГц, с максимальным общим гармоническим искажением 10% (FTC)2 канала x 5 Вт (8 Ом, 1 кГц, работают 2 канала) (IEC)
X-EM16&26_TOC&Body_Ru.fm 15 ページ 2016年8月9日 火曜日 午後3時58分
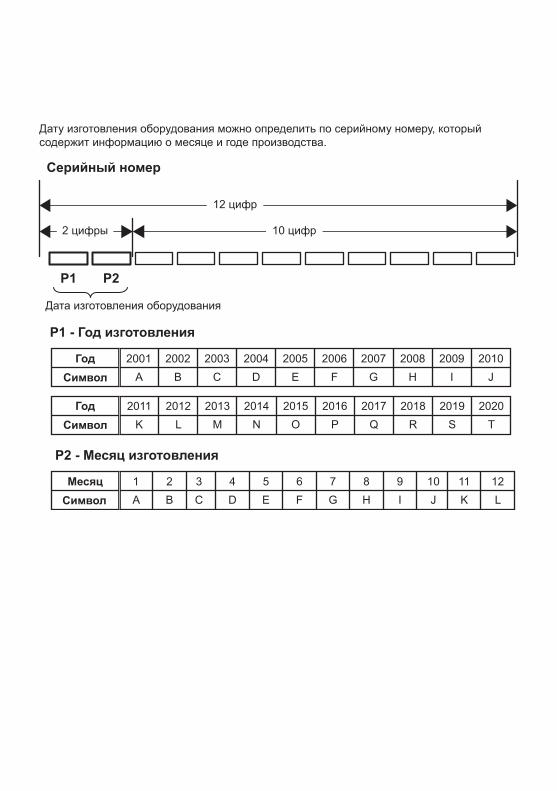
Серийный номер
P1 - Год изготовления
P1 P2
Дату изготовления оборудования можно определить по серийному номеру, который содержит информацию о месяце и годе производства.
Дата изготовления оборудования
Год 2001A
2002B
2003C
2004D
2005E
2006F
2007G
2008H
2009I
2010JСимвол
12 цифр
10 цифр2 цифры
Год 2011K
2012L
2013M
2014N
2015O
2016P
2017Q
2018R
2019S
2020TСимвол
P2 - Месяц изготовления
Месяц 1A
2B
3C
4D
5E
6F
7G
8H
9I
10J
11K
12LСимвол
SN29402702_X-EM16_26_En(Europe).book 16 ページ 2016年8月6日 土曜日 午後3時12分
Примечание:Корпорация О энд Пи устанавливает следующую продолжительность срока службы официально поставляемых на Российский рынок товаров. Аудио и видеооборудование: 7 лет Переносное аудиооборудование: 6 лет Другое оборудование (наушники, микрофон и т.д.): 5 лет
Информация для покупателей в ЕАЭС:Уполномоченной организацией в соответствии с требованиями ТР ТС 004/2011, 020/2011, является ООО “ПИОНЕР РУС”, Россия, 105064, г. Москва, Нижний Сусальный переулок, дом 5, строение 19, т. (495) 9568901
SN29402702_X-EM16_26_En(Europe).book 17 ページ 2016年8月6日 土曜日 午後3時12分
Declaration of Conformity with regard to the R&TTE Directive 1999/5/EC
English:Hereby, O&P, declares that this [*] is in compliance with the essential require-ments and other relevant provisions of Directive 1999/5/EC.
Suomi:O&P vakuuttaa täten että [*] tyyppinen laite on direktiivin 1999/5/EY oleellisten vaatimusten ja sitä koskevien direktiivin muiden ehtojen mukainen.
Nederlands:Hierbij verklaart O&P dat het toestel [*] in overeenstemming is met de essen-tiële eisen en de andere relevante bepalingen van richtlijn 1999/5/EG
Français:Par la présente O&P déclare que l’appareil [*] est conforme aux exigenc-es essentielles et aux autres disposi-tions pertinentes de la directive 1999/5/CE
Svenska:Härmed intygar O&P att denna [*] står I överensstämmelse med de väsentliga egenskapskrav och övriga relevanta bestämmelser som framgår av direktiv 1999/5/EG.
Dansk:Undertegnede , O&P erklærer herved, at følgende udstyr [*] overholder de væsentlige krav og øvrige relevante krav i direktiv 1999/5/EF
Deutsch:Hiermit erklärt O&P, dass sich dieses [*] in Übereinstimmung mit den grundlegenden Anforderungen und den anderen relevanten Vorschriften der Richtlinie 1999/5/EG befindet". (BMWi)
Ελληνικά:ΜΕ ΤΗΝ ΠΑΡΟΥΣΑ O&P ΔΗΛΩΝΕΙ ΟΤΙ [*] ΣΥΜΜΟΡΦΩΝΕΤΑΙ ΠΡΟΣ ΤΙΣ ΟΥΣΙΩΔΕΙΣ ΑΠΑΙΤΗΣΕΙΣ ΚΑΙ ΤΙΣ ΛΟΙΠΕΣ ΣΧΕΤΙΚΕΣ ΔΙΑΤΑΞΕΙΣ ΤΗΣ ΟΔΗΓΙΑΣ 1999/5/ΕΚ
Italiano:Con la presente O&P dichiara che questo [*] è conforme ai requisiti essenziali ed alle altre disposizioni pertinenti stabilite dalla direttiva 1999/5/CE.
Español:Por medio de la presente O&P declara que el [*] cumple con los requisitos esenciales y cualesquiera otras disposiciones aplicables o exigibles de la Directiva 1999/5/CE
[*] X-EM26
Manufacturer: EU Representative’s:Pioneer Europe NVHaven 1087, Keetberglaan 1, 9120 Melsele, Belgiumhttp://www.pioneer.eu
O&P Corporation2-3-12, Yaesu, Chuo-Ku, Tokyo104-0028, Japan
SN29402702_X-EM16_26_En(Europe).book 18 ページ 2016年8月6日 土曜日 午後3時12分
Português:
Čeština:
Eesti:
Magyar:
Latviešu valoda:
Lietuvių kalba:
Malti:
Slovenčina:
Slovenščina:
Română:
български:
Polski:
Norsk:
Íslenska:
O&P declara que este [*] está conforme com os requisitos essenciais e outras disposições da Directiva 1999/5/CE.
O&P tímto prohlašuje, že tento [*] je ve shodě se základními požadavky a dalšími příslušnými ustanoveními směrnice 1999/5/ES
Käesolevaga kinnitab O&P seadme [*] vastavust direktiivi 1999/5/EÜ põhinõuetele ja nimetatud direktiivist tulenevatele teistele asjakohastele sätetele.
Alulírott, O&P nyilatkozom, hogy a [*] megfelel a vonatkozó alapvetõ követelményeknek és az 1999/5/EC irányelv egyéb elõírásainak.
Ar šo O&P deklarē, ka [*] atbilst Direktīvas 1999/5/EK būtiskajām prasībām un citiem ar to saistītajiem noteikumiem.
Šiuo O&P deklaruoja, kad šis [*] atitinka esminius reikalavimus ir kitas 1999/5/EB Direktyvos nuostatas.
Hawnhekk, O&P jiddikjara li dan [*] jikkonforma mal-ħtiġijiet essenzjali u ma provvedimenti oħrajn relevanti li hemm fid-Dirrettiva 1999/5/EC
O&P týmto vyhlasuje, že [*] spĺňa základné požiadavky a všetky príslušné ustanovenia Smernice 1999/5/ES.
O&P izjavlja, da je ta [*] v skladu z bistvenimi zahtevami in ostalimi relevantnimi določili direktive 1999/5/ES.
Prin prezenta, O&P declara ca acest [*] este in conformitate cu cerintele esentiale si alte prevederi ale Directivei 1999/5/EU.
С настоящето, O&P декларира, че този [*] отговаря на основните изисквания и други съответни постановления на Директива 1999/5/EC.
Niniejszym O&P oświadcza, że [*] jest zgodny z zasadniczymi wymog-ami oraz pozostałymi stosownymi postanowieniami Dyrektywy 1999/5/EC
O&P erklærer herved at utstyret [*] er i samsvar med de grunnleggende krav og øvrige relevante krav i direktiv 1999/5/EF.
Hér með lýsir O&P yfir því að [*] er í samræmi við grunnkröfur og aðrar kröfur, sem gerðar eru í tilskipun 1999/5/EC
Hrvatski:Ovime tvrtka O&P izjavljuje da je ovaj [*] u skladu osnovnim zahtjevima i ostalim odredbama Direktive 1999/5/EC.
R-TTE-24L_C1_En
SN29402702_X-EM16_26_En(Europe).book 19 ページ 2016年8月6日 土曜日 午後3時12分
F1608-0
© 2016 Onkyo & Pioneer Corporation. All rights reserved.© 2016 Onkyo & Pioneer Corporation. Tous droits de reproduction et de traduction réservés.
Printed in China / Imprimé en Chine / Напечатано в Китае
SN 29402702 72-EM26EU-MANB1 *29402702*
* 2 9 4 0 2 7 0 2 *
<Germany>Hanns-Martin-Schleyer-Straße. 35, 47877 Willich, GermanyTel: +49(0)2154 913222
<UK>Anteros Building, Odyssey Business Park, West End Road, South Ruislip, Middlesex, HA4 6QQ United KingdomTel: +44(0)208 836 3612
<France>6, Avenue de Marais F - 95816 Argenteuil Cedex FRANCETel :+33(0)969 368 050
Корпорация О энд Пи2-3-12, Яэсу, Чуо-ку, г. Токио, 104-0028, ЯПОНИЯ
2-3-12 Yaesu, Chuo-ku, Tokyo 104-0028 JAPAN
<U.S.A.>18 PARK WAY, UPPER SADDLE RIVER, NEW JERSEY 07458, U.S.A.Tel: 1-201-785-2600 Tel: 1-844-679-5350
SN29402702_X-EM16_26_En(Europe).book 23 ページ 2016年8月6日 土曜日 午後3時12分