pwr sel source remote random repeat … · busque el número del modelo y el número de serie ya...
TRANSCRIPT
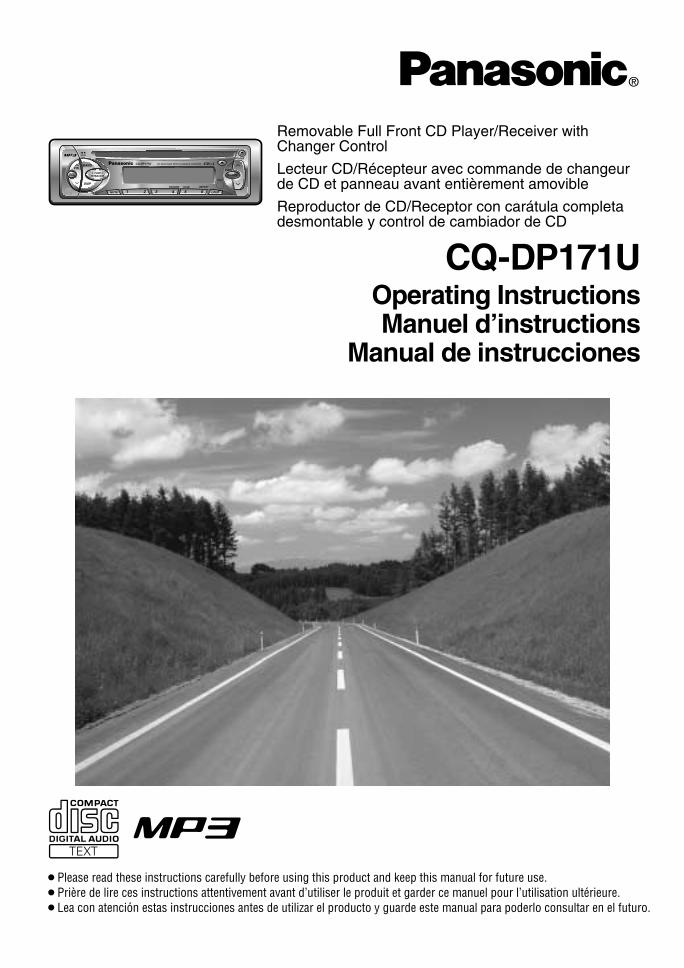
®
Removable Full Front CD Player/Receiver withChanger Control
Lecteur CD/Récepteur avec commande de changeurde CD et panneau avant entièrement amovible
Reproductor de CD/Receptor con carátula completadesmontable y control de cambiador de CD
CQ-DP171UOperating InstructionsManuel d’instructions
Manual de instrucciones
¡Please read these instructions carefully before using this product and keep this manual for future use.¡Prière de lire ces instructions attentivement avant d’utiliser le produit et garder ce manuel pour l’utilisation ultérieure.¡Lea con atención estas instrucciones antes de utilizar el producto y guarde este manual para poderlo consultar en el futuro.
VOL
SEL
SCAN
LOUD
RANDOM REPEAT
FOLDER
MUTE
SOURCE
PWRTUNE
TRACK
BAND
DISP
1 2 3 4 5 6
APM
CQ-DP171U CD RECEIVER WITH CHANGER CONTROL
REMOTE
TEXT
2 CQ-DP171U
Radio Frequency Interference Statement (Part 15 of the FCC Rules) :Applies only in U.S.A.
This equipment has been tested and found to comply with the limits for a Class B digital, pursuant to Part15 of the FCC Rules.¡These limits are designed to provide reasonable protection against harmful interference in an automo-
bile installation. This equipment generates, uses, and can radiate radio frequency energy and, if notinstalled and used in accordance with the instructions, may cause harmful interference to radio commu-nications. However, there is no guarantee that interference will not occur in a particular installation. Ifthis equipment does cause harmful interference to radio or television reception, which can be deter-mined by turning the equipment off and on, the user is encouraged to consult the dealer or an experi-ence radio technician for help.
FCC Warning:Any unauthorized changes or modifications to this equipment would void the user's authority to operatethis device.
This device complies with Part 15 of the FCC Rules:Operation is subject to the following two conditions:a This device may not cause harmful interference, ands This device must accept any interference received, including interference that may cause undesired
operation.
C For Canada:This Class B digital apparatus complies with Canadian ICES-003.
Find the model number and serial number on eitherthe back or bottom of the unit. Please record them inthe space below and retain this booklet as a perma-nent record of your purchase to help with identifica-tion in case of theft.
MODEL NUMBER CQ-DP171U
SERIAL NUMBER
DATE PURCHASED
FROM
CAUTION:THIS PRODUCT IS A CLASS I LASER PROD-UCT.USE OF CONTROLS OR ADJUSTMENTS ORPERFORMANCE OF PROCEDURES OTHERTHAN THOSE SPECIFIED HEREIN MAY RESULTIN HAZARDOUS RADIATION EXPOSURE.DO NOT OPEN COVERS AND DO NOT REPAIRYOURSELF. REFER SERVICING TO QUALI-FIED PERSONNEL.
WARNING:TO REDUCE THE RISK OF FIRE OR ELECTRICSHOCK, DO NOT EXPOSE THIS PRODUCT TORAIN OR MOISTURE.
TO REDUCE THE RISK OF FIRE OR ELECTRICSHOCK, AND ANNOYING INTERFERENCE,USE ONLY THE INCLUDED COMPONENTS.
Laser products:Wave length: 780 nmLaser power: No hazardous radiation is emitted
with safety protection.
ENGLISH
Model No.N° De Modèle
Manufactured by Dalian MatsushitaCommunication Industrial Co., Ltd.Dalian China Made in China
1 2 V 15 A
CQ-DP171U
FM75Ω
Serial No.N° De Série
4~8Ω
This device complies with Part 15 of the FCC Rules. Operation is subject to the condition that this device does not cause harmful interference.
Label Indication and Location
Safety Information

3CQ-DP171U
ATTENTION:CET APPAREIL EST UN PRODUIT LASER DE LACLASSE I.L'UTILISATION DE COMMANDES OU RÉGLAGES OUL'EXÉCUTION D'OPÉRATIONS AUTRES QUE CELLESQUI SONT INDIQUÉES DANS CE DOCUMENT PEU-VENT RÉSULTER EN UNE EXPOSITION À UN RAYON-NEMENT DANGEREUX.N'OUVREZ PAS LES COUVERCLES ET N'ESSAYEZPAS D'EFFECTUER VOUS-MÊME DES RÉPARA-TIONS. ADRESSEZ-VOUS À UN PERSONNEL QUALI-FIÉ POUR TOUTE RÉPARATION.
MISE EN GARDE:POUR RÉDUIRE LES RISQUES D'INCENDIE OUD'ÉLECTROCUTION, N'EXPOSEZ PAS CET APPAREILÀ LA PLUIE OU À L'HUMIDITÉ.
AFIN DE PRÉVENIR TOUT RISQUE D'INCENDIE OUD'INTERFÉRENCES, UTILISER UNIQUEMENT LESCOMPOSANTS FOURNIS.
Produits laser:Longueur d'onde: 780 nmPuissance du laser: Aucune radiation dangereuse
n'est émise avec la protectionde sécurité.
PRECAUCIÓN:ÉSTE ES UN PRODUCTO LÁSER DE LA CLASE I.LA UTILIZACIÓN DE CONTROLES, EL HACERAJUSTES O EL SEGUIR PROCEDIMIENTOS DISTIN-TOS DE LOS ESPECIFICADOS EN ESTE MANUALPODRÍA CAUSAR UNA EXPOSICIÓN PELIGROSA ALA RADIACIÓN.NO ABRA LAS CUBIERTAS NI HAGA REPARACIONESUSTED MISMO. SOLICITE LOS TRABAJOS DE SER-VICIO AL PERSONAL CALIFICADO.
ADVERTENCIA:PARA REDUCIR EL RIESGO DE INCENDIOS O SACU-DIDAS ELÉCTRICAS, NO EXPONGA ESTE PRODUC-TO A LA LLUVIA NI A LA HUMEDAD.
PARA REDUCIR RIESGO DE INCENDIOS O SACUDI-DAS ELÉCTRICAS, Y PARA EVITAR LAS INTERFE-RENCIAS MOLESTAS, UTILICE SOLAMENTE LOSCOMPONENTES INCLUIDOS.
Productos láser:Longitud de onda: 780 nmPotencia láser: Con protección de seguridad no se
emite radiación peligrosa.
ll est recommandé de noter, dans l'espace prévu ci-dessous, les numéros de modèle et de série inscritssoit à l'arrière soit sous le fond de l'appareil, et deconserver ce manuel comme mémorandum del'achat afin de permettre l'identification de l'appareilen cas de vol.
NUMÉRO DE MODÈLE CQ-DP171U
NUMÉRO DE SÉRIE
DATE DE L'ACHAT
VENDEUR
Busque el número del modelo y el número de serieya sea en la parte trasera o en el fondo de la unidad.Sírvase anotar dichos números en el espacio si-guiente, y mantenga este librete como una anotaciónpermanente de su compra para ayudar en la identifi-cación en el caso de robo.
NÚMERO DEL MODELO CQ-DP171U
NÚMERO DE SERIE
FECHA DE COMPRA
NOMBRE DE LA TIENDA
FRANÇAIS
ESPAÑOL
C Déclaration d'interférence de fréquencesradio (Partie 15 des Règlements FCC):Cet appareil numérique de Classe B est con-forme au règlement ICES-003 canadien.
Consignes de sécurité Información para su seguridad

4 CQ-DP171U
ENGLISH
Panasonic welcomes you to our ever growing family of electronic product owners. We know that thisproduct will bring you many hours of enjoyment. Our reputation is built on precise electronic and mechani-cal engineering, manufactured with carefully selected components and assembled by people who takepride in their work. Once you discover the quality, reliability, and value we have built into this product, youtoo will be proud to be a member of our family.
When DrivingKeep the volume level low enough to be aware of roadand traffic conditions.
When Washing Your CarDo not expose the product, including the speakers andCDs, to water or excessive moisture. This could causeelectrical shorts, fire, or other damage.
When ParkedParking in direct sunlight can produce very high tempera-tures inside your car. Give the interior a chance to cooldown before switching the unit on.
Use the Proper Power SupplyThis product is designed to operate with a 12 V, negativeground battery system (the normal system in a NorthAmerican car.)
Disc MechanismDo not insert coins or any small objects. Keep screw-drivers and other metallic objects away from the discmechanism and disc.
Use Authorized ServicentersDo not attempt to disassemble or adjust this precisionproduct. Please refer to the Servicenter list included withthis product for service assistance.
For InstallationThe product should be installed in a horizontal positionwith the front end up at a convenient angle, but not morethan 30˚.
Use This Product Safely
Components¡Operating instructions. . . . . . . . . . . . . . . . . . . . . . . . . 1¡Installation hardware . . . . . . . . . . . . 1 set (a page 24)¡Power connector. . . . . . . . . . . . . . . . . . . . . . . . . . . . . 1¡Remote control unit . . . . . . . . . . . . . . . . . . . . . . . . . . 1¡Lithium battery (CR2025) . . . . . . . . . . . . . . . . . . . . . . 1¡Warranty card . . . . . . . . . . . . . . . . . . . . . . . . . . . . . . . 1
Features¡A CD-R and a CD-RW that hold CD-DA data can be reproduced.¡A CD-ROM, a CD-R and a CD-RW that hold MP3 data can be reproduced.¡Title display function
CD text (disc and track title)* during reproducing a CD that supports CD text.MP3 folder and file name
¢ Remote Control Unit Preparation ......................................................................... 10Battery Installation, battery notes, control reference guide
¢ Power and Sound Controls .................................................................................... 11How to adjust the volume, tone and balance, mode selection, setting mute, settingloudness, setting/resetting the time, selecting the clock display
¢ Radio Basics .............................................................................................................. 14Manual and automatic tuning, band selection, preset stations
¢ CD Player Basics ...................................................................................................... 16Disc insert and playback, stop and disc eject, mode selection, display change,disc/track title scroll, track selection, search, pause, direct track selection, random,scan, repeat
¢ MP3 Player Basics .................................................................................................... 18Disc insert and playback, stop and disc eject, mode selection, display change,folder/file name scroll, MP3 folder selection, pause, direct MP3 folder selection, MP3file selection, MP3 in-file search, random, scan, repeat
¢ CD Changer Control ................................................................................................. 22Mode selection, disc selection, direct disc selection, track selection, search, random,scan, repeat
¢ Installation Guide ...................................................................................................... 24Step-by-step procedures
¢ Anti-Theft System ..................................................................................................... 29Place the removable face plate into case, install removable face plate
¢ Electrical Connections ............................................................................................ 30Cautions and wiring diagram
¢ Troubleshooting ........................................................................................................ 32Where to get service help, troubleshooting tips, error display messages
¢ Notes on MP3 ............................................................................................................. 38What is MP3, points to remember when recording on MP3 disc, glossary
¢ Maintenance ............................................................................................................... 40Care of the unit, notes on CD/CD media (CD-ROM, CD-R, CD-RW)
¢ Specifications ............................................................................................................ 41
5CQ-DP171U
ENGLISH
Safety Information …………………………………………………………………… Page 2Radio Frequency Interference Statement (Part 15 of the FCC Rules) ……………………… 2Use this Product Safely …………………………………………………………………… 4Components ………………………………………………………………………………… 4Features …………………………………………………………………………………… 4
Contents
REPSCANRAND
POWER MENU
NUMBER
Car Audio
VOL
SOURCE
SET
SEL
MUTE
BAND DISP
1 2 3
4 5 6
7 8
0
9
10 CQ-DP171U
1
ENGLISH
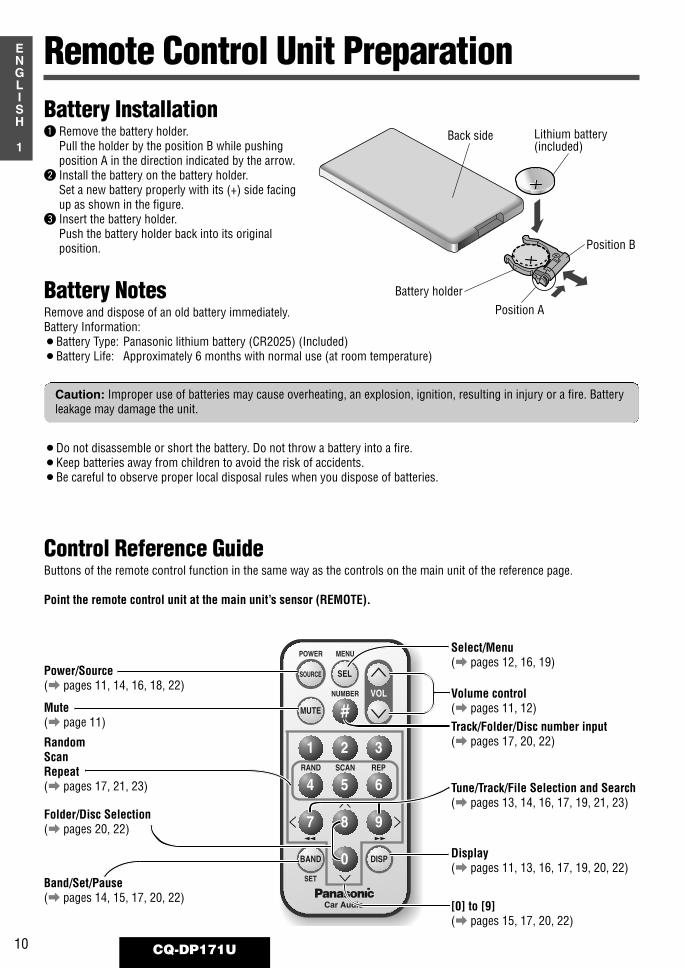
Remote Control Unit PreparationBattery Installationq Remove the battery holder.
Pull the holder by the position B while pushingposition A in the direction indicated by the arrow.
w Install the battery on the battery holder.Set a new battery properly with its (+) side facingup as shown in the figure.
e Insert the battery holder.Push the battery holder back into its originalposition.
Back side Lithium battery(included)
Position B
Position ABattery holder
¡Do not disassemble or short the battery. Do not throw a battery into a fire.¡Keep batteries away from children to avoid the risk of accidents.¡Be careful to observe proper local disposal rules when you dispose of batteries.
Control Reference GuideButtons of the remote control function in the same way as the controls on the main unit of the reference page.
Point the remote control unit at the main unit’s sensor (REMOTE).
[0] to [9](a pages 15, 17, 20, 22)
Select/Menu(a pages 12, 16, 19)
Power/Source(a pages 11, 14, 16, 18, 22)
Tune/Track/File Selection and Search(a pages 13, 14, 16, 17, 19, 21, 23)
Display(a pages 11, 13, 16, 17, 19, 20, 22)
Mute(a page 11)
RandomScanRepeat(a pages 17, 21, 23)
Folder/Disc Selection(a pages 20, 22)
Band/Set/Pause(a pages 14, 15, 17, 20, 22)
Battery NotesRemove and dispose of an old battery immediately.Battery Information:¡Battery Type: Panasonic lithium battery (CR2025) (Included)¡Battery Life: Approximately 6 months with normal use (at room temperature)
Volume control(a pages 11, 12)Track/Folder/Disc number input(a pages 17, 20, 22)
Caution: Improper use of batteries may cause overheating, an explosion, ignition, resulting in injury or a fire. Batteryleakage may damage the unit.
11CQ-DP171U
2
ENGLISH
VOL
SEL
SCAN
LOUD
RANDOM REPEAT
FOLDER
MUTE
SOURCE
PWRTUNE
TRACK
BAND
DISP
1 2 3 4 5 6
APM
CQ-DP171U CD RECEIVER WITH CHANGER CONTROL
REMOTE
SEL
MUTE
SOURCE
LOUD
DISP
TUNETRACK
VOL
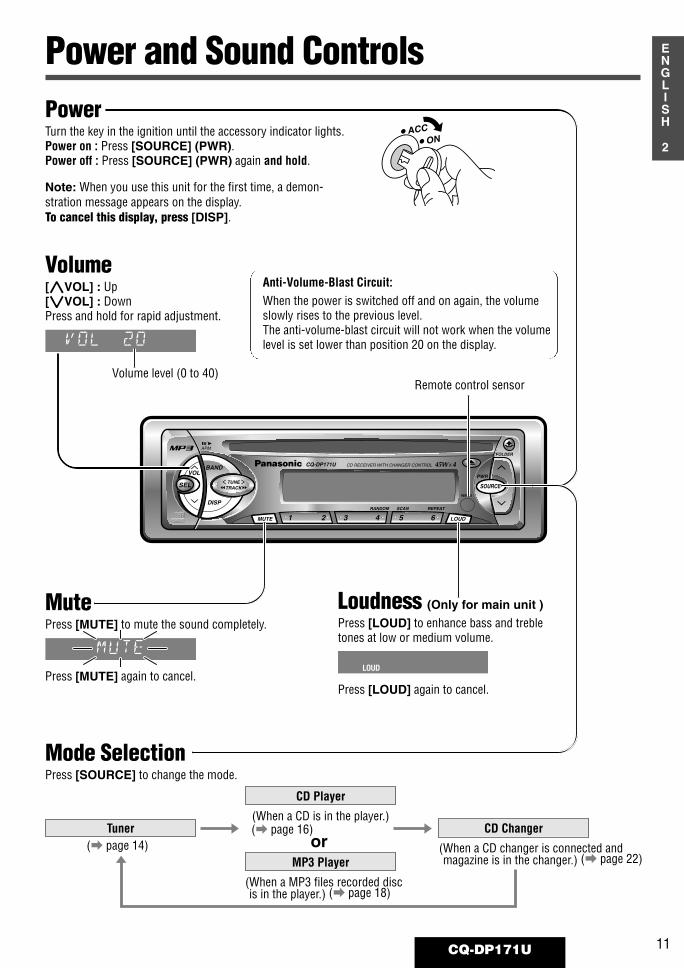
Power and Sound ControlsPowerTurn the key in the ignition until the accessory indicator lights.Power on : Press [SOURCE] (PWR).Power off : Press [SOURCE] (PWR) again and hold.
Volume[VOL] : Up[VOL] : DownPress and hold for rapid adjustment.
VOL 20LOUD
RsREP
¡•
Volume level (0 to 40)
Note: When you use this unit for the first time, a demon-stration message appears on the display.To cancel this display, press [DISP].
¡ACC
¡ON
MutePress [MUTE] to mute the sound completely.
Press [MUTE] again to cancel.
MUTELOUD
RsREP
¡•
Loudness (Only for main unit )
Press [LOUD] to enhance bass and trebletones at low or medium volume.
Press [LOUD] again to cancel.
LOUD
Remote control sensor
Tuner
CD Player
(When a CD is in the player.)(a page 16) CD Changer
(When a CD changer is connected andmagazine is in the changer.) (a page 22)MP3 Player
(When a MP3 files recorded discis in the player.) (a page 18)
or
Mode SelectionPress [SOURCE] to change the mode.
(a page 14)
Anti-Volume-Blast Circuit:When the power is switched off and on again, the volumeslowly rises to the previous level.The anti-volume-blast circuit will not work when the volumelevel is set lower than position 20 on the display.

VOL
SEL
SCAN
LOUD
RANDOM REPEAT
FOLDER
MUTE
SOURCE
PWRTUNE
TRACK
BAND
DISP
1 2 3 4 5 6
APM
CQ-DP171U CD RECEIVER WITH CHANGER CONTROL
REMOTE
SEL
VOL
12 CQ-DP171U
3
ENGLISH
Audio Mode (Bass/Treble/Balance/Fader)
Note: If no operation takes place for more than 5 seconds in audio mode (2 seconds in volume mode), the displayreturns to the regular mode.
Regular Mode Volume Bass
Balance TrebleFader
Power and Sound Controls (Continued)
Bass:
Adjustable range: –12 to +12 by 3 dB step
Treble:
Adjustable range: –12 to +12 by 3 dB step
Balance:R (right speaker) or L (left speaker)
Adjustable range: 1 to 15 by 1 step Balance center
Fader:F (front speaker) or R (rear speaker)
Adjustable range: 1 to 15 by 1 step Fader center
LOUDRsREP
¡•LOUD
RsREP
¡•
BAL CNTLOUD
RsREP
¡•BAL R15LOUD
RsREP
¡•
TRE- 3:dBLOUD
RsREP
¡•
BAS+ 9:dBLOUD
RsREP
¡•
q Press [SEL] to select the audio mode.
w Press [VOL] or [VOL] to change each level.

VOL
SEL
SCAN
LOUD
RANDOM REPEAT
FOLDER
MUTE
SOURCE
PWRTUNE
TRACK
BAND
DISP
1 2 3 4 5 6
APM
CQ-DP171U CD RECEIVER WITH CHANGER CONTROL
REMOTE
DISP
TUNETRACK
13CQ-DP171U
4
ENGLISH
Clock BasicsThe 12-hour system is used for the clock.
Initial Timeq Press [DISP] (DISPLAY).
(Clock display.)
Hoursw Press and hold [DISP] (DISPLAY).
(Hours blink.)
e Press []TUNE] or [[TUNE].
(Hours set.)
Minutesr Press [DISP] (DISPLAY).
(Minutes blink.)
t Press []TUNE] or [[TUNE].
(Minutes set.)
y Press [DISP] (DISPLAY).
(End.)
Note: Press and hold []TUNE] or [[TUNE] tochange numbers rapidly.
LOUDRsREP
¡•
LOUDRsREP
¡•
LOUDRsREP
¡•
LOUDRsREP
¡•
LOUDRsREP
¡•
LOUDRsREP
¡•
Clock DisplayPress [DISP] (DISPLAY) to switch to the clock display.In tuner mode:
Broadcast station Clock display
In CD changer mode:
CD changer play Clock display
When the power is off:
No display Clock display
Note: Refer to each description of the clock display for themodes of CD player and MP3 player (a pages 16 and 19)
Time ResetPress and hold [DISP] (DISPLAY) for more than 2 sec-onds to activate the time setting mode to reset the time.Then, repeat steps e to y.
Note: The clock is not adjustable during Track / Disc /Folder / File name scrolling.
LOUDRsREP
¡•
LOUDRsREP
¡•LOUD
RsREP
LOUDRsREP
¡•LOUD
RsREP
¡•

14 CQ-DP171U
5
ENGLISH
VOL
SEL
SCAN
LOUD
RANDOM REPEAT
FOLDER
MUTE
SOURCE
PWRTUNE
TRACK
BAND
DISP
1 2 3 4 5 6
APM
CQ-DP171U CD RECEIVER WITH CHANGER CONTROL
REMOTE
BAND
SOURCETUNE
TRACK
Radio BasicsMode SelectionPress [SOURCE] to change to the radio mode.
q
Manual Tuning[[TUNE] : Higher frequency[]TUNE] : Lower frequency
Seek TuningPress and hold ...[[TUNE] : Higher frequency[]TUNE] : Lower frequencyTuning will automatically stop when the signalsof the next broadcast station are received.
e
FM stereo indicator lights during receptionof an FM stereo broadcast
LOUD
LOUD
LOUD
LOUD
LOUDRsREP
¡•
BandPress [BAND] to change the band.
w
LOUDRsREP
¡•
VOL
SEL
SCAN
LOUD
RANDOM REPEAT
FOLDER
MUTE
SOURCE
PWRTUNE
TRACK
BAND
DISP
1 2 3 4 5 6
APM
CQ-DP171U CD RECEIVER WITH CHANGER CONTROL
REMOTE
BAND
1 2 3 4 5 6
TUNETRACK
15CQ-DP171U
6
ENGLISH
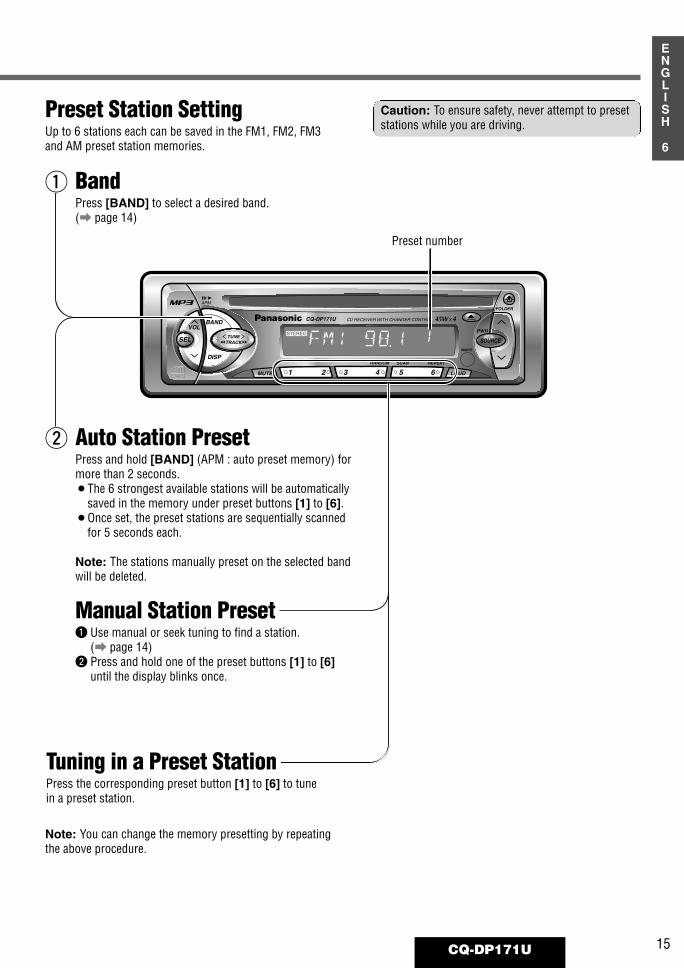
Preset Station SettingUp to 6 stations each can be saved in the FM1, FM2, FM3and AM preset station memories.
Tuning in a Preset StationPress the corresponding preset button [1] to [6] to tunein a preset station.
Auto Station PresetPress and hold [BAND] (APM : auto preset memory) formore than 2 seconds.¡The 6 strongest available stations will be automatically
saved in the memory under preset buttons [1] to [6].¡Once set, the preset stations are sequentially scanned
for 5 seconds each.
Note: The stations manually preset on the selected bandwill be deleted.
Manual Station Presetq Use manual or seek tuning to find a station.
(a page 14)w Press and hold one of the preset buttons [1] to [6]
until the display blinks once.
w
Preset number
Caution: To ensure safety, never attempt to presetstations while you are driving.
LOUDRsREP
BandPress [BAND] to select a desired band.(a page 14)
q
Note: You can change the memory presetting by repeatingthe above procedure.
16 CQ-DP171U
7
ENGLISH
VOL
SEL
SCAN
LOUD
RANDOM REPEAT
FOLDER
MUTE
SOURCE
PWRTUNE
TRACK
BAND
DISP
1 2 3 4 5 6
APM
CQ-DP171U CD RECEIVER WITH CHANGER CONTROL
REMOTE
DISP
SEL SOURCETUNE
TRACK
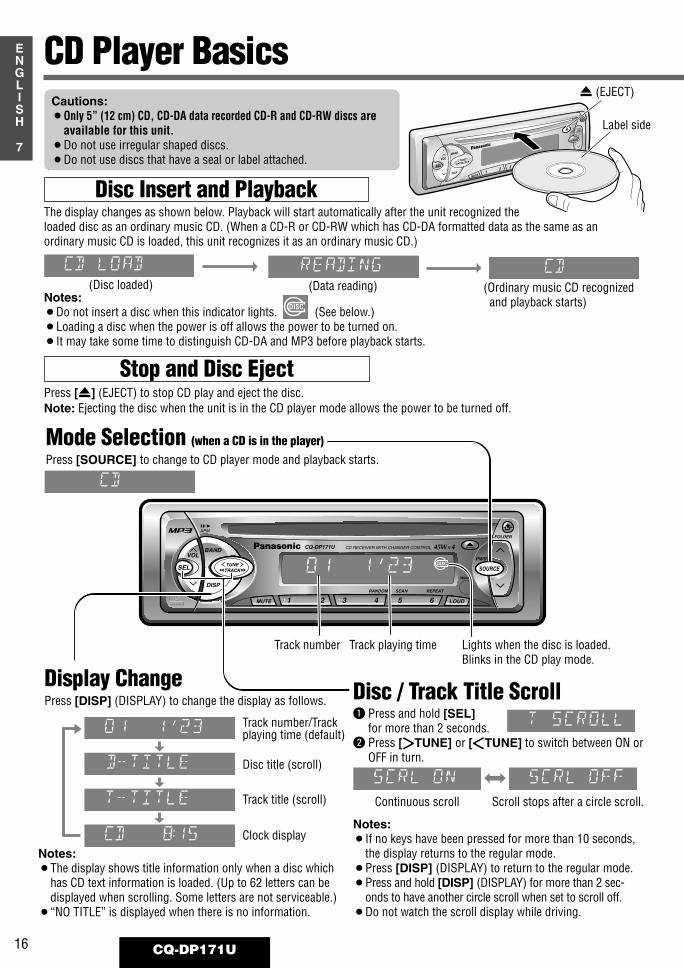
CD Player Basics
Mode Selection (when a CD is in the player)Press [SOURCE] to change to CD player mode and playback starts.
Disc Insert and PlaybackThe display changes as shown below. Playback will start automatically after the unit recognized the loaded disc as an ordinary music CD. (When a CD-R or CD-RW which has CD-DA formatted data as the same as anordinary music CD is loaded, this unit recognizes it as an ordinary music CD.)
Press [u] (EJECT) to stop CD play and eject the disc.
Cautions:¡Only 5” (12 cm) CD, CD-DA data recorded CD-R and CD-RW discs are
available for this unit.¡Do not use irregular shaped discs.¡Do not use discs that have a seal or label attached.
Disc / Track Title Scrollq Press and hold [SEL]
for more than 2 seconds.w Press [[TUNE] or []TUNE] to switch between ON or
OFF in turn.
Continuous scroll Scroll stops after a circle scroll.
SCRL OFFLOUD
¡•SCRL ONLOUD
¡•
Display ChangePress [DISP] (DISPLAY) to change the display as follows.
Notes:¡Do not insert a disc when this indicator lights. (See below.)¡Loading a disc when the power is off allows the power to be turned on.¡It may take some time to distinguish CD-DA and MP3 before playback starts.
Rs
Notes:¡If no keys have been pressed for more than 10 seconds,
the display returns to the regular mode.¡Press [DISP] (DISPLAY) to return to the regular mode.¡Press and hold [DISP] (DISPLAY) for more than 2 sec-
onds to have another circle scroll when set to scroll off.¡Do not watch the scroll display while driving.
Notes:¡The display shows title information only when a disc which
has CD text information is loaded. (Up to 62 letters can bedisplayed when scrolling. Some letters are not serviceable.)
¡“NO TITLE” is displayed when there is no information.
Track number Track playing time Lights when the disc is loaded.Blinks in the CD play mode.
LOUDRsREP
¡• Track number/Trackplaying time (default)
LOUDRsREP
¡• Disc title (scroll)
LOUDRsREP
¡• Track title (scroll)
LOUDRsREP
Clock display
LOUDRsREP
¡•
TUNETRACK
VOL
SEL
BAND
DISP
LOUD
SOURCE
PWR
Stop and Disc Eject
u (EJECT)
LOUDRsREP
¡•
LOUD
¡•
Note: Ejecting the disc when the unit is in the CD player mode allows the power to be turned off.
LOUDRsREP
¡•LOUD
RsREP
¡•LOUD
RsREP
¡•
(Disc loaded) (Data reading) (Ordinary music CD recognized and playback starts)
Label side
VOL
SEL
SCAN
LOUD
RANDOM REPEAT
FOLDER
MUTE
SOURCE
PWRTUNE
TRACK
BAND
DISP
1 2 3 4 5 6
APM
CQ-DP171U CD RECEIVER WITH CHANGER CONTROL
REMOTE
BAND
TUNETRACK
4 5 6
17CQ-DP171U
8
ENGLISH
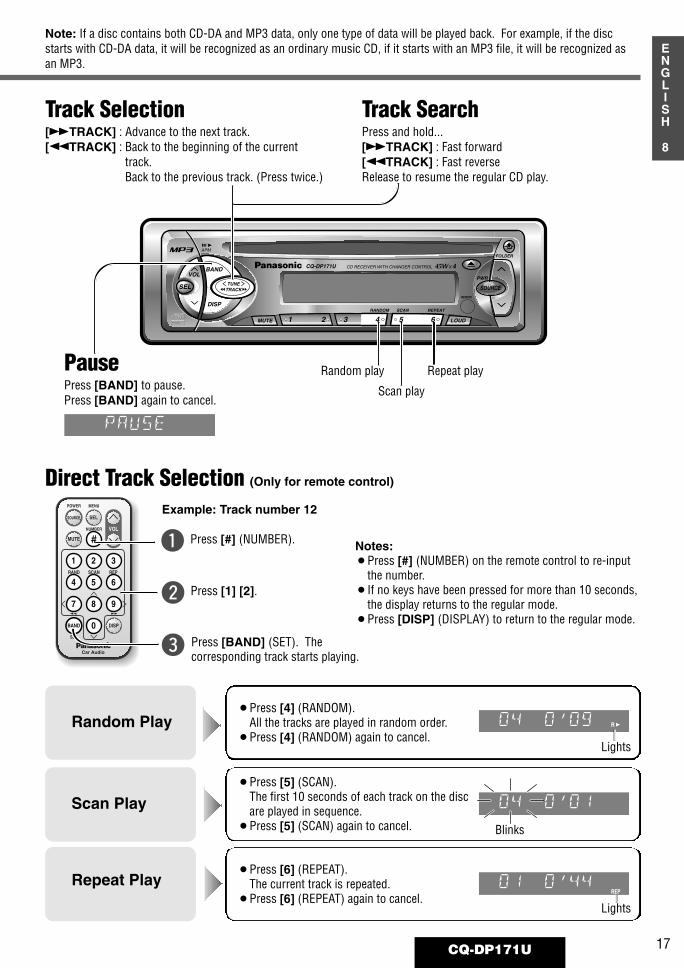
Track Selection[2TRACK] : Advance to the next track.[1TRACK] : Back to the beginning of the current
track.Back to the previous track. (Press twice.)
Track SearchPress and hold...[2TRACK] : Fast forward[1TRACK] : Fast reverseRelease to resume the regular CD play.
PausePress [BAND] to pause.Press [BAND] again to cancel.
PAUSELOUD
RsREP
¡•
¡Press [4] (RANDOM).All the tracks are played in random order.
¡Press [4] (RANDOM) again to cancel.
¡Press [5] (SCAN).The first 10 seconds of each track on the discare played in sequence.
¡Press [5] (SCAN) again to cancel.
¡Press [6] (REPEAT).The current track is repeated.
¡Press [6] (REPEAT) again to cancel.
Random Play
Scan Play
Repeat Play
Random play
Scan play
Repeat play
LOUDRsREP
¡•
LOUDRsREP
¡•
LOUDRsREP
¡•
Lights
Lights
Blinks
Note: If a disc contains both CD-DA and MP3 data, only one type of data will be played back. For example, if the discstarts with CD-DA data, it will be recognized as an ordinary music CD, if it starts with an MP3 file, it will be recognized asan MP3.
REPSCANRAND
POWER MENU
NUMBER
Car Audio
VOL
SOURCE
SET
SEL
MUTE
BAND DISP
1 2 3
4 5 6
7 8
0
9
BAND
1 2 3
4 5 6
7 8
0
9
Notes:¡Press [#] (NUMBER) on the remote control to re-input
the number.¡If no keys have been pressed for more than 10 seconds,
the display returns to the regular mode.¡Press [DISP] (DISPLAY) to return to the regular mode.
Direct Track Selection (Only for remote control)
Example: Track number 12
q
w
e
Press [#] (NUMBER).
Press [1] [2].
Press [BAND] (SET). Thecorresponding track starts playing.

18 CQ-DP171U
9
ENGLISH
VOL
SEL
SCAN
LOUD
RANDOM REPEAT
FOLDER
MUTE
SOURCE
PWRTUNE
TRACK
BAND
DISP
1 2 3 4 5 6
APM
CQ-DP171U CD RECEIVER WITH CHANGER CONTROL
REMOTE
SOURCE
MP3 Player Basics
Mode Selection (when a MP3 files recorded disc is in the player)Press [SOURCE] to change to MP3 player mode and playback starts.
Disc Insert and PlaybackThe display changes as shown below. Playback will start automatically when an MP3 file has been recognized on the disc.
Press [u] (EJECT) to stop MP3 play and eject the disc.
Cautions:¡Only 5” (12 cm) MP3 data recorded CD media (CD-ROM, CD-R, CD-RW) are available for this unit.¡Do not use irregular shaped discs.¡Do not use discs that have a seal or label attached.¡Never attempt to play a file that is not in the MP3 format by changing its file name extension to “.mp3”. This
may not only produce noise from the speakers and speaker damage, but can damage your hearing.
Notes:¡When you insert a CD media containing MP3 files (CD-ROM,
CD-R, CD-RW) into the slot, this player will automaticallyenter MP3 mode and start playing the MP3s on the disc.
¡A directory is interpreted as a folder in these instructions.
Lights when the disc is loaded.Blinks in the MP3 play mode.
Notes:¡Do not insert a disc when this indicator lights. (See below.)¡Loading a disc when the power is off allows the power to be turned on.¡It may take some time to distinguish CD-DA and MP3 before playback starts.¡If you record too many folders and MP3 files onto a disc, it may take some time before playback starts.
Rs
Folder number File number
001-003LOUD
RsREP
¡•
TUNETRACK
VOL
SEL
BAND
DISP
LOUD
SOURCE
PWR
u (EJECT)
Label side
Stop and Disc Eject
LOUDRsREP
¡•
Note: Ejecting the disc when the unit is in the MP3 player mode allows the power to be turned off.
LOUDRsREP
¡•LOUD
RsREP
¡•LOUD
RsREP
¡•
(Disc loaded) (Data reading) (MP3 data recognized and playback starts)
Not all CD media containing MP3s will play back normally.For details see “Notes on MP3” (a page 38).
Note: If the ignition switch of your car is turned to OFF during playback, there may be a time lag between the file playingtime on the display and the actual playing time. In addition, playback may start from the beginning of the music when usingVBR (Variable Bit Rate) of a MP3 file in the same situation.

19CQ-DP171U
10
ENGLISH
VOL
SEL
SCAN
LOUD
RANDOM REPEAT
FOLDER
MUTE
SOURCE
PWRTUNE
TRACK
BAND
DISP
1 2 3 4 5 6
APM
CQ-DP171U CD RECEIVER WITH CHANGER CONTROL
REMOTE
DISP
SEL TUNETRACK
Folder / File Name Scrollq Press and hold [SEL] for
more than 2 seconds.
w Press [[TUNE] or []TUNE] to switch between ON or OFF in turn.
Continuous scroll Scroll stops after a circle scroll.LOUD
¡•LOUD
¡•
Display ChangePress [DISP] (DISPLAY) to change the display as follows. Notes:
¡When VBR (Variable Bit Rate) MP3 file is playedback, the file playing time may not be correct.When the reproduction of VBR MP3 file is fin-ished, it will count again.
¡Running a file in fast forward or fast reverse maycause an error in the file playing time. The fileplaying time display will return to normal whenyou play another file.
¡“NO TITLE” is displayed when there is no informa-tion.
¡MP3 folder and file names can be displayed.Displayable character number varies with filesystems. Refer to “Supported file systems andfile names” in “Notes on MP3” for details (a page39).
¡The “.mp3” file name extension is not displayed.¡When playing a Tree 1 file, the folder name is dis-
played with the word “ROOT” (root folder).¡Characters that the player cannot display are
shown as an asterisk.
Notes:¡If no keys have been pressed for more than
10 seconds, the display returns to the regularmode.
¡Press [DISP] (DISPLAY) to return to the reg-ular mode.
¡Press and hold [DISP] (DISPLAY) for morethan 2 seconds to have another circle scrollwhen set to scroll off.
¡Do not watch the scroll display while driving.
LOUDRsREP
¡•
LOUDRsREP
¡•
LOUDRsREP
¡•
LOUDRsREP
¡•
LOUDRsREP
¡•
LOUD
¡•
Note: If a disc contains both CD-DA and MP3 data, only one type of data will be played back. For example, if the discstarts with CD-DA data, it will be recognized as an ordinary music CD, if it starts with an MP3 file, it will be recognized as anMP3.
File playing time
MP3 folder name (scroll)
MP3 file name (scroll)
Clock display
Folder number/MP3file number (default)

20 CQ-DP171U
11
ENGLISH
VOL
SEL
SCAN
LOUD
RANDOM REPEAT
FOLDER
MUTE
SOURCE
PWRTUNE
TRACK
BAND
DISP
1 2 3 4 5 6
APM
CQ-DP171U CD RECEIVER WITH CHANGER CONTROL
REMOTE
BAND
TUNETRACK SOURCETUNE
TRACK
MP3 Player Basics (continued)
MP3 Folder Selection[] : Next folder[] : Previous folderNotes:¡If the selected folder does not contain any MP3 files, the nearest MP3 file in
the order of playback will be played.¡If the total of files and folders exceeds 254, successful playback may not be performed.
PausePress [BAND] to pause.Press [BAND] again to cancel.
LOUDRsREP
¡•
Folder Selection Order/MP3 file playback order (Example)Root Folder(Root Directory)
Folder Selection
File Selection
Tree 1 Tree 2 Tree 3 Tree 4
2
1
3
4
q
q
w
e
r
t
y
u
u5
6
8
1 9
97
~In the order
~In the order
Tree 5
Notes:¡This unit counts the number of folders
irrespective of the presence or absenceof MP3 file. (Example: there is no MP3file in a root folder as shown in theright drawing, but a folder number“001” is given. In fact, there is no MP3file to reproduce. Therefore, the nextfolder is automatically selected.)
¡The writing software sometimeschanges the order of folders and fileson a disc, so the order may differ fromwhat you specified. For details refer tothe user manual of your writingsoftware.
¡If you record too many folders or filesother than MP3s onto a disc, it maytake some time before playback starts,and you may have difficulties usingfast forward and fast reverse.
¡Playback order varies with playerseven if the same disc is loaded.
REPSCANRAND
POWER MENU
NUMBER
Car Audio
VOL
SOURCE
SET
SEL
MUTE
BAND DISP
1 2 3
4 5 6
7 8
0
9
BAND
1 2 3
4 5 6
7 8
0
9
Notes:¡Press [#] (NUMBER) on the remote control to re-input
the number.¡If no keys have been pressed for more than 10 seconds,
the display returns to the regular mode.¡Press [DISP] (DISPLAY) to return to the regular mode.¡If there is no file in the specified folder, error message
“E4” appears. Select another folder which contains MP3files.
Direct MP3 Folder Selection (Only for remote control)
Example: Folder number 5
q
w
e
Press [#] (NUMBER).
Press [5].
Press [BAND] (SET). Thecorresponding folder starts playing.

21CQ-DP171U
12
ENGLISH
VOL
SEL
SCAN
LOUD
RANDOM REPEAT
FOLDER
MUTE
SOURCE
PWRTUNE
TRACK
BAND
DISP
1 2 3 4 5 6
APM
CQ-DP171U CD RECEIVER WITH CHANGER CONTROL
REMOTE
4 5 6
TUNETRACK
MP3 File Selection[2TRACK] : Advance to the next MP3 file.[1TRACK] : Back to the beginning of the current MP3 file.
Back to the previous MP3 file. (Press twice.)
MP3 In-file SearchPress and hold...[2TRACK] : Fast forward[1TRACK] : Fast reverseRelease to resume the regular MP3 play.
Random Play
Scan Play
Repeat Play
¡Press and hold [4] (RANDOM) for more than2 seconds.All the available MP3 files on the currentfolder play in a random sequence.
¡Press and hold [4] (RANDOM) again tocancel.
File
Folder
¡Press [4] (RANDOM).All the MP3 files on all folders play in arandom sequence.
¡Press [4] (RANDOM) again to cancel.
¡Press and hold [5] (SCAN) for more than 2seconds.From the next folder, the beginning 10seconds of the first MP3 file on each folderplay in sequence.
¡Press and hold [5] (SCAN) again to cancel.
Folder
¡Press [5] (SCAN).The first 10 seconds of each MP3 file on allthe folders play in sequence.
¡Press [5] (SCAN) again to cancel.
¡Press and hold [6] (REPEAT) for more than 2seconds.Repeat the current folder.
¡Press and hold [6] (REPEAT) again to cancel.
Folder
¡Press [6] (REPEAT).Repeat the current MP3 file.
¡Press [6] (REPEAT) again to cancel.
File
File
LOUDRsREP
¡•
LOUDRsREP
¡•
LOUDRsREP
¡•
LOUDRsREP
¡•
LOUDRsREP
¡•
003-001LOUD
RsREP
¡•
Random playScan play
Repeat play
Lights
Blinks
Lights
Blinks
Blinks
Blinks
22 CQ-DP171U
13
ENGLISH
VOL
SEL
SCAN
LOUD
RANDOM REPEAT
FOLDER
MUTE
SOURCE
PWRTUNE
TRACK
BAND
DISP
1 2 3 4 5 6
APM
CQ-DP171U CD RECEIVER WITH CHANGER CONTROL
REMOTE
DISP
SOURCETUNE
TRACK
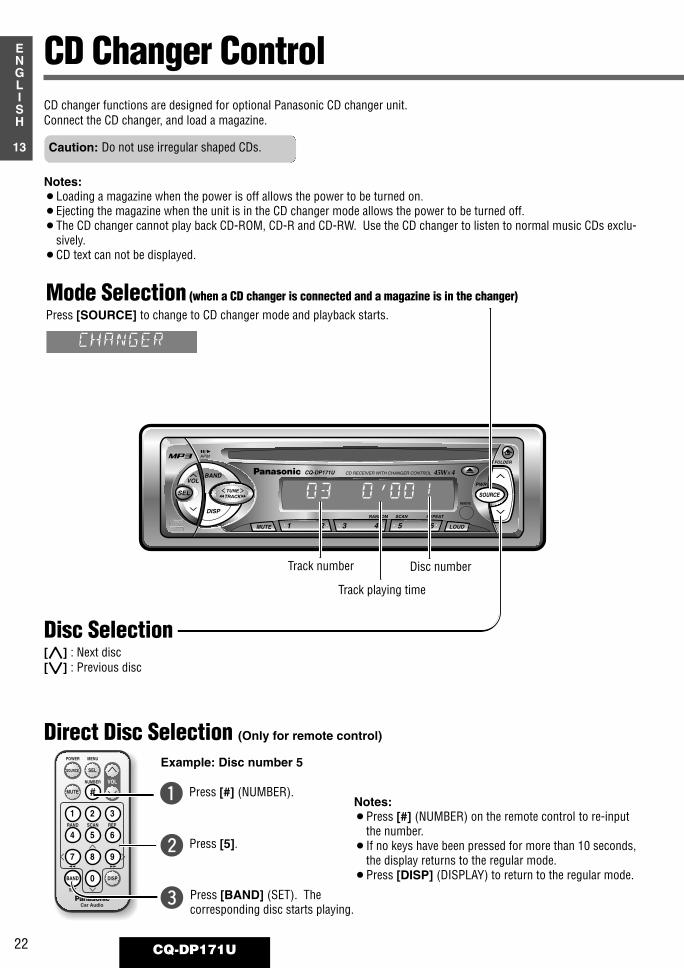
CD Changer Control
Mode Selection (when a CD changer is connected and a magazine is in the changer)Press [SOURCE] to change to CD changer mode and playback starts.
CD changer functions are designed for optional Panasonic CD changer unit.Connect the CD changer, and load a magazine.
Disc Selection[] : Next disc[] : Previous disc
Caution: Do not use irregular shaped CDs.
Notes:¡Loading a magazine when the power is off allows the power to be turned on.¡Ejecting the magazine when the unit is in the CD changer mode allows the power to be turned off.¡The CD changer cannot play back CD-ROM, CD-R and CD-RW. Use the CD changer to listen to normal music CDs exclu-
sively.¡CD text can not be displayed.
Disc numberTrack number
LOUDRsREP
Track playing time
LOUDRsREP
¡•
REPSCANRAND
POWER MENU
NUMBER
Car Audio
VOL
SOURCE
SET
SEL
MUTE
BAND DISP
1 2 3
4 5 6
7 8
0
9
BAND
1 2 3
4 5 6
7 8
0
9
Notes:¡Press [#] (NUMBER) on the remote control to re-input
the number.¡If no keys have been pressed for more than 10 seconds,
the display returns to the regular mode.¡Press [DISP] (DISPLAY) to return to the regular mode.
Direct Disc Selection (Only for remote control)
Example: Disc number 5
q
w
e
Press [#] (NUMBER).
Press [5].
Press [BAND] (SET). Thecorresponding disc starts playing.

VOL
SEL
SCAN
LOUD
RANDOM REPEAT
FOLDER
MUTE
SOURCE
PWRTUNE
TRACK
BAND
DISP
1 2 3 4 5 6
APM
CQ-DP171U CD RECEIVER WITH CHANGER CONTROL
REMOTE
TUNETRACK
4 5 6
23CQ-DP171U
14
ENGLISH
Track Selection[2TRACK] : Advance to the next track.[1TRACK] : Back to the beginning of the current track.
Back to the previous track. (Press twice.)
Track SearchPress and hold...[2TRACK] : Fast forward[1TRACK] : Fast reverseRelease to resume the regular CD play.
Random Play
Scan Play
Repeat Play
¡Press and hold [4] (RANDOM) for more than2 seconds.All the available tracks on the current discplay in a random sequence.
¡Press and hold [4] (RANDOM) again tocancel.
Track
Disc
¡Press [4] (RANDOM).All the available tracks on all discs in themagazine play in a random sequence.
¡Press [4] (RANDOM) again to cancel.
¡Press and hold [5] (SCAN) for more than 2seconds.The first 10 seconds of the first track of allthe discs in the magazine play in sequence.
¡Press and hold [5] (SCAN) again to cancel.
Track
Disc
¡Press [5] (SCAN).The first 10 seconds of each track on thediscs play in sequence.
¡Press [5] (SCAN) again to cancel.
¡Press and hold [6] (REPEAT) for more than 2seconds.Repeat the current disc.
¡Press and hold [6] (REPEAT) again to cancel.
Track
Disc
¡Press [6] (REPEAT).Repeat the current track.
¡Press [6] (REPEAT) again to cancel.
LOUDRsREP
LOUDRsREP
LOUDRsREP
LOUDRsREP
LOUDRsREP
LOUDRsREP
Random playScan play
Repeat play
Blinks
Blinks
Blinks
Lights
Blinks
Lights

24 CQ-DP171U
15
ENGLISH WARNING
This installation information is designed for experienced installers and is notintended for non-technical individuals. It does not contain warnings or cautions ofpotential dangers involved in attempting to install this product.
Any attempt to install this product in a motor vehicle by anyone other than a qual-ified installer could cause damage to the electrical system and could result inserious personal injury or death.
Installation Hardware
Installation Guide
No. Item Diagram Q’ty
q 1
w 1
e 1
r 1
t 1
y 1
u 1
i 1
Mounting collar
Hex. nut (5 mmø)
Rear support strap
Tapping screw (5 mmø x16 mm)
Mounting bolt (5 mmø)
Power connector
Removable face plate case
Trim plate
OverviewThis product should be installed by a professional.However, if you plan to install this product yourself, yourfirst step is to decide where to install it. The instructions inthese pages will guide you through the remaining steps:(Please refer to the “WARNING” statement above).
¡Identify and label the car wires.¡Connect the car wires to the wires of the power connec-
tor.¡Install the unit in the dashboard.¡Check the operation of the unit.
If you encounter problems, please consult your nearestprofessional installer.
Caution: This unit operates with a 12 V DC negativeground auto battery system only. Do not attempt to useit in any other system. Doing so could cause seriousdamage.
Before you begin installation, look for the items which arepacked with your unit.
¡Warranty Card … Fill this out promptly.¡Panasonic Servicenter for Service Directory … Keep
for future reference in case the product needs servicing.¡Installation Hardware … Needed for in-dash installa-
tion.
Required ToolsYou’ll need a screwdriver, a 1.5 V AA battery, and the fol-lowing:
Dashboard Specifications
12 V DCTest bulb
Electricaltape
Side-cutpliers
ThicknessMin. 3/16” (4.75 mm)Max. 7/32” (5.56 mm)
2 3/32” (53 mm)
7 5/32” (182 mm)
25CQ-DP171U
16
ENGLISH
Identify All LeadsThe first step in installation is to identify all the car wiresyou’ll use when hooking up your sound system.As you identify each wire, we suggest that you label itusing masking tape and a permanent marker. This willhelp avoid confusion when making connections later.
Note: Do not connect the power connector to the stereounit until you have made all connections. If there are noplastic caps on the stereo hooking wires, insulate allexposed leads with electrical tape until you are ready touse them. Identify the leads in the following order.
Power LeadIf your car has a radio or is pre-wired for one :Cut the connector wires one at a time from the plug (leav-ing the leads as long as possible) so that you can workwith individual leads.
Turn the ignition on to the accessory position, and groundone lead of the test bulb to the chassis.
Touch the other lead of the test bulb to each of theexposed wires from the cut radio connector plug. Touchone wire at a time until you find the outlet that causes thetest bulb to light.
Now turn the ignition off and then on. If the bulb alsoturns off and on, that outlet is the car power lead.
If your car is not wired for an audio unit : Go to the fuse block and find the fuse port for radio(RADIO), accessory (ACC), or ignition (IGN).
Battery LeadIf your stereo unit has a yellow lead, you will need tolocate the car's battery lead. Otherwise you may ignorethis procedure. (The yellow battery lead provides continu-ous power to maintain a clock, memory storage, or otherfunction.)
If your car has a radio or is pre-wired for one:With the ignition and headlights off, identify the car bat-tery lead by grounding one lead of the test bulb to thechassis and checking the remaining exposed wires fromthe cut radio connector plug.If your car is not wired for an audio unit : Go to the fuse block and find the fuse port for the battery,usually marked BAT.
SpeakersIdentify the car speaker leads. There are two leads foreach speaker which are usually color coded.
A handy way to identify the speaker leads and the speakerthey are connected with is to test the leads using a 1.5 VAA battery as follows:
Hold one lead against one pole of the battery and strokethe other lead across the other pole. You will hear a scrap-ing sound in one of the speakers if you are holding aspeaker lead.If not, keep testing different lead combinations until youhave located all the speaker leads. When you label them,include the speaker location for each.
Antenna MotorIf your car is equipped with an automatic power antenna,identify the car motor antenna lead by connecting onebulb tester lead to the car battery lead and touching theremaining exposed wires from the cut radio connectorplug one at a time. You will hear the antenna motor acti-vate when you touch the correct wire.
AntennaThe antenna lead is a thick, black wire with a metal plug at the end.
Connect All LeadsNow that you have identified all the wires in the car, youare ready to begin connecting them to the stereo unitwires. The wiring diagram (a page 30) shows the properconnections and color coding of the leads.We strongly recommend that you test the unit before mak-ing a final installation.
You can set the unit on the floor and make temporary con-nections to test the unit. Use electrical tape to cover allexposed wires.
GroundConnect the black ground lead of the power connector tothe metal car chassis.
SpeakersConnect the speaker wires. See the wiring diagram(a page 30) for the proper hookups. Follow the diagramcarefully to avoid damaging the speakers and the stereounit.The speaker used must be able to handle more than 45 Wof audio power. If using an optional audio amplifier, thespeakers should be able to handle the maximum amplifieroutput power. Speakers with low input ratings can bedamaged.Speaker impedance should measure 4 - 8 Ω, which is typ-ically marked on most speakers. Lower or higher imped-ance speakers will affect output and can cause bothspeaker and stereo unit damage.
Important: Connect the red power lead last, after youhave made and insulated all other connections.
26 CQ-DP171U
17
ENGLISH
Motor Antenna Connect the car motor antenna lead to the blue motorantenna relay control lead.(Do not confuse the antenna lead with blue/white stripelead for a power amplifier.)
BatteryConnect the yellow battery lead to the correct radio wire orto the battery fuse port on the fuse block.
AntennaConnect the antenna by plugging the antenna lead into theantenna receptacle.
EquipmentConnect any optional equipment such as an amplifier,according to the instructions furnished with the equip-ment. Leave about 12” (30 cm) of distance between thespeaker leads/amplifier unit and the antenna/antennaextension cord. Read the operating and installationinstructions of any equipment you will connect to this unit.
PowerConnect the red power lead to the correct car radio wire orto the appropriate fuse port on the fuse block.If the stereo unit functions properly with all these connec-tions made, disconnect the wires and proceed to the finalinstallation.
Final InstallationLead ConnectionsConnect all wires, making sure that each connection isinsulated and secure. Bundle all loose wires and fastenthem with tape so they will not fall down later. Now insertthe stereo unit into the mounting collar.
Congratulations! After making a few final checks, you’reready to enjoy your new auto stereo system.
Final Checks1. Make sure that all wires are properly connected and
insulated.2. Make sure that the stereo unit is securely held in the
mounting collar. 3. Turn on the ignition to check the unit for proper opera-
tion.
If you have difficulties, consult your nearest authorizedprofessional installer for assistance.
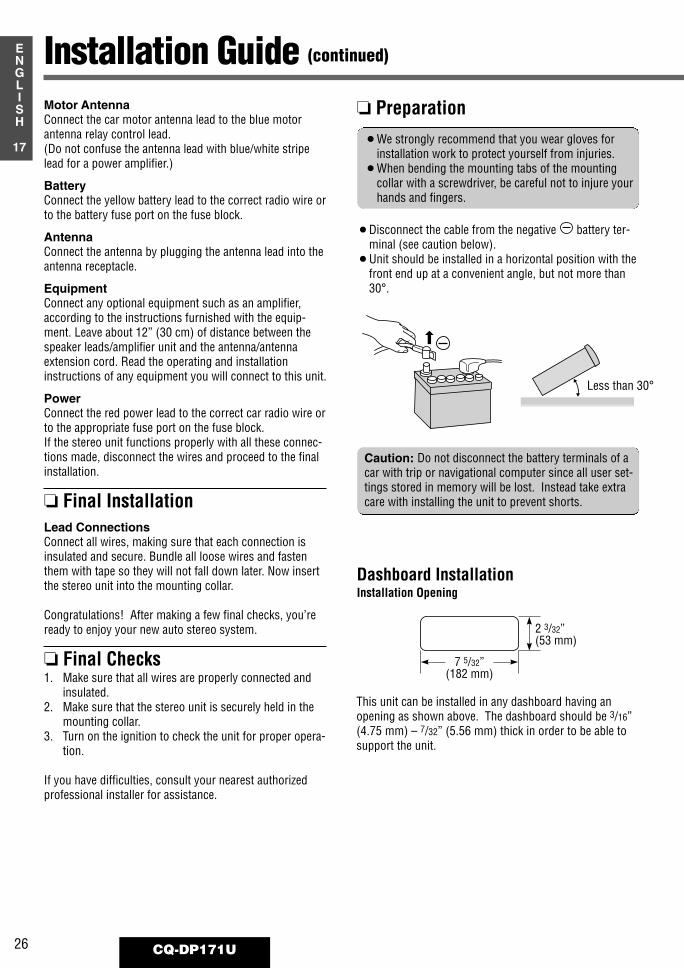
Preparation
Installation Guide (continued)
Less than 30°
¡We strongly recommend that you wear gloves forinstallation work to protect yourself from injuries.
¡When bending the mounting tabs of the mountingcollar with a screwdriver, be careful not to injure yourhands and fingers.
¡Disconnect the cable from the negative battery ter-minal (see caution below).
¡Unit should be installed in a horizontal position with thefront end up at a convenient angle, but not more than30°.
Caution: Do not disconnect the battery terminals of acar with trip or navigational computer since all user set-tings stored in memory will be lost. Instead take extracare with installing the unit to prevent shorts.
Dashboard InstallationInstallation Opening
7 5/32”(182 mm)
2 3/32”(53 mm)
This unit can be installed in any dashboard having anopening as shown above. The dashboard should be 3/16”(4.75 mm) – 7/32” (5.56 mm) thick in order to be able tosupport the unit.

27CQ-DP171U
18
ENGLISH
1
2
34
Installation ProceduresFirst complete the electrical connections, and then checkthem for correctness. (a page 30).
Insert mounting collar q into the dashboard,and bend the mounting tabs out with a screw-driver.Make sure that the lock lever (C) is flush with themounting collar q (not projecting outward).
Secure the rear of the unit.After fixing mounting bolt t and power connector y,fix the rear of the unit to the car body by either method(a) or (b) shown below.
Insert trim plate i.
After installation reconnect thenegative battery terminal.
(a) Using the rear support strap eFire wall of car
w Hex. nut
e Rear support strap
t Mounting bolt
q Mounting collar
r Tapping screw 3 mmøRubber cushion (option)
Rear support bracket(Provided on the car)
(b) Using the rubber cushion (option)
t Mounting bolt
q Mounting collar
Mounting tabs
Lock lever (C)
Lock lever (C)y Power connector
t Mounting bolt
28 CQ-DP171U
19
ENGLISH
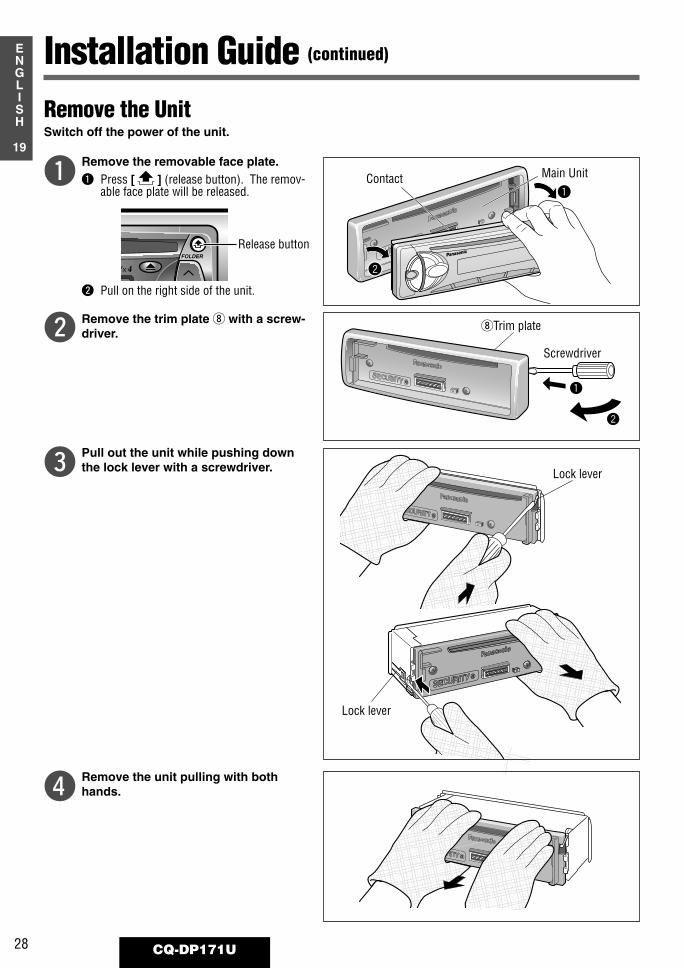
Remove the UnitSwitch off the power of the unit.
Remove the removable face plate.q Press [ ] (release button). The remov-
able face plate will be released.
w Pull on the right side of the unit.
Installation Guide (continued)
FOLDER
q
Remove the trim plate i with a screw-driver.w
Pull out the unit while pushing downthe lock lever with a screwdriver.e
Remove the unit pulling with bothhands.r
1
2
w
qContact Main Unit
iTrim plate
Screwdriver
Lock lever
Lock lever
Release button
29CQ-DP171U
20
ENGLISH
Cautions:¡This face plate is not waterproof. Do not expose it to water or excessive moisture.¡Do not remove the face plate while driving your car.¡Do not place the face plate on the dashboard or nearby areas where the temperature rises to high level.¡Do not touch the contacts on the face plate or on the main unit, since this may result in poor electrical contacts.¡If dirt or other foreign substances get on the contacts, wipe them off with clean and dry cloth.
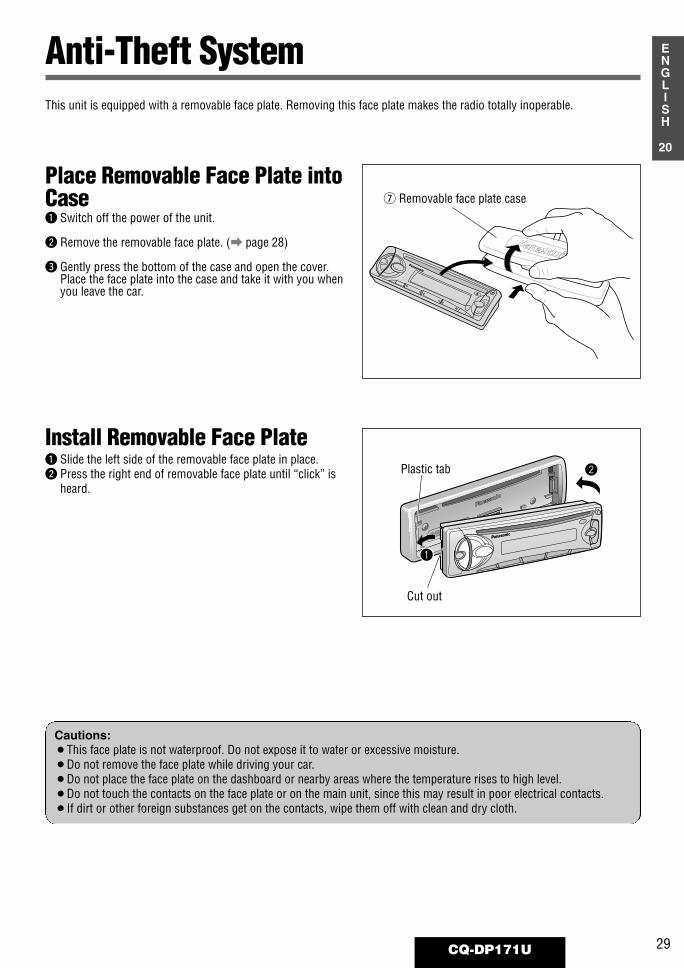
Place Removable Face Plate intoCaseq Switch off the power of the unit.
w Remove the removable face plate. (a page 28)
e Gently press the bottom of the case and open the cover.Place the face plate into the case and take it with you whenyou leave the car.
Install Removable Face Plateq Slide the left side of the removable face plate in place.w Press the right end of removable face plate until “click” is
heard.
Anti-Theft SystemThis unit is equipped with a removable face plate. Removing this face plate makes the radio totally inoperable.
w
q
u Removable face plate case
Plastic tab
Cut out
PanasonicPanasonic
Left Speaker(Rear)
Right Speaker(Rear)
(–) (+) (–) (+) (–) (+) (–) (+)
Left Speaker(Front)
Right Speaker(Front)
(White) (Violet/black stripe)
(Gray)(Gray/black stripe)
(White/black stripe)
(Green/black stripe)
(Green) (Violet)
BATTERY 15A
FRONT SP REAR SP
ACC
Antenna
Pre-Amp output connector (Rear)
CD changer input connector
CD changer control connector
Battery leadTo the car battery,continuous +12 V DC
ACC power leadTo ACC power,+12 V DC
(Yellow) Fuse (15 A)
Resistor (1 kΩ)(Red)(Black)
(Blue)
(Blue/white stripe)
y Power connector
Ground leadTo a clean, bare metallic part of the car chassis.
Motor antennarelay control lead(To motor antenna) (Max. 500mA)This lead is not intended for use with switch actuated power antenna.Note: The power antenna extends automatically when the radio mode is selected.
Speaker lead
L (White)R (Red)
External amplifier control lead (Max. 500 mA)This lead is for connection to the power amplifier.Note: This lead is used for power control when an external power amplifier is connected. The power supply of a power amplifier will be activated when turning on the power of this unit.
30 CQ-DP171U
21
ENGLISH
Cautions:¡This product is designed to operate off a 12 V DC, negative ground battery system.¡To prevent damage to the unit, be sure to follow the connection diagram below.¡Remove approx. 1/4” (5 mm) of protective covering from the ends of the leads before connecting.¡Do not insert the power connector into the unit until the wiring is completed.¡Be sure to insulate any exposed wires from a possible short-circuit from the car chassis. Bundle all cables and keep
cable terminals free from touching any metal parts.¡Remember, if your car has a drive computer or a navigation computer, the data of its memory may be erased when
the battery terminals are disconnected.
Electrical Connections
Accessory used for wiringNo. Item Q’ty
y Power connector 1
Wiring Diagram
31CQ-DP171U
22
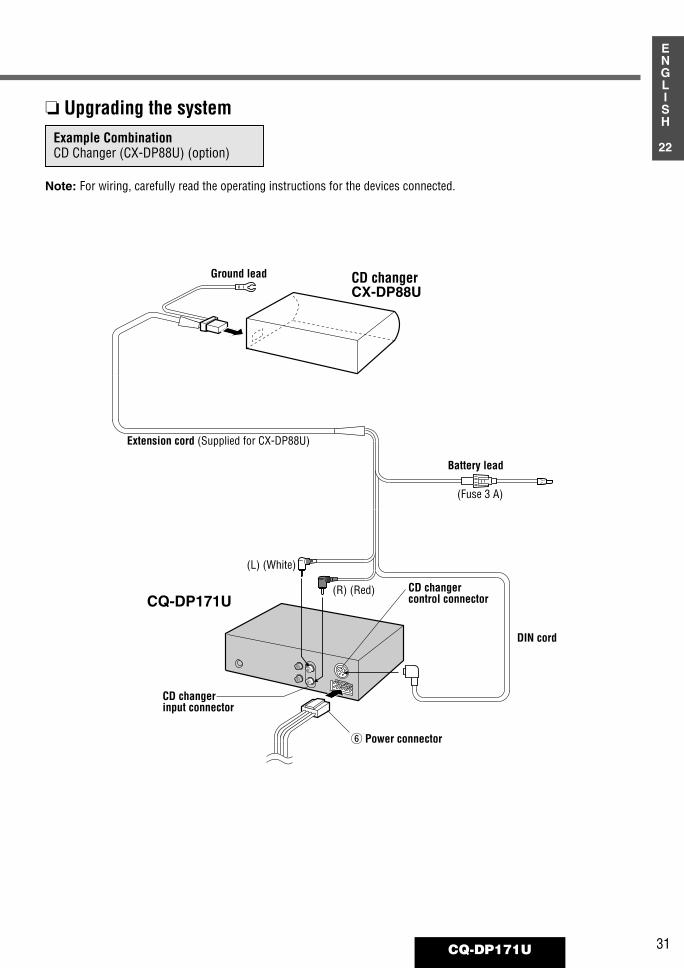
ENGLISH
Ground lead CD changerCX-DP88U
Extension cord (Supplied for CX-DP88U)
(L) (White)
(R) (Red)
(Fuse 3 A)
Battery lead
DIN cord
y Power connector
CQ-DP171U
CD changerinput connector
CD changercontrol connector
Upgrading the systemExample CombinationCD Changer (CX-DP88U) (option)
Note: For wiring, carefully read the operating instructions for the devices connected.
32 CQ-DP171U
23
ENGLISH
Preliminary StepsCheck and take steps as described in the tables below.
If You Suspect Something WrongImmediately switch power off.Disconnect the power connector and check that there is neithersmoke nor heat from the unit before asking for repairs. Never try torepair the unit yourself because it is dangerous to do so.
Cautions:¡Do not use the unit if it malfunctions or
something is wrong.¡Do not use the unit in abnormal conditions,
for example, without sound, or if it emitssmoke or a foul smell, which can causeignition or electric shock. Immediately stopusing the unit and call the store where youpurchased it.
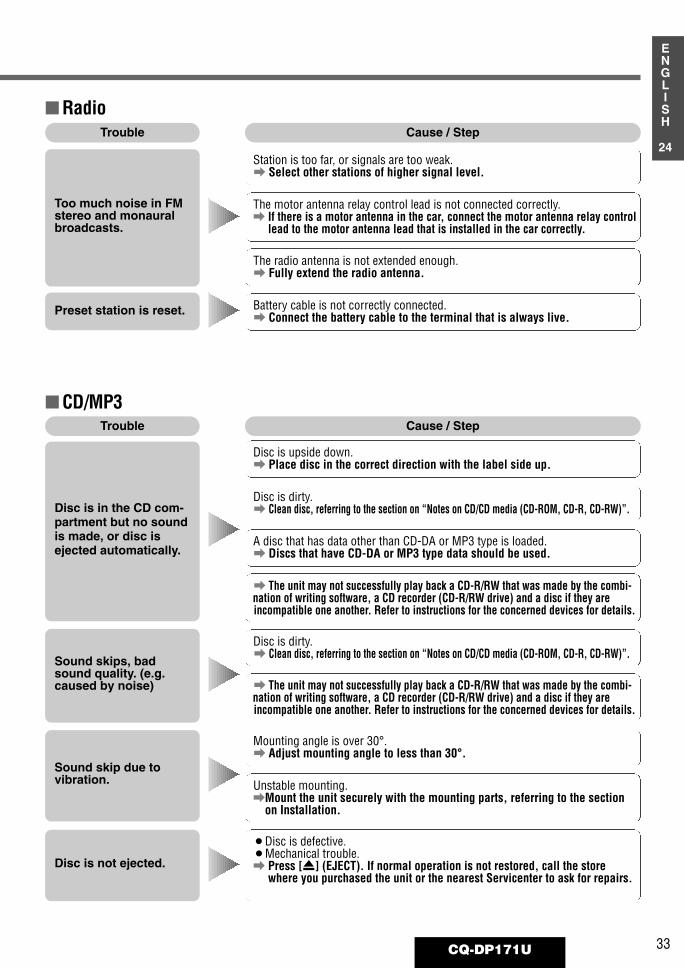
Trouble Cause / Step
No power
No sound
Noise
Audio sound is out-put but the displayshows demonstrationmessage.
Demonstration mode is ON.a Press [DISP] (DISPLAY) to cancel demonstration mode.
A mobile phone is used near the unit.a Keep the mobile phone away from the unit.
Condensation (dew)a Wait for a while before use.
Cables are not correctly connected.a Connect cables correctly.
Mute is set to ON.a Set it to OFF.
Fuse is burnt.a Call the store where you purchased the unit, or your nearest Servicenter
(see the attached sheet) and ask for fuse replacement.
Grounding wire is not correctly connected.a Connect the grounding wire to a metal part of your car.
Accessory cable is not correctly connected.a Connect the accessory cable to your car's ACC source.
Battery cable is not correctly connected.a Connect the battery cable to the terminal that is always live.
Cables are not correctly connected.a Connect cables correctly.
Car’s engine switch is not on.a Turn your car’s ignition switch to ACC or ON.
Troubleshooting
Troubleshooting TipsCommon
33CQ-DP171U
24
ENGLISH
Trouble Cause / Step
Battery cable is not correctly connected.a Connect the battery cable to the terminal that is always live.
The radio antenna is not extended enough.a Fully extend the radio antenna.
The motor antenna relay control lead is not connected correctly.a If there is a motor antenna in the car, connect the motor antenna relay control
lead to the motor antenna lead that is installed in the car correctly.
Station is too far, or signals are too weak.a Select other stations of higher signal level.
Too much noise in FMstereo and monauralbroadcasts.
Preset station is reset.
Trouble Cause / Step
¡Disc is defective.¡Mechanical trouble.a Press [u] (EJECT). If normal operation is not restored, call the store
where you purchased the unit or the nearest Servicenter to ask for repairs.
Unstable mounting.aMount the unit securely with the mounting parts, referring to the section
on Installation.
Mounting angle is over 30°.a Adjust mounting angle to less than 30°.
a The unit may not successfully play back a CD-R/RW that was made by the combi-nation of writing software, a CD recorder (CD-R/RW drive) and a disc if they areincompatible one another. Refer to instructions for the concerned devices for details.
Disc is dirty.a Clean disc, referring to the section on “Notes on CD/CD media (CD-ROM, CD-R, CD-RW)”.
a The unit may not successfully play back a CD-R/RW that was made by the combi-nation of writing software, a CD recorder (CD-R/RW drive) and a disc if they areincompatible one another. Refer to instructions for the concerned devices for details.
A disc that has data other than CD-DA or MP3 type is loaded.a Discs that have CD-DA or MP3 type data should be used.
Disc is dirty.a Clean disc, referring to the section on “Notes on CD/CD media (CD-ROM, CD-R, CD-RW)”.
Disc is upside down.a Place disc in the correct direction with the label side up.
Disc is in the CD com-partment but no soundis made, or disc isejected automatically.
Sound skips, badsound quality. (e.g.caused by noise)
Sound skip due tovibration.
Disc is not ejected.
Radio
CD/MP3
34 CQ-DP171U
25
ENGLISH
MP3
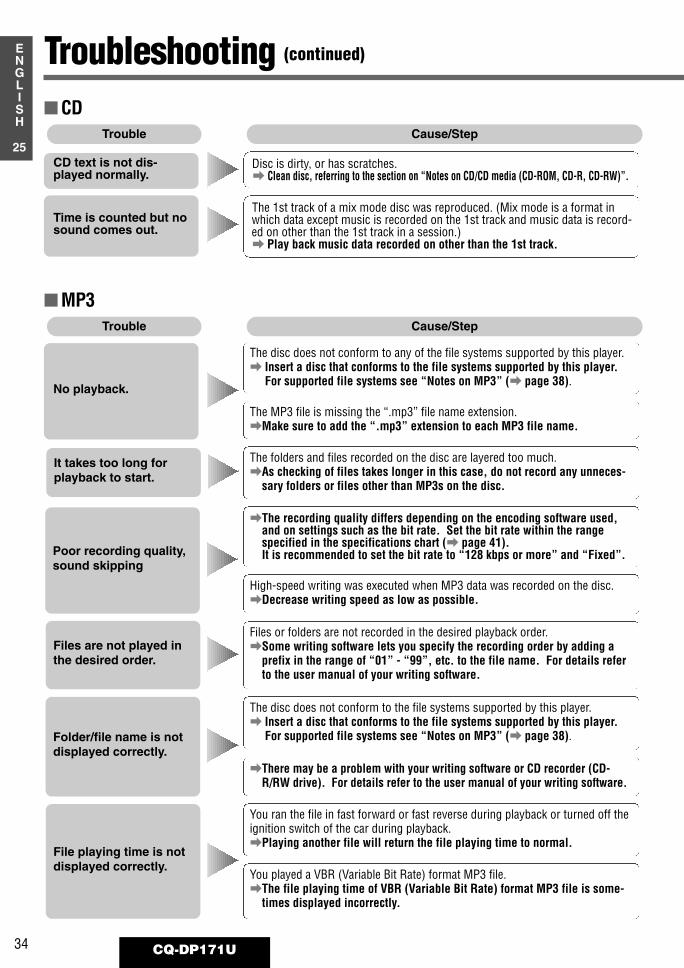
Troubleshooting (continued)
Trouble Cause/Step
CDTrouble Cause/Step
You played a VBR (Variable Bit Rate) format MP3 file.aThe file playing time of VBR (Variable Bit Rate) format MP3 file is some-
times displayed incorrectly.
You ran the file in fast forward or fast reverse during playback or turned off theignition switch of the car during playback.aPlaying another file will return the file playing time to normal.
aThere may be a problem with your writing software or CD recorder (CD-R/RW drive). For details refer to the user manual of your writing software.
The disc does not conform to the file systems supported by this player.a Insert a disc that conforms to the file systems supported by this player.
For supported file systems see “Notes on MP3” (a page 38).
Files or folders are not recorded in the desired playback order.aSome writing software lets you specify the recording order by adding a
prefix in the range of “01” - “99”, etc. to the file name. For details referto the user manual of your writing software.
High-speed writing was executed when MP3 data was recorded on the disc.aDecrease writing speed as low as possible.
aThe recording quality differs depending on the encoding software used,and on settings such as the bit rate. Set the bit rate within the rangespecified in the specifications chart (a page 41).It is recommended to set the bit rate to “128 kbps or more” and “Fixed”.
The folders and files recorded on the disc are layered too much.aAs checking of files takes longer in this case, do not record any unneces-
sary folders or files other than MP3s on the disc.
The MP3 file is missing the “.mp3” file name extension.aMake sure to add the “.mp3” extension to each MP3 file name.
The disc does not conform to any of the file systems supported by this player.a Insert a disc that conforms to the file systems supported by this player.
For supported file systems see “Notes on MP3” (a page 38).No playback.
Poor recording quality,sound skipping
Folder/file name is notdisplayed correctly.
It takes too long forplayback to start.
Files are not played inthe desired order.
File playing time is notdisplayed correctly.
CD text is not dis-played normally.
Time is counted but nosound comes out.
The 1st track of a mix mode disc was reproduced. (Mix mode is a format inwhich data except music is recorded on the 1st track and music data is record-ed on other than the 1st track in a session.)a Play back music data recorded on other than the 1st track.
Disc is dirty, or has scratches.a Clean disc, referring to the section on “Notes on CD/CD media (CD-ROM, CD-R, CD-RW)”.
35CQ-DP171U
26
ENGLISH
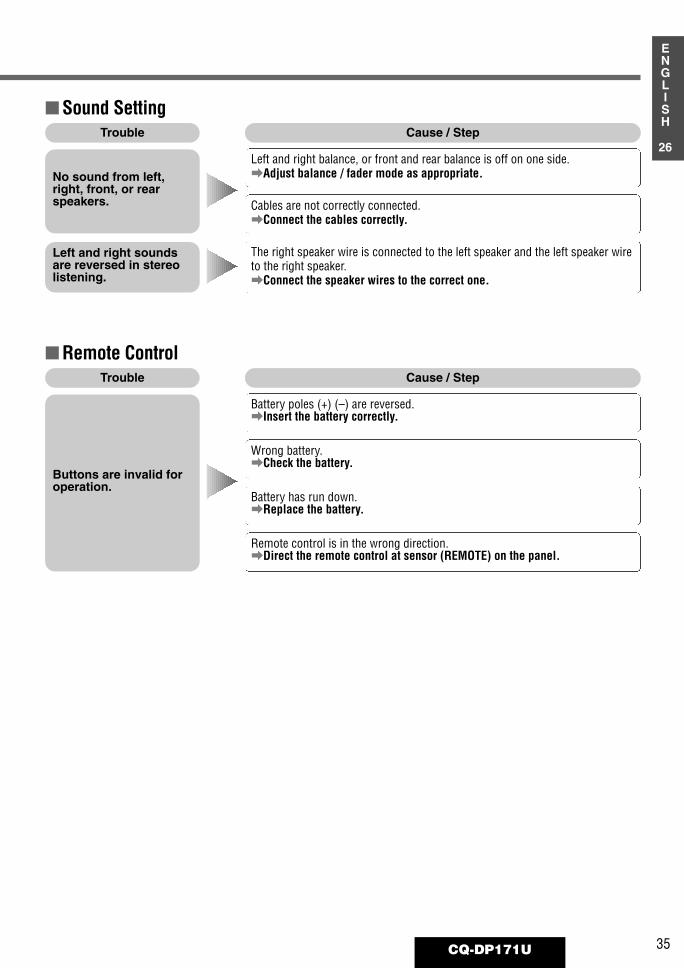
Trouble Cause / Step
No sound from left,right, front, or rearspeakers.
Left and right soundsare reversed in stereolistening.
The right speaker wire is connected to the left speaker and the left speaker wireto the right speaker.aConnect the speaker wires to the correct one.
Cables are not correctly connected.aConnect the cables correctly.
Left and right balance, or front and rear balance is off on one side.aAdjust balance / fader mode as appropriate.
Trouble Cause / Step
Buttons are invalid foroperation.
Remote control is in the wrong direction.aDirect the remote control at sensor (REMOTE) on the panel.
Battery has run down.aReplace the battery.
Wrong battery.aCheck the battery.
Battery poles (+) (–) are reversed.aInsert the battery correctly.
Sound Setting
Remote Control

36 CQ-DP171U
27
ENGLISH
Troubleshooting (continued)
Display
¡Disc is dirty, or is upside down.¡A disc that has data other than CD-DA or MP3 type is loaded.a Check disc.
Cause / Step
Notes:¡Some CD changers will let this unit to be turned off after E3 error message appears.¡For details refer to the operating instructions of your CD changer.
Error Display Messages CD / MP3
No operation by some cause.a Turn off the car engine (ACC off) and remove the fuse from the battery
lead (yellow) for 1 minute. Then reinstall the fuse.
When there is no MP3 files in the specified folder during direct MP3 folder selection.a Select another folder which contains MP3 files.
The player for some reason cannot read the file you are trying to play. (Filerecorded in an unsupported file system, compression scheme, data format,file name extension, damaged data, etc.)a Select a file that the player can read. Confirm the type of data record-
ed on the disc. Create a new disc if necessary.
Display
¡Disc is dirty, or is upside down.¡A disc other than a music CD (CD-DA type) is loaded.a Check disc.
Cause / Step
Disc has scratches.a Check disc.
No operation by some cause.a If normal operation is not restored, call the store where you pur-
chased the unit or the nearest Servicenter to ask for repairs.The display continues if you cannot switch off the power.
No disc is in the changer (magazine).a Insert discs into the changer (magazine).
CD Changer
To next disc automatically
To next disc automatically
The disc ejected automaticallyPOWER OFF
The disc ejected automaticallyPOWER OFF
POWER OFF
Disc has scratches.a Check disc.
LOUDRsREP
¡•
LOUDRsREP
¡•
LOUDRsREP
¡•
LOUDRsREP
¡•
LOUDRsREP
LOUD
LOUDRsREP
¡•
LOUDRsREP
¡•
Disc number
Disc number

37CQ-DP171U
28
ENGLISH
MaintenanceYour product is designed and manufactured to ensure a minimum of maintenance. Use a dry, soft cloth for routine exteriorcleaning. Never use benzine, thinner or other solvents.
Product ServicingIf the suggestions in the charts do not solve the problem, we recommend that you take it to your nearest authorizedPanasonic Servicenter. The product should be serviced only by a qualified technician.
Replacing the FuseUse fuses of the same specified rating (15 A). Using different substitutes or fuses with higher ratings, or connecting theunit directly without a fuse, could cause a fire or damage to the stereo unit.If the replacement fuse fails, contact your nearest Panasonic Servicenter for service.
38 CQ-DP171U
29
ENGLISH
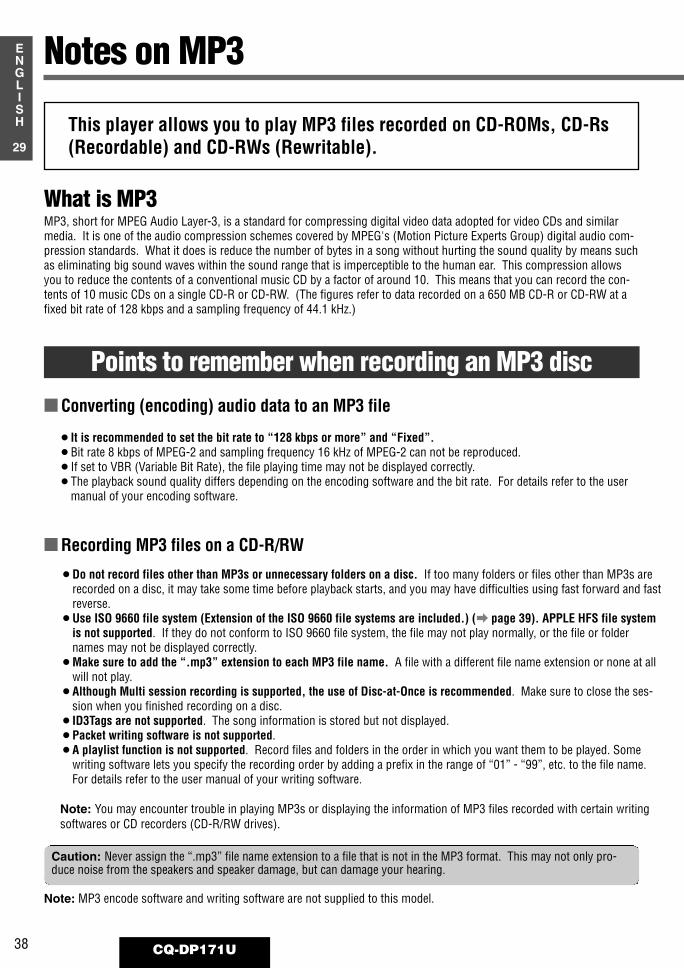
Notes on MP3
Caution: Never assign the “.mp3” file name extension to a file that is not in the MP3 format. This may not only pro-duce noise from the speakers and speaker damage, but can damage your hearing.
This player allows you to play MP3 files recorded on CD-ROMs, CD-Rs(Recordable) and CD-RWs (Rewritable).
¡It is recommended to set the bit rate to “128 kbps or more” and “Fixed”.¡Bit rate 8 kbps of MPEG-2 and sampling frequency 16 kHz of MPEG-2 can not be reproduced.¡If set to VBR (Variable Bit Rate), the file playing time may not be displayed correctly.¡The playback sound quality differs depending on the encoding software and the bit rate. For details refer to the user
manual of your encoding software.
Converting (encoding) audio data to an MP3 file
¡Do not record files other than MP3s or unnecessary folders on a disc. If too many folders or files other than MP3s arerecorded on a disc, it may take some time before playback starts, and you may have difficulties using fast forward and fastreverse.
¡Use ISO 9660 file system (Extension of the ISO 9660 file systems are included.) (a page 39). APPLE HFS file systemis not supported. If they do not conform to ISO 9660 file system, the file may not play normally, or the file or foldernames may not be displayed correctly.
¡Make sure to add the “.mp3” extension to each MP3 file name. A file with a different file name extension or none at allwill not play.
¡Although Multi session recording is supported, the use of Disc-at-Once is recommended. Make sure to close the ses-sion when you finished recording on a disc.
¡ID3Tags are not supported. The song information is stored but not displayed.¡Packet writing software is not supported.¡A playlist function is not supported. Record files and folders in the order in which you want them to be played. Some
writing software lets you specify the recording order by adding a prefix in the range of “01” - “99”, etc. to the file name.For details refer to the user manual of your writing software.
Note: You may encounter trouble in playing MP3s or displaying the information of MP3 files recorded with certain writingsoftwares or CD recorders (CD-R/RW drives).
Recording MP3 files on a CD-R/RW
What is MP3MP3, short for MPEG Audio Layer-3, is a standard for compressing digital video data adopted for video CDs and similarmedia. It is one of the audio compression schemes covered by MPEG's (Motion Picture Experts Group) digital audio com-pression standards. What it does is reduce the number of bytes in a song without hurting the sound quality by means suchas eliminating big sound waves within the sound range that is imperceptible to the human ear. This compression allowsyou to reduce the contents of a conventional music CD by a factor of around 10. This means that you can record the con-tents of 10 music CDs on a single CD-R or CD-RW. (The figures refer to data recorded on a 650 MB CD-R or CD-RW at afixed bit rate of 128 kbps and a sampling frequency of 44.1 kHz.)
Points to remember when recording an MP3 disc
Note: MP3 encode software and writing software are not supplied to this model.
39CQ-DP171U
30
ENGLISH
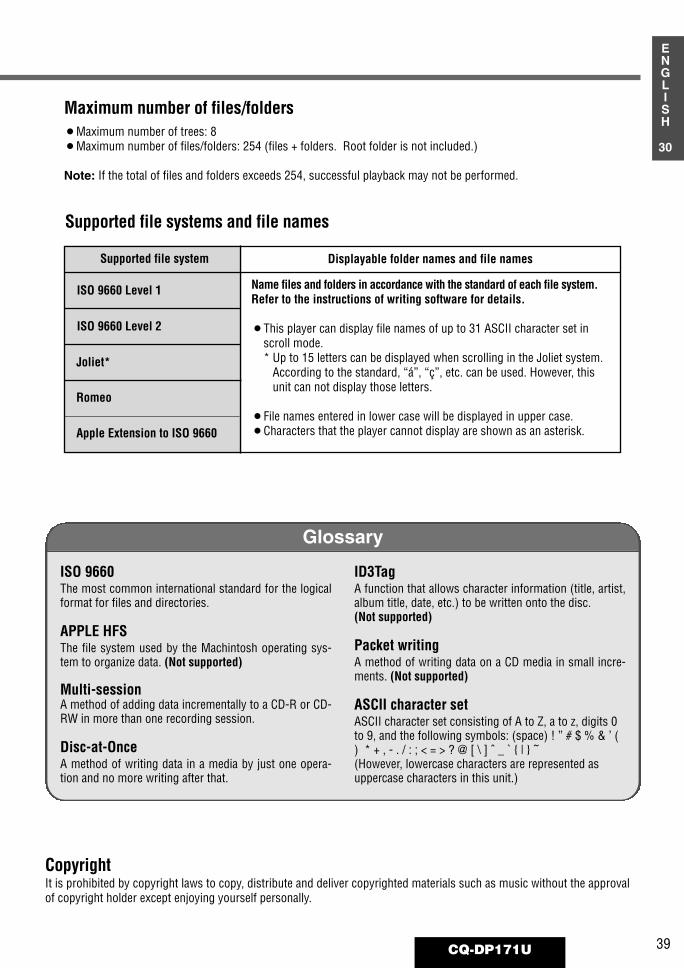
Glossary
ISO 9660The most common international standard for the logicalformat for files and directories.
APPLE HFSThe file system used by the Machintosh operating sys-tem to organize data. (Not supported)
Multi-sessionA method of adding data incrementally to a CD-R or CD-RW in more than one recording session.
Disc-at-OnceA method of writing data in a media by just one opera-tion and no more writing after that.
ID3TagA function that allows character information (title, artist,album title, date, etc.) to be written onto the disc.(Not supported)
Packet writingA method of writing data on a CD media in small incre-ments. (Not supported)
ASCII character setASCII character set consisting of A to Z, a to z, digits 0to 9, and the following symbols: (space) ! ” # $ % & ’ () * + , - . / : ; < = > ? @ [ \ ] ˆ _ ` | ~
(However, lowercase characters are represented asuppercase characters in this unit.)
Supported file systems and file names
Maximum number of files/folders¡Maximum number of trees: 8¡Maximum number of files/folders: 254 (files + folders. Root folder is not included.)
Note: If the total of files and folders exceeds 254, successful playback may not be performed.
CopyrightIt is prohibited by copyright laws to copy, distribute and deliver copyrighted materials such as music without the approvalof copyright holder except enjoying yourself personally.
ISO 9660 Level 1
ISO 9660 Level 2
Joliet*
Romeo
Apple Extension to ISO 9660
Supported file system Displayable folder names and file names
Name files and folders in accordance with the standard of each file system.Refer to the instructions of writing software for details.
¡This player can display file names of up to 31 ASCII character set inscroll mode.* Up to 15 letters can be displayed when scrolling in the Joliet system.
According to the standard, “á”, “ç”, etc. can be used. However, thisunit can not display those letters.
¡File names entered in lower case will be displayed in upper case.¡Characters that the player cannot display are shown as an asterisk.
40 CQ-DP171U
31
ENGLISH
Cleaning this unitUse a dry, soft cloth to wipe.
Caution on cleaningNever use solvents such as benzine, thinner as they maymar the surface of the unit.
MaintenanceCare of the Unit
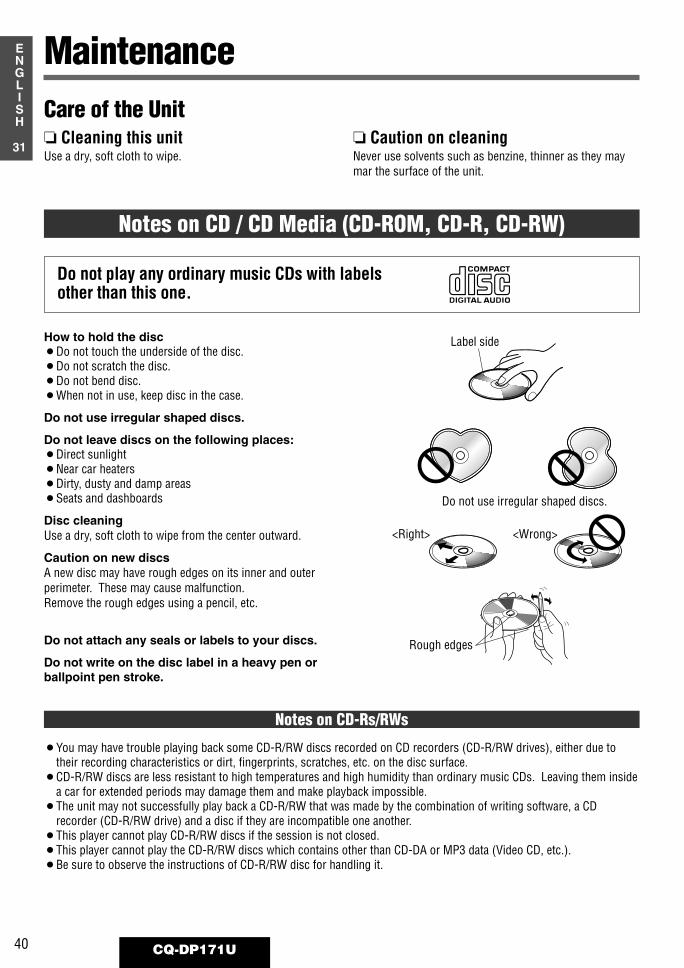
Notes on CD / CD Media (CD-ROM, CD-R, CD-RW)
How to hold the disc¡Do not touch the underside of the disc.¡Do not scratch the disc.¡Do not bend disc.¡When not in use, keep disc in the case.
Do not use irregular shaped discs.
Do not leave discs on the following places:¡Direct sunlight¡Near car heaters¡Dirty, dusty and damp areas¡Seats and dashboards
Disc cleaningUse a dry, soft cloth to wipe from the center outward.
Caution on new discsA new disc may have rough edges on its inner and outerperimeter. These may cause malfunction.Remove the rough edges using a pencil, etc.
Do not attach any seals or labels to your discs.
Do not write on the disc label in a heavy pen orballpoint pen stroke.
Label side
<Right>
Rough edges
<Wrong>
Do not use irregular shaped discs.
Do not play any ordinary music CDs with labelsother than this one.
¡You may have trouble playing back some CD-R/RW discs recorded on CD recorders (CD-R/RW drives), either due totheir recording characteristics or dirt, fingerprints, scratches, etc. on the disc surface.
¡CD-R/RW discs are less resistant to high temperatures and high humidity than ordinary music CDs. Leaving them insidea car for extended periods may damage them and make playback impossible.
¡The unit may not successfully play back a CD-R/RW that was made by the combination of writing software, a CDrecorder (CD-R/RW drive) and a disc if they are incompatible one another.
¡This player cannot play CD-R/RW discs if the session is not closed.¡This player cannot play the CD-R/RW discs which contains other than CD-DA or MP3 data (Video CD, etc.).¡Be sure to observe the instructions of CD-R/RW disc for handling it.
Notes on CD-Rs/RWs

41CQ-DP171U
32
ENGLISH
GeneralPower supply: 12 V DC (11 V – 16 V), test voltage 14.4 V, negative groundCurrent consumption: Less than 2.2 A (CD play mode; 0.5 W x 4 channels)Maximum power output: 45 W x 4 channels at 1 kHz, Volume control maximumTone adjustment range:
Bass: ±12 dB at 100 HzTreble: ±12 dB at 10 kHz
Suitable speaker impedance: 4 – 8 ΩPre-Amp output voltage: 2.0 V (CD play mode; 1 kHz, 0 dB)Output impedance: 200 ΩDimensions (W x H x D): 7” x 115/16” x 57/8” (178 x 50 x 150 mm)Weight: 3 lbs. 5 oz (1.5 kg)
FM Stereo RadioFrequency range: 87.9 MHz – 107.9 MHzUsable sensitivity: 11.0 dBf. (1.25 µV, 75 Ω)50 dB quieting sensitivity: 15.2 dBf. (1.6 µV, 75 Ω)Frequency response: 30 Hz – 15 kHz (± 3 dB)Alternate channel selectivity: 75 dBStereo separation: 42 dB (1 kHz)Image response ratio: 75 dBIF response ratio: 100 dBSignal/noise ratio: 70 dB
AM RadioFrequency range: 530 kHz – 1 710 kHzUsable sensitivity: 28 dB/µV (25 µV, S/N 20 dB)
CD Player Sampling frequency: 32 times oversamplingDA converter: MASH • 1 bit/4 DAC systemError correction system: Panasonic super decoding algorithmPick-up type: Astigma 3-beamLight source: Semiconductor laserWave length: 780 nmFrequency response: 20 Hz – 20 kHz (±1 dB)Signal/noise ratio: 96 dBTotal harmonic distortion: 0.01 % (1 kHz)Wow and flutter: Below measurable limitsChannel separation: 75 dBMP3 decoding: MPEG 1 Audio Layer 3/MPEG 2 Audio Layer 3Bit rate: (MPEG 1 Audio Layer 3) 32 kbps – 256 kbps, VBR (Variable Bit Rate)
(MPEG 2 Audio Layer 3) 16 kbps – 160 kbps, VBR (Variable Bit Rate)Sampling frequency: (MPEG 1 Audio Layer 3) 32 kHz, 44.1 kHz, 48 kHz
(MPEG 2 Audio Layer 3) 22.05 kHz, 24 kHz
Above specifications comply with EIA standards.
Note: Specifications and the design are subject to modification without notice due to improvements in technology.
Specifications

YEFM283774 D0801-1091 Printed in ChinaImprimé à ChineImpreso en China
Panasonic Consumer ElectronicsCompany, Division of MatsushitaElectric Corporation of AmericaOne Panasonic Way, Secaucus, New Jersey 07094http://www.panasonic.com
Panasonic Sales Company.Division of Matsushita Electric of Puerto Rico, Inc. (“PSC”)Ave. 65 de Infanteria, Km. 9.5San Gabriel Industrial Park, Carolina,Puerto Rico 00985http://www.panasonic.com
Panasonic Canada Inc.5770 Ambler Drive,Mississauga, OntarioL4W 2T3www.panasonic.ca