notice d’installation / manuale …€¦ · mande, la centrale doit être en mode installation,...
TRANSCRIPT

NOTICE D’INSTALLATION / MANUALE D’INSTALLAZIONETECHNISCHE BESCHREIBUNG / MANUAL DE INSTALACIONINSTALLATIEGIDS AFSTANDSBEDIENINGEN / INSTALLATION MANUAL
Télécommandes
Telecomandi
Handsender
Telemando
Fp.2
Ip.7
DS.12
Ep.17
Afstandsbedieningen NLp.22
Remote controls GBp.27
612-21X
614-21X
2F
PrésentationLa télécommande :• 2 touches : permet de commander Arrêt et Marche,• 4 touches : permet de commander Arrêt, Marche, Partiel1 et Alerte.Toutes les touches sont personnalisables afin d’adapter lescommandes aux habitudes de l’utilisateur.
Préparation• En sortie usine, toutes les touches de la télécommandesont paramétrées pour émettre les commandes suivantes :
Si la programmation usine ne convient pas, voir paragra-phe Paramétrage.
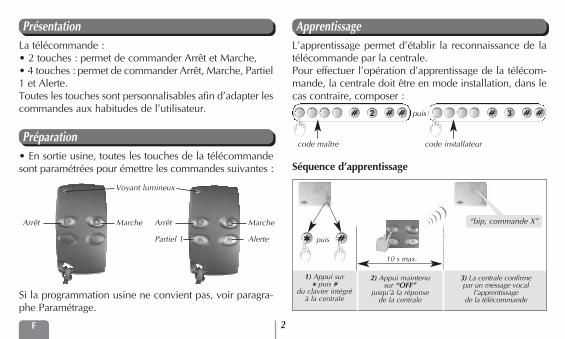
ApprentissageL’apprentissage permet d’établir la reconnaissance de latélécommande par la centrale.Pour effectuer l’opération d’apprentissage de la télécom-mande, la centrale doit être en mode installation, dans lecas contraire, composer :
Séquence d’apprentissage
32
Arrêt Marche
Voyant lumineux
Arrêt Marche
Partiel 1 Alerte
code maître code installateur
✱
)))))
puis
10 s max.
1) Appui sur * puis #
du clavier intégréà la centrale
2) Appui maintenu sur “OFF”
jusqu’à la réponse de la centrale
3) La centrale confirme par un message vocal
l’apprentissage de la télécommande
“bip, commande X”
puis

3F
ParamétrageLe paramétrage de la télécommande permet de personna-liser les commandes en fonction des habitudes de l’utili-sateur.1) Choisir la touche de la télécommande à personnaliser.2) Choisir dans le tableau page suivante, un n° de com-mande (2 ou 3 chiffres) correspondant à la commande àparamètrer.3) Réaliser le paramétrage selon la séquence ci-dessous :
Chaque chiffre du n° de commande correspond à uncertain nombre d’appuis successifs sur la télécommande.
3 clignotements successifs du voyant rouge en cours ou à la fin du paramétrage indique une erreur de
programmation ; dans ce cas, recommencer la séquence depuis le début.
�
2 s. depause env.
voyant éteint
voyant allumé
séquenced’appui
5 s. env. 10 s. env. 2 s. env.10 s. env.
1) Début de laséquence par unappui simultané sur les touches
OFF et ON
2) Sélection de la touche àpersonnaliser :
OFF, ON, P1, P2par 1 appui bref
3) Appui long sur la touchesélectionnée
jusqu’à extinctionfugitive du voyant
4) Successiond’appuis
correspondant au 1er chiffre du n° de commande
5) Successiond’appuis
correspondant au 2e chiffre du
n° de commande
6) Successiond’appuis
correspondant au 3e chiffre du
n° de commande
7) Fin de laséquence par unappui simultanésur les touches
OFF et ON
Allumage fixe du voyant =paramétrage
correct
2 s. depause env.
{ { { { {

4F
Désignation N° de de la commande commande
Arrêt 21Alerte 22Marche 23Alerte silencieuse 24Marche Partielle 1 25Marche Partielle 2 27Alarme incendie 32Marche Présence 33Commande silencieuse 36Sonnette 38Appel sonore 42Touche inactive 44Impulsionnel lumière 50Arrêt lumière 52Marche lumière 54Télérupteur lumière 56Minuterie lumière 58Impulsionnel relais 1 60Arrêt relais 1 62Marche relais 1 64Télérupteur relais 1 66Minuterie relais 1 68Impulsionnel relais 2 70
Désignation N° de de la commande commande
Arrêt relais 2 72Marche relais 2 74Télérupteur relais 2 76Minuterie relais 2 78Impulsionnel relais 3 80Arrêt relais 3 82Marche relais 3 84Télérupteur relais 3 86Minuterie relais 3 88Impulsionnel relais 4 90Arrêt relais 4 92Marche relais 4 94Télérupteur relais 4 96Minuterie relais 4 98Etat système 129Arrêt Groupe 1 - - - 131Arrêt Groupe - 2 - - 133Arrêt Groupe 1 2 - - 135Arrêt Groupe - - 3 - 137Arrêt Groupe 1 - 3 - 139Arrêt Groupe - 2 3 - 141Arrêt Groupe 1 2 3 - 143Arrêt Groupe - - - 4 145
Désignation N° de de la commande commande
Arrêt Groupe 1 - - 4 147Arrêt Groupe - 2 - 4 149Arrêt Groupe 1 2 - 4 151Arrêt Groupe - - 3 4 153Arrêt Groupe 1 - 3 4 155Arrêt Groupe - 2 3 4 157Arrêt Groupe 1 2 3 4 159Marche Groupe 1 - - - 163Marche Groupe - 2 - - 165Marche Groupe 1 2 - - 167Marche Groupe - - 3 - 169Marche Groupe 1 - 3 - 171Marche Groupe - 2 3 - 173Marche Groupe 1 2 3 - 175Marche Groupe - - - 4 177Marche Groupe 1 - - 4 179Marche Groupe - 2 - 4 181Marche Groupe 1 2 - 4 183Marche Groupe - - 3 4 185Marche Groupe 1 - 3 4 187Marche Groupe - 2 3 4 189Marche Groupe 1 2 3 4 191
Pour répondre aux exigences NF&A2P, la fonction “Alerte” doit être disponible sur au moins un des organes de commande de l’installation.

5F
Sélection de latouche P1
Début Appui deséparation
2 appuispour le 1er chiffre
4 appuispour le 2e chiffre
Fin
Exemple de paramétrage• Personnaliser la touche P1 pour déclencher une “Alerte silencieuse”. Le n° de commande correspondant est : 2 4.
2 4
• Vérification du paramétrage
Sélection de latouche P1
Début Appui deséparation
Fin 2 clignotements confirment le 1er chiffre
4 clignotements confirment le 2e chiffre
2 4

6F
Changement des pilesLorsque l’éclairage du voyant rouge de la télécommandedevient très faible, vous devez changer les 2 piles de latélécommande. • Dévissez le socle de la télécommande puis séparez lesocle de la face avant.• Remplacer les piles usagées par les nouvelles en respec-tant les polarités.• Vérifiez l’état des piles en appuyant sur une touche, levoyant rouge en face avant doit s’allumer pendant l’appui.La programmation de la télécommande est sauvegardéependant le changement des piles.
Caractéristiques techniques• Touches de commande programmables : oui • Usage : portable• Alimentation : 2 piles lithium manganèse 3 V type
CR2016• Autonomie : 5 ans en usage courant• Liaisons radio : TwinBand® 400/800 MHz• Température de fonctionnement : - 10°C à + 55°C• Indices de protection mécanique : IP 30• Dimensions L x l x H : 38 x 72 x 14 mm• Poids : 25 g avec piles
Li
piles
Doc
umen
t non
con
trac
tuel
, sou
mis
à m
odifi
catio
ns s
ans
préa
vis.

7I
PresentazioneIl telecomando:• a 2 pulsanti: permette di trasmettere i comandi di Spentoe Acceso totale,• a 4 pulsanti: permette di trasmettere i comandi di Spentoe Acceso totale, Parziale 1 e Emergenza.Tutti i pulsanti sono comunque riprogrammabili e persona-lizzabili per adattare i comandi alle esigenze dell’utente.
PreparazioneDi fabbrica, tutti i pulsanti del telecomando sono pro-grammati, per trasmettere i seguenti comandi:
Se la programmazione di fabbrica non è conforme alleesigenze, fate riferimento al paragrafo “Programmazione”.
ApprendimentoL’apprendimento permette di effettuare un riconosci-mento del telecomando da parte della centrale.Per effettuare l’operazione d’apprendimento, la centraledeve trovarsi in modo installazione; in caso contrario,digitate:
Sequenza d’apprendimento
32
codice principale codice installatore
✱
)))))
poi
10 secondi massimo
1) Premete * e poi #
sulla tastiera della centrale
2) Tenete premuto il pulsante “OFF”fino alla risposta
della centrale
3) La centrale conferma con un messaggio vocalel’avvenuto apprendimento
del telecomando
“bip, comando X”
poi
Spento Acceso
Spia luminosa
Spento Acceso
Parzial 1 Emergenza

8I
ProgrammazioneLa programmazione del telecomando permette di persona-lizzare i comandi in funzione delle esigenze dell’utente.1) Scegliete il pulsante da personalizzare.2) Scegliete, consultando la tabella a lato, il numerocomando (2 o 3 cifre) corrispondente al comando da pro-grammare.3) Effettuate la programmazione seguendo la proceduradescritta di seguito:
Ogni cifra del numero comando corrisponde ad un certo numero di pressioni da effettuare in successione sui pulsanti del telecomando.
3 lampeggiamenti della spia luminosa rossa durante o al termine della programmazione indicano un errore di programmazione; in questo caso, ripetete la sequenzadall’inizio.
�
2 sec.circa
di pausa
Spiaspenta
Spiaaccesa
Sequenza dipressioni
5 sec.circa 10 sec. circa 2 sec.
circa10 sec. circa
1) Inizio della sequenza
premendocontemporaneamente i pulsanti OFF e ON
2) Selezione del pulsante
da personalizzare: OFF, ON, P1, P2
premendo brevementeil pulsante prescelto
3) Pressioneprolungata
del pulsanteselezionato fino albreve spegnimento
della spia
4) Successione di pressioni
corrispondenti alla 1e cifra del numerocomando prescelto
5) Successione di pressioni
corrispondenti alla 2e cifra del numerocomando prescelto
6) Successione di pressioni
corrispondenti alla 3e cifra del numerocomando prescelto
7) Fine dellasequenza di
programmazionepremendo contem-
poraneamente i pulsanti OFF e ON
Accensione fissadella spia
luminosa =programmazione
effettuatacorrettamente
2 sec.circa
di pausa
{ { { { {

9I
Descrizione N°del comando comando
Spento 21Emergenza 22Acceso 23Allarme silenzioso 24Acceso parziale 1 25Acceso parziale 2 27Allarme incendio 32Acceso presenza 33Comando silenzioso (1) 36Campanello (2) 38Chiamata (3) 42Nessun comando (pulsante inattivo) 44Impulsivo luci 50Spento luci 52Acceso luci 54Teleruttore luci 56Temporizzato luci 58Impulsivo relè 1 60Spento relè 1 del ricevitore 62Acceso relè 1 del ricevitore 64Teleruttore relè 1 del ricevitore 66Temporizzato relè 1 del ricevitore 68Impulsivo relè 2 70
1) Inviando un segnale di “comando silenzioso” si inibisce temporaneamente la sintesi vocale della centrale: qualunque comando di acceso o spento trasmesso nei 30 secondisuccessivi non verrà riportato né con sintesi vocale né con toni acustici. 2) La centrale emetterà una tonalità di “campanello”. 3) La centrale emetterà una serie di “bip”. 4) La centralecomunicherà vocalmente il proprio stato.
Descrizione N°del comando comando
Spento relè 2 del ricevitore 72Acceso relè 2 del ricevitore 74Teleruttore relè 2 del ricevitore 76Temporizzato relè 2 del ricevitore 78Impulsivo relè 3 80Spento relè 3 del ricevitore 82Acceso relè 3 del ricevitore 84Teleruttore relè 3 del ricevitore 86Temporizzato relè 3 del ricevitore 88Impulsivo relè 4 90Spento relè 4 del ricevitore 92Acceso relè 4 del ricevitore 94Teleruttore relè 4 del ricevitore 96Temporizzato relè 4 del ricevitore 98Stato sistema (4) 129Spento Gruppo 1 - - - 131Spento Gruppo - 2 - - 133Spento Gruppo 1 2 - - 135Spento Gruppo - - 3 - 137Spento Gruppo 1 - 3 - 139Spento Gruppo - 2 3 - 141Spento Gruppo 1 2 3 - 143Spento Gruppo - - - 4 145
Descrizione N°del comando comando
Spento Gruppo 1 - - 4 147Spento Gruppo - 2 - 4 149Spento Gruppo 1 2 - 4 151Spento Gruppo - - 3 4 153Spento Gruppo 1 - 3 4 155Spento Gruppo - 2 3 4 157Spento Gruppo 1 2 3 4 159Acceso Gruppo 1 - - - 163Acceso Gruppo - 2 - - 165Acceso Gruppo 1 2 - - 167Acceso Gruppo - - 3 - 169Acceso Gruppo 1 - 3 - 171Acceso Gruppo - 2 3 - 173Acceso Gruppo 1 2 3 - 175Acceso Gruppo - - - 4 177Acceso Gruppo 1 - - 4 179Acceso Gruppo - 2 - 4 181Acceso Gruppo 1 2 - 4 183Acceso Gruppo - - 3 4 185Acceso Gruppo 1 - 3 4 187Acceso Gruppo - 2 3 4 189Acceso Gruppo 1 2 3 4 191
(obbligatoriamente ad accesso sotto codice)
(prestazione non certificata IMQ)

10I
Selezione del pulsante P1
Inizio Pressione di separazione
2 pressioni per la prima cifra
4 pressioniper la seconda cifra
Fine
Esempio di programmazione• Personalizzare il pulsante P1, per attivare un “Allarme silenzioso”. Il numero comando corrispondente è: 2 4.
2 4
• Verifica della programmazione
Selezione del pulsante P1
Inizio Pressione di separazione
Fine 2 lampeggiamenticonfermano
la prima cifra
2 lampeggiamenticonfermano
la seconda cifra
2 4
kOff

11I
Cambio pileQuando la spia luminosa rossa del telecomando cominciaad accendersi debolmente, le due pile del telecomandodevono essere sostituite.• Svitate la base del telecomando e poi separatela dallaparte anteriore.• Sostituite le pile scariche con pile nuove dello stessotipo, rispettando la polarità.• Verificate lo stato delle pile premendo un pulsante, laspia rossa sul lato anteriore deve accendersi durante lapressione del pulsante.La programmazione del telecomando viene mantenutaanche dopo aver cambiato le pile.
Caratteristiche tecniche• Pulsanti programmabili: sì• Uso: portatile• Alimentazione: 2 pile al Litio-manganese da 3 V tipo
CR2016• Autonomia: 5 anni circa in uso normale• Trasmissione radio TwinBand® 400/800 MHz• Temperatura di funzionamento: da –10 °C a +55 °C• Indici di protezione: IP 30• Dimensioni (L x A x P): 38 x 72 x 14 mm• Peso: 25 g pile comprese
Li
pile
Il pr
esen
te m
anua
le p
uò e
sser
e so
gget
to a
mod
ifich
e se
nza
prea
vvis
o.

12D
EinführungDer Handsendermit:• 2 Tasten zum Ein- und Ausschalten• 4 Tasten für die Befehle Aus, Gesamt Ein, Teil Ein und Notruf.Alle Tasten sind personalisierbar und können somit genauden jeweiligen Anforderungen des Betreibers angepasstwerden.
Vorbereitung• Im Auslieferungszustand sind die Tasten des Hand-
senders wie folgt belegt:
Wenn die werkseitige Programmierung geändert werdensoll, verfahren Sie gemäß des Kapitels "Programmieren"(Seite 13 ff.).
EinlernenDurch das Einlernen wird der Handsender der Zentralezugeordnet.Für den Einlernvorgang muss sich die Zentrale imMontagebetrieb befinden, andernfalls folgendes einge-ben:
Tastenfolge beim Einlernen
32
Haupt-Code Errichter-Code
✱
)))))
dann
max. 10 Sek.
1) Taste * und Taste #
der Tastatur derZentrale drücken
2) Taste “OFF”solange gedrückt halten,
bis die Zentraleantwortet
3) Die Zentrale bestätigt das Einlernen
des Handsenders durch eine Sprachmeldung
“BIP, Bedienteil X ”
dann
AUS EIN
rote LED
AUS EIN
Teil 1 Notruf

13D
ProgrammierenHierdurch können die Befehle des Handsenders auf dieBedürfnisse des Betreibers abgestimmt werden. 1) Die zu programmierende Taste des Handsenders aus-wählen.2) Aus der Tabelle auf Seite 14 eine Befehls-Nummer (2-oder 3stellig) auswählen, die dem zu programmierendenBefehl entspricht.3) Zum Programmieren wie folgt vorgehen:
Drei aufeinanderfolgende Blinkzeichen der roten LEDwährend oder nach der Programmierung signalisiereneinen Programmierfehler; in diesem Fall den Ablauf von Beginn an wiederholen.
�
ca. 2 Sek.Pause
LEDerloschen
LEDbrennt
Tastenfolge
ca. 5 Sek. ca. 10 Sek. ca. 2 Sek.ca. 10 Sek.
1) Beginn derTastenfolge durch
gleichzeitigesBetätigen der Tasten
OFF und ON
2) Wahl der zu personali-
sierenden Taste:OFF, ON, P1, P2
durch kurzesBetätigen
3) LängeresDrücken
der gewünschtenTaste, bis die LED
vorübergehenderlischt
4) Taste so oftbetätigen, bis die
Anzahl der zuprogrammierenden
1. Zifferentspricht
5) Taste so oftbetätigen, bis die
Anzahl der zuprogrammierenden
2. Zifferentspricht
6) Taste so oftbetätigen, bis die
Anzahl der zuprogrammierenden
3. Zifferentspricht
7) Ende derTastenfolge durch
gleichzeitigesDrücken
der Tasten OFF und ON
LED leuchtetständig =korrekteProgram-mierung
ca. 2 Sek.Pause
{ { { { {
Der Wert der jeweiligen Ziffer entspricht derTastendruck-Anzahl, die für den gewünschten Befehl zu programmieren ist (z. B. “eins”, “zwei”, “neun” für Systemzustand).

14D
Befehl Befehls-Nr.
AUS 21Notruf 22EIN 23Stiller Alarm 24EIN Teil 1 25EIN Teil 2 27Feueralarm 32Anwesenheit EIN 33Mute-Befehl (Stummschaltung) 36Klingel 38Tonruf 42Kein Befehl 44Licht Impulsmodus 50Licht AUS 52Licht EIN 54Licht / Eltaco-Betrieb 56Licht / Zeitmodus 58Relais 1 Impulsmodus 60AUS Relais 1 62EIN Relais 1 64Eltaco-Betrieb Relais 1 66Zeitmodus Relais 1 68Relais 2 Impulsmodus 70
Befehl Befehls-Nr.
AUS Relais 2 72EIN Relais 2 74Eltaco-Betrieb Relais 2 76Zeitmodus Relais 2 78Relais 3 Impulsmodus 80AUS Relais 3 82EIN Relais 3 84Eltaco-Betrieb Relais 3 86Zeitmodus Relais 3 88Relais 4 Impulsmodus 90AUS Relais 4 92EIN Relais 4 94Eltaco-Betrieb Relais 4 96Zeitmodus Relais 4 98Systemzustand 129AUS Bereich 1 - - - 131AUS Bereich - 2 - - 133AUS Bereich 1 2 - - 135AUS Bereich - - 3 - 137AUS Bereich 1 - 3 - 139AUS Bereich - 2 3 - 141AUS Bereich 1 2 3 - 143AUS Bereich - - - 4 145
Befehl Befehls-Nr.
AUS Bereich 1 - - 4 147AUS Bereich - 2 - 4 149AUS Bereich 1 2 - 4 151AUS Bereich - - 3 4 153AUS Bereich 1 - 3 4 155AUS Bereich - 2 3 4 157AUS Bereich 1 2 3 4 159EIN Bereich 1 - - - 163EIN Bereich - 2 - - 165EIN Bereich 1 2 - - 167EIN Bereich - - 3 - 169EIN Bereich 1 - 3 - 171EIN Bereich - 2 3 - 173EIN Bereich 1 2 3 - 175EIN Bereich - - - 4 177EIN Bereich 1 - - 4 179EIN Bereich - 2 - 4 181EIN Bereich 1 2 - 4 183EIN Bereich - - 3 4 185EIN Bereich 1 - 3 4 187EIN Bereich - 2 3 4 189EIN Bereich 1 2 3 4 191
(Eingabe des Zugangscodes erforderlich)

15D
Taste P1auswählen
Beginn 1 x drücken, um fortzufahren
2 x Drücken für die erste Ziffer
4 x Drücken für die zweite
Ziffer
Ende
Programmierbeispiel• Taste P1 so festlegen, dass darüber ein “Stiller Alarm”. Die entsprechende Befehls-Nummer ist die Zahl 2 4.
2 4
• Überprüfen der Programmierung
Taste P1auswählen
Beginn 1 x drücken, um fortzufahren
Ende 2 Blinkzeichenbestätigen
die erste Ziffer
4 Blinkzeichenbestätigen
die zweite Ziffer
2 4

16D
BatteriewechselWenn die rote LED des Handsenders nur noch schwachaufleuchtet, müssen die beiden Batterien ersetzt werden. • Hierzu das Unterteil aufschrauben und abnehmen.• Dann die verbrauchten Batterien durch neue ersetzenund dabei auf die korrekte Polung achten.• Den Batteriezustand durch Tastendruck prüfen, die roteLED muss während des Drucks aufleuchten.Die Programmierung des Handsenders bleibt nach einemBatteriewechsel erhalten.
Technische Daten• Bedientasten: frei programmierbar • Einsatz: mobil, z. B. als Schlüsselanhänger• Stromversorgung: 2 Lithium-Mangan-Batterien
3 V (CR2016)• Netzunabhängiger Betrieb: ca. 5 Jahre
bei normalem Einsatz• Funkverbindungen: TwinBand® 400/800 MHz• Betriebstemperatur: -10° C à +55° C• Schutzart: IP 30• Maße (L x B x H): 38 x 72 x 14 mm• Gewicht: 25 g mit Batterien
Li
Batterien
Hin
wei
s: Ä
nder
unge
n de
r te
chni
sche
n D
aten
und
des
Des
igns
auf
grun
d vo
n Pr
oduk
tver
bess
erun
gen
blei
ben
uns
ohne
Ank
ündi
gung
vor
beha
lten.
N
achd
ruck
, auc
h au
szug
swei
se, n
ur m
it au
sdrü
cklic
her
Gen
ehm
igun
g de
s H
erst
elle
rs.

17E
PresentaciónEl telemando:• 2 teclas: permite gestionar Paro y Marcha,• 4 teclas: permite gestionar Paro, Marcha, Parcial 1 yAlerta.Toutes las teclas son personalizadas, para adaptar elmando a los hábitos del cliente.
Preparación• De fábrica, toutes las teclas del telemando están progra-madas para emitir los comandos siguientes:
Si la programación de fabrica no conviene, ver párrafoprogramación.
ProgramaciónLa programación permite establecer el reconocimientoradio del telemando con la central.Para efectuar la programación del telemando la centraldebe estar posicionada en modo instalación, en casocontrario, componer:
Secuencia de programación:
32
código maestro código instalador
✱
)))))
después
10 seg. max.
1) Pulsar sobre* y después #del teclado
de la central
2) Pulsación mantenidasobre la tecla
de “OFF” hasta que la central enuncia
3) La central confirmavocalmente
la programación del telemando
“bip, comando X”
después
Paro Marcha
Visor luminoso
Paro Marcha
Parcial 1 Alerta

18E
ProgramaciónLa elección del numero de comando corresponde a unnúmero sucesivo de pulsaciones sobre la tecla. La progra-mación del telemando permite personalizar los comandosen función de los hábitos del usuario.1) Elegir la tecla del telemando a personalizar.2) Elección dentro de la tabla que esta al lado un nº decomando (2 o 3 cifras) correspondiente al comando a pro-gramar.3) Realice la programación según la secuencia descrita:
La elección del número de comando corresponde a un número sucesivo de pulsaciones.
La central señala un error de manipulación por 3 bips cortos, en este caso retomar la programacióndesde el principio.
�
2 seg.pausa
visorapagado
visoriluminado
secuencia de pulsación
5 seg.aprox. 10 seg. aprox. 2 seg.
aprox.10 seg. aprox.
1) Comenzar laprogramación
con la pulsaciónsimultánea
sobre OFF y ON
2) Selección de la tecla
a personalizar entre
OFF, ON, P1, P2
3) Pulsación largasobre la teclaseleccionada
hasta que el visor se apague
4) Sucesión de pulsaciones
correspondientes al número
de la primera cifra del parámetro.
5) Sucesivaspulsaciones
correspondientes al número
de la segunda cifradel parámetro.
6) Sucesivaspulsaciones
correspondientes al número du 3e
cifra del parámetro.
7) Fin de laprogramación
pulsación mantenidasobre las teclas OFF
y ON hasta que el visor se apague
Si el visor se queda 2
iluminado laprogramación
es correcta
2 seg.pausa
{ { { { {

19E
Asignación N° de del comando comando
Paro (código de acceso obligatorio) 21Alerta 22Marcha 23Alerta silenciosa 24Marcha Parcial 1 25Marcha Parcial 2 27Alarma incendio 32Marcha Presencia 33Comando silencioso 36Timbre 38Llamada sonora 42Ningún comando 44Mono-estable luz 50Paro luz 52Marcha luz 54Teleruptor luz 56Minutero luz 58Mono-estable relé 1 60Paro repetidor 1 62Marcha repetidor 1 64Teleruptor repetidor 1 66Minutero repetidor 1 68Mono-estable relé 2 70
Asignación N° de del comando comando
Paro repetidor 2 72Marcha repetidor 2 74Teleruptor repetidor 2 76Minutero repetidor 2 78Mono-estable relé 3 80Paro repetidor 3 82Marcha repetidor 3 84Teleruptor repetidor 3 86Minutero repetidor 3 88Mono-estable relé 4 90Paro repetidor 4 92Marcha repetidor 4 94Teleruptor repetidor 4 96Minutero repetidor 4 98Estado del sistema 129Paro Grupo 1 - - - 131Paro Grupo - 2 - - 133Paro Grupo 1 2 - - 135Paro Grupo - - 3 - 137Paro Grupo 1 - 3 - 139Paro Grupo - 2 3 - 141Paro Grupo 1 2 3 - 143Paro Grupo - - - 4 145
Asignación N° de del comando comando
Paro Grupo 1 - - 4 147Paro Grupo - 2 - 4 149Paro Grupo 1 2 - 4 151Paro Grupo - - 3 4 153Paro Grupo 1 - 3 4 155Paro Grupo - 2 3 4 157Paro Grupo 1 2 3 4 159Marcha Grupo 1 - - - 163Marcha Grupo - 2 - - 165Marcha Grupo 1 2 - - 167Marcha Grupo - - 3 - 169Marcha Grupo 1 - 3 - 171Marcha Grupo - 2 3 - 173Marcha Grupo 1 2 3 - 175Marcha Grupo - - - 4 177Marcha Grupo 1 - - 4 179Marcha Grupo - 2 - 4 181Marcha Grupo 1 2 - 4 183Marcha Grupo - - 3 4 185Marcha Grupo 1 - 3 4 187Marcha Grupo - 2 3 4 189Marcha Grupo 1 2 3 4 191

20E
Selección de teclaP1
Comienzo Appui deséparation
2 pulsaciones para la 1 cifra
4 pulsacionespara la 2 cifra
Fin
Ejemplo de programación• Programación de la tecla P1, para comandar “Alerta silenciosa”. El numero de parámetro correspondiente es: 2 4.
2 4
• Verificación de la programación
Selección de teclaP1
Comienzo Pulsación de la separación
Fin 2 parpadeos del visor confirma
la 1 cifra
4 parpadeos del visor confirma
la 2 cifra
2 4

21E
Cambio de las pilasDurante la iluminación del visor rojo del telemando sevuelve muy débil, debe cambiar las pilas del telemando.• Suelte la caracasa del zocalo del telemando y sepáre laparte delantera.• Cambie las pilas usadas por nuevas respetando la pola-ridad.• Verifique el estado de las pilas pulsando una tecla, elvisor rojo de la cara delantera debe iluminarse durante lapulsación.Los parámetros programados son salvaguardados cuandose realice el cambio de alimentación.
Características técnicas• Teclas de comando programables: sí• Aplicación: portátil• Alimentación: 2 pilas litihum de botón 3 V
(ref. CR2016)• Autonomía: 5 años en uso corriente• Frecuencia radio: TwinBand® 400/800 MHz• Temperatura de funcionamiento: - 10°C à + 55°C• Índice de protección mecánica: IP 30• Dimensiones Largo x Ancho x Alto: 38 x 72 x 14 mm• Peso: 25 g con las pilas
Li
pilas
Doc
umen
to n
o co
ntra
ctua
l, su
pedi
tado
a p
osib
les
mod
ifica
cion
es s
in p
reav
iso.

22NL
VoorstellingDe afstandsbediening met: • 2 toetsen: de in- en uitschakelingstoest• 4 toetsen: de in- en uitschakelingstoets, de toets voor dedeelbeveiliging 1 en de alarmtoets.Al deze toetsen zijn individualiseerbaar om zo de instructiesaan te passen aan de gewoontes van de gebruiker.
Voorbereiding• In de fabrieksconfiguratie zijn de toetsen van deafstandsbediening geprogrammeerd om de volgendeinstructies door te voeren:
Als deze fabrieksconfiguratie niet bevalt, zie het hoofdstuk“Parameterring”.
AanlerenDankzij het aanleren herkent de centrale deafstandsbediening.Om het aanleren van de afstandsbediening door tevoeren, moet de centrale in installatiemodus staan; zoniet, druk:
Verloop van het aanleren
32
Controlelampje
Uitschakeling
Inschakeling
Deelbeveiliging 1
Noodoproep
Hoofdcode Installateurscode
✱
)))))
vervolgens
Max. 10 sec.
1) Druk op hetingebouwde
toetsenbord vande centrale *vervolgens #
2) Druk tot aan hetantwoord van de
centrale op de toets“Uit”
3) De centrale bevestigt hetaanleren van de
afstandsbediening met eenstembericht
“bip, bediening X”
vervolgens

23NL
ParameterringDe parameterring van de afstandsbediening maakt hetmogelijk de instructies te individualiseren in functie vande gewoontes van de gebruiker.1) Druk op de toets van de afstandsbediening die u wenstte individualiseren2) Kies in het overzicht op de volgende pagina eeninstructienummer (2 of 3 cijfers) dat overeenkomt met dete programmeren instructie.3) Voer de parameterring door als volgt:
Elk cijfer van het instructienummer bepaalt het aantalkeren dat men de toets van de afstandsbedieningopeenvolgend moet indrukken.
Indien tijdens het programmeren of op het einde ervan, het rode controlelampje 3 opeenvolgende malen
knippert, betekent dit dat er een fout in de programmering is gemaakt. In dit geval, herbegin de procedure van bij hetbegin.
�
pauze vanongeveer
2 sec.
Controlelampjeuit
Controlelampjeaan
Hetindrukken
ongeveer5 sec.
ongeveer 10 sec.
ongeveer2 sec.
ongeveer 10 sec.
1) Begin van deprogrammering door
een gelijktijdigindrukken van de
toetsen “Aan” en “Uit”
2) Selectie van de te individualiserentoets: “Aan”, “Uit”,
“P1” of “P2”kort indrukken
3) Lang indrukken van de gekozen toets tot als hetcontrolelampjevluchtig uitgaat
4) De toets x kerenopeenvolgend
indrukken, waarbij x = het
eerste cijfer van hetinstructienummer
5) De toets x kerenopeenvolgend
indrukken, waarbij x = het
tweede cijfer van hetinstructienummer
6) De toets x kerenopeenvolgend
indrukken, waarbij x = het
derde cijfer van hetinstructienummer
7) Einde van deprogrammering door
een gelijktijdigindrukken van
de toetsen “Aan”en “Uit”
Continu branden van hetcontrolelampje
= correcteparameterring
pauze vanongeveer
2 sec.
{ { { { {

24NL
Instructiebeschrijving Instructie- nummer
Uitschakeling 21Noodoproep 22Inschakeling 23Stilalarm 24Deelbeveiliging 1 25Deelbeveiliging 2 27Brandalarm 32Werking bij aanwezigheid 33Geluidloze besturing 36Belsignaal 38Geluidsoproep 42Inactieve toets 44Licht impuls 50Licht uit 52Licht aan 54Teleruptor voor verlichting 56Tijdschakelaar voor verlichting 58Relais 1 impuls 60Uitschakeling relais 1 62Inschakeling relais 1 64Teleruptor relais 1 66Tijdschakelaar relais 1 68Relais 2 impuls 70
Instructiebeschrijving Instructie- nummer
Uitschakeling relais 2 72Inschakeling relais 2 74Teleruptor relais 2 76Tijdschakelaar relais 2 78Relais 3 impuls 80Uitschakeling relais 3 82Inschakeling relais 3 84Teleruptor relais 3 86Tijdschakelaar relais 3 88Relais 4 impuls 90Uitschakeling relais 4 92Inschakeling relais 4 94Teleruptor relais 4 96Tijdschakelaar relais 4 98Systeemstatus 129Uitschakeling groep 1 - - - 131Uitschakeling groep - 2 - - 133Uitschakeling groep 1 2 - - 135Uitschakeling groep - - 3 - 137Uitschakeling groep 1 - 3 - 139Uitschakeling groep - 2 3 - 141Uitschakeling groep 1 2 3 - 143Uitschakeling groep - - - 4 145
Instructiebeschrijving Instructie- nummer
Uitschakeling groep 1 - - 4 147Uitschakeling groep - 2 - 4 149Uitschakeling groep 1 2 - 4 151AUitschakeling groep- - 3 4 153Uitschakeling groep 1 - 3 4 155Uitschakeling groep - 2 3 4 157Uitschakeling groep 1 2 3 4 159Inschakeling groep 1 - - - 163Inschakeling groep - 2 - - 165Inschakeling groep 1 2 - - 167Inschakeling groep - - 3 - 169Inschakeling groep 1 - 3 - 171Inschakeling groep - 2 3 - 173Inschakeling groep 1 2 3 - 175Inschakeling groep - - - 4 177Inschakeling groep 1 - - 4 179Inschakeling groep - 2 - 4 181Inschakeling groep 1 2 - 4 183Inschakeling groep - - 3 4 185Inschakeling groep 1 - 3 4 187Inschakeling groep - 2 3 4 189Inschakeling groep 1 2 3 4 191

25NL
Selectie van de toets P1
Begin Druk op de toets P1tot het controlelampje
vluchtig uitgaat
Druk 2 maal op de toets P1
voor het eerste cijfer
Druk 4 maal voor het tweede
cijfer
Einde
Voorbeeld van een parameterring• De toets P1 individualiseren om een stilalarm door te voeren. Het instructienummer is: 2 4.
2 4
• Verificatie van de parameterring
Selectie van de toets P1
Begin Druk op de toets P1 tot het
controlelampjevluchtig uitgaat
Einde het controlelampjeknippert 2 maal
om het eerste cijfer te bevestigen
het controlelampjeknippert 4 maal
om het tweede cijferte bevestigen
2 4

26NL
Vervangen van de batterijWanneer de verlichting van het rode controlelampje vande afstandsbediening zwak wordt, moet u de 2 batterijenvan de afstandsbediening veranderen.• Schroef het deksel van de afstandsbediening los enmaak ze open• Verander de lege batterijen door nieuwe en respecteerde polariteit• Controleer de batterijstatus door op een toets te druk-ken; het rode controlelampje op de voorzijde moet tijdenshet indrukken branden.De programmering van de afstandsbediening blijftbewaard tijdens het vervangen van de batterijen.
Technische kenmerken• Programmeerbare besturingstoetsen: ja• Gebruik: draagbaar• Voeding: 2 lithium-mangaanbatterijen 3 V type
CR2016• Autonomie: 5 jaar bij normaal gebruik• Radioverbindingen: TwinBand® 400/800 MHz• Werkingstemperatuur: - 10°C tot + 55°C• Beschermingsgraad: IP 30• Afmetingen (l x h x b): 38 x 72 x 14 mm• Gewicht: 25 g met de batterijen
Niet contractueel document, wijzigingen zonder voorafgaande kennisgevingvoorbehouden.
Li
batterijen

27GB
IntroductionThe remote control:• 2 keys: for ON (ARMED) and OFF control,• 4 keys: for ON (ARMED), OFF, Partial 1 and Panicalarm.All keys can be programmed to function as a user requi-res.
Preparation• All the remote control keys are factory-configured toissue the following commands:
If factory programming is not suitable, refer to theConfiguration section.
ProgrammingProgramming enables the remote control to be recognisedby the control panel.To programme the remote control, the control panel mustbe in installation mode. If this is not the case, press:
Programming sequence
32
OFF Armed
Indicator lamp
OFF Armed
Partial 1 PanicAlarm
master code engineer installer code
✱
)))))
then
10 s max.
1) Press * then #on the keypadbuilt into thecontrol panel.
2) Press and hold the “OFF” key until
the control panelresponds.
3) The control panel confirms remote control
programming with a voice message.
“beep, remote control X”
then

28GB
ConfigurationRemote control configuration is used to customise thecontrol keys according to user habits.
1) Choose the remote control key to be customised.2) Choose a command number (2 or 3 digits) from thetable overleaf, to match the command to be customised.3) Configure as described in the sequence below:
Each command number digit corresponds to a certainnumber of times that the remote control is pressed.
A programming error is indicated by the red LEDindicator lamp flashing 3 times during or at the end of configuration. When this happens programmingshould be carried out again from the start.
�
Approx. 2 s
LEDindicatorlamp OFF
LEDIndicatorlamp ON
Configurationsequence
Approx.5 s Approx. 10 s Approx. 2 s Approx. 10 s
1) To start the sequence,simultaneouslypress the ONand OFF keys
2) Press once on the key to be
customisedOFF, ON, P1, P2
3) Press and holdthe selected key
until the LEDindicator lamp goes
out temporarily
4) Press the key as many times as the 1st digit
in the commandnumber
5) Press the key as many times as the 2nd digit
in the commandnumber
6) Press the key as many times as the 3rd digit
in the commandnumber
7) To end thesequence,
simultaneouslypress the ONand OFF keys
The LEDindicator lamp
comes onpermanently =configuration
correct.
Approx. 2 s
{ { { { {

29GB
Command type Commandnumber
OFF (coded access compulsory) 21Panic Alarm 22Armed 23Silent alarm 24Armed, Partial 1 25Armed, Partial 2 27Fire alarm 32Armed, Presence mode (stay) 33Silent command 36Door Bell Chime 38Audible signal Chime 42No command 44Pulse light 50Light OFF 52Light ON 54Light toggle switch 56Light timer 58Pulse relay 1 60OFF relay 1 62Armed relay 1 64Toggle switch relay 1 66Timer relay 1 68Pulse relay 2 70
Command type Commandnumber
OFF relay 2 72Armed relay 2 74Toggle switch relay 2 76Timer relay 2 78Pulse relay 3 80OFF relay 3 82Armed relay 3 84Toggle switch relay 3 86Timer relay 3 88Pulse relay 4 90OFF relay 4 92Armed relay 4 94Toggle switch relay 4 96Timer relay 4 98System status 129OFF Group 1 - - - 131OFF Group - 2 - - 133OFF Group 1 2 - - 135OFF Group - - 3 - 137OFF Group 1 - 3 - 139OFF Group - 2 3 - 141OFF Group 1 2 3 - 143OFF Group - - - 4 145
Command type Commandnumber
OFF Group 1 - - 4 147OFF Group - 2 - 4 149OFF Group 1 2 - 4 151OFF Group - - 3 4 153OFF Group 1 - 3 4 155OFF Group - 2 3 4 157OFF Group 1 2 3 4 159Armed Group 1 - - - 163Armed Group - 2 - - 165Armed Group 1 2 - - 167Armed Group - - 3 - 169Armed Group 1 - 3 - 171Armed Group - 2 3 - 173Armed Group 1 2 3 - 175Armed Group - - - 4 177Armed Group 1 - - 4 179Armed Group - 2 - 4 181Armed Group 1 2 - 4 183Armed Group - - 3 4 185Armed Group 1 - 3 4 187Armed Group - 2 3 4 189Armed Group 1 2 3 4 191

30GB
Select P1Start Press once toaccept selection
Press twice for the 1st digit
Press 4 times for the 2nd digit
End
Configuration example• Customise the P1 key to trigger a “Silent alarm”. The relevant command number is: 2 4.
2 4
• Checking configuration
Select P1Start Press once toaccept selection
End 2 flashes confirm the 1st digit
4 flashes confirm the 2nd digit
2 4

31GB
Changing the batteriesReplace the 2 remote control batteries when lighting ofthe remote control red LED indicator lamp becomes veryweak.• Unscrew the remote control base and separate the basefrom the face plate.• Replace the old batteries with new ones, making surethey are inserted the right way.• Check battery status by pressing a key. The red indica-tor lamp on the face plate must come on while you press.Remote control programming is saved in memory & willnot be lost when the batteries are replaced.
Technical data• Programmable control keys: yes• Use: hand-held• Power supply: 2 x 3 V manganese lithium batteries,
CR2016 type • Battery life: 5 years in normal conditions of use• Radio links: TwinBand® 400/800 MHz• Operating temperature: -10°C to +55°C• Degrees of mechanical protection: IP 30• Dimensions L x W x H: 38 x 72 x 14 mm• Weight: 25 g with batteries
Li
batteries
Non
-con
trac
tual
doc
umen
t, m
ay b
e m
odifi
ed w
ithou
t pri
or n
otic
e.

32

DÉCLARATION DE CONFORMITÉ Fabricant : ATRAL S.A.S.Adresse : F-38926 Crolles Cedex - FranceType de produit : TélécommandeMarque : DaitemNous déclarons sous notre seule responsabilité que les produits auxquels se réfèrent cette déclaration sont conformes aux exigences essentielles des directives suivantes :• Directive R&TTE : 99/5/CE• Directive EMC : 89/336/CEE• Directive Basse Tension : 73/23/CEconformément aux normes européennes harmonisées suivantes :
Ces produits peuvent être utilisés dans toute l’UE, l’EEA et la Suisse
Crolles, le 07/07/04 Signature :Directeur Développement et Marketing Produits
Références produits 612-21X 614-21XEN 300 220-3 X XEN 300 330-2EN 300 440-2EN 50-130-4 X XEN 55022 & 55024EN 60950 X XTBR 21
DICHIARAZIONE DI CONFORMITÀFabbricante: ATRAL S.A.S.Indirizzo: F-38926 Crolles Cedex - FranceTipo di prodotto: TelecomandoModello depositato: DaitemDichiariamo sotto la nostra responsabilità che i prodotti cui questa dichia-razione si riferisce sono conformi ai requisiti essenziali delle seguentiDirettive Europee:• Direttiva R&TTE: 99/5/CE• Direttiva EMC: 89/336/CEE• Direttiva Bassa Tensione: 73/23/CE in ottemperanza alle seguenti Normative Europee armonizzate:
Questi prodotti può essere utilizzato in tutta l'UE, i paesi di EEA, Svizzera.
Crolles, le 07/07/04 Firmato:DirettoreSviluppo e marketing prodotti
Codice dei prodotti 612-21X 614-21XEN 300 220-3 X XEN 300 330-2EN 300 440-2EN 50-130-4 X XEN 55022 & 55024EN 60950 X XTBR 21
F I

KONFORMITÄTSERKLÄRUNGHersteller: ATRAL S.A.S.Adresse: F-38926 Crolles Cedex - FranceGerätetyp: HandsenderMarke: DaitemDiese Produkte entsprechen den grundsätzlichen Anforderungen der folgenden europäischen Richtlinien, und zwar:• Richtlinie R&TTE: 99/5/EG• Richtlinie zur Elektromagnetischen Verträglichkeit: 89/336/EWG• Niederspannungsrichtlinie: 73/23/EWG konform mit folgenden europäischen harmonisieren Normen:
Dieses Produkt darf in der EU, dem EWR und der Schweiz betrieben wer-den.
Crolles, den 07/07/04 Unterschrift:Leiter Produktentwicklung und Marketing
Produktreferenz 612-21X 614-21XEN 300 220-3 X XEN 300 330-2EN 300 440-2EN 50-130-4 X XEN 55022 & 55024EN 60950 X XTBR 21
DECLARACIÓN DE CONFORMIDADFabricante: ATRAL S.A.S.Dirección: F-38926 Crolles Cedex - FranciaTipo de producto: TelemandoMarca: DaitemDeclaramos bajo nuestra responsabilidad que los productos a los que serefiere esta declaración están conformes con las exigencias esenciales delas directivas siguientes:• Directiva R&TTE: 99/5/CE• Directiva EMC: 89/336/CEE• Directiva Baja Tensión: 73/23/CEDe acuerdo con las siguientes normas europeas harmonizadas:
Este producto puede ser utilizado en toda la UE, la EEA y Suiza
Crolles el 07/07/04 Firmado:Director Desarrollo y Marketing Producto
Ref. producto 612-21X 614-21XEN 300 220-3 X XEN 300 330-2EN 300 440-2EN 50-130-4 X XEN 55022 & 55024EN 60950 X XTBR 21
D E

GELIJKVORMIGHEIDSVERKLARINGFabrikant: ATRAL S.A.S.Adres: F-38926 Crolles Cedex - FranceSoort produkt: Afstandsbediening - Merk: DaitemWij verklaren op onze eigen verantwoordelijkheid dat de produkten waarop dezeverklaring betrekking heeft, gelijkvormig zijn aan de fundamentele eisen van devolgende richtlijnen: • Richtlijn betreffende Radioapparatuur en telecommunicatie-eindapparatuur (R&TTE):
99/5/CE• Richtlijn betreffende de Electromagnetische Compatibiliteit (EMC): 89/336/CEE• Richtlijn betreffende de Laagspanning: 73/23/CEVolgens de volgende geharmoniseerde Europese normen:
Dit produkt mag gebruikt worden in de Europese Unie, de Europese EconomischeRuimte en in Zwitserland.
Crolles, op 07/07/04 Handtekening: Directeur Produktontwikkeling en Marketing
Produktreferentie 612-21X 614-21XEN 300 220-3 X XEN 300 330-2EN 300 440-2EN 50-130-4 X XEN 55022 & 55024EN 60950 X XTBR 21
DECLARATION OF CONFORMITYManufacturer: ATRAL S.A.S.Address: F-38926 Crolles Cedex - FranceProduct type: Remote controlTrade mark: DaitemWe declare under our sole responsibility that the products to which thisdeclaration relates are compliant with the essential requirements of thefollowing European Directives:• R&TTE Directive: 99/5/CE• EMC Directive: 89/336/CEE• Low Voltage Directive: 73/23/CE in compliance with the following harmonised European Standards:
These products can be used in all EU and EEA countries and Switzerland.
Crolles, 07/07/04 Signature:R&D and Product Management Director
Products code 612-21X 614-21XEN 300 220-3 X XEN 300 330-2EN 300 440-2EN 50-130-4 X XEN 55022 & 55024EN 60950 X XTBR 21
NL GB

803402/G - 03/06