k spider key - smart and green
TRANSCRIPT
K SPIDER
www.smartandgreen.eu
Lire avant emploi Please read before use
kameleon
technology
Kameleon
KEy
2 3
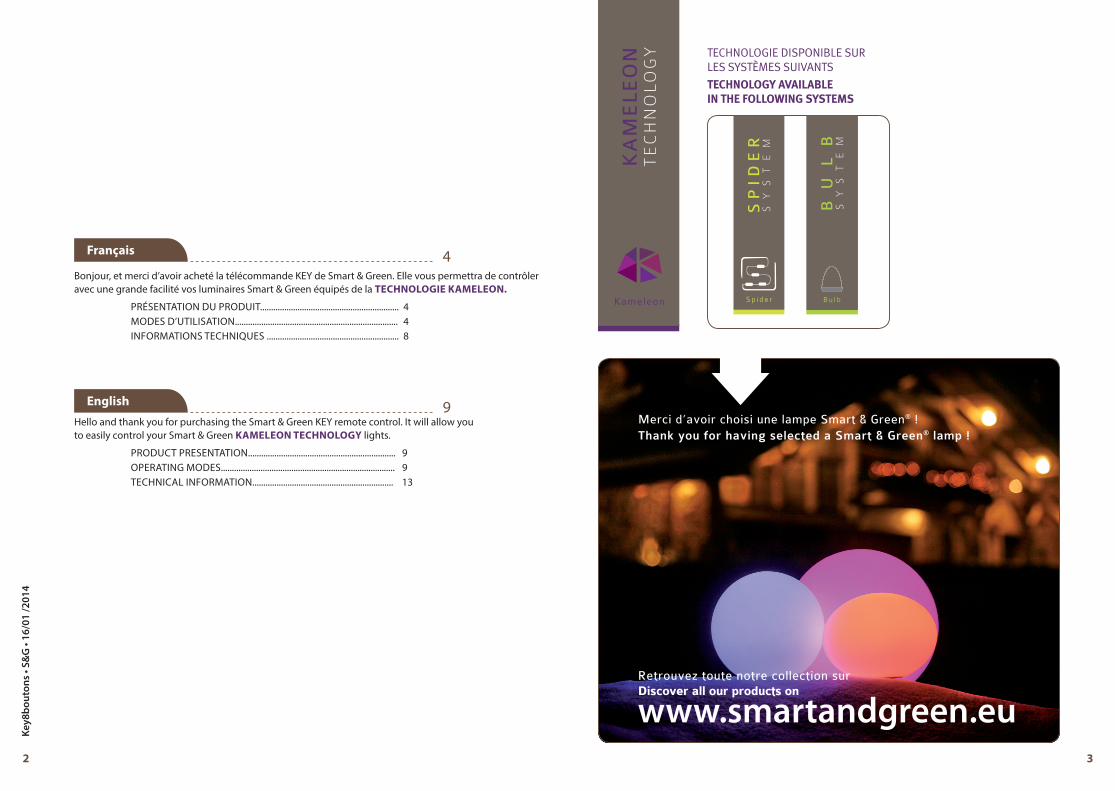
Français 4Bonjour, et merci d’avoir acheté la télécommande KEY de Smart & Green. Elle vous permettra de contrôler avec une grande facilité vos luminaires Smart & Green équipés de la technologie Kameleon.
Hello and thank you for purchasing the Smart & Green KEY remote control. It will allow you to easily control your Smart & Green Kameleon technology lights.
PréSEntatIon du ProduIt............................................................... 4ModES d’utIlISatIon.......................................................................... 4InforMatIonS tEcHnIquES ............................................................ 8
Product PrESEntatIon................................................................... 9oPEratInG ModES............................................................................... 9tEcHnIcal InforMatIon................................................................ 13
english 9
Key8
bout
ons
• S&
G •
16/0
1 /2
014
kameleon
technology
Kameleon
BulB
SyStem
Bu l b
Technology available in The following sysTems
technologie disponible sur les systèmes suivants
spider
SyStem
Sp i d e r
4 5
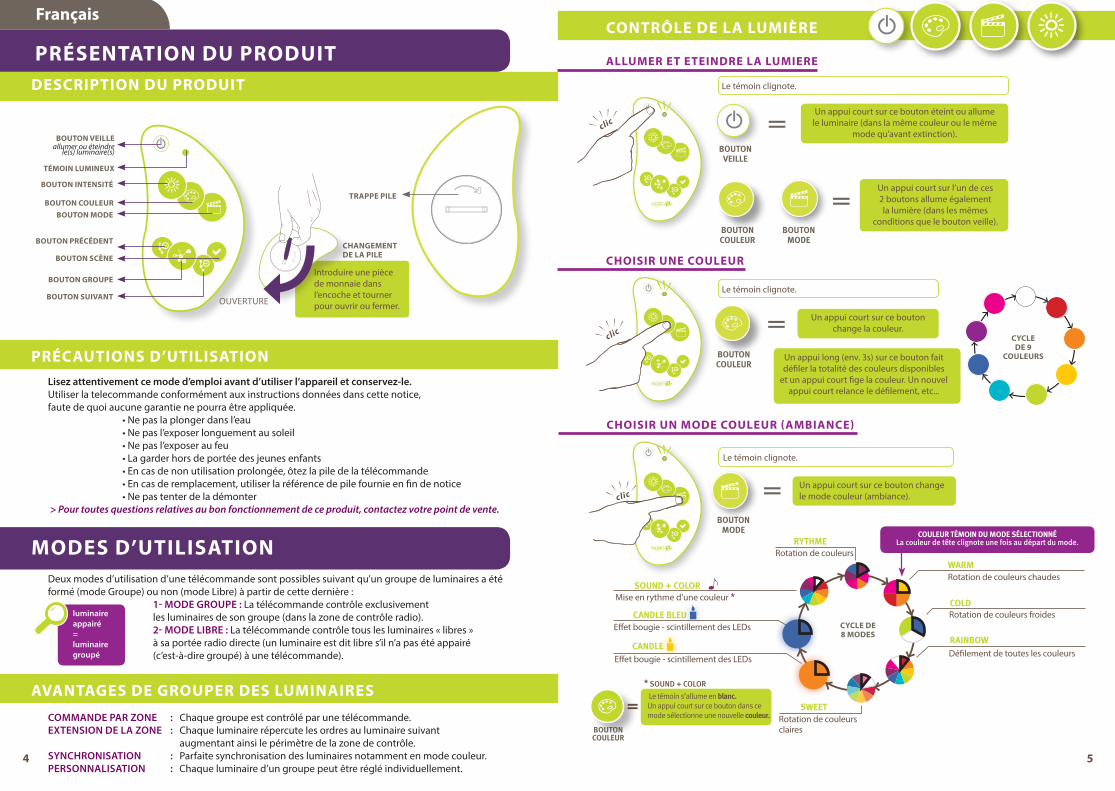
allUmer et eteindre la lUmiere
bouTon couleur
bouTon mode
bouTon veille
un appui court sur ce bouton éteint ou allume le luminaire (dans la même couleur ou le même
mode qu’avant extinction).
un appui court sur l’un de ces 2 boutons allume également la lumière (dans les mêmes
conditions que le bouton veille).
=
=
le témoin clignote.
contrôle de la lUmière
choisir Une coUleUr
cycle de 9
coUleUrsbouTon couleur
un appui court sur ce bouton change la couleur.
un appui long (env. 3s) sur ce bouton fait défiler la totalité des couleurs disponibles
et un appui court fige la couleur. un nouvel appui court relance le défilement, etc...
le témoin clignote.
=
le témoin clignote.
choisir Un mode coUleUr (ambiance)
bouTon mode
= un appui court sur ce bouton change le mode couleur (ambiance).
Français
modes d’Utilisation
Lisez attentivement ce mode d’emploi avant d’utiliser l’appareil et conservez-le.utiliser la telecommande conformément aux instructions données dans cette notice, faute de quoi aucune garantie ne pourra être appliquée. •Nepaslaplongerdansl’eau •Nepasl’exposerlonguementausoleil •Nepasl’exposeraufeu •Lagarderhorsdeportéedesjeunesenfants •Encasdenonutilisationprolongée,ôtezlapiledelatélécommande •Encasderemplacement,utiliserlaréférencedepilefournieenfindenotice •Nepastenterdeladémonter > Pour toutes questions relatives au bon fonctionnement de ce produit, contactez votre point de vente.
deux modes d’utilisation d’une télécommande sont possibles suivant qu’un groupe de luminaires a été formé (mode Groupe) ou non (mode libre) à partir de cette dernière : 1- Mode Groupe : la télécommande contrôle exclusivement lesluminairesdesongroupe(danslazonedecontrôleradio). 2- Mode libre : la télécommande contrôle tous les luminaires « libres » à sa portée radio directe (un luminaire est dit libre s’il n’a pas été appairé (c’est-à-dire groupé) à une télécommande).
CoMMande par zone : chaque groupe est contrôlé par une télécommande.extenSion de la zone : chaque luminaire répercute les ordres au luminaire suivant augmentantainsilepérimètredelazonedecontrôle.SynChroniSation : Parfaite synchronisation des luminaires notamment en mode couleur.perSonnaliSation : chaque luminaire d’un groupe peut être réglé individuellement.
description dU prodUit
précaUtions d’Utilisation
aVantages de groUper des lUminaires
boUton intensité
boUton précédent
boUton sUiVant
boUton Veille
boUton coUleUrboUton mode
témoin lUmineUx
allumer ou éteindre le(s) luminaire(s)
boUton groUpe
boUton scène
trappe pile
présentation dU prodUit
changement de la pile
Introduire une pièce de monnaie dans l’encoche et tourner pour ouvrir ou fermer.ouvErturE
luminaire appairé = luminaire groupé
bouTon couleur
=* SOUND + COlOr
le témoin s’allume en blanc.un appui court sur ce bouton dans ce mode sélectionne une nouvelle couleur.
couleur Témoin du mode sélecTionné la couleur de tête clignote une fois au départ du mode.
warmrotation de couleurs
Effet bougie - scintillement des lEds
cycle de8 modes
Effet bougie - scintillement des lEds
*
rotation de couleurs chaudes
rotation de couleurs froides
défilement de toutes les couleursrainbow
rotation de couleursclaires
candle
ryThme
coldcandle bleu
sound + color
sweeT
Mise en rythme d’une couleur
6 7
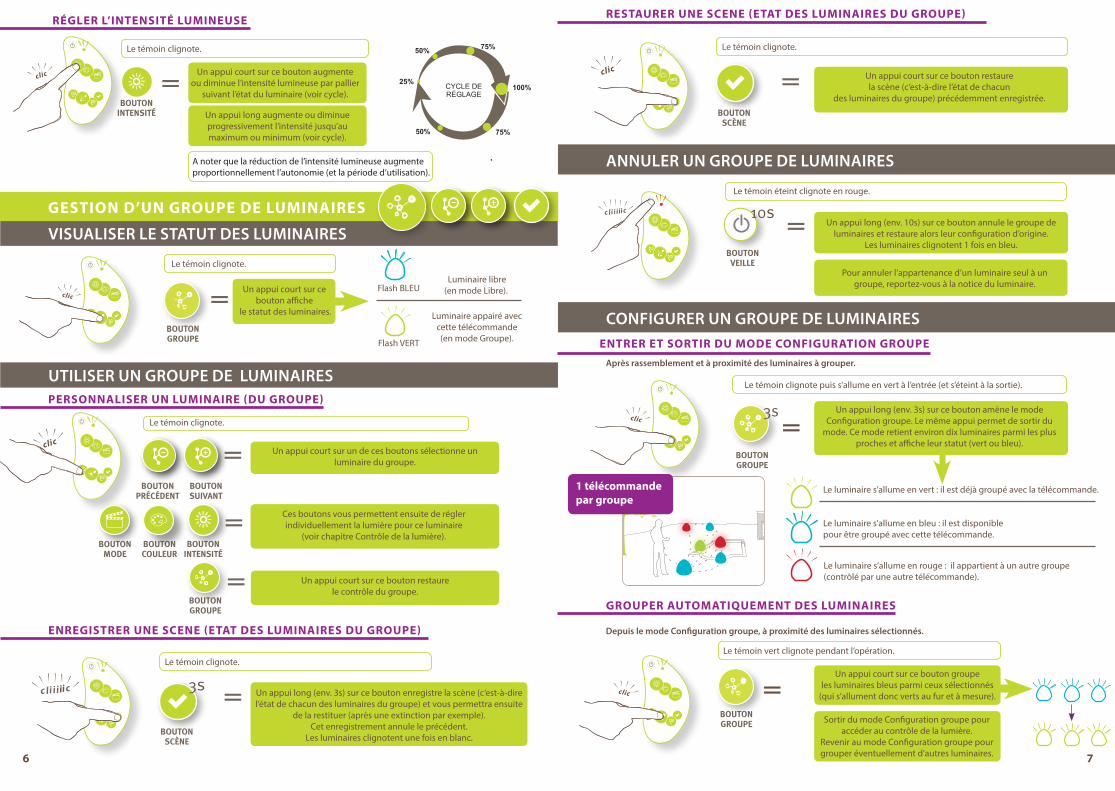
restaUrer Une scene (etat des lUminaires dU groUpe)
un appui court sur ce bouton restaure la scène (c’est-à-dire l’état de chacun
des luminaires du groupe) précédemment enregistrée.=
le témoin clignote.
annuler un Groupe de luMinaireS
Pour annuler l’appartenance d’un luminaire seul à un groupe,reportez-vousàlanoticeduluminaire.
un appui long (env. 10s) sur ce bouton annule le groupe de luminaires et restaure alors leur configuration d’origine.
les luminaires clignotent 1 fois en bleu.bouTon
veille
10s
le témoin éteint clignote en rouge.
=
ConfiGurer un Groupe de luMinaireSentrer et sortir dU mode conFigUration groUpe
après rassemblement et à proximité des luminaires à grouper.
=un appui long (env. 3s) sur ce bouton amène le mode
configuration groupe. le même appui permet de sortir du mode. ce mode retient environ dix luminaires parmi les plus
proches et affiche leur statut (vert ou bleu).
1 télécommande par groupe
bouTon groupe
3s
le témoin clignote puis s’allume en vert à l’entrée (et s’éteint à la sortie).
le luminaire s’allume en rouge : il appartient à un autre groupe (contrôlé par une autre télécommande).
le luminaire s’allume en vert : il est déjà groupé avec la télécommande.
le luminaire s’allume en bleu : il est disponible pour être groupé avec cette télécommande.
=
groUper aUtomatiqUement des lUminaires
depuis le mode Configuration groupe, à proximité des luminaires sélectionnés.
un appui court sur ce bouton groupe les luminaires bleus parmi ceux sélectionnés
(qui s’allument donc verts au fur et à mesure).
bouTon groupe Sortir du mode configuration groupe pour
accéder au contrôle de la lumière.revenir au mode configuration groupe pour grouper éventuellement d’autres luminaires.
le témoin vert clignote pendant l’opération.
personnaliser Un lUminaire (dU groUpe)
enregistrer Une scene (etat des lUminaires dU groUpe)
un appui court sur ce bouton augmente ou diminue l’intensité lumineuse par pallier
suivant l’état du luminaire (voir cycle).
un appui court sur un de ces boutons sélectionne un luminaire du groupe.
ces boutons vous permettent ensuite de régler individuellement la lumière pour ce luminaire
(voir chapitre contrôle de la lumière).
un appui court sur ce bouton restaure le contrôle du groupe.
un appui long (env. 3s) sur ce bouton enregistre la scène (c’est-à-dire l’état de chacun des luminaires du groupe) et vous permettra ensuite
de la restituer (après une extinction par exemple). cet enregistrement annule le précédent.
les luminaires clignotent une fois en blanc.
a noter que la réduction de l’intensité lumineuse augmente proportionnellement l’autonomie (et la période d’utilisation).
=
=
=
=
=
régler l’intensité lUmineUse
bouTon inTensiTé
bouTon inTensiTé
bouTon groupe
CyCle deréglage
25%100%
50%
50% 75%
75%
le témoin clignote.
le témoin clignote.
le témoin clignote.
un appui long augmente ou diminue progressivement l’intensité jusqu’au maximum ou minimum (voir cycle).
ViSualiSer le Statut deS luMinaireS
utiliSer un Groupe de luMinaireS
gestion d’Un groUpe de lUminaires
le témoin clignote.
bouTon groupe
bouTon scène
bouTon scène
= un appui court sur ce bouton affiche
le statut des luminaires.
luminaire libre (en mode libre).
luminaire appairé avec cette télécommande (en mode Groupe).
flash BlEu
flash vErt
bouTon précédenT
bouTon suivanT
bouTon couleur
bouTon mode
3s
8 9
=
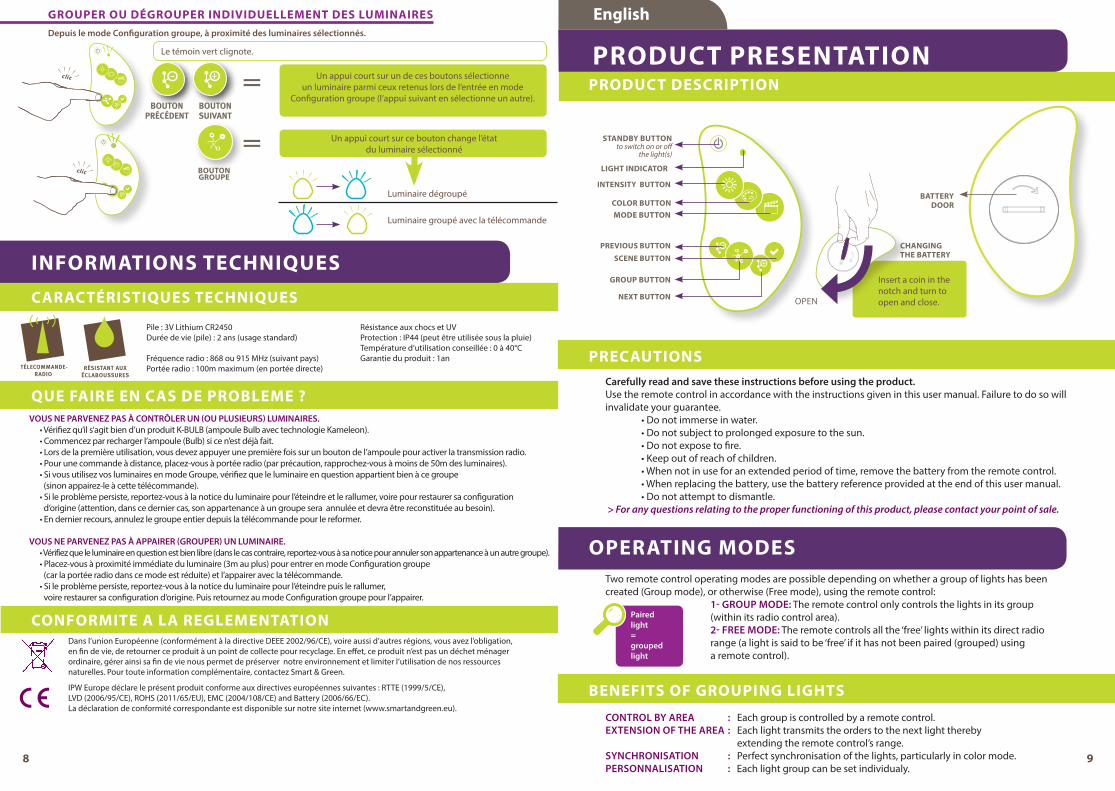
groUper oU dégroUper indiVidUellement des lUminaires
un appui court sur un de ces boutons sélectionne un luminaire parmi ceux retenus lors de l’entrée en mode
configuration groupe (l’appui suivant en sélectionne un autre).
un appui court sur ce bouton change l’état du luminaire sélectionné
depuis le mode Configuration groupe, à proximité des luminaires sélectionnés.
=boUton groUpe
le témoin vert clignote.
luminaire dégroupé
luminaire groupé avec la télécommande
VouS ne parVenez paS à Contrôler un (ou pluSieurS) luMinaireS. •Vérifiezqu’ils’agitbiend’unproduitK-BULB(ampouleBulbavectechnologieKameleon). •Commencezparrechargerl’ampoule(Bulb)sicen’estdéjàfait. •Lorsdelapremièreutilisation,vousdevezappuyerunepremièrefoissurunboutondel’ampoulepouractiverlatransmissionradio. •Pourunecommandeàdistance,placez-vousàportéeradio(parprécaution,rapprochez-vousàmoinsde50mdesluminaires). •SivousutilisezvosluminairesenmodeGroupe,vérifiezqueleluminaireenquestionappartientbienàcegroupe (sinonappairez-leàcettetélécommande). •Sileproblèmepersiste,reportez-vousàlanoticeduluminairepourl’éteindreetlerallumer,voirepourrestaurersaconfiguration d’origine (attention, dans ce dernier cas, son appartenance à un groupe sera annulée et devra être reconstituée au besoin). •Endernierrecours,annulezlegroupeentierdepuislatélécommandepourlereformer.
VouS ne parVenez paS à appairer (Grouper) un luMinaire. •Vérifiezqueleluminaireenquestionestbienlibre(danslecascontraire,reportez-vousàsanoticepourannulersonappartenanceàunautregroupe). •Placez-vousàproximitéimmédiateduluminaire(3mauplus)pourentrerenmodeConfigurationgroupe (car la portée radio dans ce mode est réduite) et l’appairer avec la télécommande. •Sileproblèmepersiste,reportez-vousàlanoticeduluminairepourl’éteindrepuislerallumer, voirerestaurersaconfigurationd’origine.PuisretournezaumodeConfigurationgroupepourl’appairer.
Pile:3VLithiumCR2450durée de vie (pile) : 2 ans (usage standard)
Fréquenceradio:868ou915MHz(suivantpays)Portée radio : 100m maximum (en portée directe)
résistance aux chocs et uvProtection : IP44 (peut être utilisée sous la pluie)température d’utilisation conseillée : 0 à 40°cGarantie du produit : 1an
inFormations techniqUescaractéristiqUes techniqUes
qUe Faire en cas de probleme ?
conFormite a la reglementationDansl’unionEuropéenne(conformémentàladirectiveDEEE2002/96/CE),voireaussid’autresrégions,vousavezl’obligation,en fin de vie, de retourner ce produit à un point de collecte pour recyclage. En effet, ce produit n’est pas un déchet ménager ordinaire, gérer ainsi sa fin de vie nous permet de préserver notre environnement et limiter l’utilisation de nos ressources naturelles.Pourtouteinformationcomplémentaire,contactezSmart&Green.
IPWEuropedéclareleprésentproduitconformeauxdirectiveseuropéennessuivantes:RTTE(1999/5/CE), LVD(2006/95/CE),ROHS(2011/65/EU),EMC(2004/108/CE)andBattery(2006/66/EC). la déclaration de conformité correspondante est disponible sur notre site internet (www.smartandgreen.eu).
résisTanT auxéclaboussures
Télecommande-radio
bouTon précédenT
bouTon suivanT
english
operating modes
Carefully read and save these instructions before using the product.use the remote control in accordance with the instructions given in this user manual. failure to do so will invalidate your guarantee. •Donotimmerseinwater. •Donotsubjecttoprolongedexposuretothesun. •Donotexposetofire. •Keepoutofreachofchildren. •Whennotinuseforanextendedperiodoftime,removethebatteryfromtheremotecontrol. •Whenreplacingthebattery,usethebatteryreferenceprovidedattheendofthisusermanual. •Donotattempttodismantle. > For any questions relating to the proper functioning of this product, please contact your point of sale.
two remote control operating modes are possible depending on whether a group of lights has been created (Group mode), or otherwise (free mode), using the remote control: 1- Group Mode: the remote control only controls the lights in its group (within its radio control area). 2- free Mode: the remote controls all the ‘free’ lights within its direct radio range (a light is said to be ‘free’ if it has not been paired (grouped) using a remote control).
Control by area : Each group is controlled by a remote control.extenSion of the area : Each light transmits the orders to the next light thereby extending the remote control’s range.SynChroniSation : Perfect synchronisation of the lights, particularly in color mode.perSonnaliSation : Each light group can be set individualy.
prodUct description
precaUtions
beneFits oF groUping lights
intensity bUtton
preVioUs bUtton
next bUtton
standby bUtton
color bUttonmode bUtton
light indicator
to switch on or off the light(s)
groUp bUtton
scene bUtton
battery door
prodUct presentation
changing the battery
Insert a coin in the notch and turn to open and close.oPEn
Paired light = grouped light
10 11
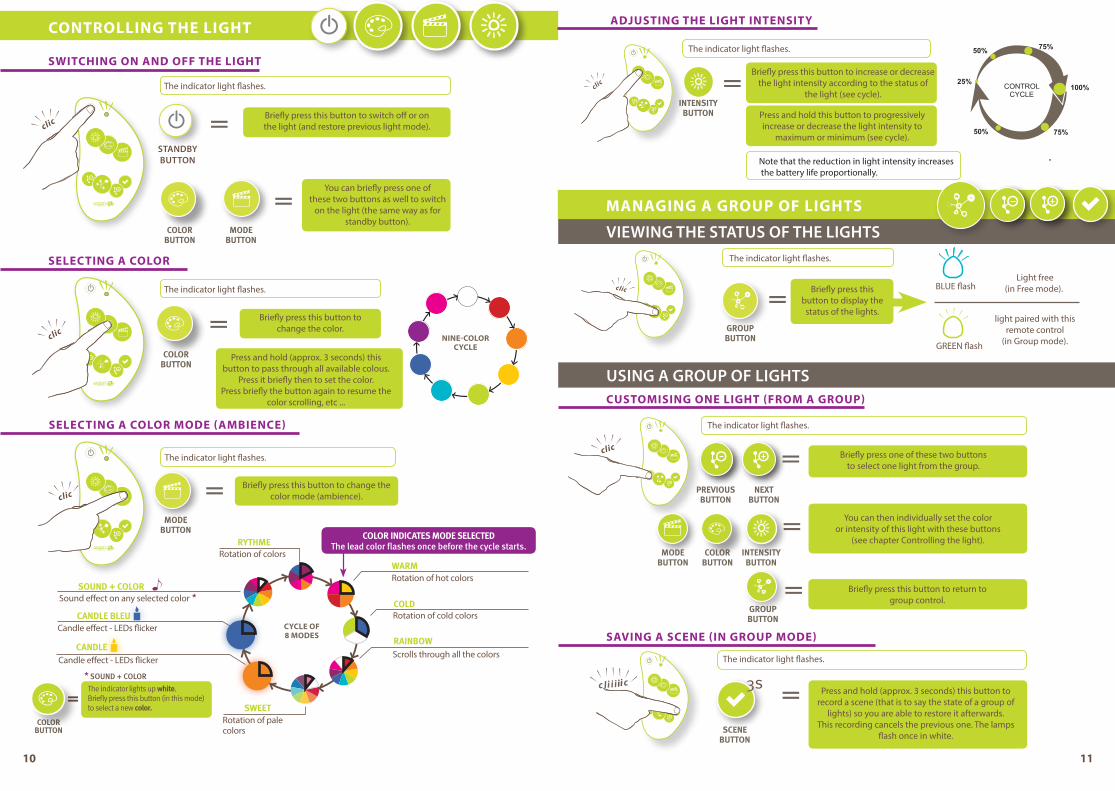
switching on and oFF the light
colorbuTTon
modebuTTon
Standbybutton
Briefly press this button to switch off or on the light (and restore previous light mode).
You can briefly press one of these two buttons as well to switch
on the light (the same way as for standby button).
=
=
the indicator light flashes.
controlling the light
selecting a color
nine-color cycle
colorbuTTon
Briefly press this button tochange the color.
Press and hold (approx. 3 seconds) this button to pass through all available colous.
Press it briefly then to set the color. Press briefly the button again to resume the
color scrolling, etc ...
the indicator light flashes.
=
the indicator light flashes.
selecting a color mode (ambience)
modebuTTon
= Briefly press this button to change the color mode (ambience).
cUstomising one light (From a groUp)
saVing a scene (in groUp mode)
Briefly press this button to increase or decrease the light intensity according to the status of
the light (see cycle).
Briefly press one of these two buttons to select one light from the group.
You can then individually set the coloror intensity of this light with these buttons
(see chapter controlling the light).
Press and hold (approx. 3 seconds) this button to record a scene (that is to say the state of a group of
lights) so you are able to restore it afterwards. this recording cancels the previous one. the lamps
flash once in white.
note that the reduction in light intensity increases the battery life proportionally.
=
=
=
=
adjUsting the light intensity
inTensiTybuTTon
inTensiTybuTTon
ControlCyCle
25%100%
50%
50% 75%
75%
the indicator light flashes.
the indicator light flashes.
the indicator light flashes.
Press and hold this button to progressively increase or decrease the light intensity to
maximum or minimum (see cycle).
ViewinG the StatuS of the liGhtS
uSinG a Group of liGhtS
managing a groUp oF lights
the indicator light flashes.
groupbuTTon
scenebuTTon
= Briefly press this button to display the
status of the lights.
light free (in free mode).
light paired with this remote control
(in Group mode).
BluE flash
GrEEn flash
previousbuTTon
nexTbuTTon
colorbuTTon
modebuTTon
3s
Briefly press this button to return togroup control.=
groupbuTTon
colorbuTTon
=* SOUND + COlOr
the indicator lights up white.briefly press this button (in this mode) to select a new color.
color indicaTes mode selecTedThe lead color flashes once before the cycle starts.
warmrotation of colors
candle effect - lEds flicker
cycle oF8 modes
candle effect - lEds flicker
*
rotation of hot colors
rotation of cold colors
Scrolls through all the colorsrainbow
rotation of pale colors
candle
ryThme
coldcandle bleu
sound + color
sweeT
Sound effect on any selected color
12 13
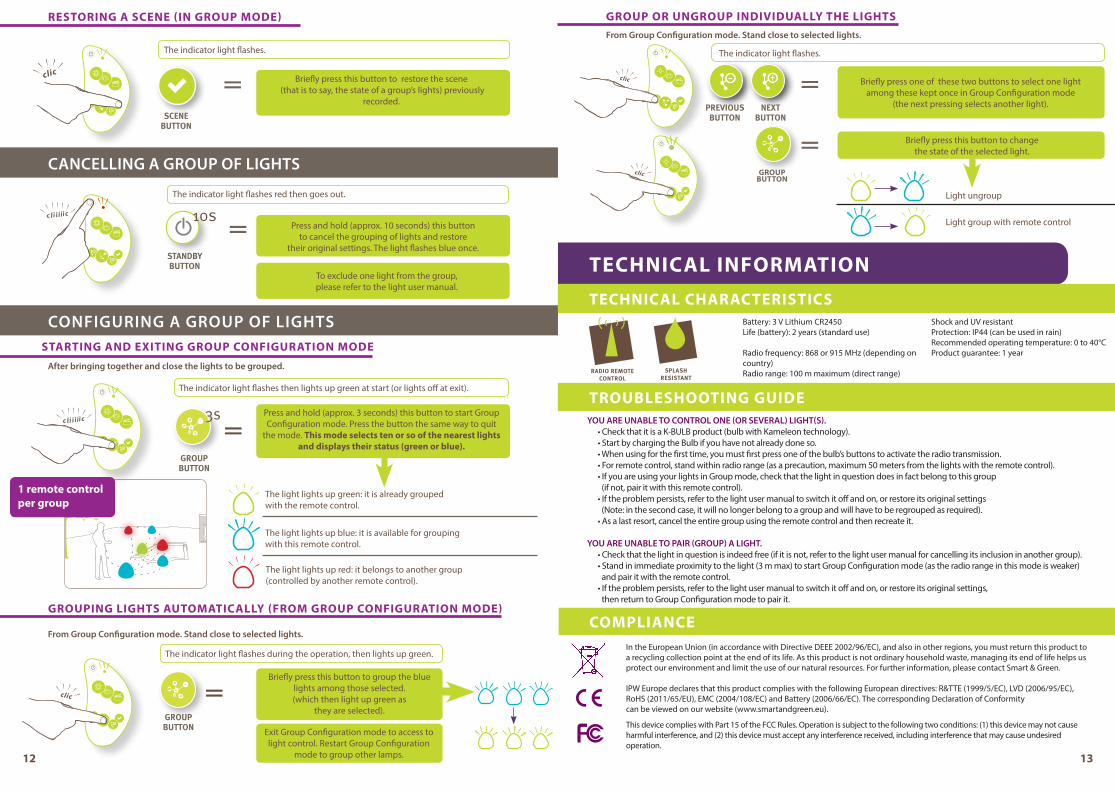
restoring a scene (in groUp mode)
Briefly press this button to restore the scene (that is to say, the state of a group’s lights) previously
recorded.=
the indicator light flashes.
CanCellinG a Group of liGhtS
to exclude one light from the group, please refer to the light user manual.
Press and hold (approx. 10 seconds) this button to cancel the grouping of lights and restore
their original settings. the light flashes blue once.sTandbybuTTon
10s
the indicator light flashes red then goes out.
=
ConfiGurinG a Group of liGhtSstarting and exiting groUp conFigUration mode
after bringing together and close the lights to be grouped.
=Press and hold (approx. 3 seconds) this button to start Group configuration mode. Press the button the same way to quit
the mode. this mode selects ten or so of the nearest lights and displays their status (green or blue).
1 remote control per group
groupbuTTon
3s
the indicator light flashes then lights up green at start (or lights off at exit).
the light lights up red: it belongs to another group (controlled by another remote control).
the light lights up green: it is already grouped with the remote control.
the light lights up blue: it is available for grouping with this remote control.
=
groUping lights aUtomatically (From groUp conFigUration mode)
from Group Configuration mode. Stand close to selected lights.
Briefly press this button to group the blue lights among those selected. (which then light up green as
they are selected).groupbuTTon Exit Group configuration mode to access to
light control. restart Group configuration mode to group other lamps.
the indicator light flashes during the operation, then lights up green.
scenebuTTon
=
groUp or UngroUp indiVidUally the lights
Briefly press one of these two buttons to select one light among these kept once in Group configuration mode
(the next pressing selects another light).
Briefly press this button to change the state of the selected light.
from Group Configuration mode. Stand close to selected lights.
=groUp
bUtton
the indicator light flashes.
light ungroup
light group with remote control
you are unable to Control one (or SeVeral) liGht(S). •CheckthatitisaK-BULBproduct(bulbwithKameleontechnology). •StartbychargingtheBulbifyouhavenotalreadydoneso. •Whenusingforthefirsttime,youmustfirstpressoneofthebulb’sbuttonstoactivatetheradiotransmission. •Forremotecontrol,standwithinradiorange(asaprecaution,maximum50metersfromthelightswiththeremotecontrol). •IfyouareusingyourlightsinGroupmode,checkthatthelightinquestiondoesinfactbelongtothisgroup (if not, pair it with this remote control). •Iftheproblempersists,refertothelightusermanualtoswitchitoffandon,orrestoreitsoriginalsettings (note: in the second case, it will no longer belong to a group and will have to be regrouped as required). •Asalastresort,canceltheentiregroupusingtheremotecontrolandthenrecreateit.
you are unable to pair (Group) a liGht. •Checkthatthelightinquestionisindeedfree(ifitisnot,refertothelightusermanualforcancellingitsinclusioninanothergroup). •Standinimmediateproximitytothelight(3mmax)tostartGroupConfigurationmode(astheradiorangeinthismodeisweaker) and pair it with the remote control. •Iftheproblempersists,refertothelightusermanualtoswitchitoffandon,orrestoreitsoriginalsettings, then return to Group configuration mode to pair it.
technical inFormationtechnical characteristics
troUbleshooting gUide
compliance
previousbuTTon
nexTbuTTon
Battery:3VLithiumCR2450life (battery): 2 years (standard use)
Radiofrequency:868or915MHz(dependingoncountry)radio range: 100 m maximum (direct range)
Shock and uv resistantProtection: IP44 (can be used in rain)recommended operating temperature: 0 to 40°cProduct guarantee: 1 year
splash resisTanT
radio remoTe conTrol
In the European union (in accordance with directive dEEE 2002/96/Ec), and also in other regions, you must return this product to a recycling collection point at the end of its life. as this product is not ordinary household waste, managing its end of life helps us protect our environment and limit the use of our natural resources. for further information, please contact Smart & Green.
IPWEuropedeclaresthatthisproductcomplieswiththefollowingEuropeandirectives:R&TTE(1999/5/EC),LVD(2006/95/EC), RoHS(2011/65/EU),EMC(2004/108/EC)andBattery(2006/66/EC).ThecorrespondingDeclarationofConformity can be viewed on our website (www.smartandgreen.eu).
ThisdevicecomplieswithPart15oftheFCCRules.Operationissubjecttothefollowingtwoconditions:(1)thisdevicemaynotcauseharmful interference, and (2) this device must accept any interference received, including interference that may cause undesired operation.
11, rue de l’abbé vincent - Z.I. les vouillands - 38600 fontaine - francetel : + 33 4 76 09 69 96 - [email protected]
www.smartandgreen.eu