gogloo...1 gogloo manual d'utilisateur des lunettes e7 merci de bien lire cette documentation...
TRANSCRIPT
1
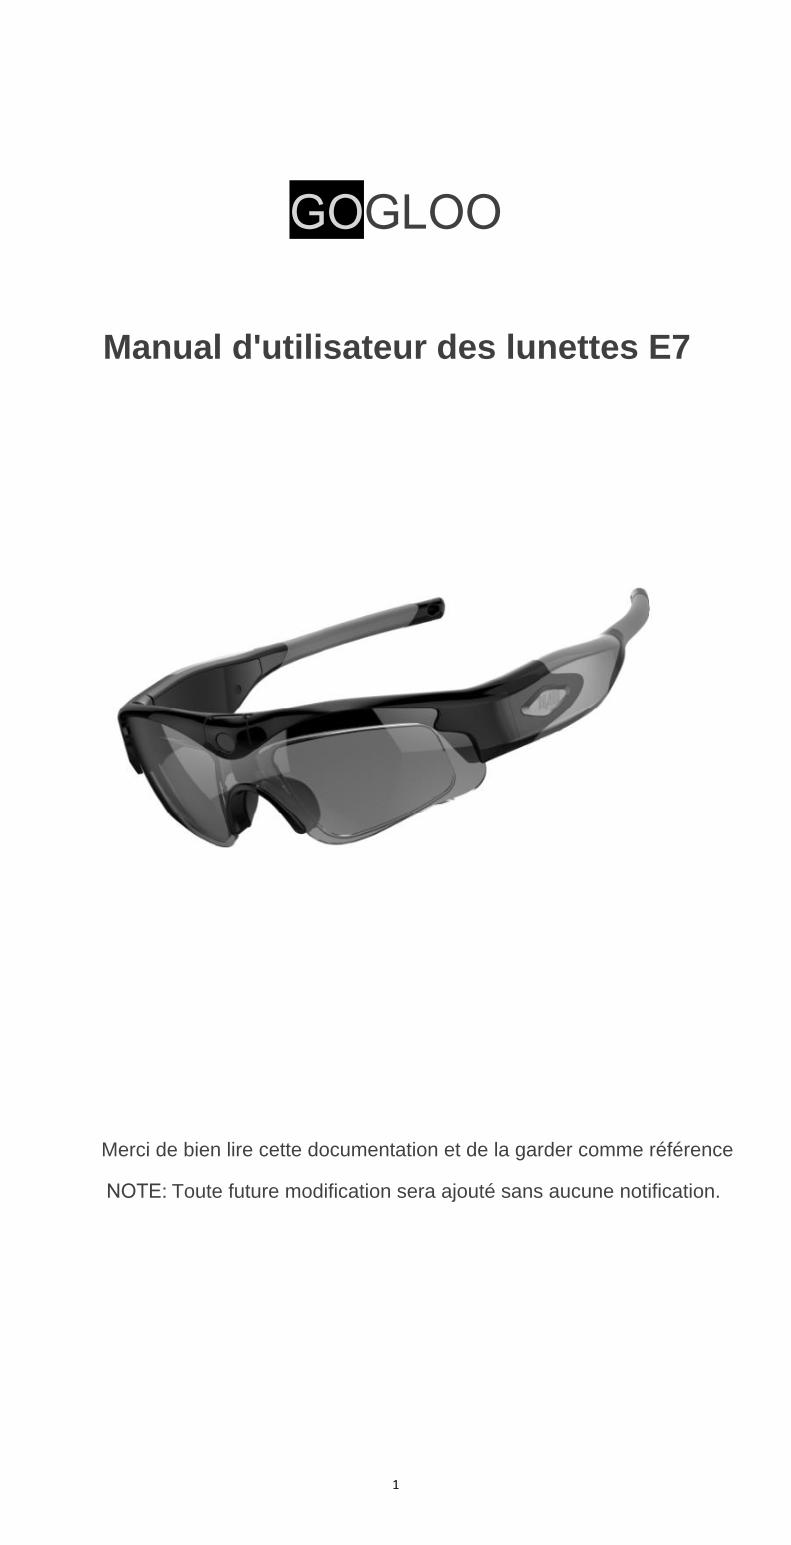
GOGLOO
Manual d'utilisateur des lunettes E7
Merci de bien lire cette documentation et de la garder comme référence
NOTE: Toute future modification sera ajouté sans aucune notification.
2
ATTENTION:Note: Cher Client, merci de noter que le coté gauche de la monture des lunettes devientTrès chaud, pendant une longue periode d'enregistrement.Ceci est normal.Un radiateur en cuivre a été ajouté pour une meilleur dicipation thermique.
User Guide ENContents
WARNING:………………………………............................................................................1
Product Features and Advantages………………….……………......................................3
What’s in the box…..………………………………………………….........................................5
Product Overview………………………………………………………........................................5
Basic Operation………………………………………………………………….….….........................6
Turning on to start video recording…………………………................….......................6
Switch to standby mode(pause mode)from recording.……………....…..……..……….6
Turning off to stop video recording…………………………......……………………...............6
How to start video recording during charging……………….......................................6
Taking photo, Toggling 1080P and 720P recordings…........................................6
Auto shut-off, Reset..............................................................................................6
Storage………………………………………………………………………………................................7
Connecting to PC/Laptop or Mac…….…………………….............................................7
System Requirement..…….……………………………….………………….......….....................7
How to play back with PC, Mac, iPad…......................................…........................7
Moving out the memory to playback, recommended way.....................................7
USB Storage mode…………………………….……..…………………..……….…........………........8
SETUP………………………………...........................……………..…......…………...................8
How to setup Manufacturer Default Settings.................................…...................8
Turn ON/OFF The Time/Date Display(Using Computer)...................…..................8
Setting Real Date/Time, the default is hiding format……...............….....................8
Changing Video Resolution Settings, Audio Volume Settings…….........................9
Low Battery Hinting Settings, Auto Power Off, Default Setting…….....................9
Settings Explained……………………………………………………………………........................10
Changing the lenses……………………………………………………......……….…...................11
How To Fix Prescription Lenses Frame Part(Option)……....………….....................11
Power Supply and Less than 10% Low Battery Hinting ………………....................11
WiFi Operation…………………………………………………….…......…………........................11
LED Indicator……………………………………………………………….........………....................13
Technical Specifications……………………………...………………………………....................13
Troubleshooting…..…………………………………………………………..……….......................14
Safety and Warning….…………………………………………………………......…....................14
Announcement…………………………………………………………………….……......................15
3
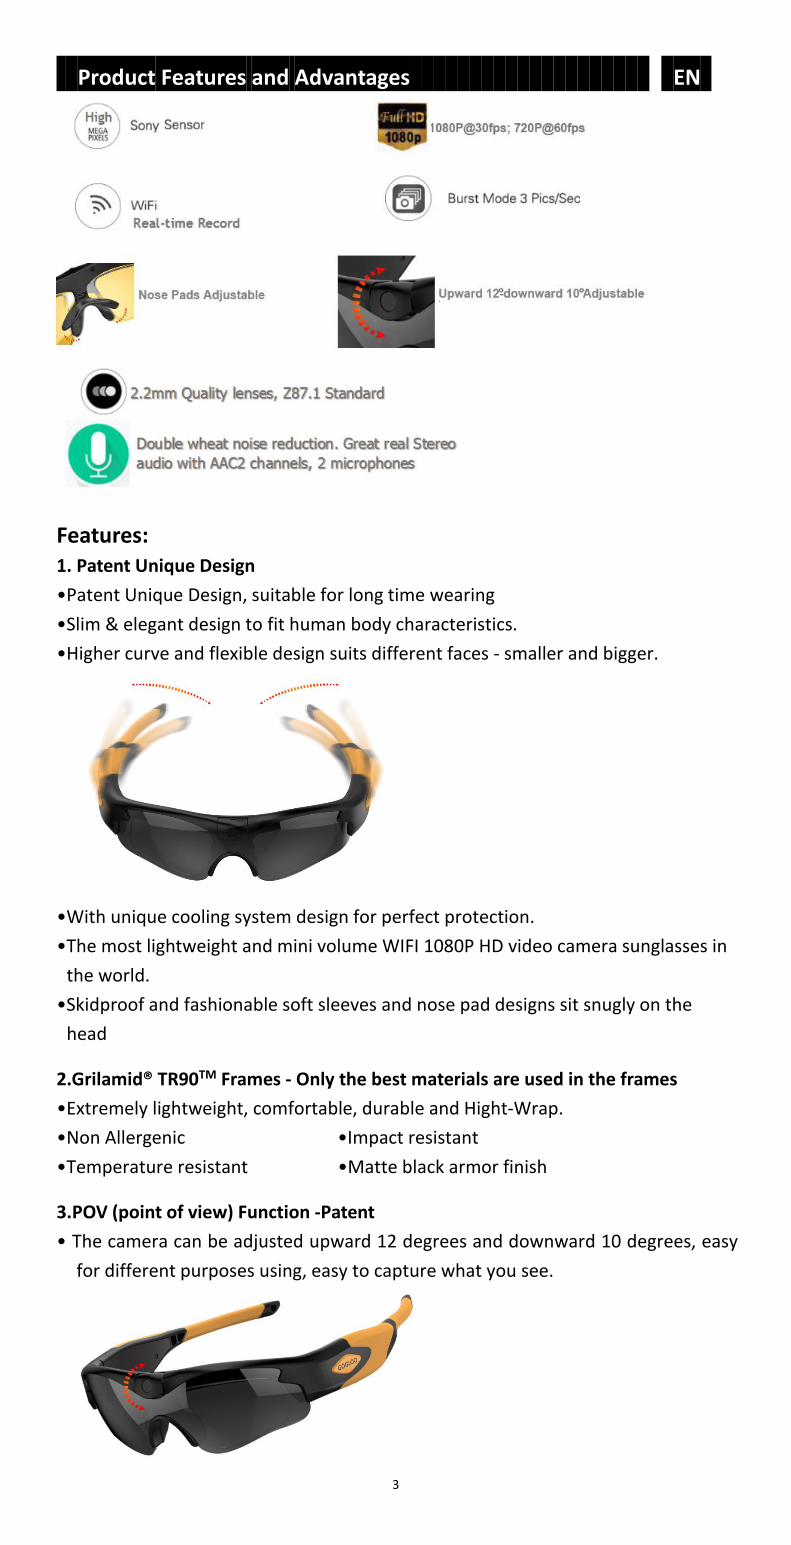
Product Features and Advantages EN
Features:1. Patent Unique Design•Patent Unique Design, suitable for long time wearing•Slim & elegant design to fit human body characteristics.•Higher curve and flexible design suits different faces - smaller and bigger.
•With unique cooling system design for perfect protection.•The most lightweight and mini volume WIFI 1080P HD video camera sunglasses inthe world.
•Skidproof and fashionable soft sleeves and nose pad designs sit snugly on thehead
2.Grilamid® TR90TM Frames - Only the best materials are used in the frames•Extremely lightweight, comfortable, durable and Hight-Wrap.•Non Allergenic •Impact resistant•Temperature resistant •Matte black armor finish
3.POV (point of view) Function -Patent• The camera can be adjusted upward 12 degrees and downward 10 degrees, easy
for different purposes using, easy to capture what you see.
4
4. Adjustable Nose Pads•The nose pads can be adjusted from smaller to larger to be suitable for differentsize noses. Smaller and bigger, suitable for long time wearing.
5. 2.2mm Quality Lens, ANSI Z87.1 standard:•UV400, interchangeable lenses•The quality lens of 2.2mm exceeds optical requirements of ANSI Z80.3,AS/NZS 1067, EN 1836 standards, ANSI Z87.1 standard
•Blocks out 100% of all UVA, UVB, UVC and harmful blue light up to 400nmprotection. Lightweight, shatter-proof and impact-resistant tough material. Fullycertified for eye protection.
•All our lenses meet AS/NZS 1067, EN 1836, ANSI Z80.3 standards for optical andmechanical performance. Light transmission ranges from 10%~95% of availablelight. All transmission profiles are based on data obtained according to AS/NZS -1067, EN 1836 and ANSI Z80.3 test protocols. Perfect for outdoor activities,maximal exercises.
6.Sweat Resistant Frame•Designed to withstand extreme weather conditions – moisture from perspirationor wet weather.
Key Electronic Function Features:1. Quick start recording / One button Standby Mode switching• Easily start recording and put in Standby Mode with a touch of a button. In
addition to a recording and standby indicator light, the glasses vibrate to alertwhen the glasses are turned on and turned off.
2. Full HD 1080P@30fps | 720P@60fps VIDEO Recorder-HANDS-FREE• With Sony high mega pixels quality CMOS camera for amazingly clear HD videos.
You can set your desired video resolutions and frames rates.• Real hardware decoding, H.264 video, easier to playback3. Can record during wall charging .4. Double wheat noise reduction. Great real Stereo audio with AAC2 channels,
2 microphones5. With vibrating alerts function to prompt you when “recording” “off” “out of
memory” “low battery” at any time.6. Easily external micro-SD card memory removable or interchangeable, support
2GB~128GB (128GB format: FAT32)7. 110ºAngle Lens
Capture all of your views with a 110ºangle lens without any distortion. Great foraction sports and outdoor activities.
8. Change Video SettingsIncludes the ability to change video settings like quality, audio, exposure,saturation, sharpness and more!
9. WiFi ON/OFF SwitchSwitch the WiFi On to see live view mode on the Camera App
10. Quality Low temperature battery up to -20 degrees perfect for coldenvironments, you will never worry about cold days.

5
What's in the box EN 1x 1080P HD video recording glasses 1x Carrying hard case 1x Carrying bag 1x Retaining lanyard 1x Cleaning cloth 1x Micro USB 2.0 HS cable 1x 16G memory card 1x USB 2.0 HS card reader 1x Warranty card 1x User Manual
Product Overview EN
A. Micro-SD Card PortB. On/Off/Record/Photo/StandbyC. Reset buttonD. USB PortE. WIFI Button and (1080P and 720P toggle button)F. Red LED (LED Charging Light)G. Yellow LED (LED WiFi Light)H. Blue LED (1080P Recording Light)I. Green LED (720P Recording Light)J/N. Microphone(left and right mic)K. Adjustable Nose PadsL. Interchangeable Soft SleevesM. Rotating CameraO. Prescription Lenses Frame Part (Option)
6
Basic OperationFR1. Turning on to start video recording
To turn on the video-glasses, simply press the ON/OFF button for 1 second.The green/blue LED is on and the device enters into the initialization status.After 2~3 seconds, the vibrating alerts ”Z-Z” 2 times and the blue LED(1080PLED light, factory default) flashes slowly, it begins to record automatically.Note: During recording, blue LED is 1080P LED light, green LED is 720P light.
2. Switch to standby mode(Pause mode) from recordingTo go into standby mode(Pause mode), shortly press the ON/OFF button foronce while recording. The vibrating alerts ”Z” 1 time and the LED keepsthere and stops flashing. To go back to recording mode, press ON/OFFbutton once again.
3. Turning off to stop video recordingTo turn off the video-glasses, press the ON/OFF button again for 2 seconds,the vibrating alerts “Z...” continuously for 3 seconds, the green and blueLED both flash fast for 3 seconds, the recorder automatically saves therecording file and then turns off.Note: To limit the file size, the recorder will automatically save the fileevery 30 minutes max and then start with a new file. It can be changed to 5minutes, 15 minutes and 30 minutes a file in SETTING.txt.
4. How to start video recording during chargingThis device can record during wall charging or power bank charging. Afterconnecting the power, the glasses enters into recording mode automatically.Note: If you don’t want the glasses to enter into recordings automatically,please take out the memory card before connecting the power.
5. Taking photoThere are 2 ways to take photos (Each time, it would take 3 photos):
1) During recording, short click the ON/OFF button 2 times quickly,the vibrating alerts “Z” 1 time and the green/blue LED both on, then itfinished taking photo, after taken photo, the vibrating alerts “Z-Z” 2times and goes back to recording mode.
2) During recording, short click the ON/OFF button for 1 time, then thevibrating alerts “Z” 1 time, the device goes into standby mode and therecording LED keeps on for a long. Short click the ON/OFF button 2times quickly, the vibrating alerts “Z” 1 time and the green/blue LEDboth on, then it finished taking photo. After taken photo, it would keepin standby mode, you can continue to take photo (clicking the ON/OFFbutton 2 times quickly), or click ON/OFF button 1 time to go back torecording mode (the vibrating alerts “Z-Z” 2 times).
6. Toggling 1080P and 720P recordingsFactory default is 1080P recording mode (Blue LED). To toggle, pressthe WiFi button for 2 seconds to change the recording mode.
7. Auto shut-offWhen battery is low or running out of memory, the device will save thecurrent file and the green/blue LED will blink very fast and the vibratingalerts “Z...”continuously for approx 3 seconds, then shuts off.
8. ResetThere is a reset button located next to the USB port of the glasses.
7
Use a tip of a pen (or other fine tip object) to press the button in fully. Itwill reset your device back to the manufacturer default. Also, if themalfunction occurred or it can’t be recognized by a computer, try resetting.Resetting will not delete recorded files.
Storage EN1. The device supports external high speed micro-SD card memory
2GB~128GB (128GB format: FAT32). It is removable and interchangeable.2. When space is insufficient, the green LED blinks very fast and the vibrating
alerts “Z...” continuously for approx 3 seconds, device will start data savingthen shut off.
Note: 128GB default format: EXFAT, please format the memory as FAT32format by your computer or camera etc equipments before using.
Connecting to PC/Laptop or Mac EN
1. System Requirements1.1 CPU 500MHz or higher1.2 Operating system: Windows XP, Win7, Win8, Win10, Vista 7/8, Mac OS1.3 USB2.0 HS port1.4 Minimum 1GB of free hard disk space1.5 Minimum 512MB RAM
2. How to playback with PC, Mac, iPad2.1 Moving out the memory to playback with PC, Mac, iPad.
a. The video-glasses are equipped with an external micro SD card slot forup to 128GB HS memory(128GB format: FAT32). The micro SD cardmemory is removable and interchangeable.
b. User can move the memory card into card reader/adapter to PC/Macand TV etc to playback or move into mobile phone/iPad etc device toplayback directly.
c. To remove the SD card (when the glasses are turned off!!), shortlypress the card. It would exit from the card slot.
d. The directory for saving video file is *Disk\ DCIM\.Note: In order to avoid damaging the glasses, please make sure to switch tothe “power off” mode before removing the SD card.
Attention:This is real hardware decoding item, full HD 1080P, the data transmissionis high. For more quality video,• Moving out the memory card from the video-glasses to playback ishighly recommend.
• Please copy the recording files from memory card to PC to playback.• It needs real high speed micro-SD card(TF card) U1 level or above.• High version player.• Please be sure there is enough virtual memory to support playing.

8
2.2 USB Storage modea. When device is under "OFF" status.b. Connect the device to PC or Mac through USB port with Micro USB2.0
HS cable provided in the kit, the red, green and blue LED are on.c. After 2~3 seconds(depends on the memory Capacity), vibrating
alert ”Z-Z” 2 times , the movable disk icon will pop up in thecomputer.
d. The directory for saving video file is *Disk\ DCIM\.e. You can then copy or cut and save to your local hard driverf. When finished, click the movable device management icon at the
lower right corner to remove the storage disk safely; Moving out USBcable, the vibrating alerts “Z...” continuously for 3 seconds, thenswitches off.
SETUP EN1. How to setup?
Connect the device to the computer via USB (with SD card inserted). Next,
locate and open the file “SETTING”.txt. Make your changes and then save the
file and disconnect the glasses. The settings will take effect on your next
recording.
2. Manufacturer Default SettingsVIDEO RESOLUTION = 0 RECORDING FILE LENGTH = 0PHOTO BURST NUMBER = 2 EV = 6SHARPNESS = 1 QUALITY = 0WHITE_BALANCE = 0LIGHT_FREQ = 1 DATE_STAMP = 0AUDIO_VOLUME = 0 LOW_BATTERY_HINTING = 1AUTO_POWER_OFF = 1 (In standby mode)TIME_SET = N2016.01.01.00:00:00 (Don’t change it)RESET TO DEFAULTS = 0
3. Turn ON/OFF The Time/Date Display (Using Computer)1.1. Under USB storage mode, open “SETTING”.txt from the root folder of
the glasses.1.2. Setting “DATE_STAMP”, Set to “0” to turn Off date stamp or set to “1”
to turn On date stamp.Note: This can also be done using the phone APP “Gogloo E7E9”.
4. Setting Real Date / Time, the default is hiding format.This device can display the current date and time in your videos.To set this function:
4.1 Under USB storage mode, click the folder "time.setting" under directoryand enter*Disk\ time.setting, if applicable; or "time.setting" in your

9
computer provided by factory4.2 Select the file namely " " , double-click left button of mouse.4.3 Back to the root directory , there is a file namely "time”.txt built up.4.4 Now open the “time” .txt file to set
Please note the blank space between date and time, note the blankspace between date/time and the Y/N option.Showing the date/time, add "Y"(yes) : yyyy.mm.dd hh:mm:ssor yyyy.mm.dd hh:mm:ss YHiding the date/time, add "N"(no) : yyyy.mm.dd hh:mm:ss NExample: 2016.08.10 16:53:05
or 2016.08.10 16:53:05 Y2016.08.10 16:53:05 N
4.5 Save it and then exit the storage disk safely.4.6 Time is set and ready for new recording.
Note: This can also be done using the phone APP “Gogloo E7E9”.5. Changing Video Resolution Settings
5.1. Under USB storage mode, open “SETTING”.txt from the root folder ofthe glasses.
5.2. Setting “VIDEO RESOLUTION”, Set to “0” to turn on 1080p@30fps or setto “1” to turn on 720p@60fps.
5.3. Saving the file and disconnect the glasses. The new setting takes effectnext time when you record a video.
Note: This also can be done using the phone APP “Gogloo E7E9”. Or clickWiFi button for 2 seconds to switch.
6. Audio Volume Settings6.1. Under USB storage mode, open “SETTING”.txt from the root folder of
the glasses.6.2. Setting “AUDIO_VOLUME”, Set “0” to max, set “1” to mid, set
“2” to min, set “3” to turn off audio.7. Low Battery Hinting SettingsThis device can help you avoid power off suddenly during exciting moment.It sets low battery hinting, different time frame for your different choices.
7.1. Under USB storage mode, open “SETTING”.txt from the root folder ofthe glasses.
7.2. Setting “LOW_BATTERY_HINTING”, set “0” to prior 1 min hinting, set“1” to prior 3 mins hinting, set “2” to prior 5 mins hinting. 3 mins asdefault.
8. Auto Power OffThis function can help us save power. During standby mode, it can power offautomatically.
8.1. Default Standby time: 1=3min.8.2. Setting “0” to set no standby time, set “2” to set 5 mins, set “3”
to set 10 mins.9. Default SettingUnder “DEFAULT_SETTING”, when set to 1, the camera will ignore othersettings, it will set to system default and write the default settings in this file
10
10. Settings Explained• VIDEO RESOLUTION ( Video Switch )= 0-1 def: 0# (0=1080p@30fps, 1= 720p@60fps)Note: This also can be done using the phone APP “Gogloo Camera”and WIFI button Switch.
• RECORDING FILE LENGTH = 0 def: 0# (0=5mins, 1=15mins, 2=30mins) recording interval timeDifferent Video file size for option, 5mins per file as default
• PHOTO BURST NUMBER = 0-2 def: 1# (0=1 numbers Single Shot, 1=3 numbers, 2=5 numbers)Snapshot quantity
• EV( Exposure) = 0-12 def: 6# (0=2.0, 1=1.6, 2=1.3, 3=1.0, 4=0.6, 5=0.3, 6=0.0, 7=-0.3, 8=-0.6, 9=-1.0,10=-1.3, 11=-1.6, 12=-2.0 )
Adjust exposure down in bright/sunny conditions.Adjust exposure up in dark/cloudy conditions.
• SHARPNESS = 1-2 def: 1# (0=SHARP, 1=NORMAL, 2=SOFT)Increase or decrease the sharpness.
• QUALITY = 0-2 def: 0# (0=fine, 1=good, 2=normal)Change the video quality
• WHITE_BALANCE = 0-4 def: 0# (0=WB_AUTO, 1=WB_DAYLIGHT, 2=WB_CLOUDY, 3=WB_TUNGSTEN,4=WB_FLUORESCENT)
• LIGHT_FREQ = 0-1 def: 1# (0=50HZ, 1=60HZ)
• DATE_STAMP = 0-1 def: 0# (0=off, 1=on)
• AUDIO_VOLUME = 0-2 def: 0# (0:Max, 1:Mid, 2:Min, 3:Off)
• LOW_BATTERY_HINTING = 0-2 def: 1# (0=1min, 1=3min, 2=5min)When low-battery, the LED light will be hint. Default: 3mins prior to hint
• AUTO_POWER_OFF = 0-3 def: 1# (0=Off, 1=3min,2=5min,3=10min)This function helps to save battery in Standby model.When in standby mode, it will be auto power off according to our settings
• TIME_SET = N2016.01.01.00:00:00 # (Y=change N=No changePlease don’t change it
• RESET TO DEFAULTS = 0-1 def: 0# (0=false, 1=true)Note: when set to 1, the camera will ignore other settings,set to system default and write the default settings in this file
11
Changing the lenses ENNote: Remove the protective film on the lenses before wearing the sunglasses.To remove the lenses, start on the nose side and pull the lens out (see below)
To insert the lens, start on the arm-side and plug it into the guides. (See below)
How to fix prescription Lenses frame part & Lenses (Option) EN
https://www.youtube.com/watch?v=BujzDYahsKg
Power Supply and Low Battery Hinting ENNote: This device can record during wall charging or power bank charging.After connecting the power ready, the blue/green/red LED lights on. Press“ON/OFF” button for 1 second, the glasses enters into recording automatically.1. For optimum use of the power supply and battery health, DO NOT chargeover 12 hours!2. To maximize the storage capacity of the battery, continue to charge for 30minutes to 1 hour after the red LED light goes off after every charge.3. You can charge the battery by using the Micro USB2.0 HS cable provided orpower adapter. Usually a full charge will take about 1.5 hours.4. The red LED will turn on when starting charging and it will turn off when thebattery is fully charged.5. If the camera has not been used for a long time, recharge it before using.6. For a fast recharge and best product protection charge, keep the battery inthe ‘power-off’ mode and take out the memory card.7. Low battery hinting: When the battery low, both the green LED and blueLED flashing speed status begins changed from flashing slowly into flashingfast during recording.
WiFi Operation EN1. WI-FI PAIRINGThis section explains how to turn on the WiFi signal of the glasses so you canconnect your iOS/Android device to it and use the glasses APP.
1.1. While the glasses is power on, press the WiFi button(next to the powerbutton) for 1 second. The glasses vibrating alerts “Z” 1 time and yellow LEDflashes, that indicates WiFi is turned on. To turn off WiFi, press the WiFibutton once again)
1.2. Turn to your iOS/Android device WiFi settings and connect to the WiFiNetwork “Gogloo_E7E9” (the default WiFi password is 12345678). Wait untilyour iOS/Android device is connected (Now the yellow LED keeps steady)
2. Camera APP overviewApp Features & SettingsBefore use this function, you have to download APP from APP store bysearching keywords “Gogloo_E7E9”. After installation, you can use APP tocontrol your glasses for recording, taking photos etc.

6
Utilisation de base FR1. Mise en marche de l'enregistrement vidéo
Pour commencer l'enregistrement, appuyer sur le bouton ON/OFF pendant 1 sec.La LED Vert/Bleuest ON; La lunette entre en mode initialisation.Après 2~3 secondes,une vibrating se déclenche ”Z-Z” 2 fois et la LED Bleu(1080P)flashe doucement, L'enregistrement vidéo commence.Note:Pendant l'enregistrement, LED Bleu pour 1080P, LED Verte pour 720P.
2. Mise en Pause pendant l'enregistrement recordingpour mettre l'enregistrement en pause, presser le button ON/OFF une seule foispendant l'enregiustrement; une vibrating se déclenche ”Z” 1 fois et la LED arretede clignoter. Afin de reprendre l'enregitrement, presser le button ON/OFF 1 fois.l 'enregistrement reprend, et la LED recommence à clignoter.
3. Arreter l'enregistrementPour arreter l'enregistrement presser le boutton ON/OFFpendant 2 secondes,une vibration continue “Z...” se déclenche pendant secondes,la LED verte et bleuclignotent rapidement pendant 3 secondes,la sequence vidéo est enregistréesur le disque.Note: afin de limiter la taille des fichiers, L'enregistreur sauvegarde le fichiertoute les 30 minutes et recommence un nouveau fichier. Ceci peut être changépour 5 minutes, 15 minuteset 30 minutes dans le fichier SETTING.txt.
4.Comment enregistrer pendant le chargement de la batterieThis device can record during wall charging or power bank charging. Afterconnecting the power, the glasses enters into recording mode automatically.Note: If you don’t want the glasses to enter into recordings automatically,please take out the memory card before connecting the power.
5. Taking photoThere are 2 ways to take photos (Each time, it would take 3 photos):
1) During recording, short click the ON/OFF button 2 times quickly,the vibrating alerts “Z” 1 time and the green/blue LED both on, then itfinished taking photo, after taken photo, the vibrating alerts “Z-Z” 2times and goes back to recording mode.
2) During recording, short click the ON/OFF button for 1 time, then thevibrating alerts “Z” 1 time, the device goes into standby mode and therecording LED keeps on for a long. Short click the ON/OFF button 2times quickly, the vibrating alerts “Z” 1 time and the green/blue LEDboth on, then it finished taking photo. After taken photo, it would keepin standby mode, you can continue to take photo (clicking the ON/OFFbutton 2 times quickly), or click ON/OFF button 1 time to go back torecording mode (the vibrating alerts “Z-Z” 2 times).
6. Toggling 1080P and 720P recordingsFactory default is 1080P recording mode (Blue LED). To toggle, pressthe WiFi button for 2 seconds to change the recording mode.
7. Auto shut-offWhen battery is low or running out of memory, the device will save thecurrent file and the green/blue LED will blink very fast and the vibratingalerts “Z...”continuously for approx 3 seconds, then shuts off.
8. ResetThere is a reset button located next to the USB port of the glasses.
13
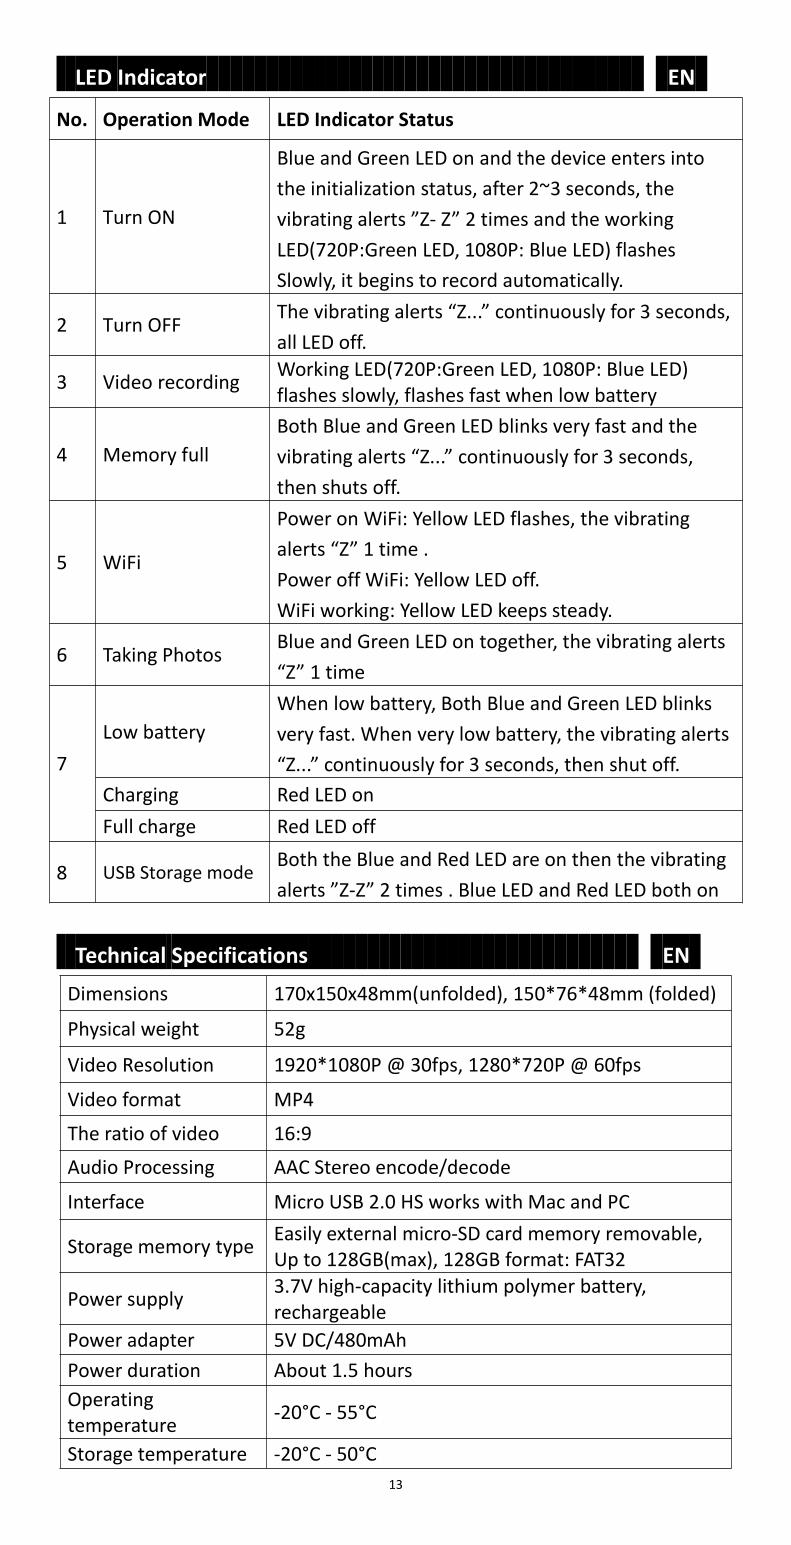
LED Indicator EN
No. Operation Mode LED Indicator Status
1 Turn ON
Blue and Green LED on and the device enters intothe initialization status, after 2~3 seconds, thevibrating alerts ”Z- Z” 2 times and the workingLED(720P:Green LED, 1080P: Blue LED) flashesSlowly, it begins to record automatically.
2 Turn OFFThe vibrating alerts “Z...” continuously for 3 seconds,all LED off.
3 Video recording Working LED(720P:Green LED, 1080P: Blue LED)flashes slowly, flashes fast when low battery
4 Memory fullBoth Blue and Green LED blinks very fast and thevibrating alerts “Z...” continuously for 3 seconds,then shuts off.
5 WiFi
Power on WiFi: Yellow LED flashes, the vibratingalerts “Z” 1 time .Power off WiFi: Yellow LED off.WiFi working: Yellow LED keeps steady.
6 Taking PhotosBlue and Green LED on together, the vibrating alerts“Z” 1 time
7Low battery
When low battery, Both Blue and Green LED blinksvery fast. When very low battery, the vibrating alerts“Z...” continuously for 3 seconds, then shut off.
Charging Red LED onFull charge Red LED off
8 USB Storage modeBoth the Blue and Red LED are on then the vibratingalerts ”Z-Z” 2 times . Blue LED and Red LED both on
Technical Specifications ENDimensions 170x150x48mm(unfolded), 150*76*48mm (folded)
Physical weight 52g
Video Resolution 1920*1080P @ 30fps, 1280*720P @ 60fps
Video format MP4
The ratio of video 16:9
Audio Processing AAC Stereo encode/decode
Interface Micro USB 2.0 HS works with Mac and PC
Storage memory type Easily external micro-SD card memory removable,Up to 128GB(max), 128GB format: FAT32
Power supply 3.7V high-capacity lithium polymer battery,rechargeable
Power adapter 5V DC/480mAhPower duration About 1.5 hoursOperatingtemperature -20°C - 55°C
Storage temperature -20°C - 50°C
14
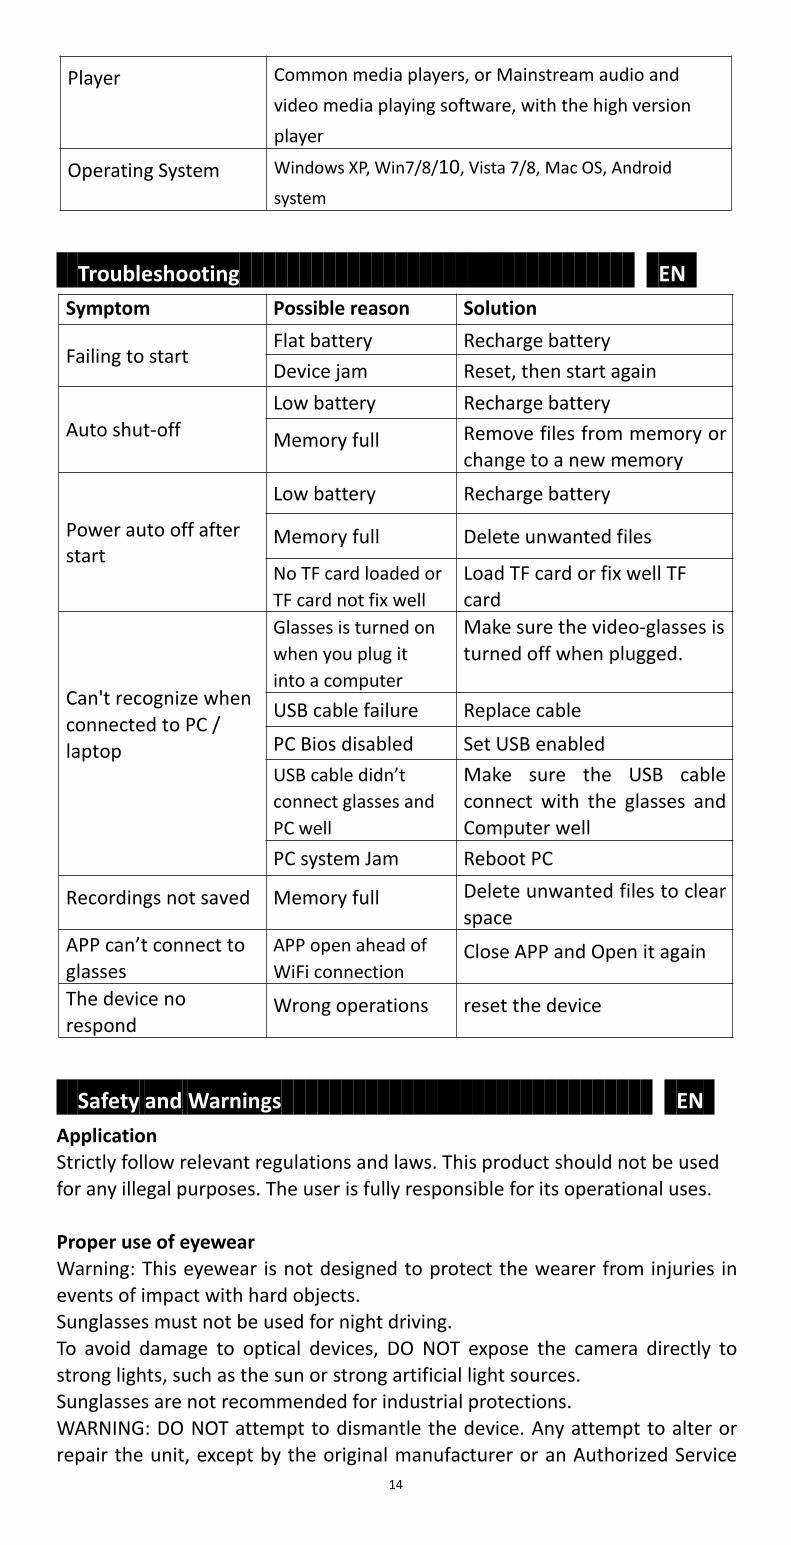
Player Common media players, or Mainstream audio andvideo media playing software, with the high versionplayer
Operating System Windows XP, Win7/8/10, Vista 7/8, Mac OS, Android
system
Troubleshooting ENSymptom Possible reason Solution
Failing to startFlat battery Recharge batteryDevice jam Reset, then start again
Auto shut-offLow battery Recharge battery
Memory full Remove files from memory orchange to a new memory
Power auto off afterstart
Low battery Recharge battery
Memory full Delete unwanted files
No TF card loaded orTF card not fix well
Load TF card or fix well TFcard
Can't recognize whenconnected to PC /laptop
Glasses is turned onwhen you plug itinto a computer
Make sure the video-glasses isturned off when plugged.
USB cable failure Replace cable
PC Bios disabled Set USB enabledUSB cable didn’tconnect glasses andPC well
Make sure the USB cableconnect with the glasses andComputer well
PC system Jam Reboot PC
Recordings not saved Memory full Delete unwanted files to clearspace
APP can’t connect toglasses
APP open ahead ofWiFi connection
Close APP and Open it again
The device norespond
Wrong operations reset the device
Safety and Warnings ENApplicationStrictly follow relevant regulations and laws. This product should not be usedfor any illegal purposes. The user is fully responsible for its operational uses.
Proper use of eyewearWarning: This eyewear is not designed to protect the wearer from injuries inevents of impact with hard objects.Sunglasses must not be used for night driving.To avoid damage to optical devices, DO NOT expose the camera directly tostrong lights, such as the sun or strong artificial light sources.Sunglasses are not recommended for industrial protections.WARNING: DO NOT attempt to dismantle the device. Any attempt to alter orrepair the unit, except by the original manufacturer or an Authorized Service
15
Facility, will void the limited warranty.RecyclingPlease contact your local corporate offices for recycling/disposal informationfor this product. Do not dispose with household waste.
BatteryDO NOT attempt to remove the battery. (Note: Battery disposal must be inaccordance with local environmental regulations. See "RECYCLING" above.)If the recording function has not been used for lengthy period, charge it fullybefore using.
File securityThis product is not a professional storage device. It does not guarantee theintegrity and security of saved files. Please back up your important documentson the computer or other storage devices.
Operating temperature: 0—55°C. To extend the unit’s lifespan it is best usedat room temperature.
DO NOT expose to excess moisture.WARNING: Although the device features a water resistant design, operationcan be affected in excessively humid environments – it is NOT completelywaterproof.
CleaningAvoid using it in excessively dusty environments. Use a normal lens cleaningcloth to clean the lens.
Other mattersThe product is a sophisticated electronic product – protect against impact andstrong vibration. Do not use it close to magnetic or high electric currents.Note: Please contact your local dealers for other matters.
ANNOUNCEMENT EN
We reserve the rights to upgrade or ameliorate the product without any priornotices, the content of which can be obtained from our website notice orsalesperson. Normally a generous transitional period is offered but we cannotguarantee to inform everybody timely.
The product design, configuration and or specifications mentioned areprotected by pertinent copyright and patent laws. Any unauthorized copy orreproduction is strictly prohibited and trespassers will be prosecuted. Wereserve the rights to claim for any direct or indirect losses incurred.