tutoriel alcasar – alcasar tutorial création d’un ... · sécurité des systèmes...
TRANSCRIPT

Sécurité des Systèmes d’Information et de Communication
Tutoriel ALCASAR – ALCASAR Tutorial
Création d’un environnement de test virtuel- Virtual testing environment creation
Virtualbox - Proxmox
Table des matières - Table of contents 1. - FR : Schéma de principe.............................................................................................................................2 2. - FR : VirtualBox...........................................................................................................................................2
2.1. FR : Création de la machine virtuelle ALCASAR..................................................................................2 2.2. FR : Création d’une machine virtuelle de consultation..........................................................................3
3. - FR : Promox................................................................................................................................................5 3.1. FR : Création d’un bridge Proxmox.......................................................................................................5 3.2. FR : Création de la machine virtuelle ALCASAR..................................................................................6
4. - EN : Principle diagram................................................................................................................................8 5. - EN : Virtualbox (English)...........................................................................................................................8
5.1. EN : ALCASAR virtual machine installation.........................................................................................8 5.2. EN : Consultation virtual machine installation.......................................................................................9
6. - EN : Promox (English)..............................................................................................................................10 6.1. EN : Creation of a Proxmox bridge......................................................................................................10 6.2. EN : ALCASAR virtual machine installation.......................................................................................11
Projet : ALCASAR Auteur : Bettyna Bourcier, Raphaël PION, Clément Siccardi, Hugo Meziani, Rexy, Jonathan Dechaux. Olivier Fatou
Objet : Installation Version : 3
Mots clés : portail captif, contrôle d’accès au réseau (Network Acces Control - NAC), imputabilité, traçabilité, authentification, contrôle parental, filtrage
Date : mars 2018
Environnement de test virtuel pour ALCASAR 1

Français
1.FR : Schéma de principe
2.FR : VirtualBox
2.1. FR : Création de la machine virtuelle ALCASAR• Téléchargez l’image ISO de la distribution Mageia exploitée par la version d'ALCASAR que vous voulez
installer.• Lancez Virtualbox et créez une première machine virtuelle (VM) pour ALCASAR
◦ Nommer cette VM◦ Sélectionner le type de système d’exploitation : « Linux » et sa Version : « Mageia (64-bits) » ou
« Other Linux (64b) »◦ Sélectionner la RAM : Minimum : 1Go ; Conseillé :2Go◦ Sélectionner « Créer un disque virtuel maintenant »◦ Sélectionner « VDI (Image Disk VirtualBox) » puis « Dynamiquement Alloué »◦ Sélectionner la taille du disque dur virtuel : Minimum : 25Go◦ Pour cette VM, cliquez sur « Configuration »◦ Dans la rubrique « Stockage », associez le lecteur optique à l’image ISO précédemment téléchargée◦ Dans la rubrique « Réseau », configurez la première carte réseau en mode « NAT » et ajoutez une
seconde carte en mode « Réseau interne ». Vous pouvez renommer ce « réseau interne » (par défaut « intnet »)
Environnement de test virtuel pour ALCASAR 2
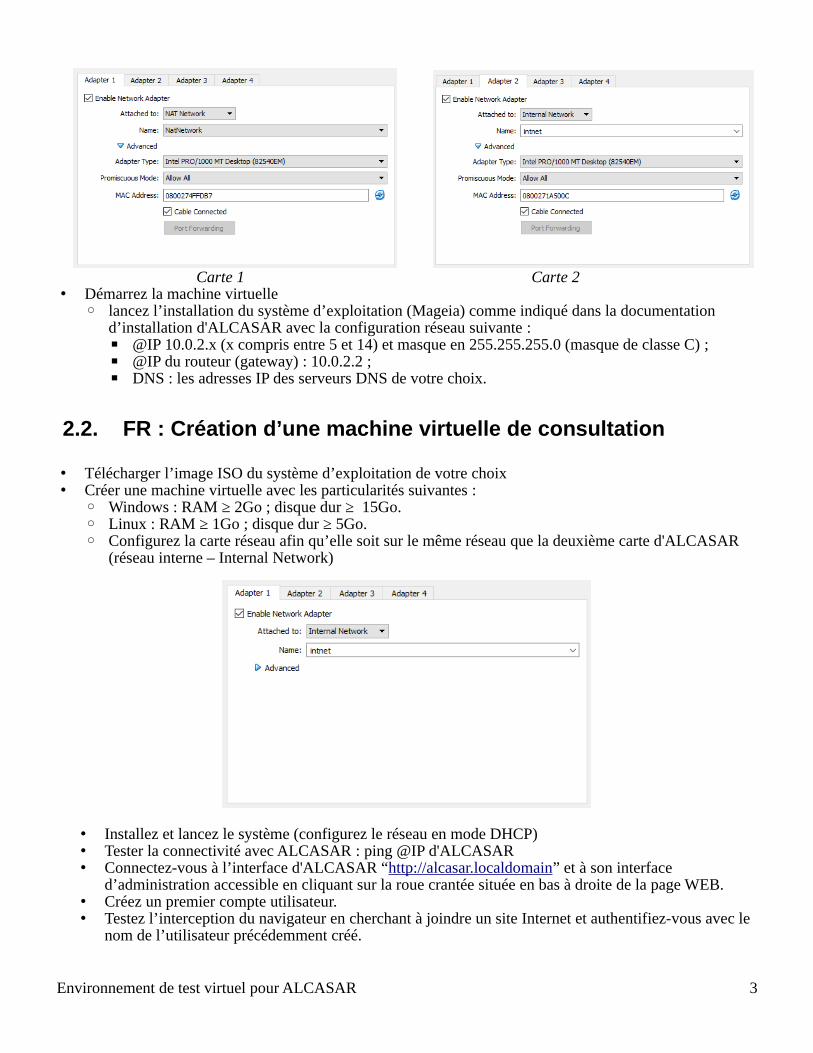
Carte 1 Carte 2• Démarrez la machine virtuelle
◦ lancez l’installation du système d’exploitation (Mageia) comme indiqué dans la documentation d’installation d'ALCASAR avec la configuration réseau suivante :▪ @IP 10.0.2.x (x compris entre 5 et 14) et masque en 255.255.255.0 (masque de classe C) ;▪ @IP du routeur (gateway) : 10.0.2.2 ;▪ DNS : les adresses IP des serveurs DNS de votre choix.
2.2. FR : Création d’une machine virtuelle de consultation
• Télécharger l’image ISO du système d’exploitation de votre choix• Créer une machine virtuelle avec les particularités suivantes :
◦ Windows : RAM ≥ 2Go ; disque dur ≥ 15Go.◦ Linux : RAM ≥ 1Go ; disque dur ≥ 5Go.◦ Configurez la carte réseau afin qu’elle soit sur le même réseau que la deuxième carte d'ALCASAR
(réseau interne – Internal Network)
• Installez et lancez le système (configurez le réseau en mode DHCP)• Tester la connectivité avec ALCASAR : ping @IP d'ALCASAR• Connectez-vous à l’interface d'ALCASAR “http://alcasar.localdomain” et à son interface
d’administration accessible en cliquant sur la roue crantée située en bas à droite de la page WEB.• Créez un premier compte utilisateur.• Testez l’interception du navigateur en cherchant à joindre un site Internet et authentifiez-vous avec le
nom de l’utilisateur précédemment créé.
Environnement de test virtuel pour ALCASAR 3

Votre environnement virtuel est prêt, vous pouvez ajouter d’autres utilisateurs, testez les différents attributs etles possibilités de filtrage. Vous pouvez bien sûr ajouter d’autres types de machines virtuelles de consultation (Linux ou Windows).
Environnement de test virtuel pour ALCASAR 4

3.FR : Promox
3.1. FR : Création d’un bridge ProxmoxContrairement à VirtualBox, Proxmox ne propose que deux modes pour une carte réseau, Bridge ou NAT. Afin de faire communiquer deux VMs Proxmox, il est donc nécessaire de créer un bridge, sans aucune information, afin qu’il fasse la liaison entre les deux cartes réseau de votre réseau de consultation.
• Rendez-vous sur votre host proxmox dans le menu de gauche et cliquez sur l’onglet Network.
• Cliquez sur Créer puis sur Linux Bridge.
• Renseigner un nom différent si vous le souhaitez (ex. alcasar_bridge) sinon cliquez sur créer.
• Redémarrer votre proxmox pour activer ce nouveau bridge.1
1 https://forum.proxmox.com/threads/how-to-connect-two-vm-via-an-internal-network.19093/
Environnement de test virtuel pour ALCASAR 5

3.2. FR : Création de la machine virtuelle ALCASAR• Téléchargez l’image ISO de la distribution Mageia exploitée par la version d'ALCASAR que vous
voulez installer.• Connectez-vous sur votre Proxmox (interface web) et créez une première machine virtuelle (VM)
pour ALCASAR◦ Système d’exploitation : Linux 4.X/3.X/2.6 Kernel◦ RAM : Minimum : 1Go ; Conseillé :2Go◦ Taille du disque dur virtuel : Minimum : 30Go◦ Il est important de définir au moins 5Go d’espace pour le /home sinon l’installation échoue
• Une fois votre VM créée et avant de la démarrer:◦ Sélectionnez votre VM dans le menu de gauche◦ Cliquez sur ajouter puis sur carte réseau◦ Ajoutez une carte réseau de type bridge en sélectionnant le bridge que vous avez créé
précédemment.
• Démarrez la machine virtuelle◦ Lancez l’installation du système d’exploitation (Mageia) comme indiqué dans la documentation
d’installation d'ALCASAR avec la configuration réseau suivante :▪ @IP 10.0.2.x (x compris entre 5 et 14) et masque en 255.255.255.0 (masque de classe C) ;▪ @IP du routeur (gateway) : 10.0.2.2 ;▪ DNS : les adresses IP des serveurs DNS de votre choix.
◦ Afin d’installer ALCASAR, vous pouvez télécharger l’archive directement sur le site www.alcasar.net. Si vous choisissez d’utiliser un périphérique USB, voici la procédure.▪ Éteindre la VM concernée▪ Branchez votre périphérique USB sur votre proxmox▪ Connectez-vous sur votre proxmox directement ou par un client ssh (Putty ou autre)▪ Lancez un terminal sur votre proxmox▪ Exécutez la commande lsusb -t ou fdisk -l afin de récupérer le Bus et le Port de votre
périphérique.2
2 https://pve.proxmox.com/wiki/USB_physical_port_mapping
Environnement de test virtuel pour ALCASAR 6

Exemple 1: Bus 3, Port 1 => 3-1
Exemple 2: Bus 1, Port 1, Port 3 => 1-1.3
▪ Dirigez-vous dans le dossier /etc/pve/qemu-server▪ Éditez le fichier de configuration associé à votre VM▪ Ajoutez la ligne suivante :
• usb0 : host=3-1▪ Dans le cas où vous voulez deux périphériques, ajoutez une nouvelle ligne
• usb1 : host=1-1.3▪ Redémarrez votre VM▪ Vérifiez la présence de votre périphérique USB sur votre VM avec la commande fdisk -l▪ Suivez le guide d’installation d'ALCASAR à partir d’un périphérique USB.
Environnement de test virtuel pour ALCASAR 7

English
4.EN : Principle diagram
5.EN : Virtualbox (English)
5.1. EN : ALCASAR virtual machine installation• Download the Mageia ISO image used by the ALCASAR version you want to deploy.• Run Virtualbox and create the first virtual machine (VM) for ALCASAR
◦ Name this VM◦ Select the operating system type : Linux and its version : « Mageia (64-bits) » or « Other Linux
(64b) »◦ Select the quantity of RAM : Minimum : 1Go ; Recommended : 2Go◦ Select : « Create a virtual hard drive now »◦ Select : « VDI (Image Disk VirtualBox) » then select dynamic allocation.◦ Select the size of the virtual hard drive : Minimum : 25 Go◦ Right-click on the created VM and choose «Settings...»◦ In the « Storage » panel, associate optical drive with the Mageia ISO image just downloaded◦ In the « Network » panel, configure the first network card in « NAT » mode and add a second
network card in « Internal Network » mode. You can name this internal network (« intnet » by default)
Carte 1 Carte 2
Environnement de test virtuel pour ALCASAR 8
• Start the virtual machine◦ Install the operating system (Mageia) as in the ALCASAR installation documentation with the
following network configuration :▪ @IP 10.0.2.x (x between 5 & 14) & network mask 255.255.255.0 (C class) ;▪ @IP Gateway : 10.0.2.2 ;▪ DNS : IP address of your chosen DNS server.
5.2. EN : Consultation virtual machine installation
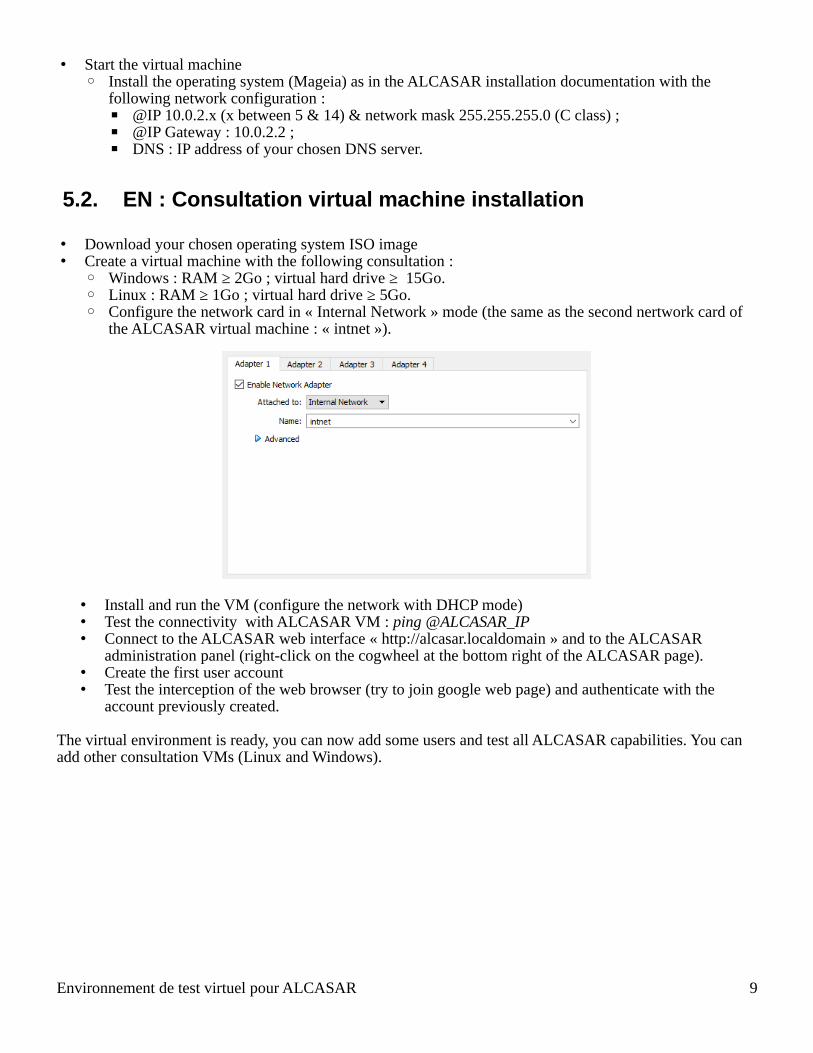
• Download your chosen operating system ISO image• Create a virtual machine with the following consultation :
◦ Windows : RAM ≥ 2Go ; virtual hard drive ≥ 15Go.◦ Linux : RAM ≥ 1Go ; virtual hard drive ≥ 5Go.◦ Configure the network card in « Internal Network » mode (the same as the second nertwork card of
the ALCASAR virtual machine : « intnet »).
• Install and run the VM (configure the network with DHCP mode)• Test the connectivity with ALCASAR VM : ping @ALCASAR_IP• Connect to the ALCASAR web interface « http://alcasar.localdomain » and to the ALCASAR
administration panel (right-click on the cogwheel at the bottom right of the ALCASAR page).• Create the first user account• Test the interception of the web browser (try to join google web page) and authenticate with the
account previously created.
The virtual environment is ready, you can now add some users and test all ALCASAR capabilities. You can add other consultation VMs (Linux and Windows).
Environnement de test virtuel pour ALCASAR 9

6.EN : Promox (English)
6.1. EN : Creation of a Proxmox bridgeUnlike Virtualbox, Proxmox proposes only two network connection modes : Brigded network or NAT. In order to make two Proxmox VMs communicate, it is mandatory to create a bridged interface, without any information. Proxmox will link the two network cards into your consultation network.
• Connect to your Promox host and click on the Network panel on the left sidebar.
• Click on « Create » and on « Linux Bridge ».
• You can give a different name to the bridge (as alcasar_bridge) and click on « Create ».
• Restart the Proxmox machine to activate the new bridge.3
3 https://forum.proxmox.com/threads/how-to-connect-two-vm-via-an-internal-network.19093/
Environnement de test virtuel pour ALCASAR 10

6.2. EN : ALCASAR virtual machine installation• Download the Mageia ISO image used by the ALCASAR version you want to deploy.• Connect to the Proxmox web interface and create the first virtual machine (VM) for ALCASAR
◦ Operating system : Linux 4.X/3.X/2.6 Kernel◦ RAM : Minimum : 1Go ; Recommended : 2Go◦ Virtual hard drive size : Minimum : 30Go◦ You must give at least 5Go for the /home partition, otherwise the installation fails.
• Before run the VM :◦ Select the VM in the left sidebar◦ Click on « add » and on « network card »◦ Add a network interface (type : bridge) and select the bridge that you create.
• Run the virtual machine◦ Install the operating system (Mageia) as in the ALCASAR installation documentation with the
following network configuration :▪ @IP 10.0.2.x (x between 5 & 14) & network mask 255.255.255.0 (C class) ;▪ @IP Gateway : 10.0.2.2 ;▪ DNS : IP address of your choosen DNS server.
◦ To install ALCASAR, you can download the archive directly on the website www.alcasar.net. If you want to use a USB device, follow the next steps :▪ Shutdown the ALCASAR VM▪ Plug the USB device on the Proxmox computer▪ Connect to your proxmox directly or with ssh client (putty for example)▪ Launch a terminal▪ Execute lsusb -t or fdisk -l to know the Bus and the Port of your USB device4.
4 https://pve.proxmox.com/wiki/USB_physical_port_mapping
Environnement de test virtuel pour ALCASAR 11

Example 1: Bus 3, Port 1 => 3-1
Example 2: Bus 1, Port 1, Port 3 => 1-1.3
▪ Go into the directory /etc/pve/qemu-server▪ Edit the configuration file of your VM▪ Add the following line :
• usb0 : host=3-1▪ if you want to add a second device, add a new line
• usb1 : host=1-1.3▪ Redémarrez votre VM▪ Restart your VM▪ Check the presence of your USB device on your VM with the command fdisk -l▪ Follow the AlCASAR installation from USB device documentation.
Environnement de test virtuel pour ALCASAR 12