tom quayle signature dual fusion...
TRANSCRIPT
Tom Quayle signature Dual Fusion Overdrives.
TM
TM
Tom Quayle
When we heard that one of the forerunners of modern Fusion, Tom Quayle, was using our pedals, it made us think – who out there caters for modern Fusion? Sure, you can �nd blues pedals, country pedals, rock and metal pedals just about any where… But no one has looked at the fastest growing genre of guitar players… Modern Fusion.
So, we talked to Tom and listened to what he had to say about his current choice of gain pedals (The Wampler Pedals Euphoria and the Paisley Drive), from there we discussed how we could make them better, dare I say… Perfect?
After much backwards and forwards of ideas and theories about tone, switching and stacking, we found that we could in fact make a pedal that suited Tom, was perfect for modern Fusion and also for just about everyone else who loves great tone, clarity and versatility.
Modern fusion is a light year away from tradition jazz or fusion. Taking the theoretical approach and knowledge and then adding a healthy amount of rock and shred, modern fusion players need a more “gainy” tone – gain that has to give them the power they need but it also has to leave room for the clarity of expression... especially when working at extremely high intensity.
So, we took the core sounds Tom loves from the Euphoria and the Paisley, modi�ed them so they work together perfectly, gave them a couple of extra special Brian tweeks – especially when stacked – then put them together to make the Dual Fusion, a milestone in tone for modern Fusion, and just about every other style that needs amazing, transparent overdrive.
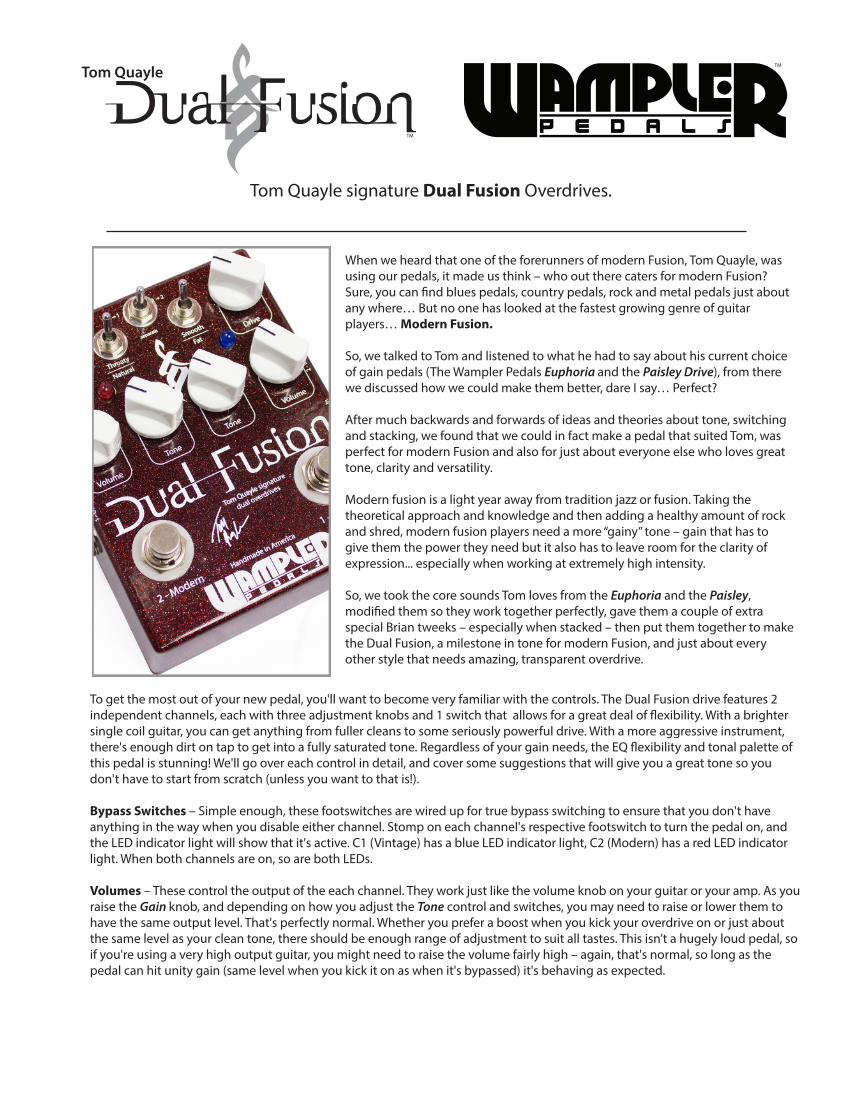
To get the most out of your new pedal, you'll want to become very familiar with the controls. The Dual Fusion drive features 2 independent channels, each with three adjustment knobs and 1 switch that allows for a great deal of �exibility. With a brighter single coil guitar, you can get anything from fuller cleans to some seriously powerful drive. With a more aggressive instrument, there's enough dirt on tap to get into a fully saturated tone. Regardless of your gain needs, the EQ �exibility and tonal palette of this pedal is stunning! We'll go over each control in detail, and cover some suggestions that will give you a great tone so you don't have to start from scratch (unless you want to that is!).
Bypass Switches – Simple enough, these footswitches are wired up for true bypass switching to ensure that you don't have anything in the way when you disable either channel. Stomp on each channel's respective footswitch to turn the pedal on, and the LED indicator light will show that it's active. C1 (Vintage) has a blue LED indicator light, C2 (Modern) has a red LED indicator light. When both channels are on, so are both LEDs.
Volumes – These control the output of the each channel. They work just like the volume knob on your guitar or your amp. As you raise the Gain knob, and depending on how you adjust the Tone control and switches, you may need to raise or lower them to have the same output level. That's perfectly normal. Whether you prefer a boost when you kick your overdrive on or just about the same level as your clean tone, there should be enough range of adjustment to suit all tastes. This isn’t a hugely loud pedal, so if you're using a very high output guitar, you might need to raise the volume fairly high – again, that's normal, so long as the pedal can hit unity gain (same level when you kick it on as when it's bypassed) it's behaving as expected.
Gain – These controls how much dirt you get from the each channel. At lower settings, it will be very nearly clean even if you dig in. Around 9-10 o'clock, it starts to get some crunch when you dig in (or if you have a high output guitar). By noon, it's really starting to cook, and past there you've got the potential for some really sweet overdrive. Again, this control will interact somewhat with the Volume control. As you raise it, you may need to lower the Volume to keep the signal level even. You'll also �nd that the same Tone settings don't work at all Gain settings.
Tone – This adjusts between a much darker, bassier sound at the fully counterclockwise position, to a very highs-forward, present sound fully clockwise. As with most tonal adjustments, you're probably going to �nd the right �t for your gear somewhere between the extremes. It's not a bad idea to start at noon and adjust in small increments from there to let your ears get used to the sound of the pedal as you raise or lower the Tone knobs. The Tone knobs on this pedal don't stand alone, however – there are voicing switches on each channel which contrib-ute strongly to how you'll want to adjust the Tone.
Channel 1 Switch – Smooth / Fat. Smooth is the most "D"-amp style sound, with a great degree of presence and tremendous touch response. This setting is the one Tom prefers because of its warmth and response. Fat comes with a slight volume boost, and has the most forward tone and has less overdrive, this work particularly well for rhythm playing.
Channel 2 Switch – Throaty / Natural. Throaty being the louder of the two options, gives you – as the name suggests a more throaty rounded sound. With a little sparkle on the top to give you clarity. Natural is more organic, open and natural. A lovely overdrive designed to let you play with your guitar singing out.
Stacking options. - Please see the enclosed sheet for a full and comprehensive explaination of the stacking/separate switch.
Power RequirementsThe pedal can be powered by a 9V battery. The battery terminal is located inside the pedal. If using a power supply, power needed for the pedal is 9V DC, regulated, center pin negative, as supplied by most standard Boss™/Ibanez™/Etc. supplies. The pedal can be safely powered with a multi-supply, like the Visual Sound 1SPOT™. The pedal was designed explicitly around the usage of a 9V DC power source, and is intended to sound its best at 9V. To avoid damage to the pedal, do not exceed 9V DC, do not use center pin positive adapters, and do not use AC power. Using an incorrect power adapter can lead to damage and will void the warranty on the pedal. This pedal draws 17mA.
Please note: If you are using a battery, it will drain when the input cord is plugged in.
Return and Warranty PolicyFor direct sales, there is a 7-day “no questions asked” period where you may return the pedal for any reason, provided that it is in its original condition. Please retain all packaging within this period in case you decide to return it! We only require that you pay shipping back. The 7 days start when you receive the pedal. This does not apply to dealer or retailer sales – see their individual return policies for speci�c information.
All Wampler Pedals, Inc. pedals carry a 5-year, fully transferable warranty that covers defects due to parts and labor. The warranty begins at the point of purchase. Please remember to register your pedal as soon as possible after purchase at the following web page to ensure quicker service if you should ever need to make a warranty claim: www.wamplerpedals.com/warranty_registration
For warranty repairs or questions, please feel free to contact us at www.wamplerpedals.com/contact_us.html
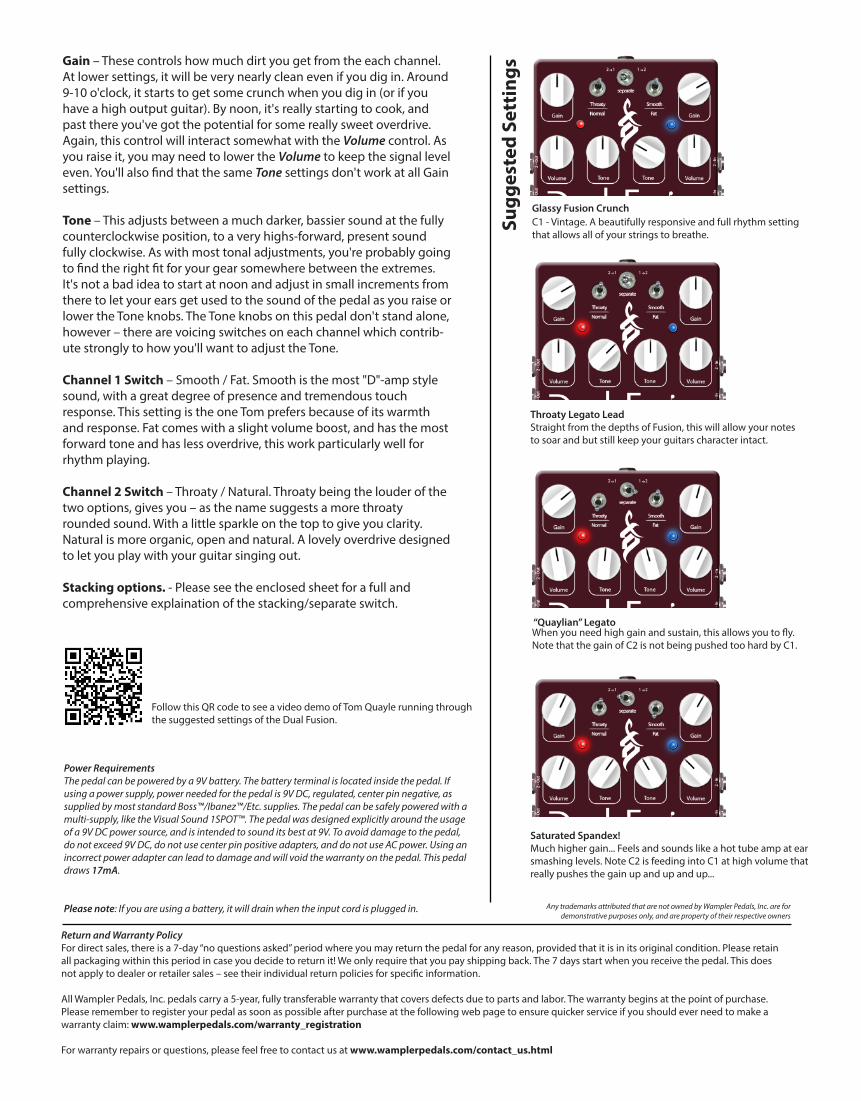
C1 - Vintage. A beautifully responsive and full rhythm setting that allows all of your strings to breathe.
Glassy Fusion Crunch
Throaty Legato LeadStraight from the depths of Fusion, this will allow your notes to soar and but still keep your guitars character intact.
“Quaylian” LegatoWhen you need high gain and sustain, this allows you to �y. Note that the gain of C2 is not being pushed too hard by C1.
Saturated Spandex!Much higher gain... Feels and sounds like a hot tube amp at ear smashing levels. Note C2 is feeding into C1 at high volume that really pushes the gain up and up and up...
Sugg
este
d Se
ttin
gs
Any trademarks attributed that are not owned by Wampler Pedals, Inc. are for demonstrative purposes only, and are property of their respective owners
Follow this QR code to see a video demo of Tom Quayle running through the suggested settings of the Dual Fusion.
Tom Quayle signature Dual Fusion Overdrives.
TM
TM
Tom Quayle
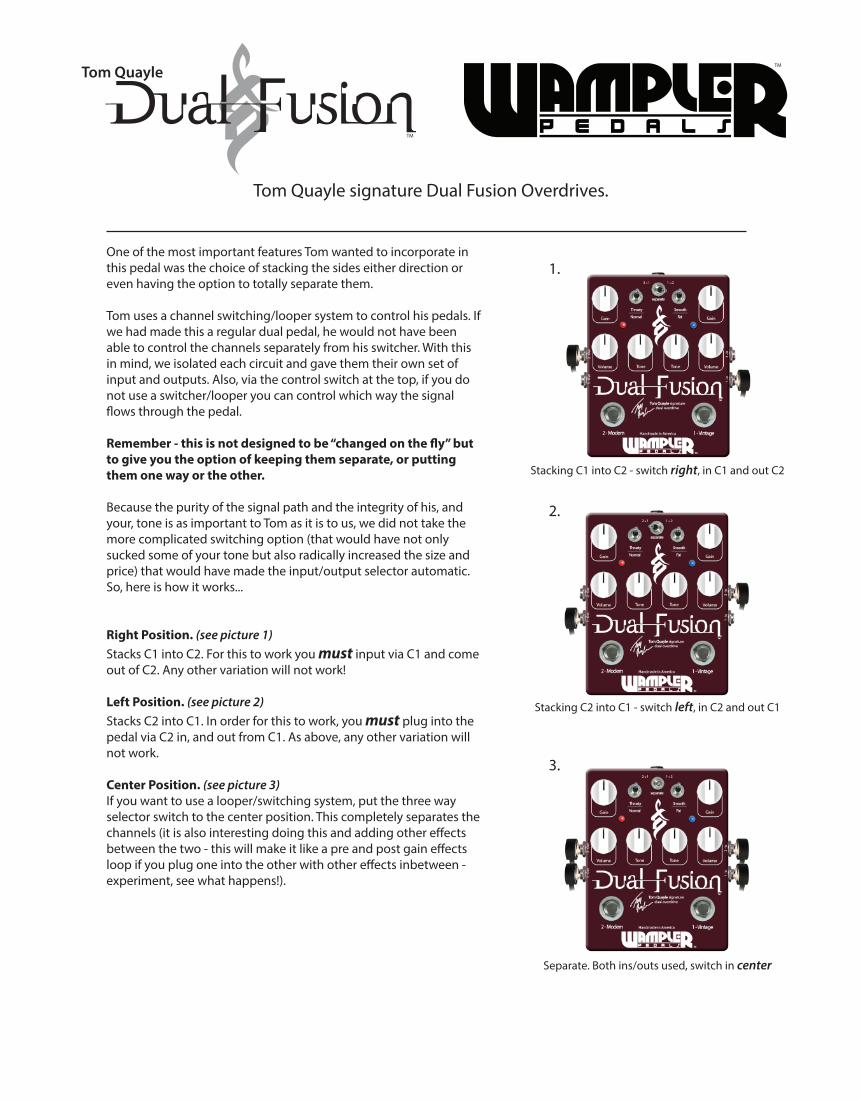
One of the most important features Tom wanted to incorporate in this pedal was the choice of stacking the sides either direction or even having the option to totally separate them.
Tom uses a channel switching/looper system to control his pedals. If we had made this a regular dual pedal, he would not have been able to control the channels separately from his switcher. With this in mind, we isolated each circuit and gave them their own set of input and outputs. Also, via the control switch at the top, if you do not use a switcher/looper you can control which way the signal �ows through the pedal.
Remember - this is not designed to be “changed on the �y” but to give you the option of keeping them separate, or putting them one way or the other.
Because the purity of the signal path and the integrity of his, and your, tone is as important to Tom as it is to us, we did not take the more complicated switching option (that would have not only sucked some of your tone but also radically increased the size and price) that would have made the input/output selector automatic. So, here is how it works...
Right Position. (see picture 1)Stacks C1 into C2. For this to work you must input via C1 and come out of C2. Any other variation will not work!
Left Position. (see picture 2)Stacks C2 into C1. In order for this to work, you must plug into the pedal via C2 in, and out from C1. As above, any other variation will not work.
Center Position. (see picture 3)If you want to use a looper/switching system, put the three way selector switch to the center position. This completely separates the channels (it is also interesting doing this and adding other e�ects between the two - this will make it like a pre and post gain e�ects loop if you plug one into the other with other e�ects inbetween - experiment, see what happens!).
3.
2.
1.
Stacking C2 into C1 - switch left, in C2 and out C1
Separate. Both ins/outs used, switch in center
Stacking C1 into C2 - switch right, in C1 and out C2