nous vous remercions pour avoir choisi nos produits et ... · desserrer et extraire du compartiment...
TRANSCRIPT
FIM/G047
ATHENA SPA - Via delle Albere, 13 - 36045 Alonte (VI) - Italy - Tel. +39-0444-727258 - Fax +39-0444-727222www.athena-ad.com - e-mail: [email protected]
F
I
GB
F
ISTRUZIONI DI MONTAGGIOGRUPPO TERMICO
ASSEMBLY INSTRUCTIONSCYLINDER KIT
INSTRUCTIONS DE MONTAGEKIT CYLINDRE
INSTRUCTIONS DE MONTAGE GROUPE THERMIQUE YAMAHA BANSHEE 350 Nous vous remercions pour avoir choisi nos produits et restons à votre disposition pour tous renseignements supplémentaires.
OPÉRATIONS PRÉALABLESBien nettoyer la zone du moteur sur lequel doit s’effectuer le travail. Pour faciliter les opérations, il est conseillé de retirer la selle et les parties en plastique telles que les caches du radiateur et du réservoir et les garde-boue avant.Vidanger le liquide du circuit de refroidissement au moyen du tuyau à la sortie du carter côté embrayage.DÉMONTER LE GROUPE D’ÉCHAPPEMENT ET LE GROUPE THERMIQUE D’ORIGINE COMME SUIT: Démonter normalement les deux pots à l’exclusion des silencieux.Enlever les câbles et les bougies.Desserrer et extraire du compartiment moteur les carburateurs avec les collecteurs et les clapets à lamelles (ce matériel OEM sera remonté avec le kit Athena). Dévisser les deux M6 qui fixent le collecteur du circuit de refroidissement aux culasses.Dévisser selon un schéma en croix les 10 écrous M8 et enlever les culasses.Desserrer les écrous de M8 qui fixent les deux cylindres un à la fois.Enlever les cylindres d’origine et les joints de base.Couvrir l’ouverture des carters et retirer les pistons en veillant à ce qu’aucun corps étrangers ne pénètre dans le moteur.RÉCUPÉRER SUR LES CYLINDRES D’ORIGINE LES COMPOSANTS SUIVANTS POUR LE MONTAGE DU KIT ATHENA:- carburateurs;- collecteurs en caoutchouc et clapets à lamelles;- collecteur du circuit de refroidissement (situé entre les deux cylindres); - démonter les vis pour la vidange du liquide de refroidissement des cylindres OEM. ATTENTION! Contrôler attentivement le degré d’usure du vilebrequin, des déflecteurs de l’huile et des coussinets du vilebrequin, de la cage à aiguilles et du pied de bielle car la fiabilité de votre moteur est également garantie par le bon état de ces composants.
MONTAGE DU GROUPE THERMIQUE:Laver avec de l’essence et souffler soigneusement tous les composants du cylindre d’origine qui seront réutilisés et tous les nouveaux composants du groupe thermique Athena, en veillant en particulier à ce qu’il n’y ait pas d’impuretés à l’in-térieur des divers canaux du cylindre, et protéger l’ouverture des carters avec un chiffon propre.Monter les 5 goujons M8 (par cylindre) fournis dans le kit Athena.Sur tous les deux pistons, monter le petit anneau dans la cave du second segment (marqué 2R), qui se trouve dans l’enveloppe des segments, avec la coupe en correspondance du grain arrête segment, voire figure E.Monter sur les deux pistons une bague de blocage de l’axe et les segments d’étanchéité.Nettoyer soigneusement le plan d’appui du cylindre sur les carter en vérifiant qu’il n’y a aucun résidu de joint ni bosselure. Monter les pistons Athena l’un après l’autre avec la flèche gravée sur le fond orientée vers l’échappement. Après avoir lubrifié l’axe, l’introduire dans le piston et le faire avancer en poussant avec la main. Après avoir positionné les bagues de blocage de l’axe, vérifier méticuleusement qu’elles sont bien bloquées dans leur logement.Vérifier que la largeur externe des arrêts-clapets soit de 22 mm, au contraire, il faut les modifier afin de respecter cette mesure (voir figure B).Procéder au montage sur les cylindres des clapets à lamelles et des collecteurs en caoutchouc en serrant les vis M6 avec un couple de 10 N•m ou 1 kgf•m.Lubrifier avec de l’huile pour mélange les pistons, les segments d’étanchéité et la chemise du cylindre. Installer le joint de base du cylindre neuf fourni dans le kit Athena (ép. 0,6 mm) et le cylindre Athena en veillant à ne pas le tourner car cela pourrait causer la rupture des segments.Appliquer de la graisse au cuivre sur les filets des goujons et serrer, selon un schéma en croix, les écrous avec un couple de 25 N•m ou 2,5 kgf•m.Installer les joints toriques dans les dômes et dans la culasse externe.Monter la culasse en veillant à ce que les joints toriques restent dans leur logement.Appliquer de la graisse au cuivre sur les filets et serrer, selon un schéma en croix (voir dessin), les écrous (fournis dans le kit ainsi que les rondelles) avec un couple de 25 N•m ou 2,5 kgf•m (voir figure A).SQUISH: pour obtenir les performances requises et testées du kit Athena, il faut avoir un squish conique qui part de 1,3 mm et grandit jusqu’à 1,6 mm (voir figure D). Pour le relever, vous pouvez agir comme suit: positionner manuellement le piston vers le point mort inférieur, passer dans le trou de la bougie un fil d’étain de 2 mm d’épaisseur aligné avec l’axe, faire tourner manuellement le moteur au moyen de la pédale de démarrage (2 ou 3 fois au moins). À la fin de cette opération, le fil d’étain présentera une zone écrasée qui, mesurée avec un calibre centésimal, indiquera la valeur de squish. Si ce n’est pas le cas, soulever ou abaisser le cylindre, en remplaçant le joint de base, jusqu’à ce que soit obtenue la mesure ci-dessus. Monter les tuyaux et le collecteur du circuit de refroidissement entre les deux cylindres.Monter les carburateurs et, pour améliorer encore les performances du moteur, enlever le tuyau en caoutchouc sur le boîtier du filtre (voir figure C).Remplir le circuit de refroidissement.Monter le groupe d’échappement en remplaçant les anciens joints toriques par ceux qui sont fournis dans le kit Athena et contrôler qu’il est en parfait état et ne présente pas trop d’incrustations; sinon, procéder au nettoyage. Nettoyer et, si nécessaire, remplacer le filtre à air. Vérifier et, si nécessaire, régler la carburation en fonction du nouveau groupe thermique Athena.
RODAGE, USAGE ET ENTRETIEN:Ne pas utiliser d’essences contenant moins de 96 octanes et utiliser de l’huile synthétique. Ne pas faire forcer le moteur pendant les 3 ou 4 premières heurs d’utilisation car cela pourrait endommager le groupe thermique ; de plus seul un bon rodage peut garantir des performances optimales.Il est conseillé de remplacer le piston dès les premiers signes d’usure du kit afin de ne pas altérer la rotondité de la chemise du cylindre.
Nous tenons à vous rappeler que l’accessoire à lui seul ne suffit pas, et qu’un montage correct donnera à votre scooter ses meilleures performances.
On recommande vivement que l’assemblage des produits inclus dans le kit soit fait par des techniciens spécialisés: si à cause d’une mauvaise installation on surgira des problèmes, nous déclinerons toute responsabilité pour tous les dommages ou prétention techniques et économiques à notre égard. Tout ce qui est écrit sur cette feuille d’instructions n’est pas contraignant. Athena se réserve le droit d’appliquer des modifications si elle le juge opportun, et n’assume aucune responsabilité pour éventuelles erreurs d’impression.
Tous les produits Athena dans les cylindrées et/ou puissances supérieures à ce qu’il est prévu par le code de la route spécifique du pays d’appartenance d’utilisateur final, ne sont destinées qu’à une utilisation dans le cadre de compétitions sportives. L’usage sur la route publique est interdit. L’usage aéronautique et marin n’est pas indiqué. Nous nous dégageons de toute responsabilité pour toute autre utilisation.Le client prend sur soi la responsabilité que la distribution des produits achetés de la société Athena est conforme à la législation en vigueur dans son pays et par conséquent dégage Athena de quelconque responsabilité.
ALESAGE
68 mm
COURSE
54 mm
CYLINDREE
392 cc
RAPPORT DE COMPRESSION
11,9:1
D
B
A
E
C
FIM/G047
ATHENA SPA - Via delle Albere, 13 - 36045 Alonte (VI) - Italy - Tel. +39-0444-727258 - Fax +39-0444-727222www.athena-ad.com - e-mail: [email protected]
I
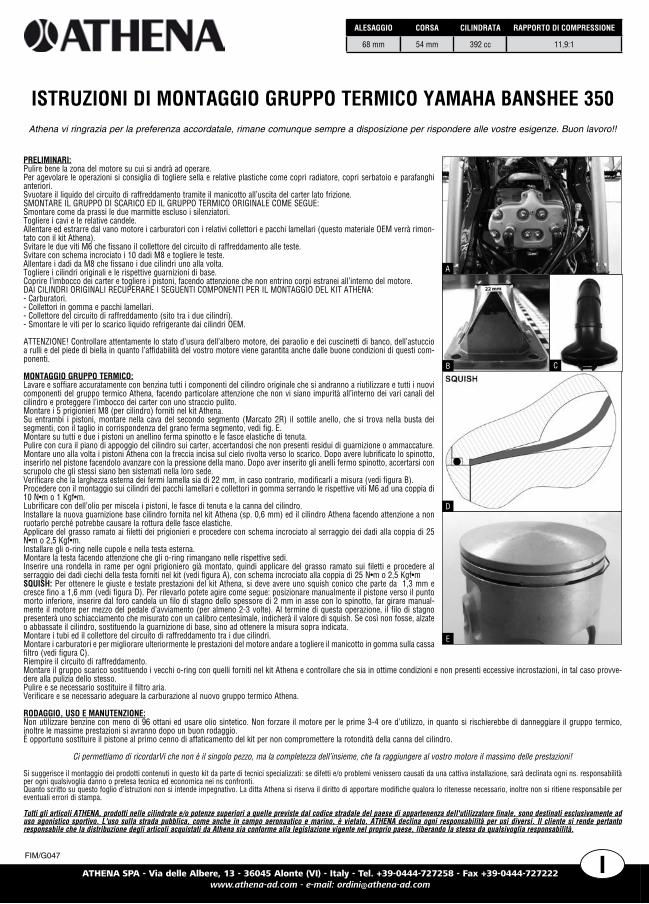
ISTRUZIONI DI MONTAGGIO GRUPPO TERMICO YAMAHA BANSHEE 350Athena vi ringrazia per la preferenza accordatale, rimane comunque sempre a disposizione per rispondere alle vostre esigenze. Buon lavoro!!
PRELIMINARI:Pulire bene la zona del motore su cui si andrà ad operare. Per agevolare le operazioni si consiglia di togliere sella e relative plastiche come copri radiatore, copri serbatoio e parafanghi anteriori.Svuotare il liquido del circuito di raffreddamento tramite il manicotto all’uscita del carter lato frizione.SMONTARE IL GRUPPO DI SCARICO ED IL GRUPPO TERMICO ORIGINALE COME SEGUE: Smontare come da prassi le due marmitte escluso i silenziatori.Togliere i cavi e le relative candele.Allentare ed estrarre dal vano motore i carburatori con i relativi collettori e pacchi lamellari (questo materiale OEM verrà rimon-tato con il kit Athena). Svitare le due viti M6 che fissano il collettore del circuito di raffreddamento alle teste.Svitare con schema incrociato i 10 dadi M8 e togliere le teste.Allentare i dadi da M8 che fissano i due cilindri uno alla volta.Togliere i cilindri originali e le rispettive guarnizioni di base.Coprire l’imbocco dei carter e togliere i pistoni, facendo attenzione che non entrino corpi estranei all’interno del motore.DAI CILINDRI ORIGINALI RECUPERARE I SEGUENTI COMPONENTI PER IL MONTAGGIO DEL KIT ATHENA:- Carburatori.- Collettori in gomma e pacchi lamellari.- Collettore del circuito di raffreddamento (sito tra i due cilindri). - Smontare le viti per lo scarico liquido refrigerante dai cilindri OEM. ATTENZIONE! Controllare attentamente lo stato d’usura dell’albero motore, dei paraolio e dei cuscinetti di banco, dell’astuccio a rulli e del piede di biella in quanto l’affidabilità del vostro motore viene garantita anche dalle buone condizioni di questi com-ponenti.
MONTAGGIO GRUPPO TERMICO:Lavare e soffiare accuratamente con benzina tutti i componenti del cilindro originale che si andranno a riutilizzare e tutti i nuovi componenti del gruppo termico Athena, facendo particolare attenzione che non vi siano impurità all’interno dei vari canali del cilindro e proteggere l’imbocco dei carter con uno straccio pulito.Montare i 5 prigionieri M8 (per cilindro) forniti nel kit Athena.Su entrambi i pistoni, montare nella cava del secondo segmento (Marcato 2R) il sottile anello, che si trova nella busta dei segmenti, con il taglio in corrispondenza del grano ferma segmento, vedi fig. E.Montare su tutti e due i pistoni un anellino ferma spinotto e le fasce elastiche di tenuta.Pulire con cura il piano di appoggio del cilindro sui carter, accertandosi che non presenti residui di guarnizione o ammaccature. Montare uno alla volta i pistoni Athena con la freccia incisa sul cielo rivolta verso lo scarico. Dopo avere lubrificato lo spinotto, inserirlo nel pistone facendolo avanzare con la pressione della mano. Dopo aver inserito gli anelli fermo spinotto, accertarsi con scrupolo che gli stessi siano ben sistemati nella loro sede.Verificare che la larghezza esterna dei fermi lamella sia di 22 mm, in caso contrario, modificarli a misura (vedi figura B).Procedere con il montaggio sui cilindri dei pacchi lamellari e collettori in gomma serrando le rispettive viti M6 ad una coppia di 10 N•m o 1 Kgf•m.Lubrificare con dell’olio per miscela i pistoni, le fasce di tenuta e la canna del cilindro. Installare la nuova guarnizione base cilindro fornita nel kit Athena (sp. 0,6 mm) ed il cilindro Athena facendo attenzione a non ruotarlo perché potrebbe causare la rottura delle fasce elastiche.Applicare del grasso ramato ai filetti dei prigionieri e procedere con schema incrociato al serraggio dei dadi alla coppia di 25 N•m o 2,5 Kgf•m.Installare gli o-ring nelle cupole e nella testa esterna.Montare la testa facendo attenzione che gli o-ring rimangano nelle rispettive sedi.Inserire una rondella in rame per ogni prigioniero già montato, quindi applicare del grasso ramato sui filetti e procedere al serraggio dei dadi ciechi della testa forniti nel kit (vedi figura A), con schema incrociato alla coppia di 25 N•m o 2,5 Kgf•mSQUISH: Per ottenere le giuste e testate prestazioni del kit Athena, si deve avere uno squish conico che parte da 1,3 mm e cresce fino a 1,6 mm (vedi figura D). Per rilevarlo potete agire come segue: posizionare manualmente il pistone verso il punto morto inferiore, inserire dal foro candela un filo di stagno dello spessore di 2 mm in asse con lo spinotto, far girare manual-mente il motore per mezzo del pedale d’avviamento (per almeno 2-3 volte). Al termine di questa operazione, il filo di stagno presenterà uno schiacciamento che misurato con un calibro centesimale, indicherà il valore di squish. Se così non fosse, alzate o abbassate il cilindro, sostituendo la guarnizione di base, sino ad ottenere la misura sopra indicata. Montare i tubi ed il collettore del circuito di raffreddamento tra i due cilindri.Montare i carburatori e per migliorare ulteriormente le prestazioni del motore andare a togliere il manicotto in gomma sulla cassa filtro (vedi figura C).Riempire il circuito di raffreddamento.Montare il gruppo scarico sostituendo i vecchi o-ring con quelli forniti nel kit Athena e controllare che sia in ottime condizioni e non presenti eccessive incrostazioni, in tal caso provve-dere alla pulizia dello stesso. Pulire e se necessario sostituire il filtro aria.Verificare e se necessario adeguare la carburazione al nuovo gruppo termico Athena. RODAGGIO, USO E MANUTENZIONE:Non utilizzare benzine con meno di 96 ottani ed usare olio sintetico. Non forzare il motore per le prime 3-4 ore d’utilizzo, in quanto si rischierebbe di danneggiare il gruppo termico, inoltre le massime prestazioni si avranno dopo un buon rodaggio.È opportuno sostituire il pistone al primo cenno di affaticamento del kit per non compromettere la rotondità della canna del cilindro.
Ci permettiamo di ricordarVi che non è il singolo pezzo, ma la completezza dell’insieme, che fa raggiungere al vostro motore il massimo delle prestazioni!
Si suggerisce il montaggio dei prodotti contenuti in questo kit da parte di tecnici specializzati: se difetti e/o problemi venissero causati da una cattiva installazione, sarà declinata ogni ns. responsabilità per ogni qualsivoglia danno o pretesa tecnica ed economica nei ns confronti.Quanto scritto su questo foglio d’istruzioni non si intende impegnativo. La ditta Athena si riserva il diritto di apportare modifiche qualora lo ritenesse necessario, inoltre non si ritiene responsabile per eventuali errori di stampa.
Tutti gli articoli ATHENA, prodotti nelle cilindrate e/o potenze superiori a quelle previste dal codice stradale del paese di appartenenza dell'utilizzatore finale, sono destinati esclusivamente ad uso agonistico sportivo. L'uso sulla strada pubblica, come anche in campo aeronautico e marino, è vietato. ATHENA declina ogni responsabilità per usi diversi. Il cliente si rende pertanto responsabile che la distribuzione degli articoli acquistati da Athena sia conforme alla legislazione vigente nel proprio paese, liberando la stessa da qualsivoglia responsabilità.
FIM/G047
ATHENA SPA - Via delle Albere, 13 - 36045 Alonte (VI) - Italy - Tel. +39-0444-727258 - Fax +39-0444-727222www.athena-ad.com - e-mail: [email protected]
GB
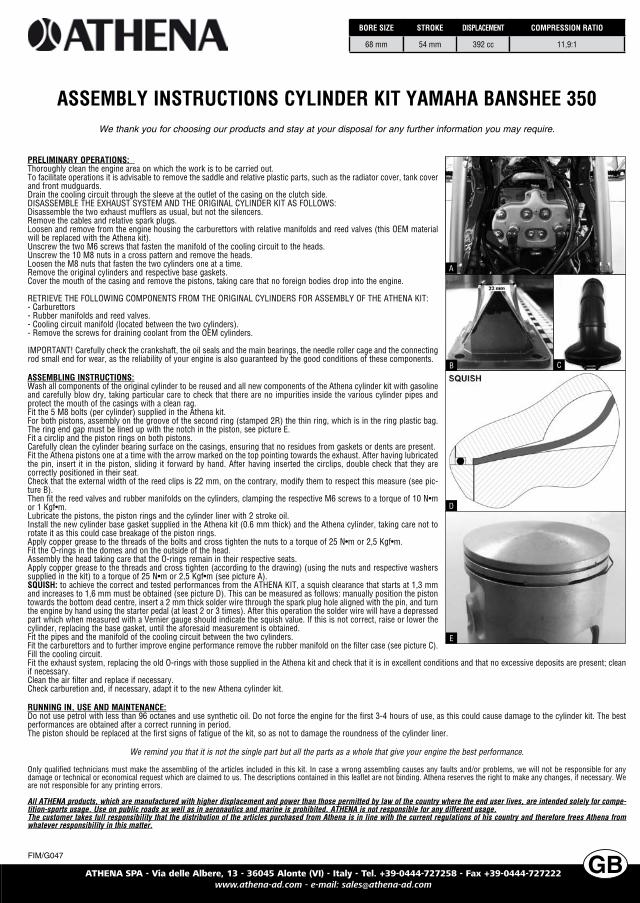
ASSEMBLY INSTRUCTIONS CYLINDER KIT YAMAHA BANSHEE 350We thank you for choosing our products and stay at your disposal for any further information you may require.
ALESAGGIO
68 mm
CORSA
54 mm
CILINDRATA
392 cc
RAPPORTO DI COMPRESSIONE
11,9:1
BORE SIZE
68 mm
STROKE
54 mm
DISPLACEMENT
392 cc
COMPRESSION RATIO
11,9:1
PRELIMINARY OPERATIONS: Thoroughly clean the engine area on which the work is to be carried out.To facilitate operations it is advisable to remove the saddle and relative plastic parts, such as the radiator cover, tank cover and front mudguards.Drain the cooling circuit through the sleeve at the outlet of the casing on the clutch side. DISASSEMBLE THE EXHAUST SYSTEM AND THE ORIGINAL CYLINDER KIT AS FOLLOWS:Disassemble the two exhaust mufflers as usual, but not the silencers.Remove the cables and relative spark plugs.Loosen and remove from the engine housing the carburettors with relative manifolds and reed valves (this OEM material will be replaced with the Athena kit).Unscrew the two M6 screws that fasten the manifold of the cooling circuit to the heads.Unscrew the 10 M8 nuts in a cross pattern and remove the heads. Loosen the M8 nuts that fasten the two cylinders one at a time.Remove the original cylinders and respective base gaskets.Cover the mouth of the casing and remove the pistons, taking care that no foreign bodies drop into the engine.
RETRIEVE THE FOLLOWING COMPONENTS FROM THE ORIGINAL CYLINDERS FOR ASSEMBLY OF THE ATHENA KIT:- Carburettors- Rubber manifolds and reed valves.- Cooling circuit manifold (located between the two cylinders).- Remove the screws for draining coolant from the OEM cylinders.
IMPORTANT! Carefully check the crankshaft, the oil seals and the main bearings, the needle roller cage and the connecting rod small end for wear, as the reliability of your engine is also guaranteed by the good conditions of these components.
ASSEMBLING INSTRUCTIONS:Wash all components of the original cylinder to be reused and all new components of the Athena cylinder kit with gasoline and carefully blow dry, taking particular care to check that there are no impurities inside the various cylinder pipes and protect the mouth of the casings with a clean rag. Fit the 5 M8 bolts (per cylinder) supplied in the Athena kit.For both pistons, assembly on the groove of the second ring (stamped 2R) the thin ring, which is in the ring plastic bag. The ring end gap must be lined up with the notch in the piston, see picture E.Fit a circlip and the piston rings on both pistons.Carefully clean the cylinder bearing surface on the casings, ensuring that no residues from gaskets or dents are present. Fit the Athena pistons one at a time with the arrow marked on the top pointing towards the exhaust. After having lubricated the pin, insert it in the piston, sliding it forward by hand. After having inserted the circlips, double check that they are correctly positioned in their seat. Check that the external width of the reed clips is 22 mm, on the contrary, modify them to respect this measure (see pic-ture B).Then fit the reed valves and rubber manifolds on the cylinders, clamping the respective M6 screws to a torque of 10 N•m or 1 Kgf•m.Lubricate the pistons, the piston rings and the cylinder liner with 2 stroke oil.Install the new cylinder base gasket supplied in the Athena kit (0.6 mm thick) and the Athena cylinder, taking care not to rotate it as this could case breakage of the piston rings. Apply copper grease to the threads of the bolts and cross tighten the nuts to a torque of 25 N•m or 2,5 Kgf•m.Fit the O-rings in the domes and on the outside of the head. Assembly the head taking care that the O-rings remain in their respective seats.Apply copper grease to the threads and cross tighten (according to the drawing) (using the nuts and respective washers supplied in the kit) to a torque of 25 N•m or 2,5 Kgf•m (see picture A).SQUISH: to achieve the correct and tested performances from the ATHENA KIT, a squish clearance that starts at 1,3 mm and increases to 1,6 mm must be obtained (see picture D). This can be measured as follows: manually position the piston towards the bottom dead centre, insert a 2 mm thick solder wire through the spark plug hole aligned with the pin, and turn the engine by hand using the starter pedal (at least 2 or 3 times). After this operation the solder wire will have a depressed part which when measured with a Vernier gauge should indicate the squish value. If this is not correct, raise or lower the cylinder, replacing the base gasket, until the aforesaid measurement is obtained. Fit the pipes and the manifold of the cooling circuit between the two cylinders. Fit the carburettors and to further improve engine performance remove the rubber manifold on the filter case (see picture C).Fill the cooling circuit.Fit the exhaust system, replacing the old O-rings with those supplied in the Athena kit and check that it is in excellent conditions and that no excessive deposits are present; clean if necessary. Clean the air filter and replace if necessary.Check carburetion and, if necessary, adapt it to the new Athena cylinder kit. RUNNING IN, USE AND MAINTENANCE:Do not use petrol with less than 96 octanes and use synthetic oil. Do not force the engine for the first 3-4 hours of use, as this could cause damage to the cylinder kit. The best performances are obtained after a correct running in period. The piston should be replaced at the first signs of fatigue of the kit, so as not to damage the roundness of the cylinder liner.
We remind you that it is not the single part but all the parts as a whole that give your engine the best performance.
Only qualified technicians must make the assembling of the articles included in this kit. In case a wrong assembling causes any faults and/or problems, we will not be responsible for any damage or technical or economical request which are claimed to us. The descriptions contained in this leaflet are not binding. Athena reserves the right to make any changes, if necessary. We are not responsible for any printing errors.
All ATHENA products, which are manufactured with higher displacement and power than those permitted by law of the country where the end user lives, are intended solely for compe-tition-sports usage. Use on public roads as well as in aeronautics and marine is prohibited. ATHENA is not responsible for any different usage.The customer takes full responsibility that the distribution of the articles purchased from Athena is in line with the current regulations of his country and therefore frees Athena from whatever responsibility in this matter.
D
B
A
E
C
D
B
A
E
C

FIM/G047
ATHENA SPA - Via delle Albere, 13 - 36045 Alonte (VI) - Italy - Tel. +39-0444-727258 - Fax +39-0444-727222www.athena-ad.com - e-mail: [email protected]
F
I
GB
F
ISTRUZIONI DI MONTAGGIOGRUPPO TERMICO
ASSEMBLY INSTRUCTIONSCYLINDER KIT
INSTRUCTIONS DE MONTAGEKIT CYLINDRE
INSTRUCTIONS DE MONTAGE GROUPE THERMIQUE YAMAHA BANSHEE 350 Nous vous remercions pour avoir choisi nos produits et restons à votre disposition pour tous renseignements supplémentaires.
OPÉRATIONS PRÉALABLESBien nettoyer la zone du moteur sur lequel doit s’effectuer le travail. Pour faciliter les opérations, il est conseillé de retirer la selle et les parties en plastique telles que les caches du radiateur et du réservoir et les garde-boue avant.Vidanger le liquide du circuit de refroidissement au moyen du tuyau à la sortie du carter côté embrayage.DÉMONTER LE GROUPE D’ÉCHAPPEMENT ET LE GROUPE THERMIQUE D’ORIGINE COMME SUIT: Démonter normalement les deux pots à l’exclusion des silencieux.Enlever les câbles et les bougies.Desserrer et extraire du compartiment moteur les carburateurs avec les collecteurs et les clapets à lamelles (ce matériel OEM sera remonté avec le kit Athena). Dévisser les deux M6 qui fixent le collecteur du circuit de refroidissement aux culasses.Dévisser selon un schéma en croix les 10 écrous M8 et enlever les culasses.Desserrer les écrous de M8 qui fixent les deux cylindres un à la fois.Enlever les cylindres d’origine et les joints de base.Couvrir l’ouverture des carters et retirer les pistons en veillant à ce qu’aucun corps étrangers ne pénètre dans le moteur.RÉCUPÉRER SUR LES CYLINDRES D’ORIGINE LES COMPOSANTS SUIVANTS POUR LE MONTAGE DU KIT ATHENA:- carburateurs;- collecteurs en caoutchouc et clapets à lamelles;- collecteur du circuit de refroidissement (situé entre les deux cylindres); - démonter les vis pour la vidange du liquide de refroidissement des cylindres OEM. ATTENTION! Contrôler attentivement le degré d’usure du vilebrequin, des déflecteurs de l’huile et des coussinets du vilebrequin, de la cage à aiguilles et du pied de bielle car la fiabilité de votre moteur est également garantie par le bon état de ces composants.
MONTAGE DU GROUPE THERMIQUE:Laver avec de l’essence et souffler soigneusement tous les composants du cylindre d’origine qui seront réutilisés et tous les nouveaux composants du groupe thermique Athena, en veillant en particulier à ce qu’il n’y ait pas d’impuretés à l’in-térieur des divers canaux du cylindre, et protéger l’ouverture des carters avec un chiffon propre.Monter les 5 goujons M8 (par cylindre) fournis dans le kit Athena.Sur tous les deux pistons, monter le petit anneau dans la cave du second segment (marqué 2R), qui se trouve dans l’enveloppe des segments, avec la coupe en correspondance du grain arrête segment, voire figure E.Monter sur les deux pistons une bague de blocage de l’axe et les segments d’étanchéité.Nettoyer soigneusement le plan d’appui du cylindre sur les carter en vérifiant qu’il n’y a aucun résidu de joint ni bosselure. Monter les pistons Athena l’un après l’autre avec la flèche gravée sur le fond orientée vers l’échappement. Après avoir lubrifié l’axe, l’introduire dans le piston et le faire avancer en poussant avec la main. Après avoir positionné les bagues de blocage de l’axe, vérifier méticuleusement qu’elles sont bien bloquées dans leur logement.Vérifier que la largeur externe des arrêts-clapets soit de 22 mm, au contraire, il faut les modifier afin de respecter cette mesure (voir figure B).Procéder au montage sur les cylindres des clapets à lamelles et des collecteurs en caoutchouc en serrant les vis M6 avec un couple de 10 N•m ou 1 kgf•m.Lubrifier avec de l’huile pour mélange les pistons, les segments d’étanchéité et la chemise du cylindre. Installer le joint de base du cylindre neuf fourni dans le kit Athena (ép. 0,6 mm) et le cylindre Athena en veillant à ne pas le tourner car cela pourrait causer la rupture des segments.Appliquer de la graisse au cuivre sur les filets des goujons et serrer, selon un schéma en croix, les écrous avec un couple de 25 N•m ou 2,5 kgf•m.Installer les joints toriques dans les dômes et dans la culasse externe.Monter la culasse en veillant à ce que les joints toriques restent dans leur logement.Appliquer de la graisse au cuivre sur les filets et serrer, selon un schéma en croix (voir dessin), les écrous (fournis dans le kit ainsi que les rondelles) avec un couple de 25 N•m ou 2,5 kgf•m (voir figure A).SQUISH: pour obtenir les performances requises et testées du kit Athena, il faut avoir un squish conique qui part de 1,3 mm et grandit jusqu’à 1,6 mm (voir figure D). Pour le relever, vous pouvez agir comme suit: positionner manuellement le piston vers le point mort inférieur, passer dans le trou de la bougie un fil d’étain de 2 mm d’épaisseur aligné avec l’axe, faire tourner manuellement le moteur au moyen de la pédale de démarrage (2 ou 3 fois au moins). À la fin de cette opération, le fil d’étain présentera une zone écrasée qui, mesurée avec un calibre centésimal, indiquera la valeur de squish. Si ce n’est pas le cas, soulever ou abaisser le cylindre, en remplaçant le joint de base, jusqu’à ce que soit obtenue la mesure ci-dessus. Monter les tuyaux et le collecteur du circuit de refroidissement entre les deux cylindres.Monter les carburateurs et, pour améliorer encore les performances du moteur, enlever le tuyau en caoutchouc sur le boîtier du filtre (voir figure C).Remplir le circuit de refroidissement.Monter le groupe d’échappement en remplaçant les anciens joints toriques par ceux qui sont fournis dans le kit Athena et contrôler qu’il est en parfait état et ne présente pas trop d’incrustations; sinon, procéder au nettoyage. Nettoyer et, si nécessaire, remplacer le filtre à air. Vérifier et, si nécessaire, régler la carburation en fonction du nouveau groupe thermique Athena.
RODAGE, USAGE ET ENTRETIEN:Ne pas utiliser d’essences contenant moins de 96 octanes et utiliser de l’huile synthétique. Ne pas faire forcer le moteur pendant les 3 ou 4 premières heurs d’utilisation car cela pourrait endommager le groupe thermique ; de plus seul un bon rodage peut garantir des performances optimales.Il est conseillé de remplacer le piston dès les premiers signes d’usure du kit afin de ne pas altérer la rotondité de la chemise du cylindre.
Nous tenons à vous rappeler que l’accessoire à lui seul ne suffit pas, et qu’un montage correct donnera à votre scooter ses meilleures performances.
On recommande vivement que l’assemblage des produits inclus dans le kit soit fait par des techniciens spécialisés: si à cause d’une mauvaise installation on surgira des problèmes, nous déclinerons toute responsabilité pour tous les dommages ou prétention techniques et économiques à notre égard. Tout ce qui est écrit sur cette feuille d’instructions n’est pas contraignant. Athena se réserve le droit d’appliquer des modifications si elle le juge opportun, et n’assume aucune responsabilité pour éventuelles erreurs d’impression.
Tous les produits Athena dans les cylindrées et/ou puissances supérieures à ce qu’il est prévu par le code de la route spécifique du pays d’appartenance d’utilisateur final, ne sont destinées qu’à une utilisation dans le cadre de compétitions sportives. L’usage sur la route publique est interdit. L’usage aéronautique et marin n’est pas indiqué. Nous nous dégageons de toute responsabilité pour toute autre utilisation.Le client prend sur soi la responsabilité que la distribution des produits achetés de la société Athena est conforme à la législation en vigueur dans son pays et par conséquent dégage Athena de quelconque responsabilité.
ALESAGE
68 mm
COURSE
54 mm
CYLINDREE
392 cc
RAPPORT DE COMPRESSION
11,9:1
D
B
A
E
C
FIM/G047
ATHENA SPA - Via delle Albere, 13 - 36045 Alonte (VI) - Italy - Tel. +39-0444-727258 - Fax +39-0444-727222www.athena-ad.com - e-mail: [email protected]
I
ISTRUZIONI DI MONTAGGIO GRUPPO TERMICO YAMAHA BANSHEE 350Athena vi ringrazia per la preferenza accordatale, rimane comunque sempre a disposizione per rispondere alle vostre esigenze. Buon lavoro!!
PRELIMINARI:Pulire bene la zona del motore su cui si andrà ad operare. Per agevolare le operazioni si consiglia di togliere sella e relative plastiche come copri radiatore, copri serbatoio e parafanghi anteriori.Svuotare il liquido del circuito di raffreddamento tramite il manicotto all’uscita del carter lato frizione.SMONTARE IL GRUPPO DI SCARICO ED IL GRUPPO TERMICO ORIGINALE COME SEGUE: Smontare come da prassi le due marmitte escluso i silenziatori.Togliere i cavi e le relative candele.Allentare ed estrarre dal vano motore i carburatori con i relativi collettori e pacchi lamellari (questo materiale OEM verrà rimon-tato con il kit Athena). Svitare le due viti M6 che fissano il collettore del circuito di raffreddamento alle teste.Svitare con schema incrociato i 10 dadi M8 e togliere le teste.Allentare i dadi da M8 che fissano i due cilindri uno alla volta.Togliere i cilindri originali e le rispettive guarnizioni di base.Coprire l’imbocco dei carter e togliere i pistoni, facendo attenzione che non entrino corpi estranei all’interno del motore.DAI CILINDRI ORIGINALI RECUPERARE I SEGUENTI COMPONENTI PER IL MONTAGGIO DEL KIT ATHENA:- Carburatori.- Collettori in gomma e pacchi lamellari.- Collettore del circuito di raffreddamento (sito tra i due cilindri). - Smontare le viti per lo scarico liquido refrigerante dai cilindri OEM. ATTENZIONE! Controllare attentamente lo stato d’usura dell’albero motore, dei paraolio e dei cuscinetti di banco, dell’astuccio a rulli e del piede di biella in quanto l’affidabilità del vostro motore viene garantita anche dalle buone condizioni di questi com-ponenti.
MONTAGGIO GRUPPO TERMICO:Lavare e soffiare accuratamente con benzina tutti i componenti del cilindro originale che si andranno a riutilizzare e tutti i nuovi componenti del gruppo termico Athena, facendo particolare attenzione che non vi siano impurità all’interno dei vari canali del cilindro e proteggere l’imbocco dei carter con uno straccio pulito.Montare i 5 prigionieri M8 (per cilindro) forniti nel kit Athena.Su entrambi i pistoni, montare nella cava del secondo segmento (Marcato 2R) il sottile anello, che si trova nella busta dei segmenti, con il taglio in corrispondenza del grano ferma segmento, vedi fig. E.Montare su tutti e due i pistoni un anellino ferma spinotto e le fasce elastiche di tenuta.Pulire con cura il piano di appoggio del cilindro sui carter, accertandosi che non presenti residui di guarnizione o ammaccature. Montare uno alla volta i pistoni Athena con la freccia incisa sul cielo rivolta verso lo scarico. Dopo avere lubrificato lo spinotto, inserirlo nel pistone facendolo avanzare con la pressione della mano. Dopo aver inserito gli anelli fermo spinotto, accertarsi con scrupolo che gli stessi siano ben sistemati nella loro sede.Verificare che la larghezza esterna dei fermi lamella sia di 22 mm, in caso contrario, modificarli a misura (vedi figura B).Procedere con il montaggio sui cilindri dei pacchi lamellari e collettori in gomma serrando le rispettive viti M6 ad una coppia di 10 N•m o 1 Kgf•m.Lubrificare con dell’olio per miscela i pistoni, le fasce di tenuta e la canna del cilindro. Installare la nuova guarnizione base cilindro fornita nel kit Athena (sp. 0,6 mm) ed il cilindro Athena facendo attenzione a non ruotarlo perché potrebbe causare la rottura delle fasce elastiche.Applicare del grasso ramato ai filetti dei prigionieri e procedere con schema incrociato al serraggio dei dadi alla coppia di 25 N•m o 2,5 Kgf•m.Installare gli o-ring nelle cupole e nella testa esterna.Montare la testa facendo attenzione che gli o-ring rimangano nelle rispettive sedi.Inserire una rondella in rame per ogni prigioniero già montato, quindi applicare del grasso ramato sui filetti e procedere al serraggio dei dadi ciechi della testa forniti nel kit (vedi figura A), con schema incrociato alla coppia di 25 N•m o 2,5 Kgf•mSQUISH: Per ottenere le giuste e testate prestazioni del kit Athena, si deve avere uno squish conico che parte da 1,3 mm e cresce fino a 1,6 mm (vedi figura D). Per rilevarlo potete agire come segue: posizionare manualmente il pistone verso il punto morto inferiore, inserire dal foro candela un filo di stagno dello spessore di 2 mm in asse con lo spinotto, far girare manual-mente il motore per mezzo del pedale d’avviamento (per almeno 2-3 volte). Al termine di questa operazione, il filo di stagno presenterà uno schiacciamento che misurato con un calibro centesimale, indicherà il valore di squish. Se così non fosse, alzate o abbassate il cilindro, sostituendo la guarnizione di base, sino ad ottenere la misura sopra indicata. Montare i tubi ed il collettore del circuito di raffreddamento tra i due cilindri.Montare i carburatori e per migliorare ulteriormente le prestazioni del motore andare a togliere il manicotto in gomma sulla cassa filtro (vedi figura C).Riempire il circuito di raffreddamento.Montare il gruppo scarico sostituendo i vecchi o-ring con quelli forniti nel kit Athena e controllare che sia in ottime condizioni e non presenti eccessive incrostazioni, in tal caso provve-dere alla pulizia dello stesso. Pulire e se necessario sostituire il filtro aria.Verificare e se necessario adeguare la carburazione al nuovo gruppo termico Athena. RODAGGIO, USO E MANUTENZIONE:Non utilizzare benzine con meno di 96 ottani ed usare olio sintetico. Non forzare il motore per le prime 3-4 ore d’utilizzo, in quanto si rischierebbe di danneggiare il gruppo termico, inoltre le massime prestazioni si avranno dopo un buon rodaggio.È opportuno sostituire il pistone al primo cenno di affaticamento del kit per non compromettere la rotondità della canna del cilindro.
Ci permettiamo di ricordarVi che non è il singolo pezzo, ma la completezza dell’insieme, che fa raggiungere al vostro motore il massimo delle prestazioni!
Si suggerisce il montaggio dei prodotti contenuti in questo kit da parte di tecnici specializzati: se difetti e/o problemi venissero causati da una cattiva installazione, sarà declinata ogni ns. responsabilità per ogni qualsivoglia danno o pretesa tecnica ed economica nei ns confronti.Quanto scritto su questo foglio d’istruzioni non si intende impegnativo. La ditta Athena si riserva il diritto di apportare modifiche qualora lo ritenesse necessario, inoltre non si ritiene responsabile per eventuali errori di stampa.
Tutti gli articoli ATHENA, prodotti nelle cilindrate e/o potenze superiori a quelle previste dal codice stradale del paese di appartenenza dell'utilizzatore finale, sono destinati esclusivamente ad uso agonistico sportivo. L'uso sulla strada pubblica, come anche in campo aeronautico e marino, è vietato. ATHENA declina ogni responsabilità per usi diversi. Il cliente si rende pertanto responsabile che la distribuzione degli articoli acquistati da Athena sia conforme alla legislazione vigente nel proprio paese, liberando la stessa da qualsivoglia responsabilità.
FIM/G047
ATHENA SPA - Via delle Albere, 13 - 36045 Alonte (VI) - Italy - Tel. +39-0444-727258 - Fax +39-0444-727222www.athena-ad.com - e-mail: [email protected]
GB
ASSEMBLY INSTRUCTIONS CYLINDER KIT YAMAHA BANSHEE 350We thank you for choosing our products and stay at your disposal for any further information you may require.
ALESAGGIO
68 mm
CORSA
54 mm
CILINDRATA
392 cc
RAPPORTO DI COMPRESSIONE
11,9:1
BORE SIZE
68 mm
STROKE
54 mm
DISPLACEMENT
392 cc
COMPRESSION RATIO
11,9:1
PRELIMINARY OPERATIONS: Thoroughly clean the engine area on which the work is to be carried out.To facilitate operations it is advisable to remove the saddle and relative plastic parts, such as the radiator cover, tank cover and front mudguards.Drain the cooling circuit through the sleeve at the outlet of the casing on the clutch side. DISASSEMBLE THE EXHAUST SYSTEM AND THE ORIGINAL CYLINDER KIT AS FOLLOWS:Disassemble the two exhaust mufflers as usual, but not the silencers.Remove the cables and relative spark plugs.Loosen and remove from the engine housing the carburettors with relative manifolds and reed valves (this OEM material will be replaced with the Athena kit).Unscrew the two M6 screws that fasten the manifold of the cooling circuit to the heads.Unscrew the 10 M8 nuts in a cross pattern and remove the heads. Loosen the M8 nuts that fasten the two cylinders one at a time.Remove the original cylinders and respective base gaskets.Cover the mouth of the casing and remove the pistons, taking care that no foreign bodies drop into the engine.
RETRIEVE THE FOLLOWING COMPONENTS FROM THE ORIGINAL CYLINDERS FOR ASSEMBLY OF THE ATHENA KIT:- Carburettors- Rubber manifolds and reed valves.- Cooling circuit manifold (located between the two cylinders).- Remove the screws for draining coolant from the OEM cylinders.
IMPORTANT! Carefully check the crankshaft, the oil seals and the main bearings, the needle roller cage and the connecting rod small end for wear, as the reliability of your engine is also guaranteed by the good conditions of these components.
ASSEMBLING INSTRUCTIONS:Wash all components of the original cylinder to be reused and all new components of the Athena cylinder kit with gasoline and carefully blow dry, taking particular care to check that there are no impurities inside the various cylinder pipes and protect the mouth of the casings with a clean rag. Fit the 5 M8 bolts (per cylinder) supplied in the Athena kit.For both pistons, assembly on the groove of the second ring (stamped 2R) the thin ring, which is in the ring plastic bag. The ring end gap must be lined up with the notch in the piston, see picture E.Fit a circlip and the piston rings on both pistons.Carefully clean the cylinder bearing surface on the casings, ensuring that no residues from gaskets or dents are present. Fit the Athena pistons one at a time with the arrow marked on the top pointing towards the exhaust. After having lubricated the pin, insert it in the piston, sliding it forward by hand. After having inserted the circlips, double check that they are correctly positioned in their seat. Check that the external width of the reed clips is 22 mm, on the contrary, modify them to respect this measure (see pic-ture B).Then fit the reed valves and rubber manifolds on the cylinders, clamping the respective M6 screws to a torque of 10 N•m or 1 Kgf•m.Lubricate the pistons, the piston rings and the cylinder liner with 2 stroke oil.Install the new cylinder base gasket supplied in the Athena kit (0.6 mm thick) and the Athena cylinder, taking care not to rotate it as this could case breakage of the piston rings. Apply copper grease to the threads of the bolts and cross tighten the nuts to a torque of 25 N•m or 2,5 Kgf•m.Fit the O-rings in the domes and on the outside of the head. Assembly the head taking care that the O-rings remain in their respective seats.Apply copper grease to the threads and cross tighten (according to the drawing) (using the nuts and respective washers supplied in the kit) to a torque of 25 N•m or 2,5 Kgf•m (see picture A).SQUISH: to achieve the correct and tested performances from the ATHENA KIT, a squish clearance that starts at 1,3 mm and increases to 1,6 mm must be obtained (see picture D). This can be measured as follows: manually position the piston towards the bottom dead centre, insert a 2 mm thick solder wire through the spark plug hole aligned with the pin, and turn the engine by hand using the starter pedal (at least 2 or 3 times). After this operation the solder wire will have a depressed part which when measured with a Vernier gauge should indicate the squish value. If this is not correct, raise or lower the cylinder, replacing the base gasket, until the aforesaid measurement is obtained. Fit the pipes and the manifold of the cooling circuit between the two cylinders. Fit the carburettors and to further improve engine performance remove the rubber manifold on the filter case (see picture C).Fill the cooling circuit.Fit the exhaust system, replacing the old O-rings with those supplied in the Athena kit and check that it is in excellent conditions and that no excessive deposits are present; clean if necessary. Clean the air filter and replace if necessary.Check carburetion and, if necessary, adapt it to the new Athena cylinder kit. RUNNING IN, USE AND MAINTENANCE:Do not use petrol with less than 96 octanes and use synthetic oil. Do not force the engine for the first 3-4 hours of use, as this could cause damage to the cylinder kit. The best performances are obtained after a correct running in period. The piston should be replaced at the first signs of fatigue of the kit, so as not to damage the roundness of the cylinder liner.
We remind you that it is not the single part but all the parts as a whole that give your engine the best performance.
Only qualified technicians must make the assembling of the articles included in this kit. In case a wrong assembling causes any faults and/or problems, we will not be responsible for any damage or technical or economical request which are claimed to us. The descriptions contained in this leaflet are not binding. Athena reserves the right to make any changes, if necessary. We are not responsible for any printing errors.
All ATHENA products, which are manufactured with higher displacement and power than those permitted by law of the country where the end user lives, are intended solely for compe-tition-sports usage. Use on public roads as well as in aeronautics and marine is prohibited. ATHENA is not responsible for any different usage.The customer takes full responsibility that the distribution of the articles purchased from Athena is in line with the current regulations of his country and therefore frees Athena from whatever responsibility in this matter.
D
B
A
E
C
D
B
A
E
C