dpw 100 piano droit numérique - eagletone.com · 2 prÉcautions d’usage afind’apprécier...
TRANSCRIPT

DPW 100Piano droit numérique
Guide de l’utilisateur
2
PRÉCAUTIONS D’USAGE
Afin d’apprécier pleinement les impressionnantes possibilités du piano numérique Eagletone DPW 100,veuillezprendrequelquesminutespourlirecesquelquespagesderecommandationsimportantes.
RISQUE DE CHOC ÉLECTRIQUENE PAS OUVRIR
Attention ! Afin de réduire les risques de choc électrique, ne pas ouvrir l’instrument.Aucune pièce à l’intérieur ne peut être réparée par l’utilisateur.
Faites appel à un technicien qualifié en cas de panne.
INSTRUCTIONS CONCERNANT LES RISQUES D’INCENDIE, DE CHOC ELECTRIQUE OU DE BLESSURE
Lesymboledel’éclairterminéparuneflècheàl’intérieurd’untrianglesertàavertirl’utilisateurdelaprésen-ced’unetensionélectriquenonisoléeoud’une«tensiondangereuse»dansl’enceinteduproduitpouvantêtresuffisammentélevéepourconstituerunrisqued’électrocution.
Lepointd’exclamationàl’intérieurd’untriangleestutilisépouravertirl’utilisateurdelaprésenced’instruc-tionsdefonctionnement,d’entretienouderéparationimportantes.
ATTENTION ! Toutchangementoutoutemodificationapportéàceproduitetquineseraitpasexpressémentapprouvéouautorisépar leserviceenchargede laconformitépeutmenerà l’annulationdudroitd’utilisationduproduit.
AVERTISSEMENT Lorsde touteutilisationd’unappareilélectrique,quelquesprécautionsdebasedoiventêtreobservées,dontcellesénuméréesci-dessous:
SÉCURITÉ Alimentation électrique : leproduitdoitêtretoujoursconnectéàunealimentationconformeautypedécritdanslemanueld’utilisationouàcelleindiquéesurleproduit.Périodes de non-utilisation : lecordond’alimentationdoitêtredébranchédelapriseélectriquelorsqueleproduitn’estpasutilisépendantunepériodeprolongée.
RÉPARATIONS ET MODIFICATIONSCeproduitdoitêtreréparéparuntechnicienqualifiélorsque:
Lecordond’alimentationoulapriseontétéendommagés;•duliquides’estinfiltrédansl’instrumentouquecedernieraétéexposéàlapluie;•Leproduitnesemblepasfonctionnercorrectementouqu’ilmontreunchangementnotoiredansses•
performances;Leproduitesttombéoulacaisseaétéendommagée;•
3
Nejamaistenterd’ouvrirlepianooudeprocéderàdesmodificationsdescircuitsoud’autrespiècesde•ceproduit.
MANIEMENT ET TRANSPORTNejamaisexerceruneforcetropimportantesurlesboutonsdecontrôle,lesconnexionsoutouteautre•
partiedel’instrument.Débranchertoujourslescâblesentenantfermementlapriseetnonentirantsurlecordon.•Débranchertouslescâblesavantdedéplacerl’instrument.•Leschocsphysiquesprovoquésparunechute,unheurtou ledépôtd’objets lourdssur l’instrument•
peuventprovoquerdeséraflureset/oudesdommagesplusimportants.Veilleràvérifierattentivementlecontrôleduvolumegénéralavantdejouerdupiano.Unvolumeexces-•
sifpeutprovoqueruneperteauditivepermanente.
NETTOYAGENettoyerlacaisseetlepanneaudecommandeavecunlingedoux,non-abrasifetsec.Nejamaisutiliser•
dediluantsdepeintureoudeproduitsd’entretientellesqueciresouproduitsàpolirdebasepétrochimi-que.
Afind’entretenirlelustredestouchesetdesboutons,lesnettoyeravecunlingeproprelégèrementhu-•mide,puislesessuyeravecunlingedouxetsec.
EMPLACEMENTAfind’évitertoutedéformation,décolorationoutoutautredommageplusimportant,veillezànepasexpo-serl’instrumentàl’undespointssuivants:
Lumièredirectedusoleil(prèsd’unefenêtre)•Fortestempératures(prèsd’unesourcedechaleur,enextérieurouprèsd’unefenêtre)•Humiditéexcessive•Localtroppoussiéreux•Fortesvibrations•Laissezassezdeplaceautourdupianopourqu’ilseventilecorrectement.•Cetinstrumentrenfermedescircuitsnumériquesquipeuventcauserdesinterférencessi lepianoest•
placétropprèsderécepteursradiooudetélévision.Sidesinterférencesseproduisent,éloignezl’instru-mentdeséquipementsaffectés.
Éviterdeplacerdesobjetsenvinylesurl’instrument:levinylepeutyadhéreretdécolorerlasurface.•
ALIMENTATION ÉLECTRIQUEÉteindrelepianoàl’aidedel’interrupteurON/OFFlorsqu’iln’estpasutilisé.•Pouréviterd’endommagerl’instrumentainsiquetoutautreappareilauquelilseraitconnecté,veillerà•
tousleséteindreavantdebrancheroudedébrancherdescâblesMIDI.Éteindrelepianosilecâbled’alimentationprincipalestendommagéousiunliquideaétérenversésur•
l’instrument.Nepasallumeretéteindrerapidementl’unitédemanièrerépétitive,celafaitsubirunesurchargeélectri-•
queauxcomposantsélectroniques.Débrancherlecordond’alimentationCApendantunorage.•Éviterdebrancherlecordond’alimentationCAdanslamêmeprisequed’autresappareilsénergivores,•
telsqueradiateursélectriquesouréfrigérateurs.

4
TABLE DES MATIÈRES
ASSEMBLAGE. . . . . . . . . . . . . . . . . . . . . . . . . . . . . . . . . . . . . . . . . . . . . . . . . . . . . . . . . . . . . . . . . . . . . . . . . . . . . . . . . . . . . . . . 5
PANNEAUDECOMMANDESETPEDALIER . . . . . . . . . . . . . . . . . . . . . . . . . . . . . . . . . . . . . . . . . . . . . . . . . . . . . . . . . . . . . 9
SEPREPARERAJOUER. . . . . . . . . . . . . . . . . . . . . . . . . . . . . . . . . . . . . . . . . . . . . . . . . . . . . . . . . . . . . . . . . . . . . . . . . . . . . . . 10
PIÈCESMUSICALESDEDÉMONSTRATION . . . . . . . . . . . . . . . . . . . . . . . . . . . . . . . . . . . . . . . . . . . . . . . . . . . . . . . . . . . . 11
LESVOIX. . . . . . . . . . . . . . . . . . . . . . . . . . . . . . . . . . . . . . . . . . . . . . . . . . . . . . . . . . . . . . . . . . . . . . . . . . . . . . . . . . . . . . . . . . . . 11
TRANSPOSITION . . . . . . . . . . . . . . . . . . . . . . . . . . . . . . . . . . . . . . . . . . . . . . . . . . . . . . . . . . . . . . . . . . . . . . . . . . . . . . . . . . . . 13
LESMODESDUCLAVIER. . . . . . . . . . . . . . . . . . . . . . . . . . . . . . . . . . . . . . . . . . . . . . . . . . . . . . . . . . . . . . . . . . . . . . . . . . . . . 13
EFFETS. . . . . . . . . . . . . . . . . . . . . . . . . . . . . . . . . . . . . . . . . . . . . . . . . . . . . . . . . . . . . . . . . . . . . . . . . . . . . . . . . . . . . . . . . . . . . 14
MÉTRONOME. . . . . . . . . . . . . . . . . . . . . . . . . . . . . . . . . . . . . . . . . . . . . . . . . . . . . . . . . . . . . . . . . . . . . . . . . . . . . . . . . . . . . . . 15
TEMPO . . . . . . . . . . . . . . . . . . . . . . . . . . . . . . . . . . . . . . . . . . . . . . . . . . . . . . . . . . . . . . . . . . . . . . . . . . . . . . . . . . . . . . . . . . . . . 16
ENREGISTREMENT. . . . . . . . . . . . . . . . . . . . . . . . . . . . . . . . . . . . . . . . . . . . . . . . . . . . . . . . . . . . . . . . . . . . . . . . . . . . . . . . . . . 16
MORCEAUXD’ACCOMPAGNEMENT . . . . . . . . . . . . . . . . . . . . . . . . . . . . . . . . . . . . . . . . . . . . . . . . . . . . . . . . . . . . . . . . . . 18
MODEDESFONCTIONS. . . . . . . . . . . . . . . . . . . . . . . . . . . . . . . . . . . . . . . . . . . . . . . . . . . . . . . . . . . . . . . . . . . . . . . . . . . . . 19
RÉINITIALISATIONDOUCE . . . . . . . . . . . . . . . . . . . . . . . . . . . . . . . . . . . . . . . . . . . . . . . . . . . . . . . . . . . . . . . . . . . . . . . . . . . 22
MIDI. . . . . . . . . . . . . . . . . . . . . . . . . . . . . . . . . . . . . . . . . . . . . . . . . . . . . . . . . . . . . . . . . . . . . . . . . . . . . . . . . . . . . . . . . . . . . . . . 22
ANNEXE:TABLEAUD’IMPLANTATIONMIDI. . . . . . . . . . . . . . . . . . . . . . . . . . . . . . . . . . . . . . . . . . . . . . . . . . . . . . . . . . . 24
ANNEXE:CARACTÉRISTIQUESTECHNIQUES. . . . . . . . . . . . . . . . . . . . . . . . . . . . . . . . . . . . . . . . . . . . . . . . . . . . . . . . . . 25

5
ASSEMBLAGE
Voustrouverezlesvissuivantespourl’assemblagedesdifférentespartiesdanslesachetd’accessoires:1-visM6X25(4)2-visM6X15(4)3-visautotaraudeuses4X12(2)
Fixer le pédalier aux panneaux latéraux1.Renverserlepanneaulatéral,lebasseretrouveenhaut,lestamponsdecaoutchoucapparaissentsurledessus.Commencerlemontageparlepanneaulatéralgauche.
vis 1
Tourillon-guide
Alignerletourillon-guidesituésurlabarredupédalieravecletrousituédanslepanneaulatéral,puisvisserlabarredupédalieraupanneauàl’aidedesvis1.
2.Fairedemêmeaveclepanneaulatéraldroit.vis 1

6
Fixer le caisson des enceintes aux panneaux latérauxFixerlecaissondesenceintesauxpanneauxlatérauxaveclesvis2.
vis 2
Poser la caisse du piano1.Lacaissedupianopossèdedestourillons-guidessur ledessous,et lehautdespanneaux latérauxestéquipéd’équerresavecdesencoches.Placezlepianosurlesupportassemblé,enretraitdecinqcentimè-tresparrapportàl’avant.Insérerlestourillonsdupianodanslesencochesdeséquerresenfaisantglisserlepianoversl’avant,jusqu’àcequ’ilarriveàl’aplombdusupport.
2.Fixerlecorpsdupianoàl’aidedevis1.
vis 1
7
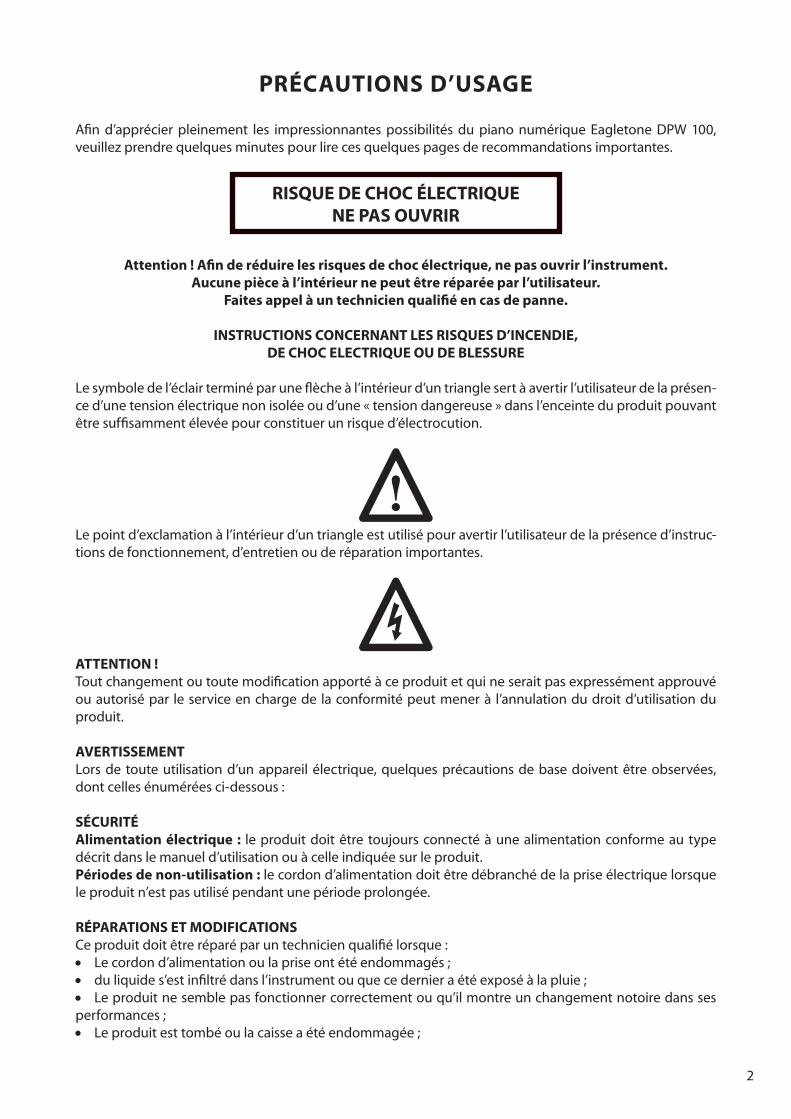
Mettre en place le porte-casque.Fixezleporte-casquestéréosouslacaissedupianoàl’aidedesvis3.
vis 3
Porte-casque stéréo
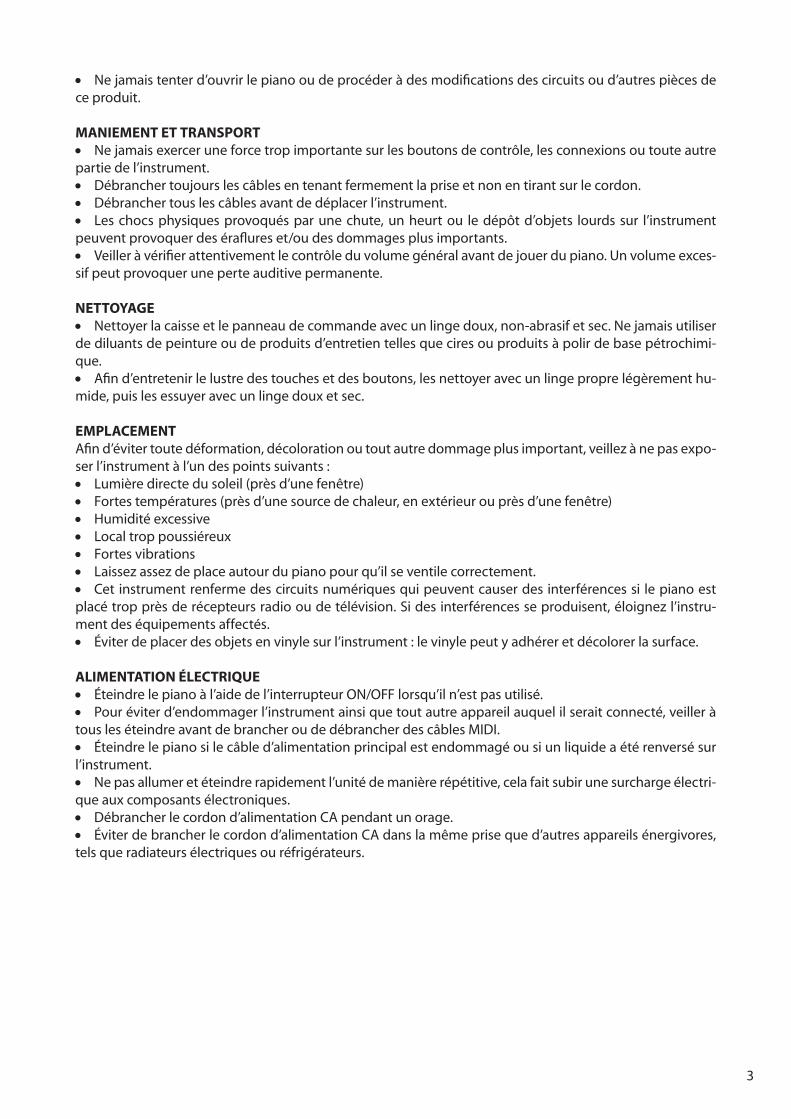
Finalisation de l’assemblageÀprésent,l’assemblagedesdifférentespartiesestterminé.
étapessuivantes:1.Branchezlecâbledupédalierdanslapriseprévueàceteffetaudosdupiano.Immobilisezlecâblelelongdusupportàl’aidedesclips.
2.Branchezlecaissondesenceintesdanslapriseprévueàceteffetsituéesouslepiano.

8
3.Insérezlecâbled’alimentationdanslapriseaudosdupiano.Branchezl’autreextrémitédansuneprisemuraleappropriée.
NOTE : débranchezlepianolorsd’oragesoulorsdelonguespériodesdenon-utilisation.Évitezdebran-cherl’adaptateurCAsurlamêmeprisedecourantqued’autresappareilsénergivores,telsqueradiateurélectriqueoufour.
9
PANNEAU DE COMMANDE ET PEDALIER
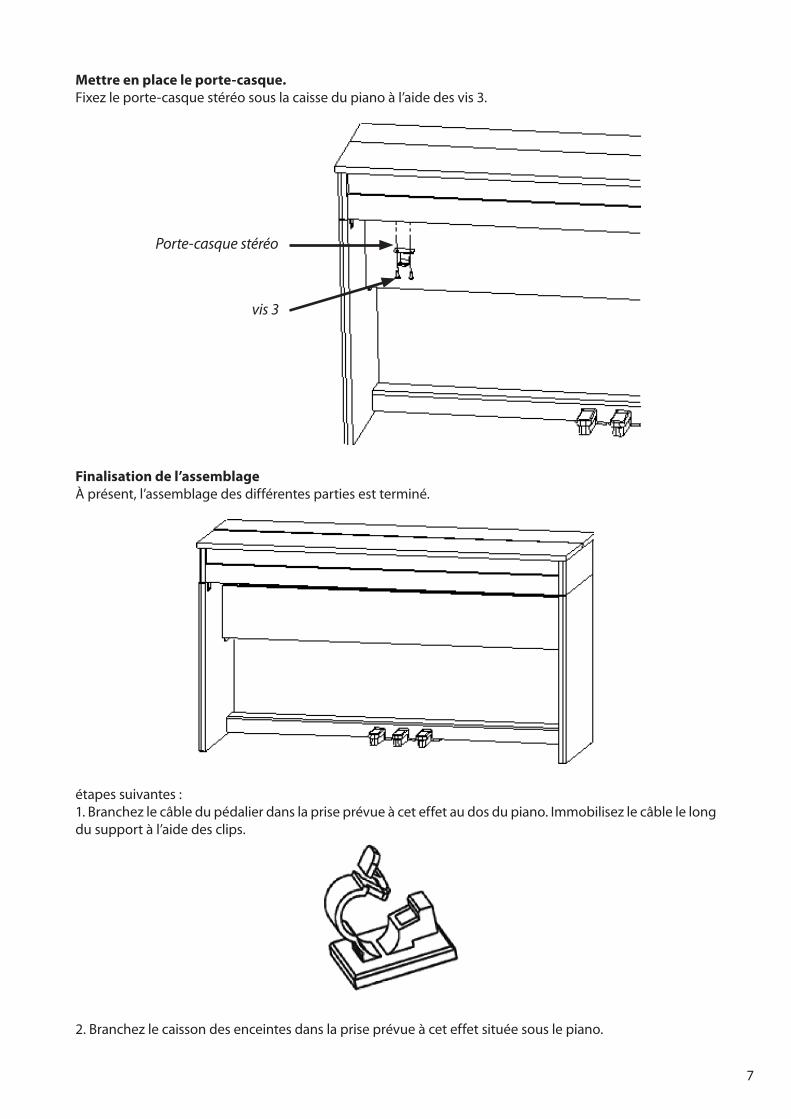
PANNEAU DE COMMANDE
Volumeprincipal Sélecteurdevoix Affichage Flècheshaut/basdenavigation enregistrement chansonsmorceauxdedémonstration,paramétrage,égalisation,effetderéverbération,effetdechœur,métronome,tempo
modedesuperposition,modedecouche,modeDoubleclavier,transpositionduton
Reportez-vousauxchapitressuivantspourobtenirunedescriptiondétailléedesboutonsdecontrôle.
INTERRUPTEUR DE MISE EN MARCHE : l’interrupteurdemiseenmarcheestsituéàgaucheduclavier.Appuyezsurcet interrupteurpourallumerouéteindre l’instrument.L’indicateurdetensionrougesur lagauches’allumelorsquelepianoestsoustension.NOTE : lorsquevouséteignez l’instrument,ne lerallumezpas immédiatement.Attendezaumoinscinqsecondesafinquelescircuitsélectroniquesseréinitialisentcorrectement.
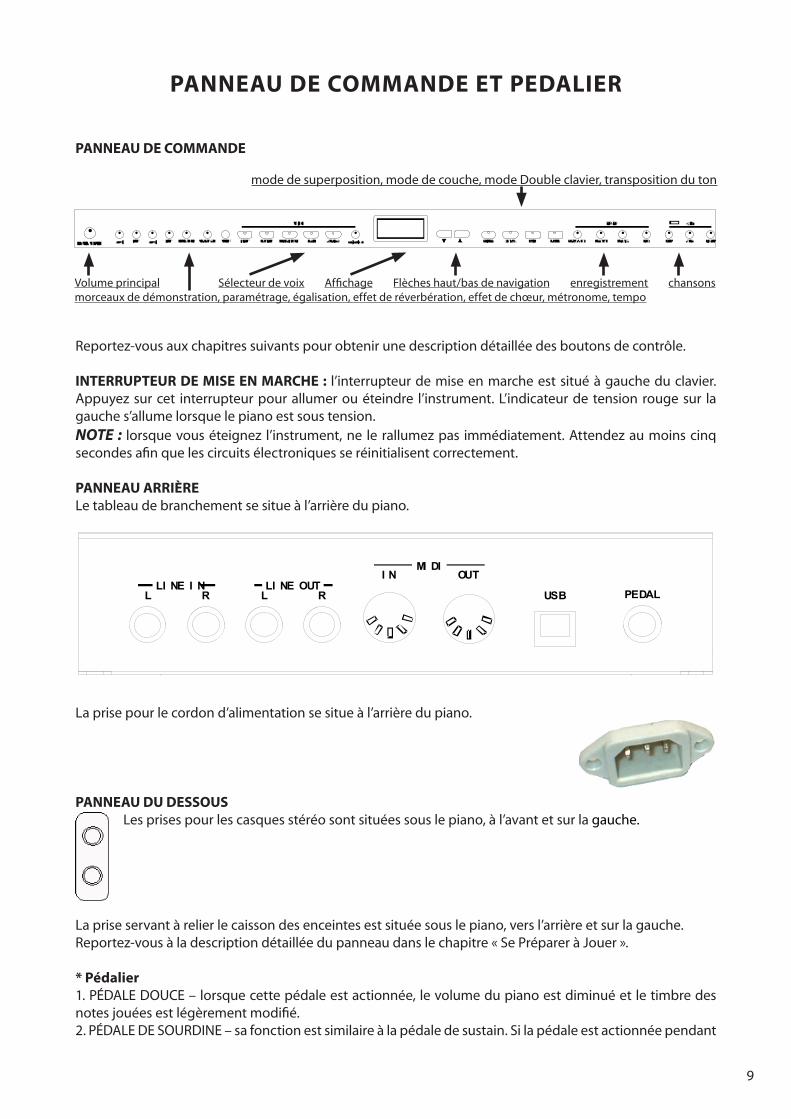
PANNEAU ARRIÈRELetableaudebranchementsesitueàl’arrièredupiano.
L RLI NE I N
L RLI NE OUT
I N OUTMI DI
USB PEDAL
Laprisepourlecordond’alimentationsesitueàl’arrièredupiano.
PANNEAU DU DESSOUS
Lesprisespourlescasquesstéréosontsituéessouslepiano,àl’avantetsurlagauche.
Lapriseservantàrelierlecaissondesenceintesestsituéesouslepiano,versl’arrièreetsurlagauche.Reportez-vousàladescriptiondétailléedupanneaudanslechapitre«SePrépareràJouer».
* Pédalier 1.PÉDALEDOUCE–lorsquecettepédaleestactionnée,levolumedupianoestdiminuéetletimbredesnotesjouéesestlégèrementmodifié.2.PÉDALEDESOURDINE–safonctionestsimilaireàlapédaledesustain.Silapédaleestactionnéependant

10
quedesnotessontjouées, lesnotesseronttenues.L’effetdesustainnes’appliquepasauxnotesjouéesaprèsquelapédaleaitétéactionnée,mêmesilapédaleestmaintenueenfoncée.3.PÉDALEDESUSTAIN–lorsquelapédalededroiteestactionnée,lesnotesdepianosonttenuestoutenétantjouées.Decefait,lesnotesdepianovontdiminuerenintensitégraduellementcommesivousconti-nuiezd’appuyersurlestouchesduclavier.
SE PRÉPARER À JOUER
VOLUME PRINCIPALTournezceboutondanslesensdesaiguillesd’unemontrepouraugmenterlevolumegénéraldupiano,etdanslesenscontrairepourlediminuer.Mettezceboutonaumilieuavantdemettrelepianosoustension.
Quelques équipements pour le confort de votre utilisation personnelle :
PUPITRELorsquevousdésirezutiliserlepupitre,redressez-le.
CASQUE STÉRÉOLepianopossèdedeuxsortiesjackpourdeuxcasquesstéréosituéessousl’instrument,àgaucheversl’avant.Celavouspermetdejouerensilence,sansdérangerlesautrespersonnesquisetrouventdanslapièce,toutsimplementenbranchantuncasquedansl’unedesprisesjackprévuesàceteffet.Lorsqu’uncasqueestbranchédansl’unedesdeuxprisesjack,leshaut-parleurscessentdefonctionner.Deuxcasquespeuventêtrebranchéssimultanément.
LINE IN (entrée ligne)Cesentréesjackaudiostéréoamplifientlesignalquiyestenvoyégrâceausystèmeinternederestitutiondeson.Vouspouvezraccorderdesappareilstelsqu’unlecteurCD,MP3oucassette.
LINE OUT (sortie ligne)Cessortiesjackaudiostéréopermettentdefairesortirlesignalémisparlepianoetdelerelieràunsystèmed’amplificationexterne,telsqu’unechaîneHi-Fi,unsystèmed’APoutoutautretyped’amplificationauto-nome.
MIDI IN/OUT (entrée/sortie MIDI)Cepianoestpourvudeportsd’entréeetdesortieMIDI.DescâblesMIDIpermettent lacommunicationentreplusieursappareilsmunisd’interfacesMIDI.Veuillezvousreporteràlasection«MIDI»decemanuelpourdeplusamplesdétails.USBLeconnecteurUSBvouspermetdeconnectercepianodirectementauportUSBdevotreordinateur.Veuillezvousreporteràlasection«MIDI»decemanuelpourdeplusamplesdétails.

11
PIÈCES MUSICALES DE DÉMONSTRATION
Ilyadeuxtypesdemorceauxdedémonstrationcomprisdanslepiano.Lepianopossèdedixpiècesmusicalesdedémonstrationd’orchestrepourvotreplaisir.Ladémonstrationdevoixprésentepourchaquevoixsélectionnéeuncourtmorceaud’illustration.
DÉMONSTRATION DE VOIXAppuyezetmaintenezenfoncéunboutondesélectiondeVoix(VOICE)puisappuyezsurleboutonDEMO.Vousentendrezalorsunmorceaudemusiquejouéaveclavoixsélectionnée.Utilisezlesboutonsdesélec-tiondevoix(VOICE),leboutondeVARIATIONoulesboutons▲,▼pourchangerlavoixdedémonstration.L’affichagesurl’écranindiquelenumérodelavoix.AppuyezdenouveausurleboutonDEMOpourarrêterladémonstration.
DE MO PI ANO E. PI ANO HARPS I CHORD ORGAN VARI ATI ON
VOI CE
ST RI NGS
DÉMONSTRATION D’ORCHESTREIlyadixdémonstrations.AppuyezsurleboutonDEMO.Sontémoins’illumine.Vousallezentendretouteslespiècesdedémonstrationencommençantparlapiècen°1,jouéesenboucle.L’affichagesurl’écranin-diquelenumérodumorceaudedémonstrationprécédédelalettre«d-».Appuyezsurlesboutons▲/▼poursélectionner lemorceaudedémonstrationdésiré.Appuyezdenouveausur leboutonDEMOpourarrêterladémonstration.
DE MO
LES VOIXLorsquelepianoestallumé,l’écranDELindiquelenumérodelavoix.Pardéfaut,lavoixest«01GrandPia-no».
SÉLECTIONNER UN SONIlyaquinzevoix,numérotéesde1à15,sélectionnablesparlesboutonsdesélectionrapidedesvoixetleboutonVARIATION.Chaqueboutondesélectiondevoixseréfèreàunecatégoriedevoixd’instrument.Appuyezsur leboutonVARIATIONpourchoisirunevoixdanschaquecatégorie.LetémoinlumineuxduboutonVARIATIONadeuxcouleurs.Lorsquelavoixchangedansunecatégoriedonnée,lacouleurduté-moin du bouton VARIATION change aussi et le numéro correspondant s’affiche sur l’écran. Les boutons ▲/▼peuventaussiserviràchoisirlesvoixenmode‘sélectiondevoix’;lestémoinsdevoixcorrespondantss’illumineront.
P I ANO E . P I ANO HAR PS I C HORD ORGAN V AR I ATI ON
V OI CE
S TR I NGS
NOTE :siseulement15voixpeuventêtresélectionnéesparlebiaisdesboutons,lepianodisposeenrevan-chede128voixMIDIetd’unkitdepercussions.IlssontàdispositionpourjouerdelamusiqueenmodeMIDI

12
enpassantparlesconnexionsMIDI/USB.LISTE DES VOIX
GROUPE N° VOIX N°MIDI
PIANO01 GrandPiano 0
02 GrandPiano2 1
03 HonkyTonk 3
E.PIANO
04 E.Piano1 4
05 E.Piano2 5
06 Vibraphone 11
HARPSICHORD(clavecin)
07 Harpsichord 6
08 Clavinet 7
09 NylonGuitar 24
ORGAN(Orgue)
10 ChurchOrgan(orgued’église) 19
11 JazzOrgan(orgueJazz) 16
12 RockOrgan(orgueRock) 18
STRINGS(cordes)
13 StringsEnsemble 48
14 SlowStrings 49
15 Synthstrings 50
LAYER : SUPERPOSITION DE VOIXAveclemodedesuperposition,vouspouvezsuperposer(oumixer)deuxsonsd’instrumentensemblequevouspouvezjouersurl’intégralitéduclavier.AppuyezsurleboutonLAYERetletémoins’illuminepourmontrerquelemodededoublevoixestactivé.L’écranindiquelenumérodelavoixprincipale(lavoixsuperposéepardéfautestSTRINGS[cordes]).SivousappuyezsimultanémentsurleboutonLAYERetunboutondesélectiondevoix,lemodedesuperpositionestactivéetletémoinduboutonLAYERclignote.Ensuite,àl’aidedesboutonsdesélectiondevoix,dubou-tonVARIATIONoudesboutons ▲/▼,vouspouvezsélectionnerladeuxièmevoixdelasuperposition.
P I ANO E . P I ANO HAR PS I C HORD ORGAN V AR I ATI ON
V OI CE
S TR I NGS LAY ER
Unefoisvotresélectionterminéeousivousnetouchezplusàuneseulecommandependant5secondes,l’écranafficheànouveaulenumérodelavoixprincipaleetlepianorevientaumodedesélectiondevoix.LetémoinlumineuxduboutonLAYERrestecependantallumé.AppuyezdenouveausurleboutonLAYERpourdésactiverlemodedesuperpositiondevoix.LetémoinduboutonLAYERs’éteint.
NOTE : sivousappuyezsurleboutonLAYERlorsquelemodededoubleclavier(DUET)ouLOWER(clavierscindé,deuxvoixdifférentes)sontactifs,cesdernierssontautomatiquementdésactivés.
Levolumeentrelavoixprincipaleetlavoixsuperposéepeutêtreajusté.Référez-vousauchapitre«FONC-TIONS»pourdeplusamplesprécisions.
13
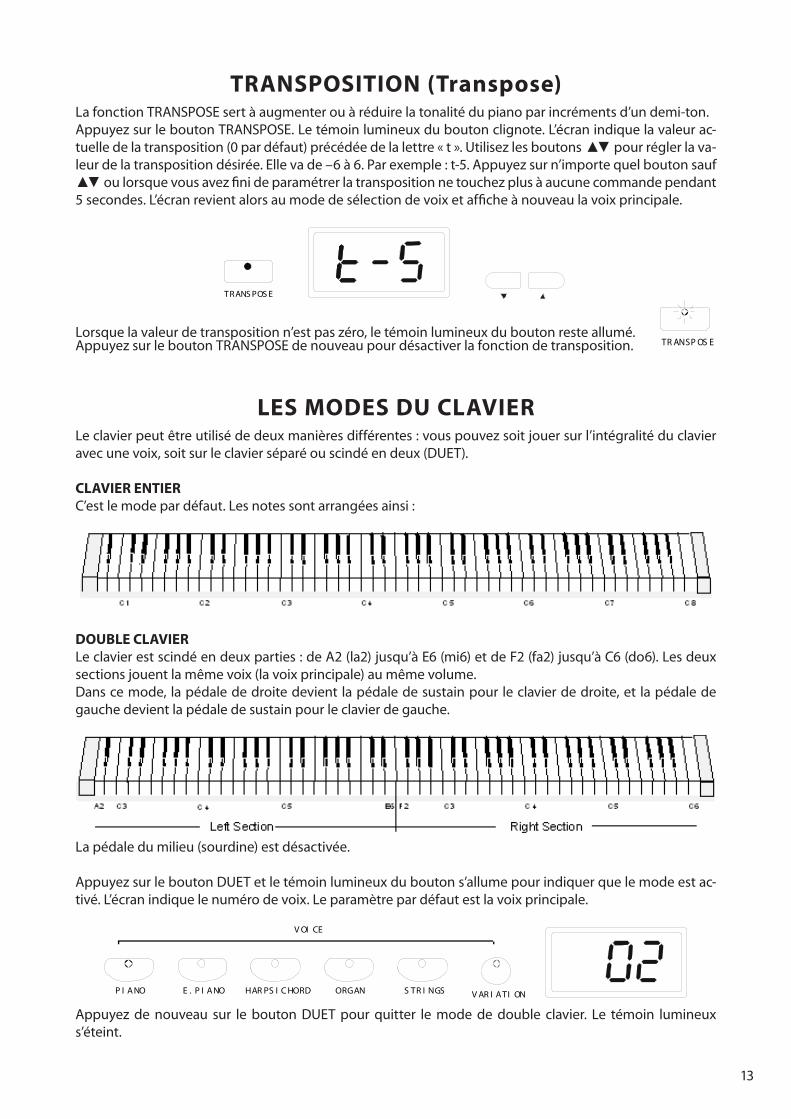
TRANSPOSITION (Transpose)LafonctionTRANSPOSEsertàaugmenterouàréduirelatonalitédupianoparincrémentsd’undemi-ton.AppuyezsurleboutonTRANSPOSE.Letémoinlumineuxduboutonclignote.L’écranindiquelavaleurac-tuelledelatransposition(0pardéfaut)précédéedelalettre«t».Utilisezlesboutons ▲▼pourréglerlava-leurdelatranspositiondésirée.Ellevade–6à6.Parexemple:t-5.Appuyezsurn’importequelboutonsauf▲▼oulorsquevousavezfinideparamétrerlatranspositionnetouchezplusàaucunecommandependant5secondes.L’écranrevientalorsaumodedesélectiondevoixetafficheànouveaulavoixprincipale.
TRANS POS E
Lorsquelavaleurdetranspositionn’estpaszéro,letémoinlumineuxduboutonresteallumé.AppuyezsurleboutonTRANSPOSEdenouveaupourdésactiverlafonctiondetransposition. TR ANSP OS E
LES MODES DU CLAVIERLeclavierpeutêtreutilisédedeuxmanièresdifférentes:vouspouvezsoitjouersurl’intégralitéduclavieravecunevoix,soitsurleclavierséparéouscindéendeux(DUET).
CLAVIER ENTIERC’estlemodepardéfaut.Lesnotessontarrangéesainsi:
DOUBLE CLAVIER Leclavierestscindéendeuxparties:deA2(la2)jusqu’àE6(mi6)etdeF2(fa2)jusqu’àC6(do6).Lesdeuxsectionsjouentlamêmevoix(lavoixprincipale)aumêmevolume.Danscemode, lapédalededroitedevientlapédaledesustainpourleclavierdedroite,et lapédaledegauchedevientlapédaledesustainpourleclavierdegauche.
Lapédaledumilieu(sourdine)estdésactivée.
AppuyezsurleboutonDUETetletémoinlumineuxduboutons’allumepourindiquerquelemodeestac-tivé.L’écranindiquelenumérodevoix.Leparamètrepardéfautestlavoixprincipale.
P I ANO E . P I ANO HAR PS I C HORD ORGAN V AR I ATI ON
V OI CE
S TR I NGS
Appuyez de nouveau sur le bouton DUET pour quitter le mode de double clavier. Le témoin lumineuxs’éteint.
14
NOTE : sivousappuyezsurleboutonDUETlorsquelemodeLAYER(superposition)ouLOWER(voixsecon-daire)sontactifs,lesmodesLAYERetdeclavierscindésontautomatiquementdésactivés.
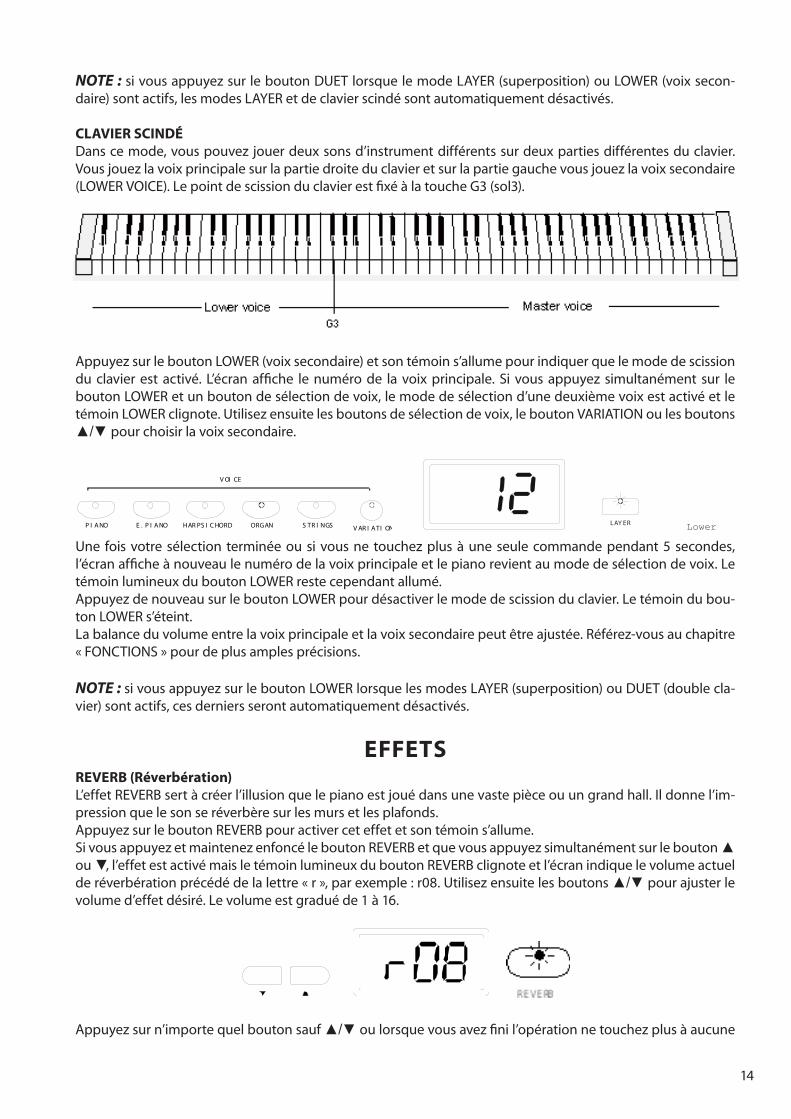
CLAVIER SCINDÉDanscemode,vouspouvezjouerdeuxsonsd’instrumentdifférentssurdeuxpartiesdifférentesduclavier.Vousjouezlavoixprincipalesurlapartiedroiteduclavieretsurlapartiegauchevousjouezlavoixsecondaire(LOWERVOICE).LepointdescissionduclavierestfixéàlatoucheG3(sol3).
AppuyezsurleboutonLOWER(voixsecondaire)etsontémoins’allumepourindiquerquelemodedescissiondu clavier est activé. L’écran affiche le numéro de la voix principale. Si vous appuyez simultanément sur leboutonLOWERetunboutondesélectiondevoix,lemodedesélectiond’unedeuxièmevoixestactivéetletémoinLOWERclignote.Utilisezensuitelesboutonsdesélectiondevoix,leboutonVARIATIONoulesboutons▲/▼pourchoisirlavoixsecondaire.
P I ANO E . P I ANO HAR PS I C HORD ORGAN V AR I ATI ON
V OI CE
S TR I NGS LAY ER Lower Une foisvotresélection terminéeousivousne touchezplusàuneseulecommandependant5secondes,l’écranafficheànouveaulenumérodelavoixprincipaleetlepianorevientaumodedesélectiondevoix.LetémoinlumineuxduboutonLOWERrestecependantallumé.AppuyezdenouveausurleboutonLOWERpourdésactiverlemodedescissionduclavier.Letémoindubou-tonLOWERs’éteint.Labalanceduvolumeentrelavoixprincipaleetlavoixsecondairepeutêtreajustée.Référez-vousauchapitre«FONCTIONS»pourdeplusamplesprécisions.
NOTE : sivousappuyezsurleboutonLOWERlorsquelesmodesLAYER(superposition)ouDUET(doublecla-vier)sontactifs,cesderniersserontautomatiquementdésactivés.
EFFETSREVERB (Réverbération)L’effetREVERBsertàcréerl’illusionquelepianoestjouédansunevastepièceouungrandhall.Ildonnel’im-pressionquelesonseréverbèresurlesmursetlesplafonds.AppuyezsurleboutonREVERBpouractiverceteffetetsontémoins’allume.SivousappuyezetmaintenezenfoncéleboutonREVERBetquevousappuyezsimultanémentsurlebouton▲ou▼,l’effetestactivémaisletémoinlumineuxduboutonREVERBclignoteetl’écranindiquelevolumeactuelderéverbérationprécédédelalettre«r»,parexemple:r08.Utilisezensuitelesboutons▲/▼pourajusterlevolumed’effetdésiré.Levolumeestgraduéde1à16.
Appuyezsurn’importequelboutonsauf▲/▼oulorsquevousavezfinil’opérationnetouchezplusàaucune

15
commandependant5secondesetainsil’écranindiqueraànouveaulavoixprincipaleetreviendraaumodedesélectiondevoix.LetémoinduboutonREVERBresteallumé.Chaquevoixpossèdeunréglaged’effetderéverbérationetdechoruspardéfaut.Lorsqu’unevoixpossé-dantuneffetderéverbérationestsélectionnée,letémoinduboutonREVERBs’allumeautomatiquement.
CHORUS (chœur)L’effetCHORUS(chœur)ajoutedelaprofondeuretdel’espaceàlavoixdeclaviersélectionnée.AppuyezsurleboutonCHORUSpouractiverl’effet;letémoinduboutons’allume.SivousappuyezetmaintenezenfoncéleboutonCHORUSetquevousappuyezsimultanémentsurlebou-ton▲ou▼, l’effetestactivémaisletémoinlumineuxduboutonCHORUSclignoteetl’écranindiquelevolumeactuelduChorusprécédédelalettre«c»,parexemple:c08.Utilisezensuitelesboutons▲/▼pourajusterlevolumed’effetdésiré.Levolumeestgraduéde1à16.
Appuyezsurn’importequelboutonsauf▲/▼oulorsquevousavezfinil’opérationnetouchezplusàaucu-necommandependant3secondesetainsil’écranindiqueraànouveaulavoixprincipaleetreviendraaumodedesélectiondevoix.LetémoinduboutonCHORUSresteallumé.Chaquevoixpossèdeunréglaged’effetde réverbérationetdechoruspardéfaut.Lorsqu’unevoixpos-sédantuneffetdeChorusestsélectionnée,letémoinduboutonCHORUSs’allumeautomatiquement.Leréglageduvolumedechaqueeffets’appliqueauxdeuxvoixdanslesmodesdevoixdouble(LOWER)etdedoubleclavier(DUET).
BRIGHTNESS (Brillance)Cettefonctionvouspermetderéglerlabrillanceduson.EntrezdanscemodeenappuyantsurleboutonEQ(égalisation).Utilisezlesboutons▲/▼pourréglerledegrédebrillancedésiré,allantde1à8.Appuyezsimultanémentsurlesboutons ▲ et▼pourreveniràlavaleurpardéfaut(7).
E Q
MÉTRONOMEDéclenchezlemétronomeinternedupianoenappuyantsurleboutonMETRONOME.Ilvasemettrealorsàjouerselonlesréglagesdetempoetdetypedemesuredéfinis.SivousappuyezsimultanémentsurleboutonMETRONOMEetlebouton▲ ou ▼,lemétronomesemetenmarchemaisl’écranindiqueletypedemesurequiestentraind’êtrejoué(letypedemesurejouépardéfautest4/4).Ilyaunpointséparantlenombredetempsparmesureetlenombredenotesparmesure.Parexemple,leschémaci-dessousre-présenteunemesureen3/4.Utilisezlesboutons ▲/▼pourmodifierletypedemesure,selonlaséquencesuivante:1/4,2/4,3/4,4/4,5/4,6/4,6/8et12/8.Lorsquelemétronomeestactivé,lestémoinslumineuxsituésau-dessusduboutonMETRONOMEclignotentenfonctiondutypedemesuresélectionné.
ME TR ONOME
16
Appuyezsurn’importequelboutonsauf▲/▼oulorsquevousavezfinil’opérationnetouchezplusàaucu-necommandependanttroissecondesetainsil’écranindiqueraànouveaulavoixprincipaleetreviendraaumodedesélectiondevoix.LetémoinduboutonMETRONOMEresteallumé.AppuyezdenouveausurleboutonMETRONOMEpourl’arrêter.
NOTE :leseffetsderéverbération(REVERB)etdechœur(CHORUS)nes’appliquentpasauxbattementsdumétronome.
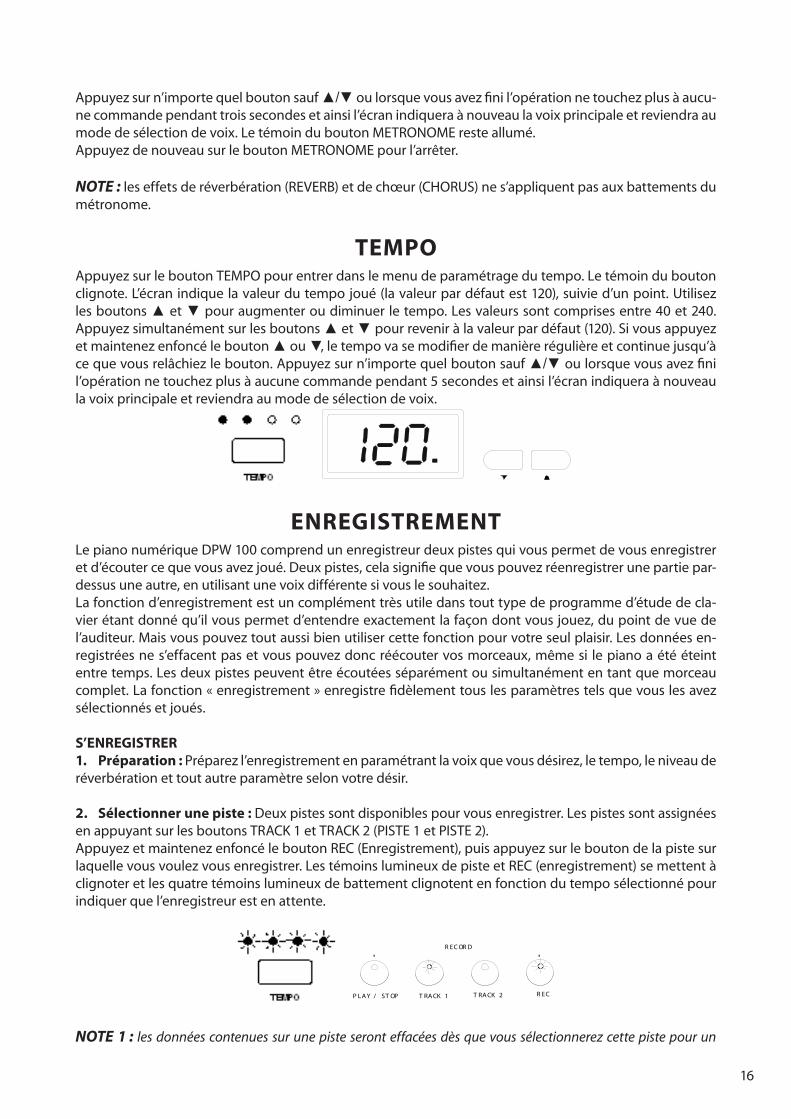
TEMPOAppuyezsurleboutonTEMPOpourentrerdanslemenudeparamétragedutempo.Letémoinduboutonclignote.L’écranindiquelavaleurdutempojoué(lavaleurpardéfautest120),suivied’unpoint.Utilisezlesboutons▲et▼pouraugmenteroudiminuerletempo.Lesvaleurssontcomprisesentre40et240.Appuyezsimultanémentsurlesboutons▲et▼pourreveniràlavaleurpardéfaut(120).Sivousappuyezetmaintenezenfoncélebouton▲ou▼,letempovasemodifierdemanièrerégulièreetcontinuejusqu’àcequevousrelâchiezlebouton.Appuyezsurn’importequelboutonsauf▲/▼oulorsquevousavezfinil’opérationnetouchezplusàaucunecommandependant5secondesetainsil’écranindiqueraànouveaulavoixprincipaleetreviendraaumodedesélectiondevoix.
ENREGISTREMENTLepianonumériqueDPW100comprendunenregistreurdeuxpistesquivouspermetdevousenregistreretd’écoutercequevousavezjoué.Deuxpistes,celasignifiequevouspouvezréenregistrerunepartiepar-dessusuneautre,enutilisantunevoixdifférentesivouslesouhaitez.Lafonctiond’enregistrementestuncomplémenttrèsutiledanstouttypedeprogrammed’étudedecla-vierétantdonnéqu’ilvouspermetd’entendreexactementlafaçondontvousjouez,dupointdevuedel’auditeur.Maisvouspouveztoutaussibienutilisercettefonctionpourvotreseulplaisir.Lesdonnéesen-registréesnes’effacentpasetvouspouvezdoncréécoutervosmorceaux,mêmesi lepianoaétééteintentretemps.Lesdeuxpistespeuventêtreécoutéesséparémentousimultanémententantquemorceaucomplet.Lafonction«enregistrement»enregistrefidèlementtouslesparamètrestelsquevouslesavezsélectionnésetjoués.
S’ENREGISTRERPréparation : 1. Préparezl’enregistrementenparamétrantlavoixquevousdésirez,letempo,leniveaude
réverbérationettoutautreparamètreselonvotredésir.
Sélectionner une piste : 2. Deuxpistessontdisponiblespourvousenregistrer.LespistessontassignéesenappuyantsurlesboutonsTRACK1etTRACK2(PISTE1etPISTE2).AppuyezetmaintenezenfoncéleboutonREC(Enregistrement),puisappuyezsurleboutondelapistesurlaquellevousvoulezvousenregistrer.LestémoinslumineuxdepisteetREC(enregistrement)semettentàclignoteretlesquatretémoinslumineuxdebattementclignotentenfonctiondutemposélectionnépourindiquerquel’enregistreurestenattente.
R EC OR D
P LAY / ST OP T RACK 1 T RACK 2 R EC
NOTE 1 : les données contenues sur une piste seront effacées dès que vous sélectionnerez cette piste pour un
17
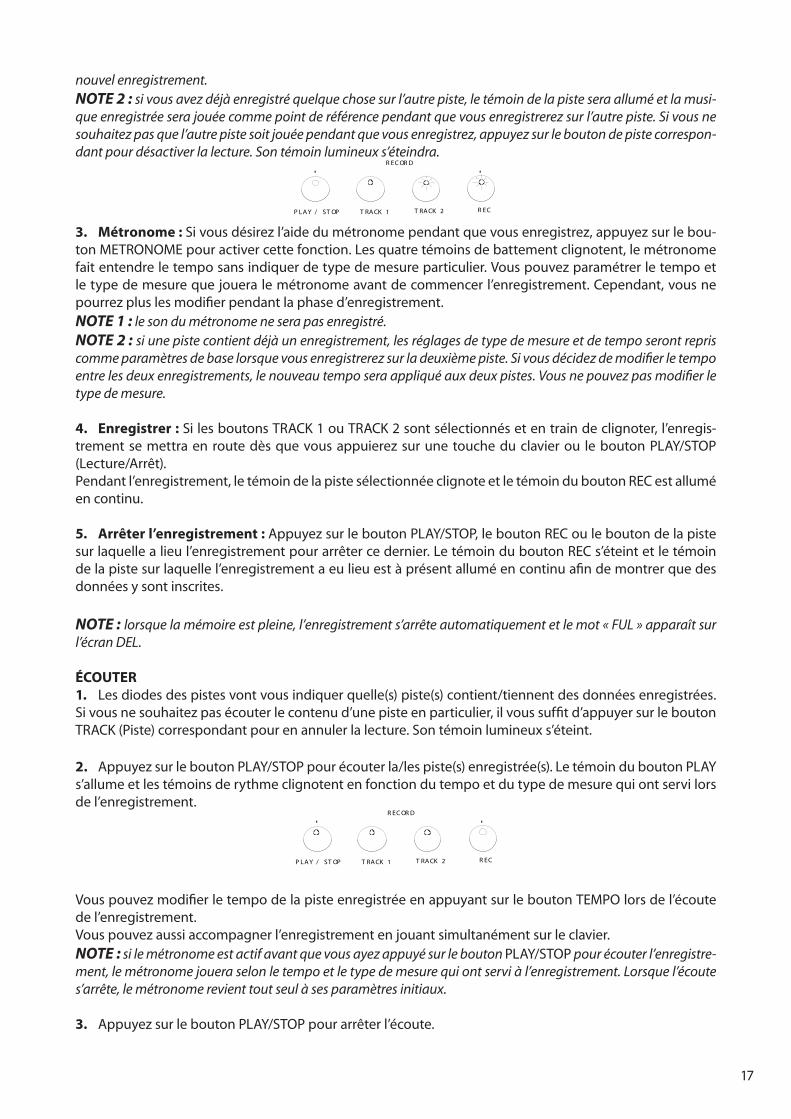
nouvel enregistrement.NOTE 2 : si vous avez déjà enregistré quelque chose sur l’autre piste, le témoin de la piste sera allumé et la musi-que enregistrée sera jouée comme point de référence pendant que vous enregistrerez sur l’autre piste. Si vous ne souhaitez pas que l’autre piste soit jouée pendant que vous enregistrez, appuyez sur le bouton de piste correspon-dant pour désactiver la lecture. Son témoin lumineux s’éteindra.
R EC OR D
P LAY / ST OP T RACK 1 T RACK 2 R EC
Métronome : 3. Sivousdésirezl’aidedumétronomependantquevousenregistrez,appuyezsurlebou-tonMETRONOMEpouractivercettefonction.Lesquatretémoinsdebattementclignotent,lemétronomefaitentendreletemposansindiquerdetypedemesureparticulier.Vouspouvezparamétrerletempoetletypedemesurequejoueralemétronomeavantdecommencerl’enregistrement.Cependant,vousnepourrezpluslesmodifierpendantlaphased’enregistrement.NOTE 1 : le son du métronome ne sera pas enregistré.NOTE 2 : si une piste contient déjà un enregistrement, les réglages de type de mesure et de tempo seront repris comme paramètres de base lorsque vous enregistrerez sur la deuxième piste. Si vous décidez de modifier le tempo entre les deux enregistrements, le nouveau tempo sera appliqué aux deux pistes. Vous ne pouvez pas modifier le type de mesure.
Enregistrer : 4. SilesboutonsTRACK1ouTRACK2sontsélectionnésetentraindeclignoter,l’enregis-trementsemettraenroutedèsquevousappuierezsurunetoucheduclavierou leboutonPLAY/STOP(Lecture/Arrêt).Pendantl’enregistrement,letémoindelapistesélectionnéeclignoteetletémoinduboutonRECestalluméencontinu.
Arrêter l’enregistrement :5. AppuyezsurleboutonPLAY/STOP,leboutonRECouleboutondelapistesurlaquellealieul’enregistrementpourarrêtercedernier.LetémoinduboutonRECs’éteintetletémoindelapistesurlaquellel’enregistrementaeulieuestàprésentalluméencontinuafindemontrerquedesdonnéesysontinscrites.
NOTE :lorsque la mémoire est pleine, l’enregistrement s’arrête automatiquement et le mot « FUL » apparaît sur l’écran DEL.
ÉCOUTERLesdiodesdespistesvontvousindiquerquelle(s)piste(s)contient/tiennentdesdonnéesenregistrées.1.
Sivousnesouhaitezpasécouterlecontenud’unepisteenparticulier,ilvoussuffitd’appuyersurleboutonTRACK(Piste)correspondantpourenannulerlalecture.Sontémoinlumineuxs’éteint.
AppuyezsurleboutonPLAY/STOPpourécouterla/lespiste(s)enregistrée(s).LetémoinduboutonPLAY2. s’allumeetlestémoinsderythmeclignotentenfonctiondutempoetdutypedemesurequiontservilorsdel’enregistrement.
R EC OR D
P LAY / ST OP T RACK 1 T RACK 2 R EC
VouspouvezmodifierletempodelapisteenregistréeenappuyantsurleboutonTEMPOlorsdel’écoutedel’enregistrement.Vouspouvezaussiaccompagnerl’enregistrementenjouantsimultanémentsurleclavier.NOTE : si le métronome est actif avant que vous ayez appuyé sur le bouton PLAY/STOP pour écouter l’enregistre-ment, le métronome jouera selon le tempo et le type de mesure qui ont servi à l’enregistrement. Lorsque l’écoute s’arrête, le métronome revient tout seul à ses paramètres initiaux.
AppuyezsurleboutonPLAY/STOPpourarrêterl’écoute.3.

18
L’écoutes’arrêteaussid’elle-mêmelorsquel’enregistrementarriveàsafin.
Aupoint2,vouspouvezmodifierletempodelecturedespistesenregistréessoitmomentanément,soit4. demanièrepermanentecommesuit:-réglezlanouvellevaleurdutempo;-maintenezenfoncélatoucheREC(enregistrement)etappuyezsurleboutonPLAY/STOP.Lespistesserontluesàcenouveautempo,quidevientletempopardéfautdespistes.Enrevanche,letypedemesurenepeutpasêtremodifié.
EFFACER LES PISTESPoureffacerlamusiqueenregistréesurlespistes:
AppuyezetmaintenezenfoncéleboutonREC.1. Appuyezsurleboutondelapistequevoussouhaitezeffacertoutencontinuantdemaintenirenfoncé2. leboutonREC.Celavaimmédiatementeffacertouteslesdonnéesdevotreenregistrementdefaçondéfinitive.RelâchezleboutonREC(lestémoinsdepisteetRECclignotent).3. Appuyezsurleboutondepistedenouveau(lestémoinss’éteignent)4. Répétezlesétapes1à4jusqu’àcequelespistesdésiréessoienteffacées.5.
MORCEAUX D’ACCOMPAGNEMENTLabanquedesmorceauxd’apprentissagecontient58titrespourvotreplusgrandplaisir.Lesjeuxdesmainsgaucheetdroitesontséparésetpeuventêtreactivésoudésactivésselonvotrebonvouloir,vouslaissantainsilapossibilitédepratiquerlapartiequevousvoulezsurleclavier.
CHOISIR UN MORCEAUAppuyezsurleboutonSONG(chanson).Letémoinduboutonvas’illumineretlenumérodumorceauvaapparaîtresurl’écranDEL.LesdeuxtémoinslumineuxLEFT(gauche)etRIGHT(droite)sontéteints.Utilisezlesboutons ▲/▼ pourchoisirunmorceau.
SONG
SONG LEF T RI GHT
Sivousdésirezjouerlemorceausélectionnéàunevitesseinférieureousupérieureàcelled’origine,appuyezsurleboutonTEMPOetservez-vousdesboutons▲/▼pourmodifierletemposelonuncoefficientbasésurletempoinitialdumorceau.Lecoefficientvade50%à150%.Appuyezsimultanémentsurlesboutons▲et▼pourrevenirautempopardéfautdumorceauchoisi.Après5secondes,l’affichagedel’écranrevientaunumérodumorceau.
ME TR ONOME TR ANSP OS E TE MP O
ÉCOUTER LE MORCEAU EN ENTIERAppuyezsurleboutonPLAY/STOPpourécouterlesdeuxmainsjouerlemorceauenentier.1.
PL AY / S TOP
AppuyezdenouveausurPLAY/STOPpourarrêterl’écoute.Autrement,l’écoutes’arrêterad’elle-même2. àlafindumorceau.
19
PRATIQUER LA MAIN DROITE DU MORCEAU SÉLECTIONNÉAppuyezsurleboutonRIGHT(droite)pourdésactiverlapartiejouéeparlamaindroite.Letémoindu1.
boutonRIGHTs’allume.SONG
SONG LEF T RI GHT
AppuyezsurleboutonDEMOpourentendreseulementlapartiedelamaindroiteavantdevousexer-2. ceràlajouer.AppuyezdenouveausurleboutonDEMOpourl’arrêter.AppuyezsurleboutonPLAY/STOP.Sontémoins’allumeetvousallezentendrelemétronome«battrela3.
mesure»dumorceau.Vousallezensuiteentendrelapartiejouéeparlamaingauche.Lemétronomeestactivépardéfaut(ON).AppuyezsurleboutonMETRONOMEsivousvoulezledésac-4.
tiverenmodemainGauche/Droite.Cependant,lorsquelesdeuxmainssontjouéessimultanément,vousnepouvezpasledésactiver.
Jouezlapartiedelamaindroitedumorceauquevousavezsélectionnépendantquelapartiedela5. maingaucheestjouée.
Appuyezdenouveausur leboutonPLAY/STOPpourarrêter l’écoute.La lectures’arrêteraautrement6. d’elle-mêmeàlafindumorceau.
PRATIQUER LA MAIN GAUCHE DU MORCEAU SÉLECTIONNÉSuivez les étapes 1 à 5 sus-indiquées en remplaçant chaque mention du « bouton RIGHT (droite) » par«boutonLEFT(gauche)».
SONG
SONG LEF T RI GHT
Vousentendrezalorslapartiedelamaindroitedumorceauquevousavezsélectionné.Jouezlapartiedelamaingauchependantquelapartiedelamaindroiteestjouée.
PRATIQUER LES DEUX MAINS DU MORCEAU SÉLECTIONNÉAppuyezsurlesboutonsRIGHT(droite)etLEFT(gauche)simultanément.Lestémoinsdesboutonss’al-1.
lumenttouslesdeux.SONG
SONG LEF T RI GHT
AppuyezsurleboutonPLAY/STOP.Sontémoins’allumeetvousallezentendrelemétronome«battre2. lamesure»dumorceau.
Jouez lespartiesdesmainsgaucheetdroitedumorceauquevousavezsélectionné.Lemétronome3. continueradebattrelamesurepourvousaideràgarderlerythme.
AppuyezsurleboutonPLAY/STOPunenouvellefoispourarrêterlalecture.Lalectures’arrêteraautre-4. mentd’elle-mêmeàlafindumorceau.
LE MODE DES FONCTIONSLeModedesFonctionsvousdonneaccèsauxautrespossibilitésdevotrepiano.
AppuyezsurleboutonSETUPpouraccéderaumenudeparamétragedesfonctions.AppuyezdemanièrerépétitivesurleboutonSETUPpouraccéderàlafonctionnalitéquevoussouhaitezparamétrer.Appuyezsurlesboutons▲/▼poursélectionneruneoptionoudéfinirunevaleurpourcettefonctionnalité.LorsquevousaccédezàlafonctionnalitésuivanteenappuyantdenouveausurleboutonSETUP,lesparamètresquevousavezdéfinissontautomatiquementsauvegardés.Appuyezsurn’importequelboutonhormislesbou-tons▲/▼ etSETUPpoursortirdumodedesFonctionsetretourneraumodedesélectiondevoix.
20
LesfonctionnalitéssuivantespeuventêtresélectionnéesetparamétréesdansleModedesFonctions:
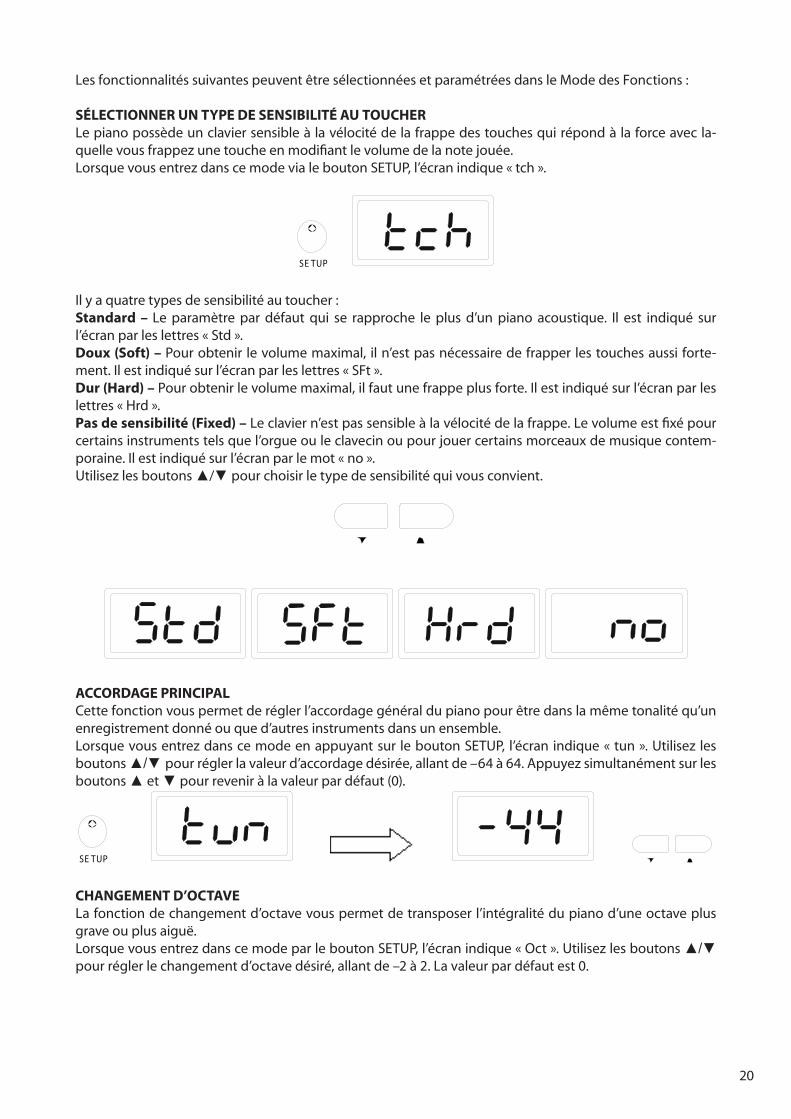
SÉLECTIONNER UN TYPE DE SENSIBILITÉ AU TOUCHERLepianopossèdeunclaviersensibleàlavélocitédelafrappedestouchesquirépondàlaforceavecla-quellevousfrappezunetoucheenmodifiantlevolumedelanotejouée.LorsquevousentrezdanscemodevialeboutonSETUP,l’écranindique«tch».
SE TUP
Ilyaquatretypesdesensibilitéautoucher:Standard – Le paramètre par défaut qui se rapproche le plus d’un piano acoustique. Il est indiqué surl’écranparleslettres«Std».Doux (Soft) – Pourobtenir levolumemaximal, iln’estpasnécessairedefrapperlestouchesaussiforte-ment.Ilestindiquésurl’écranparleslettres«SFt».Dur (Hard) –Pourobtenirlevolumemaximal,ilfautunefrappeplusforte.Ilestindiquésurl’écranparleslettres«Hrd».Pas de sensibilité (Fixed) –Leclaviern’estpassensibleàlavélocitédelafrappe.Levolumeestfixépourcertainsinstrumentstelsquel’orgueouleclavecinoupourjouercertainsmorceauxdemusiquecontem-poraine.Ilestindiquésurl’écranparlemot«no».Utilisezlesboutons▲/▼pourchoisirletypedesensibilitéquivousconvient.
ACCORDAGE PRINCIPALCettefonctionvouspermetderéglerl’accordagegénéraldupianopourêtredanslamêmetonalitéqu’unenregistrementdonnéouqued’autresinstrumentsdansunensemble.Lorsquevousentrezdanscemodeenappuyantsur leboutonSETUP, l’écranindique«tun».Utilisezlesboutons▲/▼ pourréglerlavaleurd’accordagedésirée,allantde–64à64.Appuyezsimultanémentsurlesboutons▲et▼pourreveniràlavaleurpardéfaut(0).
SE TUP
CHANGEMENT D’OCTAVELafonctiondechangementd’octavevouspermetdetransposerl’intégralitédupianod’uneoctaveplusgraveouplusaiguë.LorsquevousentrezdanscemodeparleboutonSETUP,l’écranindique«Oct».Utilisezlesboutons▲/▼pourréglerlechangementd’octavedésiré,allantde–2à2.Lavaleurpardéfautest0.

21
SE TUP
BALANCE DES VOLUMESLemodedebalancedesvolumespermetdefairelabalanceentrelavoixprincipaleetlavoixsecondairedanslemodeLAYER(voixsuperposée)etdeclavierscindé.LorsquevousentrezdanscemodevialeboutonSETUP,l’écranindique«bLn».Labalancedevolumesecomprendainsi:«volumedelavoixsecondaire–volumedelavoixprincipale».Chaqueparamètrevade1à9;1étantlevolumeminimalet9levolumemaximal.Labalanceduvolumepardéfautest«5–5».Utilisezlebouton ▼ pourdiminuerlevolumedelavoixsecondaireetaugmenterlevolumedelavoixprin-cipale,parexemple:4–6,3–7…1–9.Utilisezlebouton▲pouraugmenterlevolumedelavoixsecondaireetdiminuerlevolumedelavoixprin-cipale,parexemple:6–4,7–3…9–1.Appuyezsimultanémentsurlesboutons▲et ▼pourreveniràlavaleurpardéfautde5–5.
Note : la même valeur de balance des volumes s’applique aux modes LAYER et clavier scindé.
LOCAL OFF«LOCALOFF»estunmodespécialdejeudupianodanslequellepianoestconnectéàuneautremachineMIDIouàunordinateur.Lorsque«Local»estenposition«ON»(activé),cequiestjouésurlepianosortirasurlesenceintesdupianoetlessignauxMIDIserontégalementtransmisàl’autreappareilparlasortieMIDI(MIDIOut).Lorsque«Local»estenposition«OFF»(désactivé),cequiestjouésurlepianonesortpassurlesenceintesdupiano,maislesmessagesdujeusonttransmisparlasortieMIDI(MIDIOut).Cettefonctionnalitéestutilelorsqu’onveutseservirdupianoentantqueclavieretquelesonsortesurunautreinstrumentMIDI.LorsquevousentrezdanscemodevialeboutonSETUP,l’écranindique«Loc».Utilisezlebouton ▼pourdésactiverle«Local»(OFF)etlebouton▲pourl’activer(ON).Leréglagepardéfautest«ON».
NOTE : lorsque«Local»estenposition«OFF»,lemétronomefonctionnenormalementetestaudible.
STORE (Mémoire)Normalement,lorsquevousallumezlepiano,cesontlesréglagespardéfautquisontinitialisés;lesréglagesdéfinisoumodifiésprécédemmentparl’utilisateurnesontpassauvegardés.Si lafonction«STORE»estactivée, lorsquevousallumezlepiano,lesderniersréglageseffectuésparl’utilisateursontmémorisésetinitialisés.Cesréglagesincluent:voixdeLAYER(superposition)etvoixDUET(modedoubleclavier),balancedesvolumes,typedesensibilitéduclavier,numérodemorceau,paramètresd’effetssonores,etc.LorsquevousentrezdanscemodevialeboutonSETUP,l’écranindique«Sto».Utilisezlebouton▼pourdésactiverlafonctiondemémorisationetlebouton ▲pourl’activer.Leréglagepardéfautest«OFF»(désactivé).
22
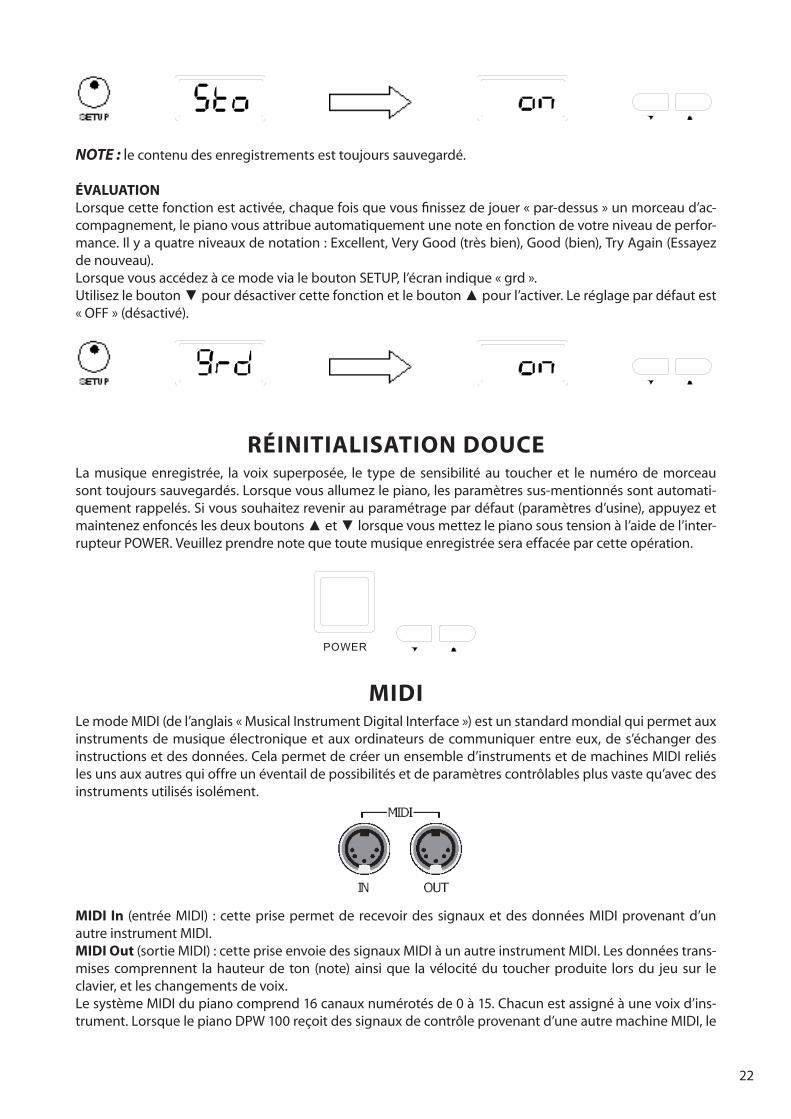
NOTE : lecontenudesenregistrementsesttoujourssauvegardé.
ÉVALUATION Lorsquecettefonctionestactivée,chaquefoisquevousfinissezdejouer«par-dessus»unmorceaud’ac-compagnement,lepianovousattribueautomatiquementunenoteenfonctiondevotreniveaudeperfor-mance.Ilyaquatreniveauxdenotation:Excellent,VeryGood(trèsbien),Good(bien),TryAgain(Essayezdenouveau).LorsquevousaccédezàcemodevialeboutonSETUP,l’écranindique«grd».Utilisezlebouton▼pourdésactivercettefonctionetlebouton▲pourl’activer.Leréglagepardéfautest«OFF»(désactivé).
RÉINITIALISATION DOUCE La musique enregistrée, la voix superposée, le type de sensibilité au toucher et le numéro de morceausonttoujourssauvegardés.Lorsquevousallumezlepiano,lesparamètressus-mentionnéssontautomati-quementrappelés.Sivoussouhaitezrevenirauparamétragepardéfaut(paramètresd’usine),appuyezetmaintenezenfoncéslesdeuxboutons▲et▼lorsquevousmettezlepianosoustensionàl’aidedel’inter-rupteurPOWER.Veuillezprendrenotequetoutemusiqueenregistréeseraeffacéeparcetteopération.
POWER
MIDILemodeMIDI(del’anglais«MusicalInstrumentDigitalInterface»)estunstandardmondialquipermetauxinstrumentsdemusiqueélectroniqueetauxordinateursdecommuniquerentreeux,des’échangerdesinstructionsetdesdonnées.Celapermetdecréerunensembled’instrumentsetdemachinesMIDIreliéslesunsauxautresquioffreunéventaildepossibilitésetdeparamètrescontrôlablesplusvastequ’avecdesinstrumentsutilisésisolément.
MIDI In (entréeMIDI) :cetteprisepermetderecevoirdessignauxetdesdonnéesMIDIprovenantd’unautreinstrumentMIDI.MIDI Out (sortieMIDI):cettepriseenvoiedessignauxMIDIàunautreinstrumentMIDI.Lesdonnéestrans-misescomprennent lahauteurde ton (note)ainsique lavélocitédu toucherproduite lorsdu jeusur leclavier,etleschangementsdevoix.LesystèmeMIDIdupianocomprend16canauxnumérotésde0à15.Chacunestassignéàunevoixd’ins-trument.LorsquelepianoDPW100reçoitdessignauxdecontrôleprovenantd’uneautremachineMIDI,le

23
canalactifestdéterminéparlesparamètresMIDIdupianooulesignaldecontrôlereçu.
Exemples de connexionSortieMIDIduDPW100versungénérateurdesonexterne:ReliezlapriseMIDIOutdupianoàlapriseMIDIInd’unappareilexterne(clavier,synthétiseur,générateurdeson…).L’appareilexternerépondraàcequevousjouezsurlepianoDPW100.Decettefaçon,vouspou-vezjouerdeuxinstrumentsàlafoisoujouersurvotreinstrumentetnefairesonnerquel’autreinstrumentMIDI.
SortieMIDId’unautreinstrumentversl’entréeMIDIduDPW100:ReliezlapriseMIDIIndupianoàlapriseMIDIOutd’uninstrumentexterne.Lesdonnéesetsignauxgénéréssurl’autremachinepiloterontvotrepiano.
Connexionàunordinateur:Vouspouveztransférervotrejeusurunordinateurafindebénéficierdescapacitésetdesparamétragesd’enregistrement,decompositionetd’éditionavancésdisponiblesdansleslogicielsdevotreordinateur.LamusiqueMIDIstockéedansvotreordinateurpeutaussiêtreenvoyéeàvotrepianopourqu’illajoue.
USB :lapriseUSBvouspermetderelierlepianoDPW100directementàl’undesportsUSBdevotreordina-teur.Lescaractéristiquesdel’interfaceUSBsontlesmêmesquecellesdesprisesMIDI,àladifférencequelapriseUSBpermetletransitdesdonnéesdesprisesMIDIInetOutparlemêmeportetlemêmecâbleUSB.L’interfaceUSBestcompatibleavecWindowsXP/VistaetMAC.
24
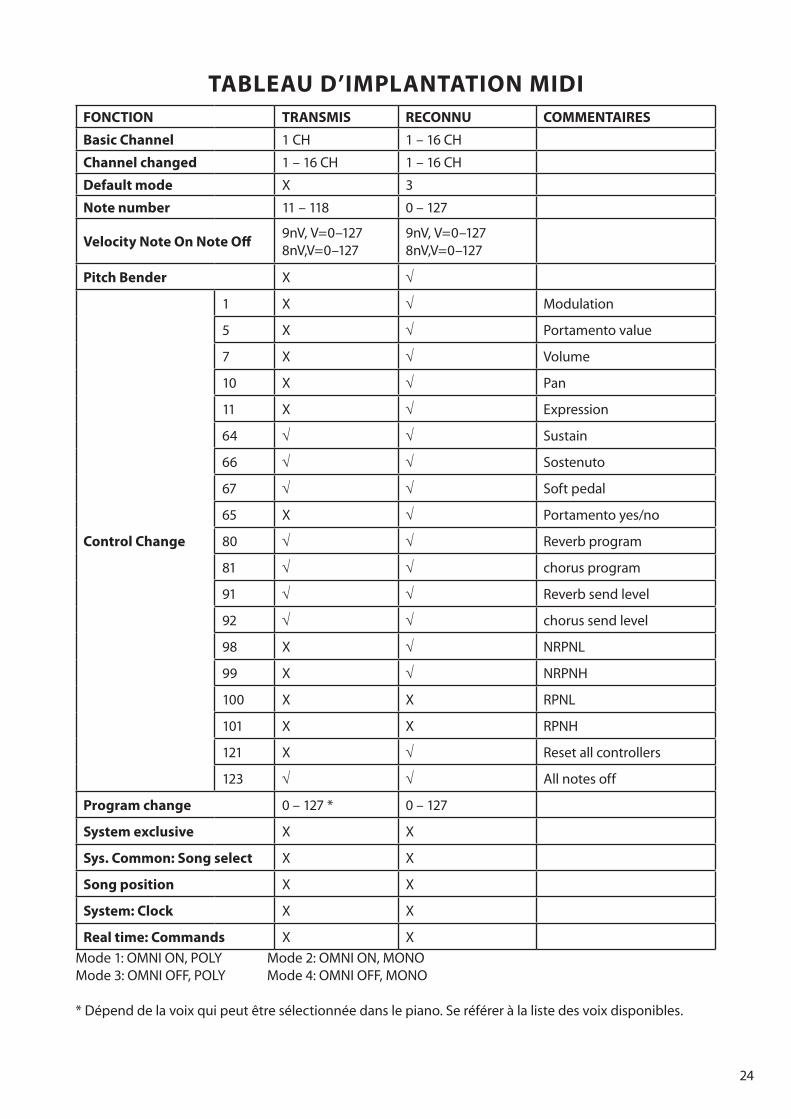
TABLEAU D’IMPLANTATION MIDIFONCTION TRANSMIS RECONNU COMMENTAIRESBasic Channel 1CH 1–16CH
Channel changed 1–16CH 1–16CH
Default mode X 3
Note number 11–118 0–127
Velocity Note On Note Off 9nV,V=0–1278nV,V=0–127
9nV,V=0–1278nV,V=0–127
Pitch Bender X √
Control Change
1 X √ Modulation
5 X √ Portamentovalue
7 X √ Volume
10 X √ Pan
11 X √ Expression
64 √ √ Sustain
66 √ √ Sostenuto
67 √ √ Softpedal
65 X √ Portamentoyes/no
80 √ √ Reverbprogram
81 √ √ chorusprogram
91 √ √ Reverbsendlevel
92 √ √ chorussendlevel
98 X √ NRPNL
99 X √ NRPNH
100 X X RPNL
101 X X RPNH
121 X √ Resetallcontrollers
123 √ √ Allnotesoff
Program change 0–127* 0–127
System exclusive X X
Sys. Common: Song select X X
Song position X X
System: Clock X X
Real time: Commands X X
Mode1:OMNION,POLY Mode2:OMNION,MONOMode3:OMNIOFF,POLY Mode4:OMNIOFF,MONO
*Dépenddelavoixquipeutêtresélectionnéedanslepiano.Seréféreràlalistedesvoixdisponibles.

25
CARACTÉRISTIQUES TECHNIQUES
CLAVIER 88touches,claviersensibleautoucher
VOIX 15Voix,5boutonsdesélection+unboutondevariation
MODEDEVOIX Upper(principale),Layer(superposée),duet(double)
EFFETS Reverb(Réverbération)etChorus(chœur)
BOUTONSDECONTRÔLETranspose (transposition), Tempo, Setup (paramétrage/fonc-tions),Metronome,Demo,+/-
PARAMÉTRAGE/FONCTIONSTuning (accordage), Octave (changement d’octave), Touch res-ponse(réglagedelasensibilitéautoucher),Volumebalance(ba-lanceduvolume)
DÉMONSTRATION10 morceaux d’orchestre; un morceau de démonstration pourchacunedesvoix
APPRENTISSAGE58 morceaux d’apprentissage avec entraînement main droite/gauche
ENREGISTREMENT 2pistes
AFFICHAGE ÉcranDELà3X7segments
CONNEXIONSAUXILIAIRESPrisecasquestéréox2,LineOut(Sortie),Linein(Entrée),MIDIIn/Out(entrée/sortieMIDI),priseUSB
PÉDALIER Pédalessustain,sourdineetdouce
AMPLIFICATEUR 2x10W
DIMENSIONS 1377mmx510mmx862mm

DPW100 Owner’s manual
1
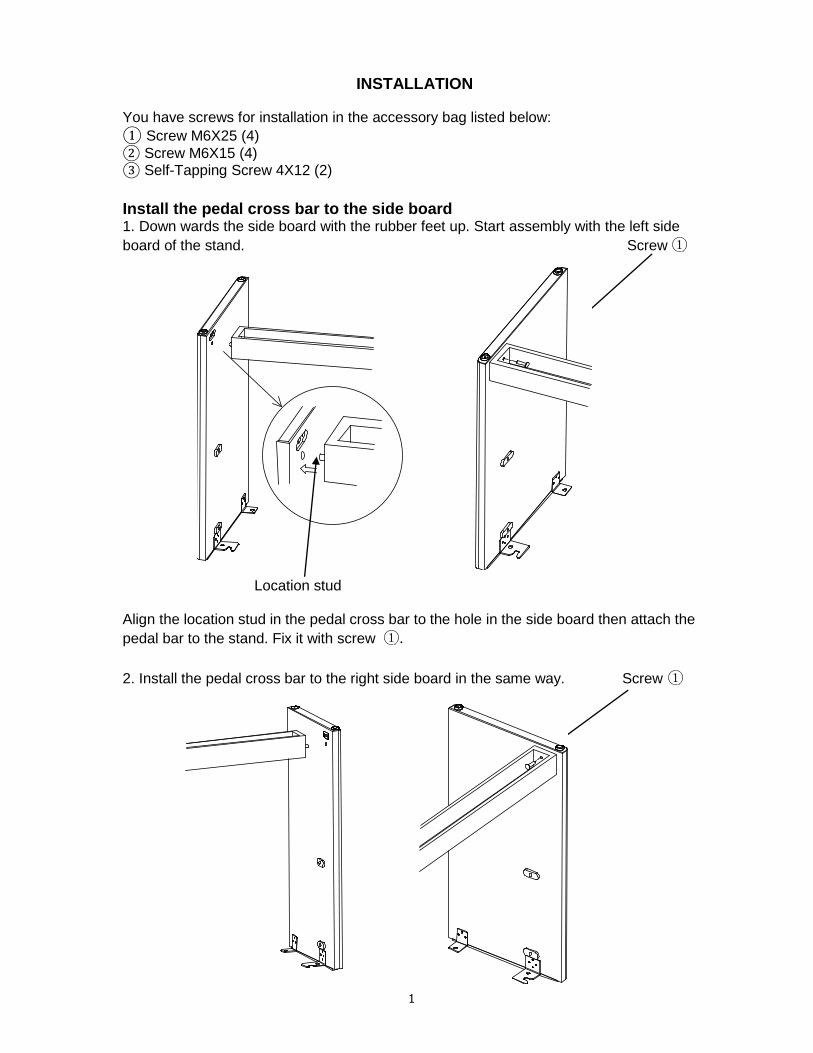
INSTALLATION
You have screws for installation in the accessory bag listed below:
① Screw M6X25 (4)
② Screw M6X15 (4) ③ Self-Tapping Screw 4X12 (2)
Install the pedal cross bar to the side board 1. Down wards the side board with the rubber feet up. Start assembly with the left side
board of the stand. Screw ①
Location stud
Align the location stud in the pedal cross bar to the hole in the side board then attach the
pedal bar to the stand. Fix it with screw ①.
2. Install the pedal cross bar to the right side board in the same way. Screw ①

2
Install the speaker box to the side board
Install the speaker box to the side board with screw ②.
Screw ②
Install the piano body
1. There is location stud in the bottom of piano body and bracket with notch in the top of the side board. Put piano on the assembled stand, behind the front edge about 2 inches. Move piano body towards to make stud insert the to the notch.
50 m
m (2”)

3
2. Fix the piano body with the screw ①
Screw ①
Install the headphone holder
Install the headphone holder to the piano with the screw ③
Headphone holder
Screw ③
4
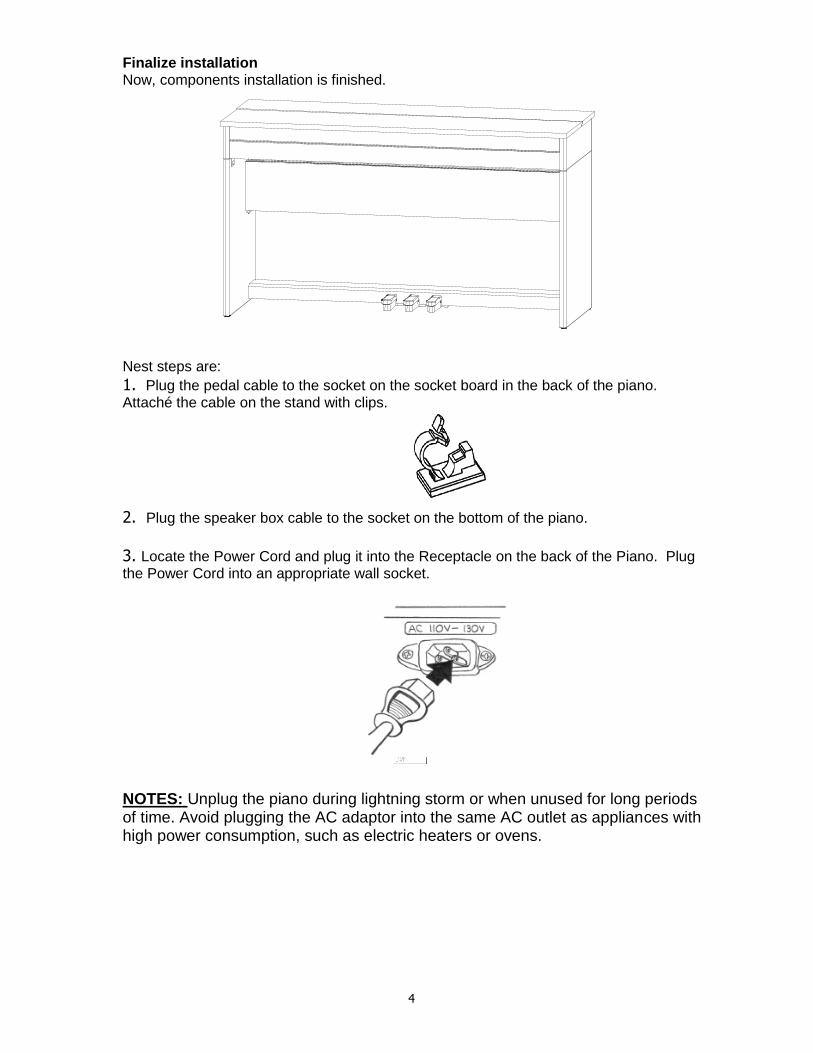
Finalize installation Now, components installation is finished.
Nest steps are:
1. Plug the pedal cable to the socket on the socket board in the back of the piano. Attaché the cable on the stand with clips.
2. Plug the speaker box cable to the socket on the bottom of the piano.
3. Locate the Power Cord and plug it into the Receptacle on the back of the Piano. Plug the Power Cord into an appropriate wall socket.
NOTES: Unplug the piano during lightning storm or when unused for long periods of time. Avoid plugging the AC adaptor into the same AC outlet as appliances with high power consumption, such as electric heaters or ovens.
2. Place the piano in its final position, on the bottom the pedal board is aturn down knob. Turn the Pedal Brace Knob down to firmly touch thefloor.
3. Locate the Power Cord and plug it into the Receptacle on the bottom ofthe Piano. Plug the Power Cord into an appropriate wall socket.
FRONT Holes for HeadphoneHanger Clip toattach to thebottom of the piano

5
CONTROL PANEL AND PEDAL
FRONT CONTROL PANEL
Master Volume Voice Select Display ▲,▼ Record Song Demo, Setup, EQ, Reverb, Chorus, Metro, Tempo Layer, Lower, Duet, Transpose
See detailed description of the control panel in the following chapters.
POWER SWITCH - The power switch is located to the left of the keyboard. Press the button to turn the power on and off. The red power indicator in the left of the front cross bar lights up when the power is on. Note: When you turn the power off, do not turn it back on immediately. Wait at least five seconds to turn the power back on so that the electronic circuits can properly reset. REAR PANEL
The socket board is located in the back of the piano
The Receptacle is on the back of the piano BOTTOM
The headphone jack board is located on the front-left of the bottom.
The speaker box cable socket is located on the back-left of the bottom. See detailed description of the panel in the PREPARING FOR PLAY chapter.
L RLINE IN
L RLINE OUT
IN OUTMIDI
USB PEDAL
REWOP
6
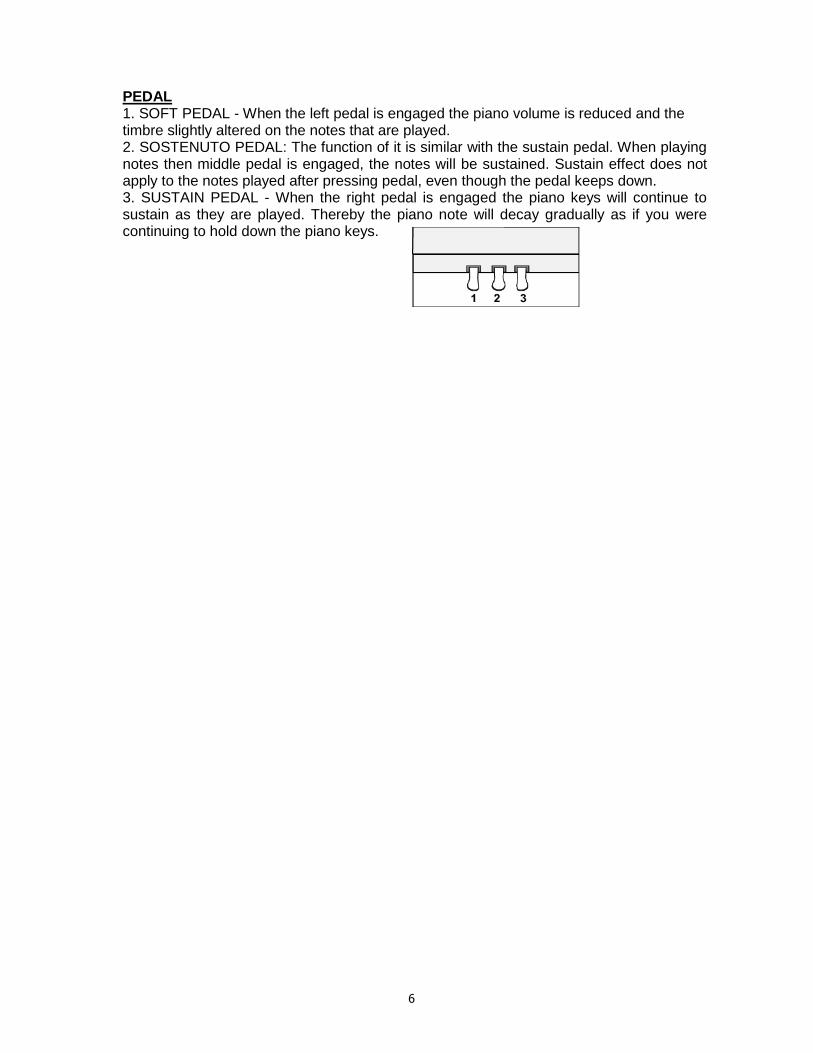
PEDAL 1. SOFT PEDAL - When the left pedal is engaged the piano volume is reduced and the timbre slightly altered on the notes that are played. 2. SOSTENUTO PEDAL: The function of it is similar with the sustain pedal. When playing notes then middle pedal is engaged, the notes will be sustained. Sustain effect does not apply to the notes played after pressing pedal, even though the pedal keeps down. 3. SUSTAIN PEDAL - When the right pedal is engaged the piano keys will continue to sustain as they are played. Thereby the piano note will decay gradually as if you were continuing to hold down the piano keys.
7
PREPARING FOR PLAY MASTER VOLUME Rotate this knob to the clockwise to increase the overall volume of the piano, and counter-clockwise to decrease the volume. Put the knob to the middle position before turn on the power, The Following Facilities Could be Set Up for Your Application: MUSIC STAND When use it, open up the music stand. HEADPHONES The piano has two stereo headphone jacks on the front-left of the bottom. You can play in total silence, without disturbing others in the room, by plugging a set of headphones into one of the appropriate sockets. When headphones are plugged into jack, the speakers will turn off. Two sets of headphones may be used simultaneously. LINE IN These stereo audio input jacks will amplify the supplied signal through the internal sound delivery system. They can be used to hook up items such as CD players, MP3 player or Cassette player. LINE OUT These stereo audio output jacks supplies the piano’s output signal to external amplification, such as home stereo, PA system or other stand alone amplifiers. MIDI IN / MIDI OUT This piano contains MIDI in and MIDI output ports. MIDI jacks allow communication with other products equipped with MIDI interfaces. Please see the MIDI section of this manual for further details. USB The USB connector allows you to connect the piano directly to your computer’s USB port. Please see the MIDI section of this manual for further details.
8
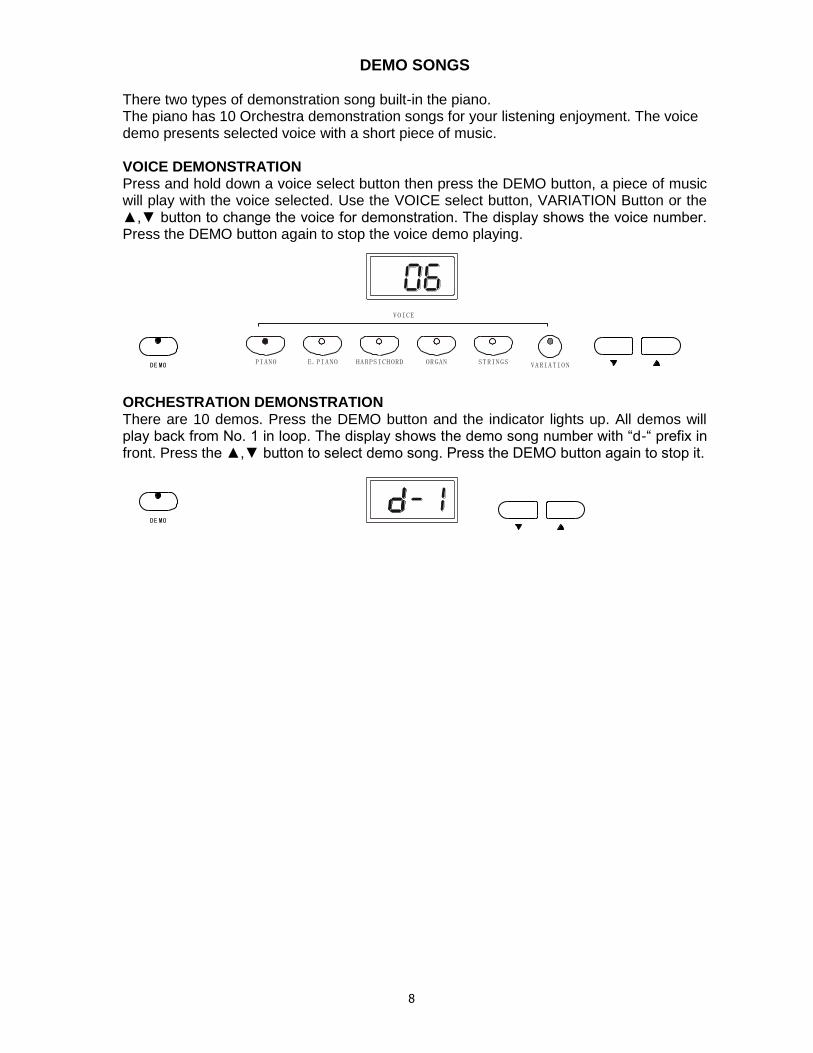
DEMO SONGS There two types of demonstration song built-in the piano. The piano has 10 Orchestra demonstration songs for your listening enjoyment. The voice demo presents selected voice with a short piece of music. VOICE DEMONSTRATION Press and hold down a voice select button then press the DEMO button, a piece of music will play with the voice selected. Use the VOICE select button, VARIATION Button or the ▲,▼ button to change the voice for demonstration. The display shows the voice number. Press the DEMO button again to stop the voice demo playing.
ORCHESTRATION DEMONSTRATION There are 10 demos. Press the DEMO button and the indicator lights up. All demos will play back from No. 1 in loop. The display shows the demo song number with “d-“ prefix in front. Press the ▲,▼ button to select demo song. Press the DEMO button again to stop it.
DE MO
DE MO
PIANO E.PIANO HARPSICHORD ORGAN VARIATION
VOICE
STRINGS
9
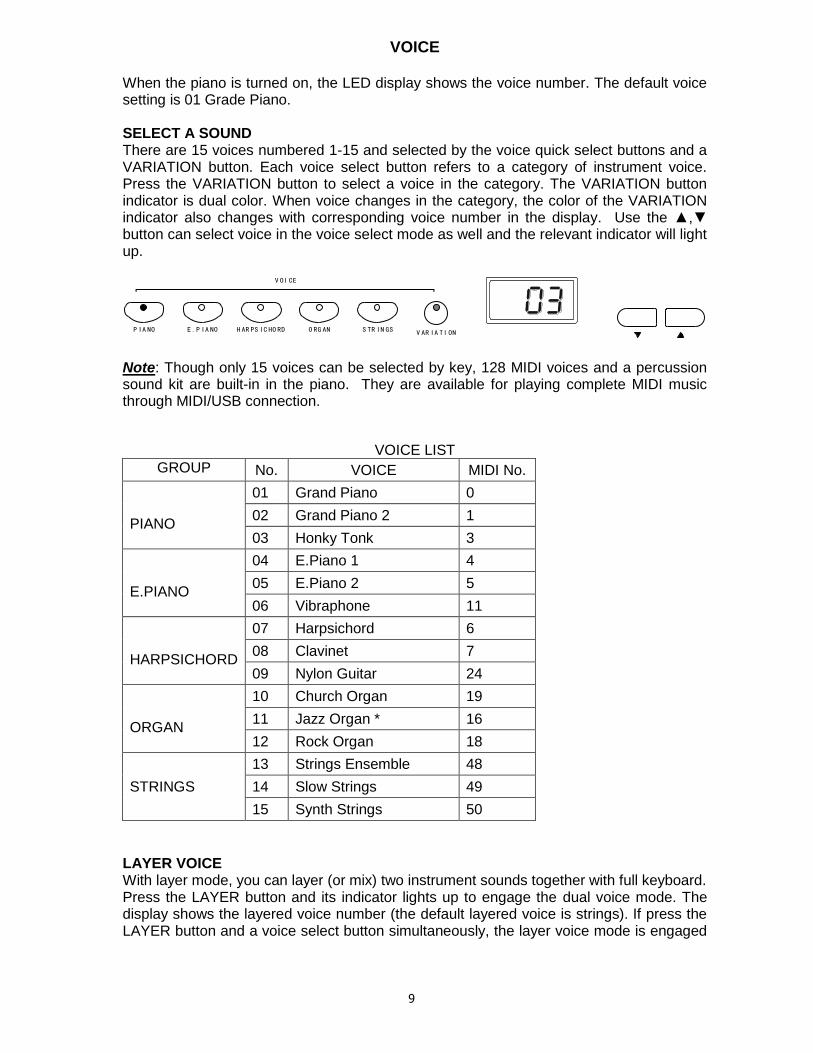
VOICE When the piano is turned on, the LED display shows the voice number. The default voice setting is 01 Grade Piano. SELECT A SOUND There are 15 voices numbered 1-15 and selected by the voice quick select buttons and a VARIATION button. Each voice select button refers to a category of instrument voice. Press the VARIATION button to select a voice in the category. The VARIATION button indicator is dual color. When voice changes in the category, the color of the VARIATION indicator also changes with corresponding voice number in the display. Use the ▲,▼ button can select voice in the voice select mode as well and the relevant indicator will light up.
Note: Though only 15 voices can be selected by key, 128 MIDI voices and a percussion sound kit are built-in in the piano. They are available for playing complete MIDI music through MIDI/USB connection.
VOICE LIST
GROUP
No. VOICE MIDI No.
PIANO
01 Grand Piano 0
02 Grand Piano 2 1
03 Honky Tonk 3
E.PIANO
04 E.Piano 1 4
05 E.Piano 2 5
06 Vibraphone 11
HARPSICHORD
07 Harpsichord 6
08 Clavinet 7
09 Nylon Guitar 24
ORGAN
10 Church Organ 19
11 Jazz Organ * 16
12 Rock Organ 18
STRINGS
13 Strings Ensemble 48
14 Slow Strings 49
15 Synth Strings 50
LAYER VOICE With layer mode, you can layer (or mix) two instrument sounds together with full keyboard. Press the LAYER button and its indicator lights up to engage the dual voice mode. The display shows the layered voice number (the default layered voice is strings). If press the LAYER button and a voice select button simultaneously, the layer voice mode is engaged
P IA NO E .P IA NO H AR PS IC HO RD O RG AN V AR IA TI ON
V OI CE
S TR IN GS

10
as well but the LAYER indicator flashes. Then, use the voice select button, the VARIATION button or ▲,▼ button to select the layer voice.
After finish the selection or not manipulate for 5 second, the display shows the master voice and return to the voice select mode. The LAYER indicator keeps on. Press the LAYER Button again to exit the layer voice mode and the indicator turns off. NOTE: If press the LAYER button when DUET or LOWER is On, the duet or split mode will disable automatically. The volume balance between layered voice and master voice can be adjusted. Please refer to FUNCTION chapter for details.
TRANSPOSE
The Transpose feature can shift the pitch of the piano up or down in semitone intervals. Press the TRANSPOSE button to engage the transpose feature and its indicator blinks. The display shows current transpose value (the default is 0) with the prefix “t” in front. Use the ▲,▼ button to set the transpose value ranged -6 to 6, e.g. t-5. Press any button except ▲▼, or after finish the setting or not manipulate for 5 second, the display shows master voice and return to the voice select mode.
When the transpose value is not zero, its indicator will keep lighting. Press the TRANSPOSE button again to disable the transpose feature.
TRANSPOSE
TR AN SP OS E
P IA NO E .P IA NO H AR PS IC HO RD O RG AN V AR IA TI ON
V OI CE
S TR IN GSLAY ER

11
KEYBOARD MODE There are two modes of the keyboard: full keyboard and duet keyboard. FULL KEYBOARD The full keyboard is standard mode as shown below.
DUET KEYBOARD The keyboard is divided to A2- E6 and F2 – C6 two sections. Two sections have the same voice (master voice) and volume. In this mode, the right pedal becomes the sustain pedal for the right section of the keyboard and the left pedal becomes the sustain pedal for the left section of the keyboard.
The middle pedal (Sostenuto) is disabled. Press the DUET and its indicator lights up to indicate this mode engaged. The display shows the voice number. The default setting of it is the same as master voice.
Press the DUET Button again to exit the duet keyboard mode and the indicator turns off. NOTE: If press the DUET button when LAYER or LOWER is On, the layer or split mode will disable automatically. SPLIT KEYBOARD With this mode, you can play two instrument sounds in separate parts of the keyboard. In the right section of the keyboard play the master voice and in the left section of the keyboard play lower voice. The split point of the keyboard is fixed on the G3 key.
C1 C2 C4C3 C5 C6 C8C7
DU ETP IA NO E .P IA NO H AR PS IC HO RD O RG AN V AR IA TI ON
V OI CE
S TR IN GS
C3 C4 C5 C3 C4 C6C5
Right SectionLeft Section
A2 E6 F2
Master voice
G3
Lower voice

12
Press the Lower button and its indicator lights up to engage the split keyboard mode. The display shows the master voice number. If press the LOWER button and a voice select button simultaneously, the lower voice selection is engaged and the LAYER indicator flashes. Then, use the voice select button, the VARIATION button or the ▲,▼ button to select the lower voice.
After finish the selection or not manipulate for 5 second, the display shows the master voice and return to the voice select mode. The LOWER indicator keeps on. Press the LOWER Button again to exit the split mode and the indicator turns off. The volume balance between lower voice and master voice can be adjusted. Please refer to FUNCTION chapter for details. NOTE: If press the LOWER button when LAYER or DUET is On, the layer or duet mode will disable automatically.
P IA NO E .P IA NO H AR PS IC HO RD O RG AN V AR IA TI ON
V OI CE
S TR IN GS LAY ERLower
13
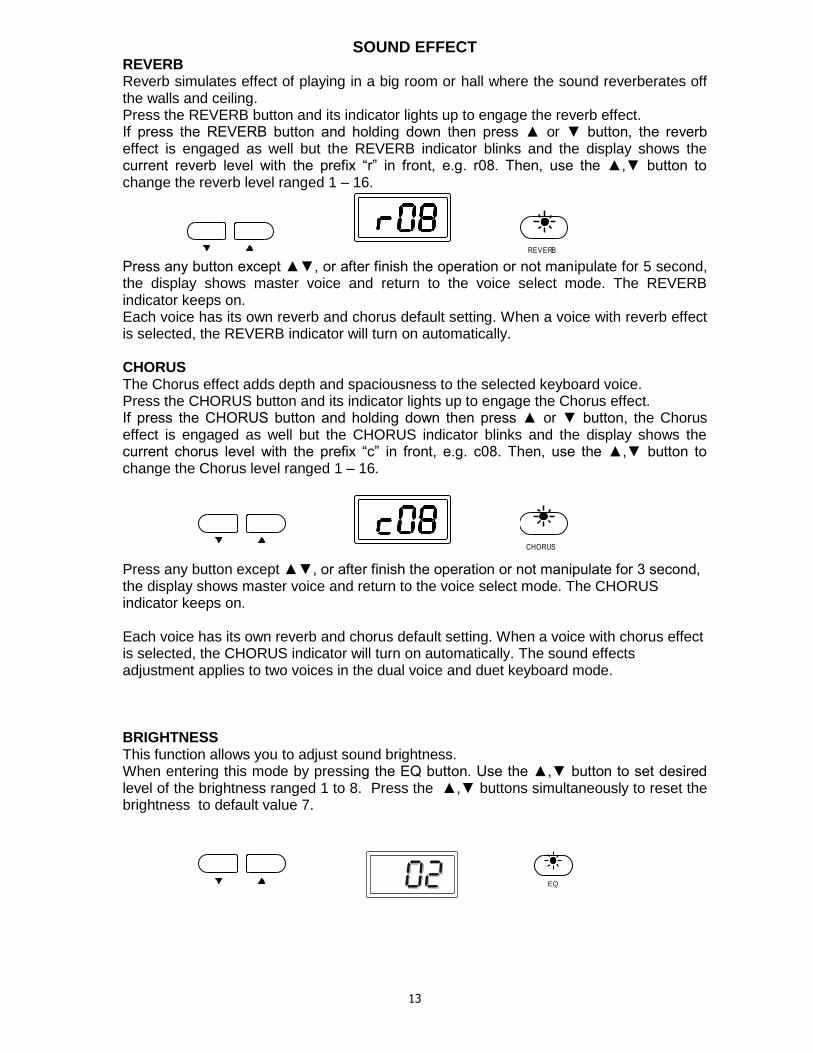
SOUND EFFECT REVERB Reverb simulates effect of playing in a big room or hall where the sound reverberates off the walls and ceiling. Press the REVERB button and its indicator lights up to engage the reverb effect. If press the REVERB button and holding down then press ▲ or ▼ button, the reverb effect is engaged as well but the REVERB indicator blinks and the display shows the current reverb level with the prefix “r” in front, e.g. r08. Then, use the ▲,▼ button to change the reverb level ranged 1 – 16. Press any button except ▲▼, or after finish the operation or not manipulate for 5 second, the display shows master voice and return to the voice select mode. The REVERB indicator keeps on. Each voice has its own reverb and chorus default setting. When a voice with reverb effect is selected, the REVERB indicator will turn on automatically. CHORUS The Chorus effect adds depth and spaciousness to the selected keyboard voice. Press the CHORUS button and its indicator lights up to engage the Chorus effect. If press the CHORUS button and holding down then press ▲ or ▼ button, the Chorus effect is engaged as well but the CHORUS indicator blinks and the display shows the current chorus level with the prefix “c” in front, e.g. c08. Then, use the ▲,▼ button to change the Chorus level ranged 1 – 16. Press any button except ▲▼, or after finish the operation or not manipulate for 3 second, the display shows master voice and return to the voice select mode. The CHORUS indicator keeps on. Each voice has its own reverb and chorus default setting. When a voice with chorus effect is selected, the CHORUS indicator will turn on automatically. The sound effects adjustment applies to two voices in the dual voice and duet keyboard mode. BRIGHTNESS This function allows you to adjust sound brightness. When entering this mode by pressing the EQ button. Use the ▲,▼ button to set desired level of the brightness ranged 1 to 8. Press the ▲,▼ buttons simultaneously to reset the brightness to default value 7.
REVERB
CHORUS
EQ

14
METRONOME Press the METRONOME button; the built-in metronome will start to play with the current tempo and beat pattern. If press the METRONOME button and ▲ or ▼ button simultaneously, the metronome is engaged as well the display shows the current beat pattern (the default setting is 4/4). There is a doc between the number of beat per measure and the note definition of note. e.g. the picture below refers to 3/4. Use the ▲,▼ button to change the beat pattern in sequence of 1/4, 2/4, 3/4, 4/4, 5/4, 6/4, 6/8 and 12/8. When the metronome sounds, the beat indicator will flash per the beat pattern. Press any button except ▲▼, or after finish the selection or not manipulate for 3 second, the display shows the master voice and return to the voice select mode. The Metronome indicator keeps on. Press the METRONOME button again to stop the metronome. Note: Reverb and chorus sound effect does not apply to the metronome sound.
TEMPO Press the TEMPO button to enter the tempo setting mode and its indicator blinks. The display shows current tempo value (the default is 120) followed by a dot mark. Use the ▲,▼ button to change the tempo ranged 40 – 240; press ▲ and ▼ buttons simultaneously to recall the default tempo 120. If you press and hold down the ▲ or ▼ button, the tempo will change continuously until release the button. Press any button except ▲▼, or after finish the setting or not manipulate for 5 second, the display shows master voice and return to the voice select mode.
ME TR ON OM ETE MP O
TE MP O
15
RECORD
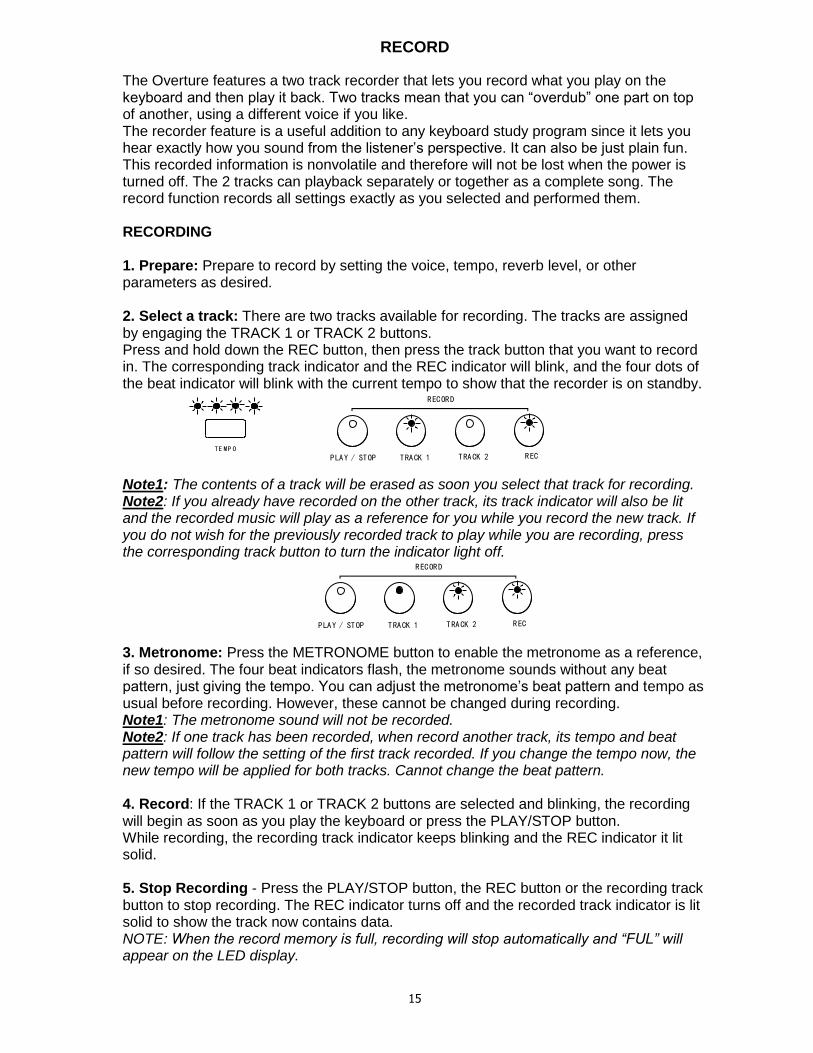
The Overture features a two track recorder that lets you record what you play on the keyboard and then play it back. Two tracks mean that you can “overdub” one part on top of another, using a different voice if you like. The recorder feature is a useful addition to any keyboard study program since it lets you hear exactly how you sound from the listener’s perspective. It can also be just plain fun. This recorded information is nonvolatile and therefore will not be lost when the power is turned off. The 2 tracks can playback separately or together as a complete song. The record function records all settings exactly as you selected and performed them. RECORDING 1. Prepare: Prepare to record by setting the voice, tempo, reverb level, or other parameters as desired. 2. Select a track: There are two tracks available for recording. The tracks are assigned by engaging the TRACK 1 or TRACK 2 buttons. Press and hold down the REC button, then press the track button that you want to record in. The corresponding track indicator and the REC indicator will blink, and the four dots of the beat indicator will blink with the current tempo to show that the recorder is on standby. Note1: The contents of a track will be erased as soon you select that track for recording. Note2: If you already have recorded on the other track, its track indicator will also be lit and the recorded music will play as a reference for you while you record the new track. If you do not wish for the previously recorded track to play while you are recording, press the corresponding track button to turn the indicator light off. 3. Metronome: Press the METRONOME button to enable the metronome as a reference, if so desired. The four beat indicators flash, the metronome sounds without any beat pattern, just giving the tempo. You can adjust the metronome’s beat pattern and tempo as usual before recording. However, these cannot be changed during recording. Note1: The metronome sound will not be recorded. Note2: If one track has been recorded, when record another track, its tempo and beat pattern will follow the setting of the first track recorded. If you change the tempo now, the new tempo will be applied for both tracks. Cannot change the beat pattern. 4. Record: If the TRACK 1 or TRACK 2 buttons are selected and blinking, the recording will begin as soon as you play the keyboard or press the PLAY/STOP button. While recording, the recording track indicator keeps blinking and the REC indicator it lit solid. 5. Stop Recording - Press the PLAY/STOP button, the REC button or the recording track button to stop recording. The REC indicator turns off and the recorded track indicator is lit solid to show the track now contains data. NOTE: When the record memory is full, recording will stop automatically and “FUL” will appear on the LED display.
TE MP O
RECORD
PLAY / STOP TRACK 1 TRACK 2 REC
RECORD
PLAY / STOP TRACK 1 TRACK 2 REC

16
PLAYBACK 1. The Track LED indicators will show which tracks contain recorded data. If you do not wish to hear one of the two Tracks, press the corresponding TRACK button to turn that track off. Its LED indicator will turn off. 2. Press the PLAY/STOP button to hear the recorded track(s). The PLAY indicator lights up and the beat indicators will flash per the beat pattern and tempo. You can change the tempo of your recorded track by pressing the TEMPO button while the recording is being played back. You may also accompany the recorded tracks on the keyboard while the recording is playing back. Note: If the metronome is turned on before pressing the PLAY/STOP button to play back the recorded music, the metronome will sound with proper tempo and beat pattern which performed during your recording. 3. Press the PLAY/STOP button to stop the playback. Playback will also stop automatically when the recording reaches its end.
4.In the step 2, you can change the tempo of the playing back temporarily. You could
also change the tempo for the recorded tracks permanently: - adjust the new tempo value - hold the REC button and press the PLAY/STOP button Tracks will playback at the new tempo and this tempo will be set for the tracks. Beat pattern cannot be changed. ERASING TRACKS To erase the music recorded on the tracks: 1. Press and Hold the REC button down. 2. Press the track button that you which to erase while you continue to hold down the REC button. This will immediately erase the existing data from your previous recording. 3. Release the REC button (the track and REC indicators are blinking). 4. Press the track button again (the indicators will go off). 5. Repeat Steps 1 through 4 until all the tracks that you desire are erased.
RECORD
PLAY / STOP TRACK 1 TRACK 2 REC
17
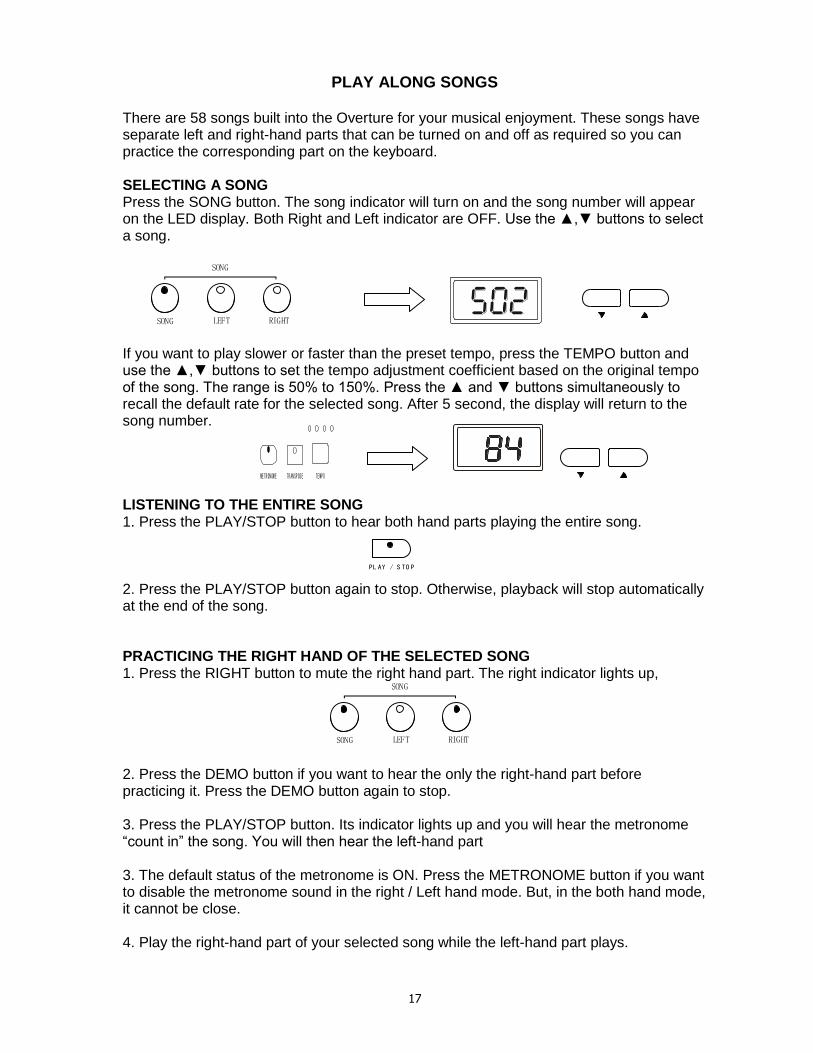
PLAY ALONG SONGS
There are 58 songs built into the Overture for your musical enjoyment. These songs have separate left and right-hand parts that can be turned on and off as required so you can practice the corresponding part on the keyboard. SELECTING A SONG Press the SONG button. The song indicator will turn on and the song number will appear on the LED display. Both Right and Left indicator are OFF. Use the ▲,▼ buttons to select a song.
If you want to play slower or faster than the preset tempo, press the TEMPO button and use the ▲,▼ buttons to set the tempo adjustment coefficient based on the original tempo of the song. The range is 50% to 150%. Press the ▲ and ▼ buttons simultaneously to recall the default rate for the selected song. After 5 second, the display will return to the song number. LISTENING TO THE ENTIRE SONG 1. Press the PLAY/STOP button to hear both hand parts playing the entire song. 2. Press the PLAY/STOP button again to stop. Otherwise, playback will stop automatically at the end of the song. PRACTICING THE RIGHT HAND OF THE SELECTED SONG 1. Press the RIGHT button to mute the right hand part. The right indicator lights up, 2. Press the DEMO button if you want to hear the only the right-hand part before practicing it. Press the DEMO button again to stop. 3. Press the PLAY/STOP button. Its indicator lights up and you will hear the metronome “count in” the song. You will then hear the left-hand part 3. The default status of the metronome is ON. Press the METRONOME button if you want to disable the metronome sound in the right / Left hand mode. But, in the both hand mode, it cannot be close. 4. Play the right-hand part of your selected song while the left-hand part plays.
PL AY / S TO P
ME TR ON OM E TR AN SP OS E TE MP O
SONG
SONG LEFT RIGHT
SONG
SONG LEFT RIGHT

18
5. Press the PLAY/STOP button again to stop. Otherwise, playback will stop automatically at the end of the song. PRACTICING THE LEFT HAND OF THE SELECTED SONG Follow steps 1-5 listed above, substituting the LEFT button whenever RIGHT button is mentioned. You will hear the right-hand part of your selected song. Play the left-hand part of your selected song while the right-hand part plays. PRACTICING BOTH HANDS OF THE SELECTED SONG 1. Press the RIGHT and LEFT buttons simultaneously. The right and left indicators will both turn on. 2. Press the PLAY/STOP button. Its indicator lights up and you will hear the metronome “count in” the song. 3. Play the left-hand and right-hand parts of your selected song. The metronome will continue to play to assist you in keeping time. 4. Press the PLAY/STOP button again to stop. Otherwise, playback will stop automatically at the end of the song.
SONG
SONG LEFT RIGHT
SONG
SONG LEFT RIGHT
19
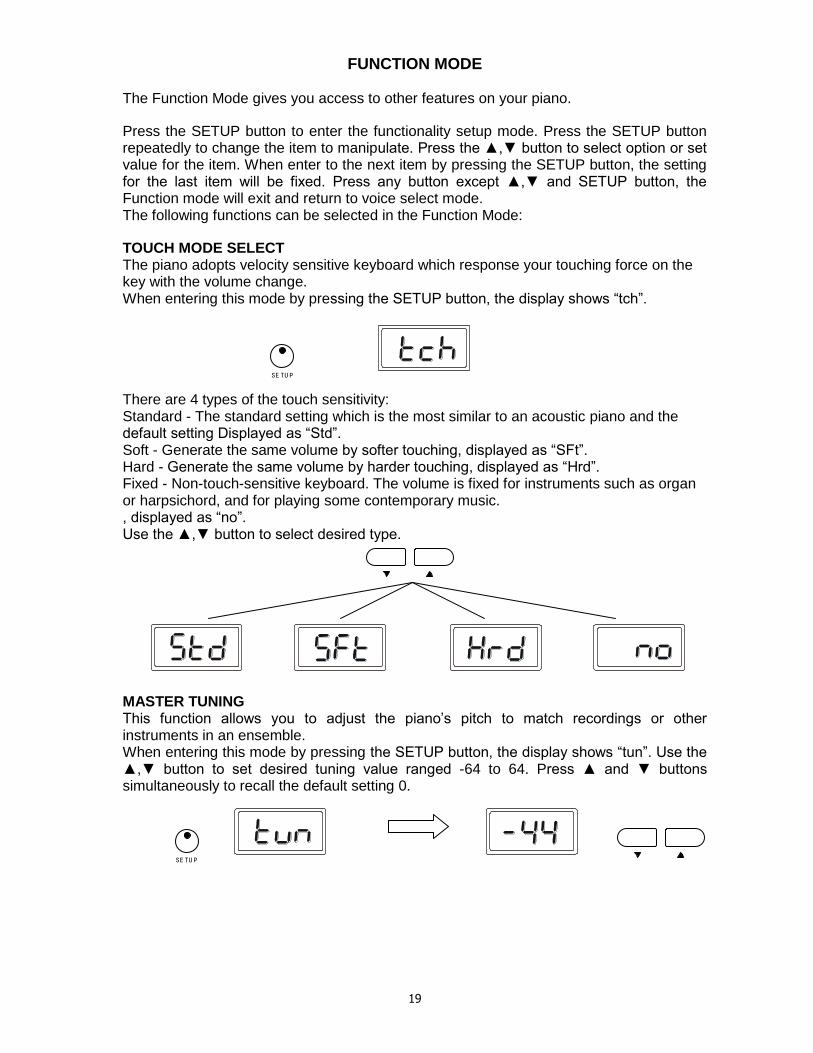
FUNCTION MODE The Function Mode gives you access to other features on your piano.
Press the SETUP button to enter the functionality setup mode. Press the SETUP button repeatedly to change the item to manipulate. Press the ▲,▼ button to select option or set value for the item. When enter to the next item by pressing the SETUP button, the setting for the last item will be fixed. Press any button except ▲,▼ and SETUP button, the Function mode will exit and return to voice select mode. The following functions can be selected in the Function Mode:
TOUCH MODE SELECT The piano adopts velocity sensitive keyboard which response your touching force on the key with the volume change. When entering this mode by pressing the SETUP button, the display shows “tch”. There are 4 types of the touch sensitivity: Standard - The standard setting which is the most similar to an acoustic piano and the default setting Displayed as “Std”. Soft - Generate the same volume by softer touching, displayed as “SFt”. Hard - Generate the same volume by harder touching, displayed as “Hrd”. Fixed - Non-touch-sensitive keyboard. The volume is fixed for instruments such as organ or harpsichord, and for playing some contemporary music. , displayed as “no”. Use the ▲,▼ button to select desired type.
MASTER TUNING This function allows you to adjust the piano’s pitch to match recordings or other instruments in an ensemble. When entering this mode by pressing the SETUP button, the display shows “tun”. Use the ▲,▼ button to set desired tuning value ranged -64 to 64. Press ▲ and ▼ buttons simultaneously to recall the default setting 0.
SE TU P
SE TU P

20
OCTAVE The octave shift function will transpose the entire piano one octave down or up. When entering this mode by pressing the SETUP button, The display shows “Oct”. Use the ▲,▼ button to set desired octave shift range is -2 to 2. The default setting is 0.
VOLUME BALANCE The Volume Balance function will set volume balance between the master and second voice in the layer mode and split mode. When entering this mode by pressing the SETUP button, the display shows “bLn”. The format of the setting is “The second volume-The master volume”, each parameter is ranged 1 – 9; 1 refers to the min. volume and 9 refers to the max. volume. The default setting of the volume is balanced as 5-5. Use the ▼ button to reduce the second volume while the master volume will increase, for example 4-6, 3-7 ……1-9. Use the ▲ button to increase the second volume while the master volume will decrease, for example 6-4, 7-3……9-1. Press ▲ and ▼ buttons simultaneously to recall the default setting 5-5.
Note: The same value of the volume balance applies to both layer and split mode. LOCAL OFF “Local Off” is a special mode of piano performance when the piano is connected with another MIDI device or computer. When “Local” is “On”, performance on the piano will sound by built-in speakers while the performance message is transmitted via MIDI out. When “Local” is “Off”, performance on the piano will not sound but the performance message is transmitted via MIDI out. It is useful to use the piano as keyboard and sound by another MIDI device. When entering this mode by pressing the SETUP button, the display shows “Loc”. Use the ▼ button to turn “Local” off and use the ▲ button to turn “Local” on. The default setting is “On”.
Note: When Local is off, the metronome will sound as normal.
STORE
Normally, when turn on the power, all settings are default and user settings are volatile. If the “Store” feature is engaged, when turn on the power, the latest user customized settings will be recalled which include: layer and duet voice, volume balance, touch mode,
SE TU P
SE TU P
SE TU P

21
song number, sound effects setting etc. When entering this mode by pressing the SETUP button, the display shows “Sto”. Use the ▼ button to set the store feature off and use the ▲ button to set it on. The default setting is Off.
Note: The record contents are always nonvolatile. GRADING When this function is engaged, after playing play-along song, it’ll give you grading automatically according to your performance. There are 4 levels of the grading: Excellent, Very good, Good and Try again. When entering this mode by pressing the SETUP button, the display shows “grd”. Use the ▼ button to set this feature off and use the ▲ button to set it on. The default setting is Off.
SOFT RESET The recorded music, layer voice, touch mode, song number are un-volatile. When turn on the power, the settings above will be recalled automatically. If you want to recover the default setting, press and hold down both ▲,▼ buttons when turn on the power. Please note that recorded contents will be erased.
POWER
SE TU P
SE TU P

22
MIDI
MIDI (Musical Instrument Digital Interface) is a world-standard interface that enables electronic musical instruments and computers to communicate with each other so that instructions and other data can pass between them. This makes it possible to create a system of MIDI instruments and devices that offer far greater versatility and control than is available with isolated instruments.
MIDI In: This terminal receives data from an external MIDI device. MIDI Out: This terminal transmits data from the instrument to another MIDI device. The transmitted data include the note and touch velocity produced while playing on the piano as well as voice changes. The MIDI system in the unit has 16 channels numbered from 0 to 15. Each of them is responsible for a instrument voice. When the piano receives control from external device, the active channel is determined by the MIDI setting of the piano or control message. Connection Examples Output to an external sound generator Connect the MIDI Out terminal of the piano and MIDI In terminal of an external device (keyboard, synthesizer, or sound module). The external device will response to your playing. In this way, you can play two instruments at same time or play on your instrument to sound on another MIDI device. Output from an external MIDI device Connect the MIDI In terminal of the piano and MIDI Out terminal of an external device. Data generated on another device can sound on your piano. Connect with computer You can transmit your performance to a computer to utilize advanced recording, composing and editing available from software on the computer. MIDI music stored on the computer can be played back through your instrument. USB - The USB connector allows you to connect the piano directly to your computer’s USB port. The features of the USB interface are the same as MIDI, but both MIDI In and MIDI Out data run in the same USB port and cable. The USB interface is compatible with Windows XP/Vista and MAC.

23
MIDI APPLICATION CHART
Function Transmitted Recognized Remark
Basic Channel 1 CH 1 – 16 CH
Channel changed 1 – 16 CH 1 – 16 CH
Default mode X 3
Note number 11 – 118 0 – 127
Velocity Note On Note Off
9nV,V=0–127 8nV,V=0–127
9nV,V=0–127 8nV,V=0–127
Pitch Bender X √
Control Change
1 X √ Modulation
5 X √ Portamento value
7 X √ Volume
10 X √ Pan
11 X √ Expression
64, √ √ Sustain, ,
66 √ √ Sostenuto
67 √ √ Soft pedal
65 X √ Portamento yes/no
80 √ √ Reverb program
81 √ √ chorus program
91 √ √ Reverb send level
92 √ √ chorus send level
98 X √ NRPNL
99 X √ NRPNH
100 X X RPNL
101 X X RPNH
121 X √ Reset all controllers
123 √ √ All notes off
Program change 0 – 127 * 0 – 127
System exclusive X X
Sys. Common: Song select X X
Song position X X
System: Clock X X
Real time: Commands X X
Mode 1: OMNI ON, POLY Mode 2: OMNI ON, MONO
Mode 3: OMNI OFF, POLY Mode 4: OMNI OFF, MONO
* Depends on the voice can be selected in the piano, refer to the Voice List.

24
SPECIFICATIONS KEYBOARD 88-note, Hammer-Action keyboard
VOICES 15 Voices, 5 buttons + a variation button
VOICE MODE Upper, Layer, duet
SOUND EFFECTS Reverb and Chorus
CONTROL BUTTONS Transpose, Tempo, Setup, Metronome, Demo, +/-,
SETUP Tuning, Octave, Touch response, Volume balance
DEMONSTRATION 10 orchestra songs; each voice has a demo music piece
TEACHING 58 Lesson songs, right / left hand training
RECORDING 2 tracks
DISPLAY 3 X 7-segment LED
AUXILIARY JACKS Headphone x 2, Line Out, Line in, MIDI In/Out, USB
PEDALS Sustain Pedal, Sustenuto Pedal, Soft Pedal
AMPLIFIER 10W x 2
DIMENSIONS 1377mm x 510mm x 862mm