deutsch convertisseur fibre optique pour systèmes … · liaison à fibre optique est détectée...
TRANSCRIPT
PHOENIX CONTACT GmbH & Co. KG
Flachsmarktstraße 8, 32825 Blomberg, Germany
Fax +49-(0)5235-341200, Phone +49-(0)5235-300
phoenixcontact.com
DE Einbauanweisung für den Elektroinstallateur
EN Installation notes for electricians
FR Instructions d'installation pour l'électricien
2016-06-02
© PHOENIX CONTACT 2016
LWL-Umsetzer für RS-485 2-Draht-Bussysteme
1. Sicherheitshinweise
1.1 Errichtungshinweise
• Das Gerät der Kategorie 3 ist zur Installation im explosionsgefährdeten Bereich der Zone 2 geeignet. Es
erfüllt die Anforderungen der EN 60079-0:2012+A11:2013 und EN 60079-15:2010.
• Die Installation, Bedienung und Wartung ist von elektrotechnisch qualifiziertem Fachpersonal
durchzuführen. Befolgen Sie die beschriebenen Installationsanweisungen. Halten Sie die für das Errichten
und Betreiben geltenden Bestimmungen und Sicherheitsvorschriften (auch nationale
Sicherheitsvorschriften), sowie die allgemein anerkannten Regeln der Technik ein. Die
sicherheitstechnischen Daten sind dieser Packungsbeilage und den Zertifikaten (Konformitätsbewertung,
ggf. weitere Approbationen) zu entnehmen.
• Öffnen oder Verändern des Gerätes, über die Konfiguration der DIP-Schalter hinaus, ist nicht zulässig.
Reparieren Sie das Gerät nicht selbst, sondern ersetzen Sie es durch ein gleichwertiges Gerät. Reparaturen
dürfen nur vom Hersteller vorgenommen werden. Der Hersteller haftet nicht für Schäden aus
Zuwiderhandlung.
• Die Schutzart IP20 (IEC 60529/EN 60529) des Gerätes ist für eine saubere und trockene Umgebung
vorgesehen. Setzen Sie das Gerät keiner mechanischen und/oder thermischen Beanspruchung aus, die die
beschriebenen Grenzen überschreitet.
• Das Gerät ist nicht für den Einsatz in staubexplosionsgefährdeten Atmosphären ausgelegt.
• Die zugänglichen Schalter des Gerätes dürfen nur betätigt werden, wenn das Gerät stromlos ist.
• Das Gerät ist ausschließlich für den Betrieb mit Sicherheitskleinspannung (SELV) nach IEC 60950/
EN 60950/VDE 0805 ausgelegt. Das Gerät darf nur an Geräte angeschlossen werden, die die Bedingungen
der EN 60950 erfüllen.
1.2 Installation in der Zone 2
• Halten Sie die festgelegten Bedingungen für den Einsatz in explosionsgefährdeten Bereichen ein!
• Setzen Sie bei der Installation ein geeignetes, zugelassenes Gehäuse (Mindestschutzart IP54) ein, das die
Anforderungen der EN 60079-15 erfüllt. Beachten Sie dabei die Anforderungen der IEC 60079-14/
EN 60079-14.
• An die Versorgungs- und Signalstromkreise in der Zone 2 dürfen nur Geräte angeschlossen werden, die für
den Betrieb in der Ex-Zone 2 und die am Einsatzort vorliegenden Bedingungen geeignet sind.
• Das Auf- und Abrasten auf den Tragschienen-Busverbinder bzw. das Anschließen und das Trennen von
Leitungen im explosionsgefährdeten Bereich ist nur im spannungslosen Zustand zulässig.
• Das Gerät ist außer Betrieb zu nehmen und unverzüglich aus dem Ex-Bereich zu entfernen, wenn es
beschädigt ist, unsachgemäß belastet oder gelagert wurde bzw. Fehlfunktionen aufweist.
• Aktuelle Dokumente können Sie über die Adresse phoenixcontact.net/products herunterladen.
2. Kurzbeschreibung
LWL-Umsetzer für RS-485 2-Draht-Bussysteme, Endgerät in 1300 nm Übertragungstechnik.
3. Anschlusshinweise
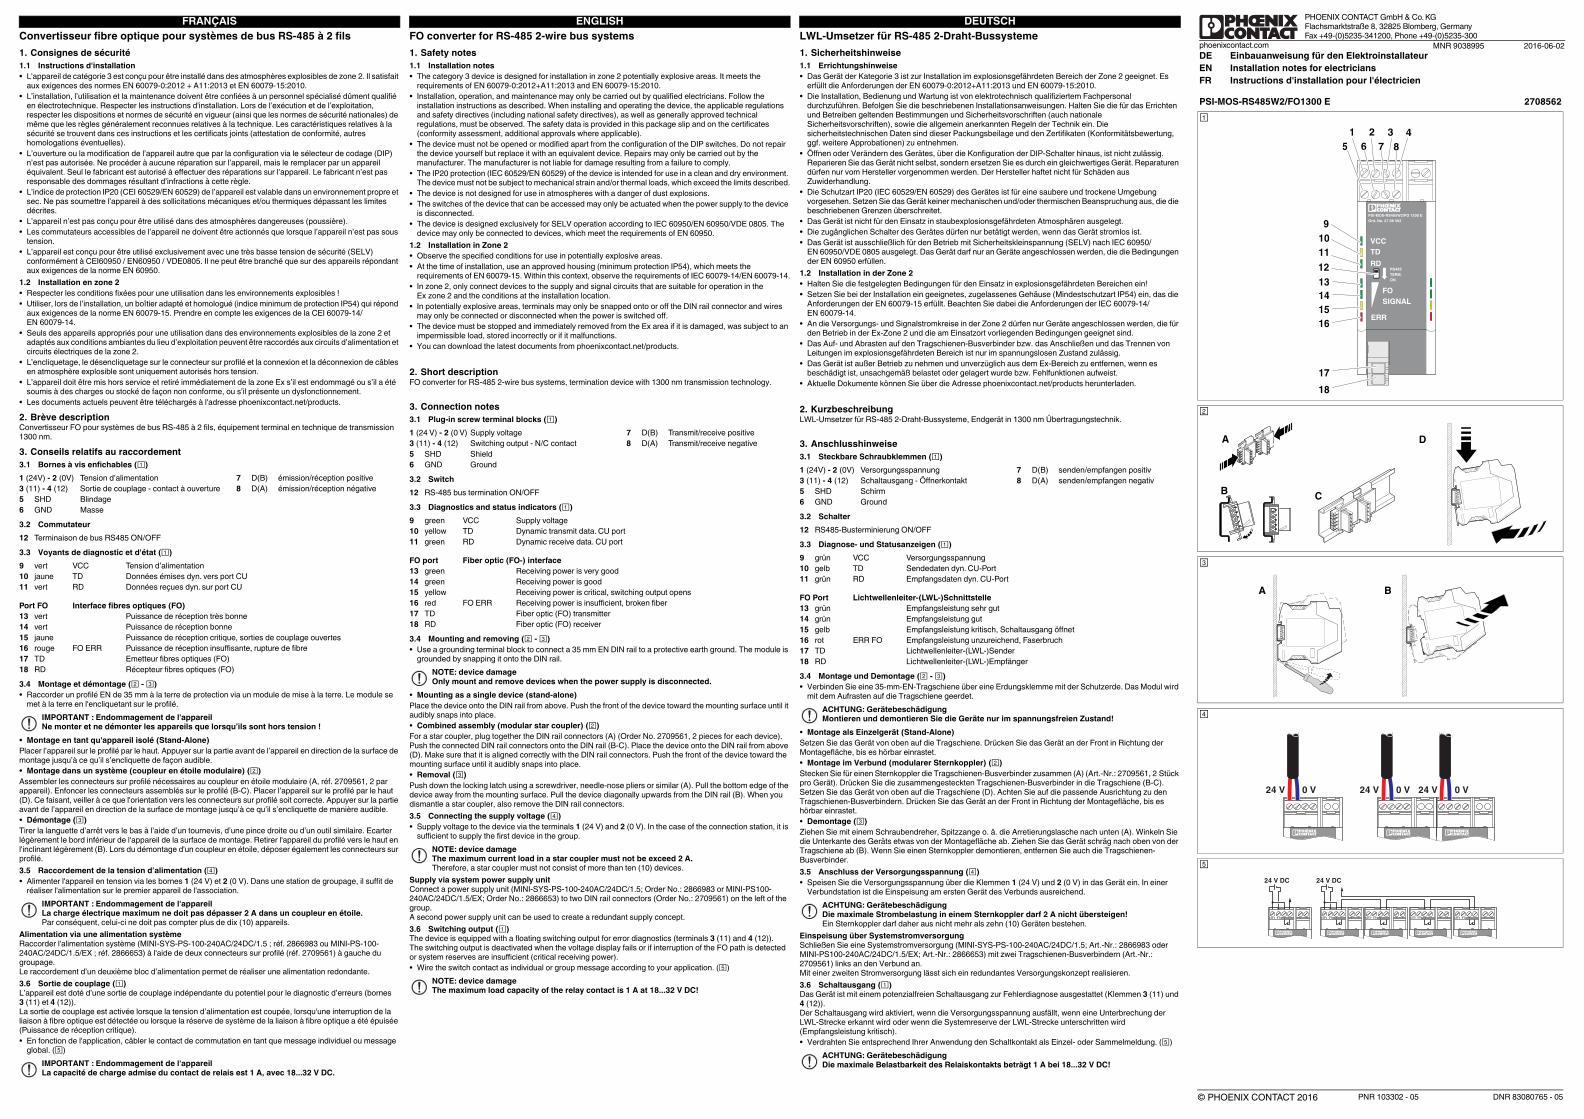
3.1 Steckbare Schraubklemmen ()
3.2 Schalter
3.3 Diagnose- und Statusanzeigen ()
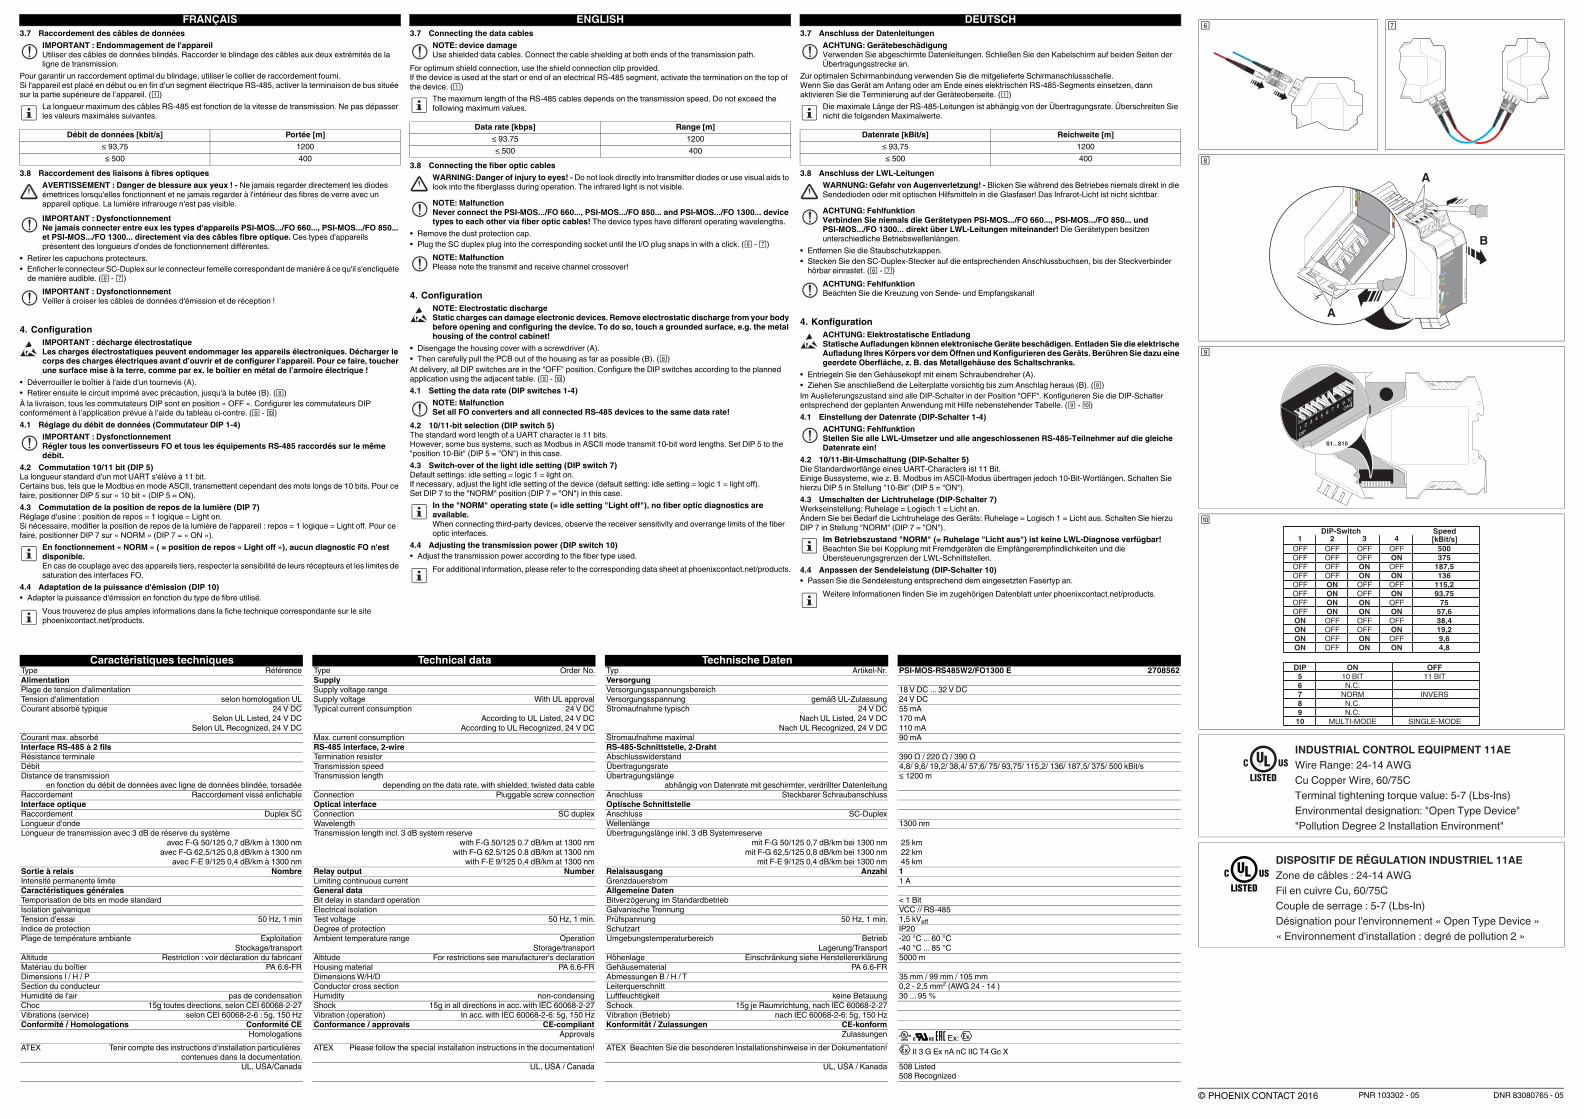
3.4 Montage und Demontage ( - )
• Verbinden Sie eine 35-mm-EN-Tragschiene über eine Erdungsklemme mit der Schutzerde. Das Modul wird
mit dem Aufrasten auf die Tragschiene geerdet.
• Montage als Einzelgerät (Stand-Alone)
Setzen Sie das Gerät von oben auf die Tragschiene. Drücken Sie das Gerät an der Front in Richtung der
Montagefläche, bis es hörbar einrastet.
• Montage im Verbund (modularer Sternkoppler) ()
Stecken Sie für einen Sternkoppler die Tragschienen-Busverbinder zusammen (A) (Art.-Nr.: 2709561, 2 Stück
pro Gerät). Drücken Sie die zusammengesteckten Tragschienen-Busverbinder in die Tragschiene (B-C).
Setzen Sie das Gerät von oben auf die Tragschiene (D). Achten Sie auf die passende Ausrichtung zu den
Tragschienen-Busverbindern. Drücken Sie das Gerät an der Front in Richtung der Montagefläche, bis es
hörbar einrastet.
• Demontage ()
Ziehen Sie mit einem Schraubendreher, Spitzzange o. ä. die Arretierungslasche nach unten (A). Winkeln Sie
die Unterkante des Geräts etwas von der Montagefläche ab. Ziehen Sie das Gerät schräg nach oben von der
Tragschiene ab (B). Wenn Sie einen Sternkoppler demontieren, entfernen Sie auch die Tragschienen-
Busverbinder.
3.5 Anschluss der Versorgungsspannung ()
• Speisen Sie die Versorgungsspannung über die Klemmen 1 (24 V) und 2 (0 V) in das Gerät ein. In einer
Verbundstation ist die Einspeisung am ersten Gerät des Verbunds ausreichend.
Einspeisung über Systemstromversorgung
Schließen Sie eine Systemstromversorgung (MINI-SYS-PS-100-240AC/24DC/1.5; Art.-Nr.: 2866983 oder
MINI-PS100-240AC/24DC/1.5/EX; Art.-Nr.: 2866653) mit zwei Tragschienen-Busverbindern (Art.-Nr.:
2709561) links an den Verbund an.
Mit einer zweiten Stromversorgung lässt sich ein redundantes Versorgungskonzept realisieren.
3.6 Schaltausgang ()
Das Gerät ist mit einem potenzialfreien Schaltausgang zur Fehlerdiagnose ausgestattet (Klemmen 3 (11) und
4 (12)).
Der Schaltausgang wird aktiviert, wenn die Versorgungsspannung ausfällt, wenn eine Unterbrechung der
LWL-Strecke erkannt wird oder wenn die Systemreserve der LWL-Strecke unterschritten wird
(Empfangsleistung kritisch).
• Verdrahten Sie entsprechend Ihrer Anwendung den Schaltkontakt als Einzel- oder Sammelmeldung. ()
1 (24V) - 2 (0V) Versorgungsspannung 7 D(B) senden/empfangen positiv
3 (11) - 4 (12) Schaltausgang - Öffnerkontakt 8 D(A) senden/empfangen negativ
5 SHD Schirm
6 GND Ground
12 RS485-Busterminierung ON/OFF
9 grün VCC Versorgungsspannung
10 gelb TD Sendedaten dyn. CU-Port
11 grün RD Empfangsdaten dyn. CU-Port
FO Port Lichtwellenleiter-(LWL-)Schnittstelle
13 grün Empfangsleistung sehr gut
14 grün Empfangsleistung gut
15 gelb Empfangsleistung kritisch, Schaltausgang öffnet
16 rot ERR FO Empfangsleistung unzureichend, Faserbruch
17 TD Lichtwellenleiter-(LWL-)Sender
18 RD Lichtwellenleiter-(LWL-)Empfänger
ACHTUNG: Gerätebeschädigung
Montieren und demontieren Sie die Geräte nur im spannungsfreien Zustand!
ACHTUNG: Gerätebeschädigung
Die maximale Strombelastung in einem Sternkoppler darf 2 A nicht übersteigen!
Ein Sternkoppler darf daher aus nicht mehr als zehn (10) Geräten bestehen.
ACHTUNG: Gerätebeschädigung
Die maximale Belastbarkeit des Relaiskontakts beträgt 1 A bei 18...32 V DC!
Convertisseur fibre optique pour systèmes de bus RS-485 à 2 fils
1. Consignes de sécurité
1.1 Instructions d'installation
• L'appareil de catégorie 3 est conçu pour être installé dans des atmosphères explosibles de zone 2. Il satisfait
aux exigences des normes EN 60079-0:2012 + A11:2013 et EN 60079-15:2010.
• L’installation, l’utilisation et la maintenance doivent être confiées à un personnel spécialisé dûment qualifié
en électrotechnique. Respecter les instructions d'installation. Lors de l’exécution et de l’exploitation,
respecter les dispositions et normes de sécurité en vigueur (ainsi que les normes de sécurité nationales) de
même que les règles généralement reconnues relatives à la technique. Les caractéristiques relatives à la
sécurité se trouvent dans ces instructions et les certificats joints (attestation de conformité, autres
homologations éventuelles).
• L’ouverture ou la modification de l’appareil autre que par la configuration via le sélecteur de codage (DIP)
n’est pas autorisée. Ne procéder à aucune réparation sur l’appareil, mais le remplacer par un appareil
équivalent. Seul le fabricant est autorisé à effectuer des réparations sur l’appareil. Le fabricant n’est pas
responsable des dommages résultant d’infractions à cette règle.
• L’indice de protection IP20 (CEI 60529/EN 60529) de l’appareil est valable dans un environnement propre et
sec. Ne pas soumettre l’appareil à des sollicitations mécaniques et/ou thermiques dépassant les limites
décrites.
• L’appareil n’est pas conçu pour être utilisé dans des atmosphères dangereuses (poussière).
• Les commutateurs accessibles de l’appareil ne doivent être actionnés que lorsque l’appareil n’est pas sous
tension.
• L’appareil est conçu pour être utilisé exclusivement avec une très basse tension de sécurité (SELV)
conformément à CEI60950 / EN60950 / VDE0805. Il ne peut être branché que sur des appareils répondant
aux exigences de la norme EN 60950.
1.2 Installation en zone 2
• Respecter les conditions fixées pour une utilisation dans les environnements explosibles !
• Utiliser, lors de l’installation, un boîtier adapté et homologué (indice minimum de protection IP54) qui répond
aux exigences de la norme EN 60079-15. Prendre en compte les exigences de la CEI 60079-14/
EN 60079-14.
• Seuls des appareils appropriés pour une utilisation dans des environnements explosibles de la zone 2 et
adaptés aux conditions ambiantes du lieu d’exploitation peuvent être raccordés aux circuits d’alimentation et
circuits électriques de la zone 2.
• L’encliquetage, le désencliquetage sur le connecteur sur profilé et la connexion et la déconnexion de câbles
en atmosphère explosible sont uniquement autorisés hors tension.
• L’appareil doit être mis hors service et retiré immédiatement de la zone Ex s’il est endommagé ou s’il a été
soumis à des charges ou stocké de façon non conforme, ou s’il présente un dysfonctionnement.
• Les documents actuels peuvent être téléchargés à l'adresse phoenixcontact.net/products.
2. Brève description
Convertisseur FO pour systèmes de bus RS-485 à 2 fils, équipement terminal en technique de transmission
1300 nm.
3. Conseils relatifs au raccordement
3.1 Bornes à vis enfichables ()
3.2 Commutateur
3.3 Voyants de diagnostic et d'état ()
3.4 Montage et démontage ( - )
• Raccorder un profilé EN de 35 mm à la terre de protection via un module de mise à la terre. Le module se
met à la terre en l'encliquetant sur le profilé.
• Montage en tant qu'appareil isolé (Stand-Alone)
Placer l’appareil sur le profilé par le haut. Appuyer sur la partie avant de l’appareil en direction de la surface de
montage jusqu’à ce qu’il s’encliquette de façon audible.
• Montage dans un système (coupleur en étoile modulaire) ()
Assembler les connecteurs sur profilé nécessaires au coupleur en étoile modulaire (A, réf. 2709561, 2 par
appareil). Enfoncer les connecteurs assemblés sur le profilé (B-C). Placer l’appareil sur le profilé par le haut
(D). Ce faisant, veiller à ce que l'orientation vers les connecteurs sur profilé soit correcte. Appuyer sur la partie
avant de l’appareil en direction de la surface de montage jusqu’à ce qu’il s’encliquette de manière audible.
• Démontage ()
Tirer la languette d’arrêt vers le bas à l’aide d’un tournevis, d’une pince droite ou d’un outil similaire. Ecarter
légèrement le bord inférieur de l'appareil de la surface de montage. Retirer l'appareil du profilé vers le haut en
l'inclinant légèrement (B). Lors du démontage d'un coupleur en étoile, déposer également les connecteurs sur
profilé.
3.5 Raccordement de la tension d’alimentation ()
• Alimenter l'appareil en tension via les bornes 1 (24 V) et 2 (0 V). Dans une station de groupage, il suffit de
réaliser l'alimentation sur le premier appareil de l'association.
Alimentation via une alimentation système
Raccorder l'alimentation système (MINI-SYS-PS-100-240AC/24DC/1.5 ; réf. 2866983 ou MINI-PS-100-
240AC/24DC/1.5/EX ; réf. 2866653) à l'aide de deux connecteurs sur profilé (réf. 2709561) à gauche du
groupage.
Le raccordement d’un deuxième bloc d’alimentation permet de réaliser une alimentation redondante.
3.6 Sortie de couplage ()
L’appareil est doté d’une sortie de couplage indépendante du potentiel pour le diagnostic d’erreurs (bornes
3 (11) et 4 (12)).
La sortie de couplage est activée lorsque la tension d’alimentation est coupée, lorsqu'une interruption de la
liaison à fibre optique est détectée ou lorsque la réserve de système de la liaison à fibre optique a été épuisée
(Puissance de réception critique).
• En fonction de l'application, câbler le contact de commutation en tant que message individuel ou message
global. ()
1 (24V) - 2 (0V) Tension d’alimentation 7 D(B) émission/réception positive
3 (11) - 4 (12) Sortie de couplage - contact à ouverture 8 D(A) émission/réception négative
5 SHD Blindage
6 GND Masse
12 Terminaison de bus RS485 ON/OFF
9 vert VCC Tension d’alimentation
10 jaune TD Données émises dyn. vers port CU
11 vert RD Données reçues dyn. sur port CU
Port FO Interface fibres optiques (FO)
13 vert Puissance de réception très bonne
14 vert Puissance de réception bonne
15 jaune Puissance de réception critique, sorties de couplage ouvertes
16 rouge FO ERR Puissance de réception insuffisante, rupture de fibre
17 TD Emetteur fibres optiques (FO)
18 RD Récepteur fibres optiques (FO)
IMPORTANT : Endommagement de l'appareil
Ne monter et ne démonter les appareils que lorsqu’ils sont hors tension !
IMPORTANT : Endommagement de l'appareil
La charge électrique maximum ne doit pas dépasser 2 A dans un coupleur en étoile.
Par conséquent, celui-ci ne doit pas compter plus de dix (10) appareils.
IMPORTANT : Endommagement de l'appareil
La capacité de charge admise du contact de relais est 1 A, avec 18...32 V DC.
FO converter for RS-485 2-wire bus systems
1. Safety notes
1.1 Installation notes
• The category 3 device is designed for installation in zone 2 potentially explosive areas. It meets the
requirements of EN 60079-0:2012+A11:2013 and EN 60079-15:2010.
• Installation, operation, and maintenance may only be carried out by qualified electricians. Follow the
installation instructions as described. When installing and operating the device, the applicable regulations
and safety directives (including national safety directives), as well as generally approved technical
regulations, must be observed. The safety data is provided in this package slip and on the certificates
(conformity assessment, additional approvals where applicable).
• The device must not be opened or modified apart from the configuration of the DIP switches. Do not repair
the device yourself but replace it with an equivalent device. Repairs may only be carried out by the
manufacturer. The manufacturer is not liable for damage resulting from a failure to comply.
• The IP20 protection (IEC 60529/EN 60529) of the device is intended for use in a clean and dry environment.
The device must not be subject to mechanical strain and/or thermal loads, which exceed the limits described.
• The device is not designed for use in atmospheres with a danger of dust explosions.
• The switches of the device that can be accessed may only be actuated when the power supply to the device
is disconnected.
• The device is designed exclusively for SELV operation according to IEC 60950/EN 60950/VDE 0805. The
device may only be connected to devices, which meet the requirements of EN 60950.
1.2 Installation in Zone 2
• Observe the specified conditions for use in potentially explosive areas.
• At the time of installation, use an approved housing (minimum protection IP54), which meets the
requirements of EN 60079-15. Within this context, observe the requirements of IEC 60079-14/EN 60079-14.
• In zone 2, only connect devices to the supply and signal circuits that are suitable for operation in the
Ex zone 2 and the conditions at the installation location.
• In potentially explosive areas, terminals may only be snapped onto or off the DIN rail connector and wires
may only be connected or disconnected when the power is switched off.
• The device must be stopped and immediately removed from the Ex area if it is damaged, was subject to an
impermissible load, stored incorrectly or if it malfunctions.
• You can download the latest documents from phoenixcontact.net/products.
2. Short description
FO converter for RS-485 2-wire bus systems, termination device with 1300 nm transmission technology.
3. Connection notes
3.1 Plug-in screw terminal blocks ()
3.2 Switch
3.3 Diagnostics and status indicators ()
3.4 Mounting and removing ( - )
• Use a grounding terminal block to connect a 35 mm EN DIN rail to a protective earth ground. The module is
grounded by snapping it onto the DIN rail.
• Mounting as a single device (stand-alone)
Place the device onto the DIN rail from above. Push the front of the device toward the mounting surface until it
audibly snaps into place.
• Combined assembly (modular star coupler) ()
For a star coupler, plug together the DIN rail connectors (A) (Order No. 2709561, 2 pieces for each device).
Push the connected DIN rail connectors onto the DIN rail (B-C). Place the device onto the DIN rail from above
(D). Make sure that it is aligned correctly with the DIN rail connectors. Push the front of the device toward the
mounting surface until it audibly snaps into place.
• Removal ()
Push down the locking latch using a screwdriver, needle-nose pliers or similar (A). Pull the bottom edge of the
device away from the mounting surface. Pull the device diagonally upwards from the DIN rail (B). When you
dismantle a star coupler, also remove the DIN rail connectors.
3.5 Connecting the supply voltage ()
• Supply voltage to the device via the terminals 1 (24 V) and 2 (0 V). In the case of the connection station, it is
sufficient to supply the first device in the group.
Supply via system power supply unit
Connect a power supply unit (MINI-SYS-PS-100-240AC/24DC/1.5; Order No.: 2866983 or MINI-PS100-
240AC/24DC/1.5/EX; Order No.: 2866653) to two DIN rail connectors (Order No.: 2709561) on the left of the
group.
A second power supply unit can be used to create a redundant supply concept.
3.6 Switching output ()
The device is equipped with a floating switching output for error diagnostics (terminals 3 (11) and 4 (12)).
The switching output is deactivated when the voltage display fails or if interruption of the FO path is detected
or system reserves are insufficient (critical receiving power).
• Wire the switch contact as individual or group message according to your application. ()
1 (24 V) - 2 (0 V) Supply voltage 7 D(B) Transmit/receive positive
3 (11) - 4 (12) Switching output - N/C contact 8 D(A) Transmit/receive negative
5 SHD Shield
6 GND Ground
12 RS-485 bus termination ON/OFF
9 green VCC Supply voltage
10 yellow TD Dynamic transmit data. CU port
11 green RD Dynamic receive data. CU port
FO port Fiber optic (FO-) interface
13 green Receiving power is very good
14 green Receiving power is good
15 yellow Receiving power is critical, switching output opens
16 red FO ERR Receiving power is insufficient, broken fiber
17 TD Fiber optic (FO) transmitter
18 RD Fiber optic (FO) receiver
NOTE: device damage
Only mount and remove devices when the power supply is disconnected.
NOTE: device damage
The maximum current load in a star coupler must not be exceed 2 A.
Therefore, a star coupler must not consist of more than ten (10) devices.
NOTE: device damage
The maximum load capacity of the relay contact is 1 A at 18...32 V DC!
DEUTSCHENGLISHFRANÇAIS
MNR 9038995
PNR 103302 - 05 DNR 83080765 - 05
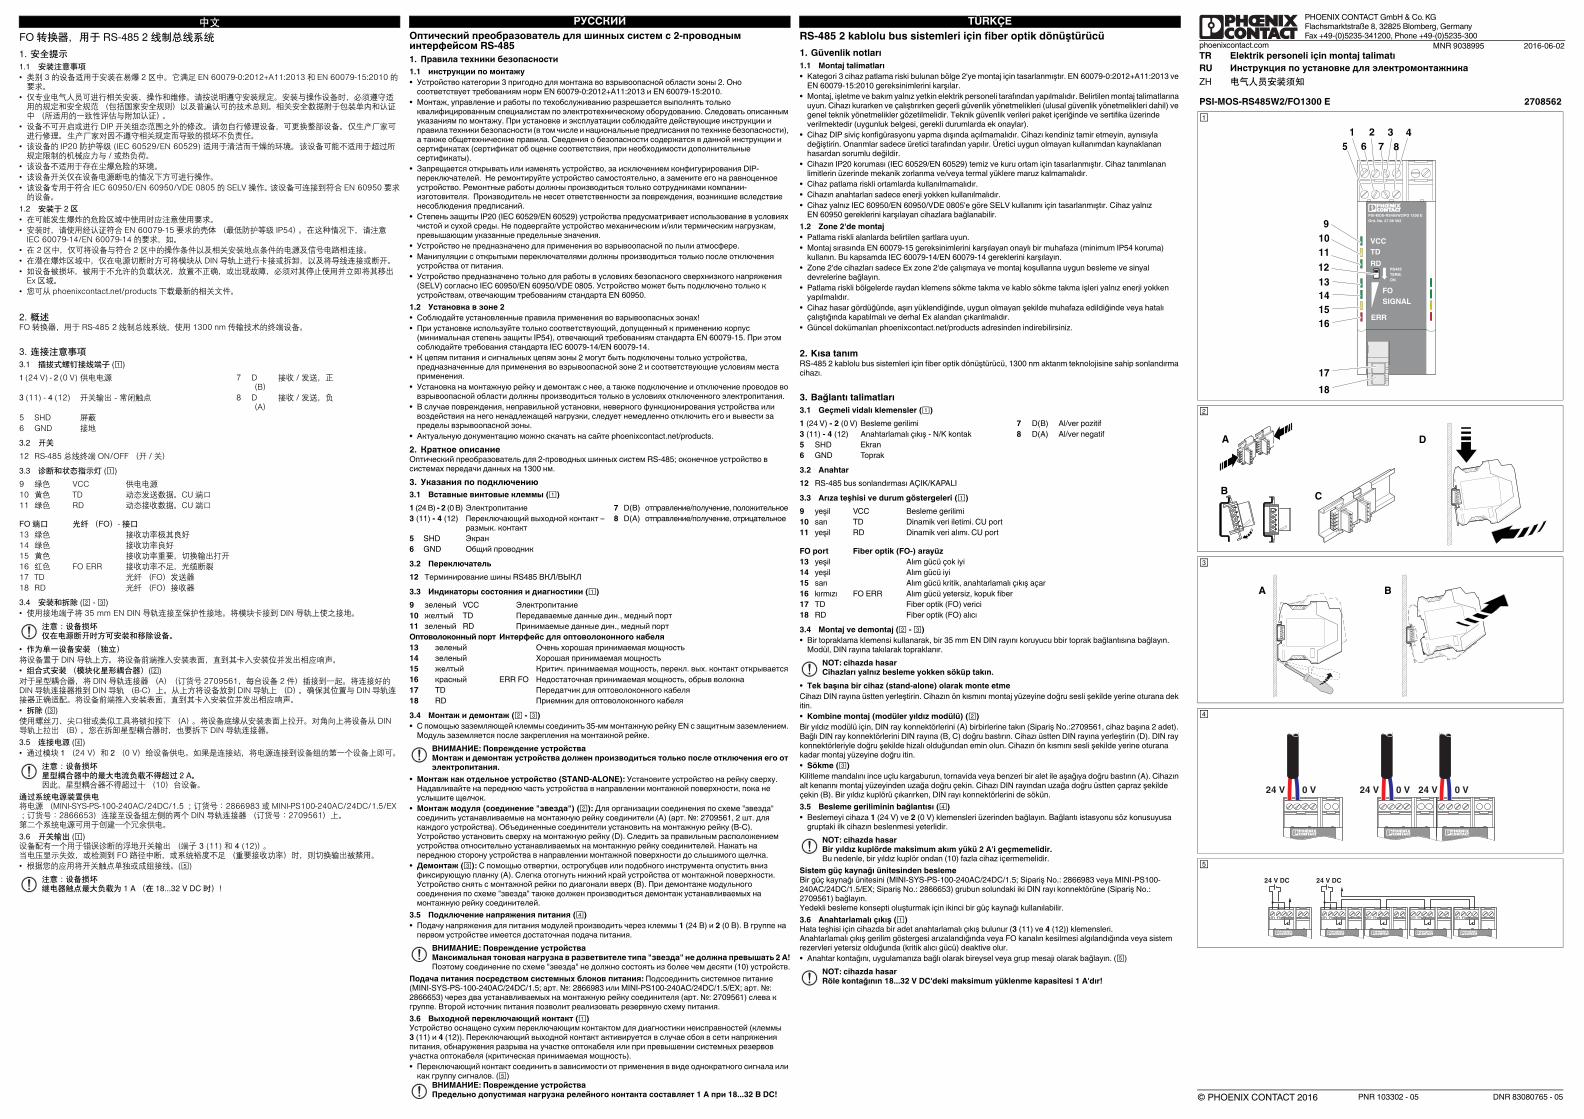
PSI-MOS-RS485W2/FO1300 E 2708562
A
CB
D
A B
24 V 0 V 24 V 0 V 0 V24 V
24 V 0 V
24 V DC
24 V 0 V 24 V 0 V 24 V 0 V 24 V 0 V
24 V DC
Caractéristiques techniques Technical data Technische Daten
Type Référence Type Order No. Typ Artikel-Nr. PSI-MOS-RS485W2/FO1300 E 2708562
Alimentation Supply Versorgung
Plage de tension d'alimentation Supply voltage range Versorgungsspannungsbereich 18 V DC ... 32 V DC
Tension d'alimentation selon homologation UL Supply voltage With UL approval Versorgungsspannung gemäß UL-Zulassung 24 V DC
Courant absorbé typique 24 V DC Typical current consumption 24 V DC Stromaufnahme typisch 24 V DC 55 mA
Selon UL Listed, 24 V DC According to UL Listed, 24 V DC Nach UL Listed, 24 V DC 170 mA
Selon UL Recognized, 24 V DC According to UL Recognized, 24 V DC Nach UL Recognized, 24 V DC 110 mA
Courant max. absorbé Max. current consumption Stromaufnahme maximal 90 mA
Interface RS-485 à 2 fils RS-485 interface, 2-wire RS-485-Schnittstelle, 2-Draht
Résistance terminale Termination resistor Abschlusswiderstand 390 Ω / 220 Ω / 390 Ω
Débit Transmission speed Übertragungsrate 4,8/ 9,6/ 19,2/ 38,4/ 57,6/ 75/ 93,75/ 115,2/ 136/ 187,5/ 375/ 500 kBit/s
Distance de transmission
en fonction du débit de données avec ligne de données blindée, torsadée
Transmission length
depending on the data rate, with shielded, twisted data cable
Übertragungslänge
abhängig von Datenrate mit geschirmter, verdrillter Datenleitung
≤ 1200 m
Raccordement Raccordement vissé enfichable Connection Pluggable screw connection Anschluss Steckbarer Schraubanschluss
Interface optique Optical interface Optische Schnittstelle
Raccordement Duplex SC Connection SC duplex Anschluss SC-Duplex
Longueur d'onde Wavelength Wellenlänge 1300 nm
Longueur de transmission avec 3 dB de réserve du système Transmission length incl. 3 dB system reserve Übertragungslänge inkl. 3 dB Systemreserve
avec F-G 50/125 0,7 dB/km à 1300 nm with F-G 50/125 0.7 dB/km at 1300 nm mit F-G 50/125 0,7 dB/km bei 1300 nm 25 km
avec F-G 62,5/125 0,8 dB/km à 1300 nm with F-G 62.5/125 0.8 dB/km at 1300 nm mit F-G 62,5/125 0,8 dB/km bei 1300 nm 22 km
avec F-E 9/125 0,4 dB/km à 1300 nm with F-E 9/125 0,4 dB/km at 1300 nm mit F-E 9/125 0,4 dB/km bei 1300 nm 45 km
Sortie à relais Nombre Relay output Number Relaisausgang Anzahl 1
Intensité permanente limite Limiting continuous current Grenzdauerstrom 1 A
Caractéristiques générales General data Allgemeine Daten
Temporisation de bits en mode standard Bit delay in standard operation Bitverzögerung im Standardbetrieb < 1 Bit
Isolation galvanique Electrical isolation Galvanische Trennung VCC // RS-485
Tension d'essai 50 Hz, 1 min Test voltage 50 Hz, 1 min. Prüfspannung 50 Hz, 1 min. 1,5 kVeff
Indice de protection Degree of protection Schutzart IP20
Plage de température ambiante Exploitation Ambient temperature range Operation Umgebungstemperaturbereich Betrieb -20 °C ... 60 °C
Stockage/transport Storage/transport Lagerung/Transport -40 °C ... 85 °C
Altitude Restriction : voir déclaration du fabricant Altitude For restrictions see manufacturer's declaration Höhenlage Einschränkung siehe Herstellererklärung 5000 m
Matériau du boîtier PA 6.6-FR Housing material PA 6.6-FR Gehäusematerial PA 6.6-FR
Dimensions l / H / P Dimensions W/H/D Abmessungen B / H / T 35 mm / 99 mm / 105 mm
Section du conducteur Conductor cross section Leiterquerschnitt 0,2 - 2,5 mm² (AWG 24 - 14 )
Humidité de l'air pas de condensation Humidity non-condensing Luftfeuchtigkeit keine Betauung 30 ... 95 %
Choc 15g toutes directions, selon CEI 60068-2-27 Shock 15g in all directions in acc. with IEC 60068-2-27 Schock 15g je Raumrichtung, nach IEC 60068-2-27
Vibrations (service) selon CEI 60068-2-6 : 5g, 150 Hz Vibration (operation) In acc. with IEC 60068-2-6: 5g, 150 Hz Vibration (Betrieb) nach IEC 60068-2-6: 5g, 150 Hz
Conformité / Homologations Conformité CE Conformance / approvals CE-compliant Konformität / Zulassungen CE-konform
Homologations Approvals Zulassungen Ex: ATEX Tenir compte des instructions d'installation particulières
contenues dans la documentation.
ATEX Please follow the special installation instructions in the documentation! ATEX Beachten Sie die besonderen Installationshinweise in der Dokumentation! II 3 G Ex nA nC IIC T4 Gc X
UL, USA/Canada UL, USA / Canada UL, USA / Kanada 508 Listed
508 Recognized
xxxxxxxxxxxxxxxxxxxxxx
Ord.-No.xxxxxxx
VCC
TD
RD
FO
ERR
A
B
A
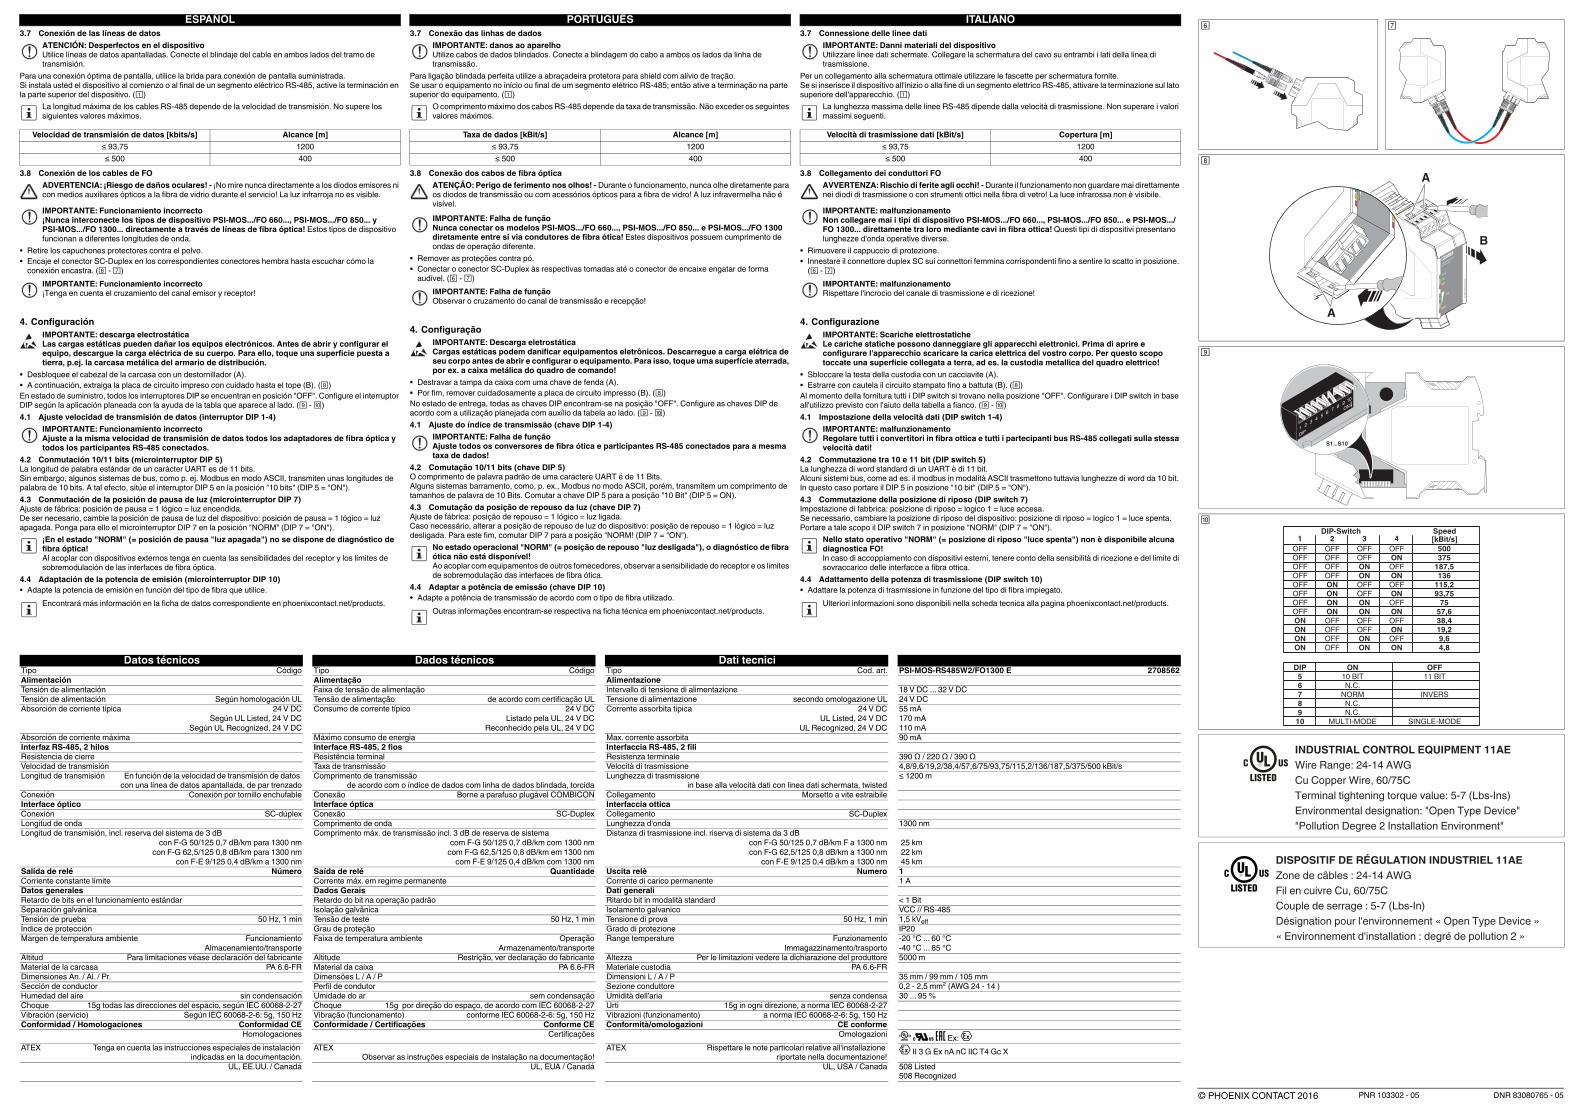
1
DIP
23
45
67
89
10
ON
S1...S10
DIP-Switch1 2 3 4
Speed[kBit/s]
OFFOFFOFFOFFOFFOFFOFFOFFONONONON
OFFOFFOFFOFF
OFF
ONONONON
OFFOFFOFF
OFFOFF
OFFOFF
OFF
ONON
ONON
OFFONON
OFF
OFF
OFF
OFF
OFF
ON
ON
ON
ON
ON
ONOFF
500375
187,5136
115,293,75
7557,638,419,29,64,8
DIP56789
10
ON10 BITN.C.
NORMN.C.N.C.
MULTI-MODE
OFF11 BIT
INVERS
SINGLE-MODE
DISPOSITIF DE RÉGULATION INDUSTRIEL 11AE
Zone de câbles : 24-14 AWG
Fil en cuivre Cu, 60/75C
Couple de serrage : 5-7 (Lbs-In)
Désignation pour l'environnement « Open Type Device »
« Environnement d'installation : degré de pollution 2 »
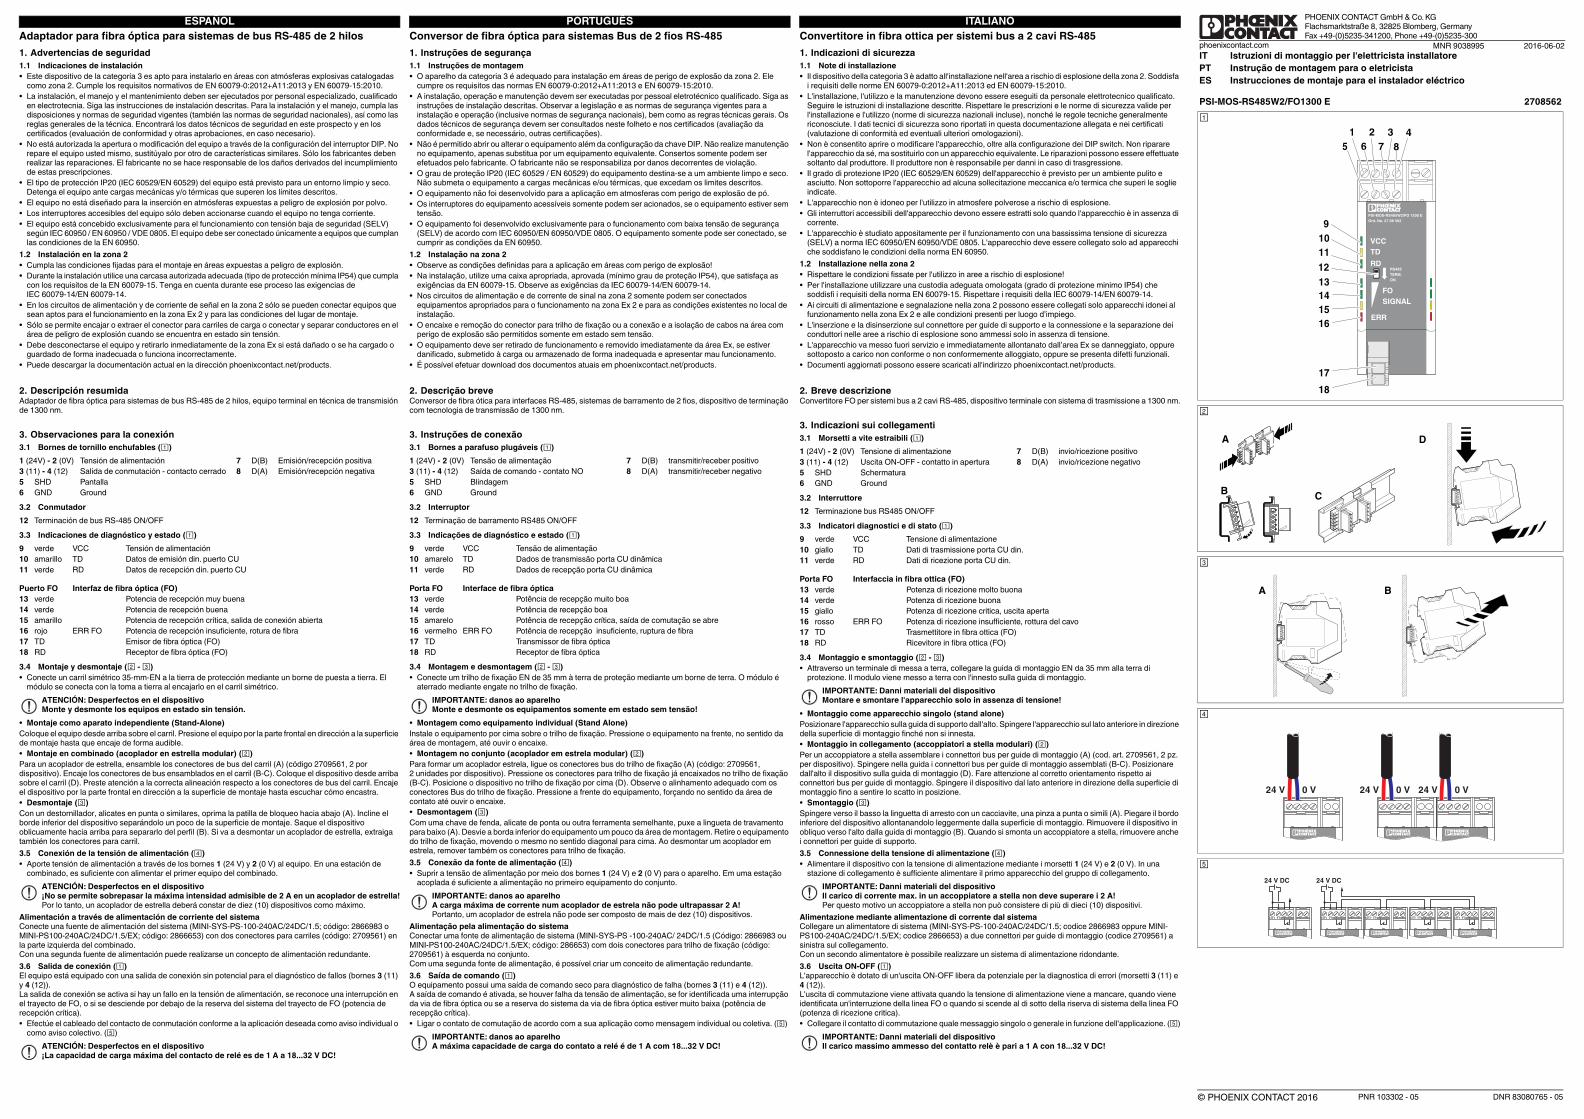
3.7 Anschluss der Datenleitungen
Zur optimalen Schirmanbindung verwenden Sie die mitgelieferte Schirmanschlussschelle.
Wenn Sie das Gerät am Anfang oder am Ende eines elektrischen RS-485-Segments einsetzen, dann
aktivieren Sie die Terminierung auf der Geräteoberseite. ()
3.8 Anschluss der LWL-Leitungen
• Entfernen Sie die Staubschutzkappen.
• Stecken Sie den SC-Duplex-Stecker auf die entsprechenden Anschlussbuchsen, bis der Steckverbinder
hörbar einrastet. ( - )
4. Konfiguration
• Entriegeln Sie den Gehäusekopf mit einem Schraubendreher (A).
• Ziehen Sie anschließend die Leiterplatte vorsichtig bis zum Anschlag heraus (B). ()
Im Auslieferungszustand sind alle DIP-Schalter in der Position "OFF". Konfigurieren Sie die DIP-Schalter
entsprechend der geplanten Anwendung mit Hilfe nebenstehender Tabelle. ( - )
4.1 Einstellung der Datenrate (DIP-Schalter 1-4)
4.2 10/11-Bit-Umschaltung (DIP-Schalter 5)
Die Standardwortlänge eines UART-Characters ist 11 Bit.
Einige Bussysteme, wie z. B. Modbus im ASCII-Modus übertragen jedoch 10-Bit-Wortlängen. Schalten Sie
hierzu DIP 5 in Stellung "10-Bit" (DIP 5 = "ON").
4.3 Umschalten der Lichtruhelage (DIP-Schalter 7)
Werkseinstellung: Ruhelage = Logisch 1 = Licht an.
Ändern Sie bei Bedarf die Lichtruhelage des Geräts: Ruhelage = Logisch 1 = Licht aus. Schalten Sie hierzu
DIP 7 in Stellung "NORM" (DIP 7 = "ON").
4.4 Anpassen der Sendeleistung (DIP-Schalter 10)
• Passen Sie die Sendeleistung entsprechend dem eingesetzten Fasertyp an.
ACHTUNG: Gerätebeschädigung
Verwenden Sie abgeschirmte Datenleitungen. Schließen Sie den Kabelschirm auf beiden Seiten der
Übertragungsstrecke an.
Die maximale Länge der RS-485-Leitungen ist abhängig von der Übertragungsrate. Überschreiten Sie
nicht die folgenden Maximalwerte.
Datenrate [kBit/s] Reichweite [m]
≤ 93,75 1200
≤ 500 400
WARNUNG: Gefahr von Augenverletzung! - Blicken Sie während des Betriebes niemals direkt in die
Sendedioden oder mit optischen Hilfsmitteln in die Glasfaser! Das Infrarot-Licht ist nicht sichtbar.
ACHTUNG: Fehlfunktion
Verbinden Sie niemals die Gerätetypen PSI-MOS.../FO 660..., PSI-MOS.../FO 850... und
PSI-MOS.../FO 1300... direkt über LWL-Leitungen miteinander! Die Gerätetypen besitzen
unterschiedliche Betriebswellenlängen.
ACHTUNG: Fehlfunktion
Beachten Sie die Kreuzung von Sende- und Empfangskanal!
ACHTUNG: Elektrostatische Entladung
Statische Aufladungen können elektronische Geräte beschädigen. Entladen Sie die elektrische
Aufladung Ihres Körpers vor dem Öffnen und Konfigurieren des Geräts. Berühren Sie dazu eine
geerdete Oberfläche, z. B. das Metallgehäuse des Schaltschranks.
ACHTUNG: Fehlfunktion
Stellen Sie alle LWL-Umsetzer und alle angeschlossenen RS-485-Teilnehmer auf die gleiche
Datenrate ein!
Im Betriebszustand "NORM" (= Ruhelage "Licht aus") ist keine LWL-Diagnose verfügbar!
Beachten Sie bei Kopplung mit Fremdgeräten die Empfängerempfindlichkeiten und die
Übersteuerungsgrenzen der LWL-Schnittstellen.
Weitere Informationen finden Sie im zugehörigen Datenblatt unter phoenixcontact.net/products.
3.7 Raccordement des câbles de données
Pour garantir un raccordement optimal du blindage, utiliser le collier de raccordement fourni.
Si l'appareil est placé en début ou en fin d’un segment électrique RS-485, activer la terminaison de bus située
sur la partie supérieure de l’appareil. ()
3.8 Raccordement des liaisons à fibres optiques
• Retirer les capuchons protecteurs.
• Enficher le connecteur SC-Duplex sur le connecteur femelle correspondant de manière à ce qu'il s'encliquète
de manière audible. ( - )
4. Configuration
• Déverrouiller le boîtier à l'aide d'un tournevis (A).
• Retirer ensuite le circuit imprimé avec précaution, jusqu'à la butée (B). ()
À la livraison, tous les commutateurs DIP sont en position « OFF ». Configurer les commutateurs DIP
conformément à l’application prévue à l’aide du tableau ci-contre. ( - )
4.1 Réglage du débit de données (Commutateur DIP 1-4)
4.2 Commutation 10/11 bit (DIP 5)
La longueur standard d'un mot UART s'élève à 11 bit.
Certains bus, tels que le Modbus en mode ASCII, transmettent cependant des mots longs de 10 bits. Pour ce
faire, positionner DIP 5 sur « 10 bit » (DIP 5 = ON).
4.3 Commutation de la position de repos de la lumière (DIP 7)
Réglage d'usine : position de repos = 1 logique = Light on.
Si nécessaire, modifier la position de repos de la lumière de l'appareil : repos = 1 logique = Light off. Pour ce
faire, positionner DIP 7 sur « NORM » (DIP 7 = « ON »).
4.4 Adaptation de la puissance d'émission (DIP 10)
• Adapter la puissance d'émission en fonction du type de fibre utilisé.
IMPORTANT : Endommagement de l'appareil
Utiliser des câbles de données blindés. Raccorder le blindage des câbles aux deux extrémités de la
ligne de transmission.
La longueur maximum des câbles RS-485 est fonction de la vitesse de transmission. Ne pas dépasser
les valeurs maximales suivantes.
Débit de données [kbit/s] Portée [m]
≤ 93,75 1200
≤ 500 400
AVERTISSEMENT : Danger de blessure aux yeux ! - Ne jamais regarder directement les diodes
émettrices lorsqu'elles fonctionnent et ne jamais regarder à l'intérieur des fibres de verre avec un
appareil optique. La lumière infrarouge n'est pas visible.
IMPORTANT : Dysfonctionnement
Ne jamais connecter entre eux les types d'appareils PSI-MOS.../FO 660..., PSI-MOS.../FO 850...
et PSI-MOS.../FO 1300... directement via des câbles fibre optique. Ces types d'appareils
présentent des longueurs d'ondes de fonctionnement différentes.
IMPORTANT : Dysfonctionnement
Veiller à croiser les câbles de données d'émission et de réception !
IMPORTANT : décharge électrostatique
Les charges électrostatiques peuvent endommager les appareils électroniques. Décharger le
corps des charges électriques avant d’ouvrir et de configurer l’appareil. Pour ce faire, toucher
une surface mise à la terre, comme par ex. le boîtier en métal de l’armoire électrique !
IMPORTANT : Dysfonctionnement
Régler tous les convertisseurs FO et tous les équipements RS-485 raccordés sur le même
débit.
En fonctionnement « NORM » ( = position de repos « Light off »), aucun diagnostic FO n'est
disponible.
En cas de couplage avec des appareils tiers, respecter la sensibilité de leurs récepteurs et les limites de
saturation des interfaces FO.
Vous trouverez de plus amples informations dans la fiche technique correspondante sur le site
phoenixcontact.net/products.
3.7 Connecting the data cables
For optimum shield connection, use the shield connection clip provided.
If the device is used at the start or end of an electrical RS-485 segment, activate the termination on the top of
the device. ()
3.8 Connecting the fiber optic cables
• Remove the dust protection cap.
• Plug the SC duplex plug into the corresponding socket until the I/O plug snaps in with a click. ( - )
4. Configuration
• Disengage the housing cover with a screwdriver (A).
• Then carefully pull the PCB out of the housing as far as possible (B). ()
At delivery, all DIP switches are in the "OFF" position. Configure the DIP switches according to the planned
application using the adjacent table. ( - )
4.1 Setting the data rate (DIP switches 1-4)
4.2 10/11-bit selection (DIP switch 5)
The standard word length of a UART character is 11 bits.
However, some bus systems, such as Modbus in ASCII mode transmit 10-bit word lengths. Set DIP 5 to the
"position 10-Bit" (DIP 5 = "ON") in this case.
4.3 Switch-over of the light idle setting (DIP switch 7)
Default settings: idle setting = logic 1 = light on.
If necessary, adjust the light idle setting of the device (default setting: idle setting = logic 1 = light off).
Set DIP 7 to the "NORM" position (DIP 7 = "ON") in this case.
4.4 Adjusting the transmission power (DIP switch 10)
• Adjust the transmission power according to the fiber type used.
NOTE: device damage
Use shielded data cables. Connect the cable shielding at both ends of the transmission path.
The maximum length of the RS-485 cables depends on the transmission speed. Do not exceed the
following maximum values.
Data rate [kbps] Range [m]
≤ 93.75 1200
≤ 500 400
WARNING: Danger of injury to eyes! - Do not look directly into transmitter diodes or use visual aids to
look into the fiberglasss during operation. The infrared light is not visible.
NOTE: Malfunction
Never connect the PSI-MOS.../FO 660..., PSI-MOS.../FO 850... and PSI-MOS.../FO 1300... device
types to each other via fiber optic cables! The device types have different operating wavelengths.
NOTE: Malfunction
Please note the transmit and receive channel crossover!
NOTE: Electrostatic discharge
Static charges can damage electronic devices. Remove electrostatic discharge from your body
before opening and configuring the device. To do so, touch a grounded surface, e.g. the metal
housing of the control cabinet!
NOTE: Malfunction
Set all FO converters and all connected RS-485 devices to the same data rate!
In the "NORM" operating state (= idle setting "Light off"), no fiber optic diagnostics are
available.
When connecting third-party devices, observe the receiver sensitivity and overrange limits of the fiber
optic interfaces.
For additional information, please refer to the corresponding data sheet at phoenixcontact.net/products.
DEUTSCHENGLISHFRANÇAIS
© PHOENIX CONTACT 2016 DNR 83080765 - 05PNR 103302 - 05
PHOENIX CONTACT GmbH & Co. KG
Flachsmarktstraße 8, 32825 Blomberg, Germany
Fax +49-(0)5235-341200, Phone +49-(0)5235-300
phoenixcontact.com
IT Istruzioni di montaggio per l'elettricista installatore
PT Instrução de montagem para o eletricista
ES Instrucciones de montaje para el instalador eléctrico
2016-06-02
© PHOENIX CONTACT 2016
Convertitore in fibra ottica per sistemi bus a 2 cavi RS-485
1. Indicazioni di sicurezza
1.1 Note di installazione
• Il dispositivo della categoria 3 è adatto all'installazione nell'area a rischio di esplosione della zona 2. Soddisfa
i requisiti delle norme EN 60079-0:2012+A11:2013 ed EN 60079-15:2010.
• L'installazione, l'utilizzo e la manutenzione devono essere eseguiti da personale elettrotecnico qualificato.
Seguire le istruzioni di installazione descritte. Rispettare le prescrizioni e le norme di sicurezza valide per
l'installazione e l'utilizzo (norme di sicurezza nazionali incluse), nonché le regole tecniche generalmente
riconosciute. I dati tecnici di sicurezza sono riportati in questa documentazione allegata e nei certificati
(valutazione di conformità ed eventuali ulteriori omologazioni).
• Non è consentito aprire o modificare l'apparecchio, oltre alla configurazione dei DIP switch. Non riparare
l'apparecchio da sé, ma sostituirlo con un apparecchio equivalente. Le riparazioni possono essere effettuate
soltanto dal produttore. Il produttore non è responsabile per danni in caso di trasgressione.
• Il grado di protezione IP20 (IEC 60529/EN 60529) dell'apparecchio è previsto per un ambiente pulito e
asciutto. Non sottoporre l'apparecchio ad alcuna sollecitazione meccanica e/o termica che superi le soglie
indicate.
• L'apparecchio non è idoneo per l'utilizzo in atmosfere polverose a rischio di esplosione.
• Gli interruttori accessibili dell'apparecchio devono essere estratti solo quando l'apparecchio è in assenza di
corrente.
• L'apparecchio è studiato appositamente per il funzionamento con una bassissima tensione di sicurezza
(SELV) a norma IEC 60950/EN 60950/VDE 0805. L'apparecchio deve essere collegato solo ad apparecchi
che soddisfano le condizioni della norma EN 60950.
1.2 Installazione nella zona 2
• Rispettare le condizioni fissate per l'utilizzo in aree a rischio di esplosione!
• Per l'installazione utilizzare una custodia adeguata omologata (grado di protezione minimo IP54) che
soddisfi i requisiti della norma EN 60079-15. Rispettare i requisiti della IEC 60079-14/EN 60079-14.
• Ai circuiti di alimentazione e segnalazione nella zona 2 possono essere collegati solo apparecchi idonei al
funzionamento nella zona Ex 2 e alle condizioni presenti per luogo d’impiego.
• L'inserzione e la disinserzione sul connettore per guide di supporto e la connessione e la separazione dei
conduttori nelle aree a rischio di esplosione sono ammessi solo in assenza di tensione.
• L'apparecchio va messo fuori servizio e immediatamente allontanato dall’area Ex se danneggiato, oppure
sottoposto a carico non conforme o non conformemente alloggiato, oppure se presenta difetti funzionali.
• Documenti aggiornati possono essere scaricati all'indirizzo phoenixcontact.net/products.
2. Breve descrizione
Convertitore FO per sistemi bus a 2 cavi RS-485, dispositivo terminale con sistema di trasmissione a 1300 nm.
3. Indicazioni sui collegamenti
3.1 Morsetti a vite estraibili ()
3.2 Interruttore
3.3 Indicatori diagnostici e di stato ()
3.4 Montaggio e smontaggio ( - )
• Attraverso un terminale di messa a terra, collegare la guida di montaggio EN da 35 mm alla terra di
protezione. Il modulo viene messo a terra con l'innesto sulla guida di montaggio.
• Montaggio come apparecchio singolo (stand alone)
Posizionare l'apparecchio sulla guida di supporto dall'alto. Spingere l'apparecchio sul lato anteriore in direzione
della superficie di montaggio finché non si innesta.
• Montaggio in collegamento (accoppiatori a stella modulari) ()
Per un accoppiatore a stella assemblare i connettori bus per guide di montaggio (A) (cod. art. 2709561, 2 pz.
per dispositivo). Spingere nella guida i connettori bus per guide di montaggio assemblati (B-C). Posizionare
dall'alto il dispositivo sulla guida di montaggio (D). Fare attenzione al corretto orientamento rispetto ai
connettori bus per guide di montaggio. Spingere il dispositivo dal lato anteriore in direzione della superficie di
montaggio fino a sentire lo scatto in posizione.
• Smontaggio ()
Spingere verso il basso la linguetta di arresto con un cacciavite, una pinza a punta o simili (A). Piegare il bordo
inferiore del dispositivo allontanandolo leggermente dalla superficie di montaggio. Rimuovere il dispositivo in
obliquo verso l'alto dalla guida di montaggio (B). Quando si smonta un accoppiatore a stella, rimuovere anche
i connettori per guide di supporto.
3.5 Connessione della tensione di alimentazione ()
• Alimentare il dispositivo con la tensione di alimentazione mediante i morsetti 1 (24 V) e 2 (0 V). In una
stazione di collegamento è sufficiente alimentare il primo apparecchio del gruppo di collegamento.
Alimentazione mediante alimentazione di corrente dal sistema
Collegare un alimentatore di sistema (MINI-SYS-PS-100-240AC/24DC/1.5; codice 2866983 oppure MINI-
PS100-240AC/24DC/1.5/EX; codice 2866653) a due connettori per guide di montaggio (codice 2709561) a
sinistra sul collegamento.
Con un secondo alimentatore è possibile realizzare un sistema di alimentazione ridondante.
3.6 Uscita ON-OFF ()
L'apparecchio è dotato di un'uscita ON-OFF libera da potenziale per la diagnostica di errori (morsetti 3 (11) e
4 (12)).
L'uscita di commutazione viene attivata quando la tensione di alimentazione viene a mancare, quando viene
identificata un'interruzione della linea FO o quando si scende al di sotto della riserva di sistema della linea FO
(potenza di ricezione critica).
• Collegare il contatto di commutazione quale messaggio singolo o generale in funzione dell'applicazione. ()
1 (24V) - 2 (0V) Tensione di alimentazione 7 D(B) invio/ricezione positivo
3 (11) - 4 (12) Uscita ON-OFF - contatto in apertura 8 D(A) invio/ricezione negativo
5 SHD Schermatura
6 GND Ground
12 Terminazione bus RS485 ON/OFF
9 verde VCC Tensione di alimentazione
10 giallo TD Dati di trasmissione porta CU din.
11 verde RD Dati di ricezione porta CU din.
Porta FO Interfaccia in fibra ottica (FO)
13 verde Potenza di ricezione molto buona
14 verde Potenza di ricezione buona
15 giallo Potenza di ricezione critica, uscita aperta
16 rosso ERR FO Potenza di ricezione insufficiente, rottura del cavo
17 TD Trasmettitore in fibra ottica (FO)
18 RD Ricevitore in fibra ottica (FO)
IMPORTANTE: Danni materiali del dispositivo
Montare e smontare l'apparecchio solo in assenza di tensione!
IMPORTANTE: Danni materiali del dispositivo
Il carico di corrente max. in un accoppiatore a stella non deve superare i 2 A!
Per questo motivo un accoppiatore a stella non può consistere di più di dieci (10) dispositivi.
IMPORTANTE: Danni materiali del dispositivo
Il carico massimo ammesso del contatto relè è pari a 1 A con 18...32 V DC!
Adaptador para fibra óptica para sistemas de bus RS-485 de 2 hilos
1. Advertencias de seguridad
1.1 Indicaciones de instalación
• Este dispositivo de la categoría 3 es apto para instalarlo en áreas con atmósferas explosivas catalogadas
como zona 2. Cumple los requisitos normativos de EN 60079-0:2012+A11:2013 y EN 60079-15:2010.
• La instalación, el manejo y el mantenimiento deben ser ejecutados por personal especializado, cualificado
en electrotecnia. Siga las instrucciones de instalación descritas. Para la instalación y el manejo, cumpla las
disposiciones y normas de seguridad vigentes (también las normas de seguridad nacionales), así como las
reglas generales de la técnica. Encontrará los datos técnicos de seguridad en este prospecto y en los
certificados (evaluación de conformidad y otras aprobaciones, en caso necesario).
• No está autorizada la apertura o modificación del equipo a través de la configuración del interruptor DIP. No
repare el equipo usted mismo, sustitúyalo por otro de características similares. Sólo los fabricantes deben
realizar las reparaciones. El fabricante no se hace responsable de los daños derivados del incumplimiento
de estas prescripciones.
• El tipo de protección IP20 (IEC 60529/EN 60529) del equipo está previsto para un entorno limpio y seco.
Detenga el equipo ante cargas mecánicas y/o térmicas que superen los límites descritos.
• El equipo no está diseñado para la inserción en atmósferas expuestas a peligro de explosión por polvo.
• Los interruptores accesibles del equipo sólo deben accionarse cuando el equipo no tenga corriente.
• El equipo está concebido exclusivamente para el funcionamiento con tensión baja de seguridad (SELV)
según IEC 60950 / EN 60950 / VDE 0805. El equipo debe ser conectado únicamente a equipos que cumplan
las condiciones de la EN 60950.
1.2 Instalación en la zona 2
• Cumpla las condiciones fijadas para el montaje en áreas expuestas a peligro de explosión.
• Durante la instalación utilice una carcasa autorizada adecuada (tipo de protección mínima IP54) que cumpla
con los requisitos de la EN 60079-15. Tenga en cuenta durante ese proceso las exigencias de
IEC 60079-14/EN 60079-14.
• En los circuitos de alimentación y de corriente de señal en la zona 2 sólo se pueden conectar equipos que
sean aptos para el funcionamiento en la zona Ex 2 y para las condiciones del lugar de montaje.
• Sólo se permite encajar o extraer el conector para carriles de carga o conectar y separar conductores en el
área de peligro de explosión cuando se encuentra en estado sin tensión.
• Debe desconectarse el equipo y retirarlo inmediatamente de la zona Ex si está dañado o se ha cargado o
guardado de forma inadecuada o funciona incorrectamente.
• Puede descargar la documentación actual en la dirección phoenixcontact.net/products.
2. Descripción resumida
Adaptador de fibra óptica para sistemas de bus RS-485 de 2 hilos, equipo terminal en técnica de transmisión
de 1300 nm.
3. Observaciones para la conexión
3.1 Bornes de tornillo enchufables ()
3.2 Conmutador
3.3 Indicaciones de diagnóstico y estado ()
3.4 Montaje y desmontaje ( - )
• Conecte un carril simétrico 35-mm-EN a la tierra de protección mediante un borne de puesta a tierra. El
módulo se conecta con la toma a tierra al encajarlo en el carril simétrico.
• Montaje como aparato independiente (Stand-Alone)
Coloque el equipo desde arriba sobre el carril. Presione el equipo por la parte frontal en dirección a la superficie
de montaje hasta que encaje de forma audible.
• Montaje en combinado (acoplador en estrella modular) ()
Para un acoplador de estrella, ensamble los conectores de bus del carril (A) (código 2709561, 2 por
dispositivo). Encaje los conectores de bus ensamblados en el carril (B-C). Coloque el dispositivo desde arriba
sobre el carril (D). Preste atención a la correcta alineación respecto a los conectores de bus del carril. Encaje
el dispositivo por la parte frontal en dirección a la superficie de montaje hasta escuchar cómo encastra.
• Desmontaje ()
Con un destornillador, alicates en punta o similares, oprima la patilla de bloqueo hacia abajo (A). Incline el
borde inferior del dispositivo separándolo un poco de la superficie de montaje. Saque el dispositivo
oblicuamente hacia arriba para separarlo del perfil (B). Si va a desmontar un acoplador de estrella, extraiga
también los conectores para carril.
3.5 Conexión de la tensión de alimentación ()
• Aporte tensión de alimentación a través de los bornes 1 (24 V) y 2 (0 V) al equipo. En una estación de
combinado, es suficiente con alimentar el primer equipo del combinado.
Alimentación a través de alimentación de corriente del sistema
Conecte una fuente de alimentación del sistema (MINI-SYS-PS-100-240AC/24DC/1.5; código: 2866983 o
MINI-PS100-240AC/24DC/1.5/EX; código: 2866653) con dos conectores para carriles (código: 2709561) en
la parte izquierda del combinado.
Con una segunda fuente de alimentación puede realizarse un concepto de alimentación redundante.
3.6 Salida de conexión ()
El equipo está equipado con una salida de conexión sin potencial para el diagnóstico de fallos (bornes 3 (11)
y 4 (12)).
La salida de conexión se activa si hay un fallo en la tensión de alimentación, se reconoce una interrupción en
el trayecto de FO, o si se desciende por debajo de la reserva del sistema del trayecto de FO (potencia de
recepción crítica).
• Efectúe el cableado del contacto de conmutación conforme a la aplicación deseada como aviso individual o
como aviso colectivo. ()
1 (24V) - 2 (0V) Tensión de alimentación 7 D(B) Emisión/recepción positiva
3 (11) - 4 (12) Salida de conmutación - contacto cerrado 8 D(A) Emisión/recepción negativa
5 SHD Pantalla
6 GND Ground
12 Terminación de bus RS-485 ON/OFF
9 verde VCC Tensión de alimentación
10 amarillo TD Datos de emisión din. puerto CU
11 verde RD Datos de recepción din. puerto CU
Puerto FO Interfaz de fibra óptica (FO)
13 verde Potencia de recepción muy buena
14 verde Potencia de recepción buena
15 amarillo Potencia de recepción crítica, salida de conexión abierta
16 rojo ERR FO Potencia de recepción insuficiente, rotura de fibra
17 TD Emisor de fibra óptica (FO)
18 RD Receptor de fibra óptica (FO)
ATENCIÓN: Desperfectos en el dispositivo
Monte y desmonte los equipos en estado sin tensión.
ATENCIÓN: Desperfectos en el dispositivo
¡No se permite sobrepasar la máxima intensidad admisible de 2 A en un acoplador de estrella!
Por lo tanto, un acoplador de estrella deberá constar de diez (10) dispositivos como máximo.
ATENCIÓN: Desperfectos en el dispositivo
¡La capacidad de carga máxima del contacto de relé es de 1 A a 18...32 V DC!
Conversor de fibra óptica para sistemas Bus de 2 fios RS-485
1. Instruções de segurança
1.1 Instruções de montagem
• O aparelho da categoria 3 é adequado para instalação em áreas de perigo de explosão da zona 2. Ele
cumpre os requisitos das normas EN 60079-0:2012+A11:2013 e EN 60079-15:2010.
• A instalação, operação e manutenção devem ser executadas por pessoal eletrotécnico qualificado. Siga as
instruções de instalação descritas. Observar a legislação e as normas de segurança vigentes para a
instalação e operação (inclusive normas de segurança nacionais), bem como as regras técnicas gerais. Os
dados técnicos de segurança devem ser consultados neste folheto e nos certificados (avaliação da
conformidade e, se necessário, outras certificações).
• Não é permitido abrir ou alterar o equipamento além da configuração da chave DIP. Não realize manutenção
no equipamento, apenas substitua por um equipamento equivalente. Consertos somente podem ser
efetuados pelo fabricante. O fabricante não se responsabiliza por danos decorrentes de violação.
• O grau de proteção IP20 (IEC 60529 / EN 60529) do equipamento destina-se a um ambiente limpo e seco.
Não submeta o equipamento a cargas mecânicas e/ou térmicas, que excedam os limites descritos.
• O equipamento não foi desenvolvido para a aplicação em atmosferas com perigo de explosão de pó.
• Os interruptores do equipamento acessíveis somente podem ser acionados, se o equipamento estiver sem
tensão.
• O equipamento foi desenvolvido exclusivamente para o funcionamento com baixa tensão de segurança
(SELV) de acordo com IEC 60950/EN 60950/VDE 0805. O equipamento somente pode ser conectado, se
cumprir as condições da EN 60950.
1.2 Instalação na zona 2
• Observe as condições definidas para a aplicação em áreas com perigo de explosão!
• Na instalação, utilize uma caixa apropriada, aprovada (mínimo grau de proteção IP54), que satisfaça as
exigências da EN 60079-15. Observe as exigências da IEC 60079-14/EN 60079-14.
• Nos circuitos de alimentação e de corrente de sinal na zona 2 somente podem ser conectados
equipamentos apropriados para o funcionamento na zona Ex 2 e para as condições existentes no local de
instalação.
• O encaixe e remoção do conector para trilho de fixação ou a conexão e a isolação de cabos na área com
perigo de explosão são permitidos somente em estado sem tensão.
• O equipamento deve ser retirado de funcionamento e removido imediatamente da área Ex, se estiver
danificado, submetido à carga ou armazenado de forma inadequada e apresentar mau funcionamento.
• É possível efetuar download dos documentos atuais em phoenixcontact.net/products.
2. Descrição breve
Conversor de fibra ótica para interfaces RS-485, sistemas de barramento de 2 fios, dispositivo de terminação
com tecnologia de transmissão de 1300 nm.
3. Instruções de conexão
3.1 Bornes a parafuso plugáveis ()
3.2 Interruptor
3.3 Indicações de diagnóstico e estado ()
3.4 Montagem e desmontagem ( - )
• Conecte um trilho de fixação EN de 35 mm à terra de proteção mediante um borne de terra. O módulo é
aterrado mediante engate no trilho de fixação.
• Montagem como equipamento individual (Stand Alone)
Instale o equipamento por cima sobre o trilho de fixação. Pressione o equipamento na frente, no sentido da
área de montagem, até ouvir o encaixe.
• Montagem no conjunto (acoplador em estrela modular) ()
Para formar um acoplador estrela, ligue os conectores bus do trilho de fixação (A) (código: 2709561,
2 unidades por dispositivo). Pressione os conectores para trilho de fixação já encaixados no trilho de fixação
(B-C). Posicione o dispositivo no trilho de fixação por cima (D). Observe o alinhamento adequado com os
conectores Bus do trilho de fixação. Pressione a frente do equipamento, forçando no sentido da área de
contato até ouvir o encaixe.
• Desmontagem ()
Com uma chave de fenda, alicate de ponta ou outra ferramenta semelhante, puxe a lingueta de travamento
para baixo (A). Desvie a borda inferior do equipamento um pouco da área de montagem. Retire o equipamento
do trilho de fixação, movendo o mesmo no sentido diagonal para cima. Ao desmontar um acoplador em
estrela, remover também os conectores para trilho de fixação.
3.5 Conexão da fonte de alimentação ()
• Suprir a tensão de alimentação por meio dos bornes 1 (24 V) e 2 (0 V) para o aparelho. Em uma estação
acoplada é suficiente a alimentação no primeiro equipamento do conjunto.
Alimentação pela alimentação do sistema
Conectar uma fonte de alimentação de sistema (MINI-SYS-PS -100-240AC/ 24DC/1.5 (Código: 2866983 ou
MINI-PS100-240AC/24DC/1.5/EX; código: 286653) com dois conectores para trilho de fixação (código:
2709561) à esquerda no conjunto.
Com uma segunda fonte de alimentação, é possível criar um conceito de alimentação redundante.
3.6 Saída de comando ()
O equipamento possui uma saída de comando seco para diagnóstico de falha (bornes 3 (11) e 4 (12)).
A saída de comando é ativada, se houver falha da tensão de alimentação, se for identificada uma interrupção
da via de fibra óptica ou se a reserva do sistema da via de fibra óptica estiver muito baixa (potência de
recepção crítica).
• Ligar o contato de comutação de acordo com a sua aplicação como mensagem individual ou coletiva. ()
1 (24V) - 2 (0V) Tensão de alimentação 7 D(B) transmitir/receber positivo
3 (11) - 4 (12) Saída de comando - contato NO 8 D(A) transmitir/receber negativo
5 SHD Blindagem
6 GND Ground
12 Terminação de barramento RS485 ON/OFF
9 verde VCC Tensão de alimentação
10 amarelo TD Dados de transmissão porta CU dinâmica
11 verde RD Dados de recepção porta CU dinâmica
Porta FO Interface de fibra óptica
13 verde Potência de recepção muito boa
14 verde Potência de recepção boa
15 amarelo Potência de recepção crítica, saída de comutação se abre
16 vermelho ERR FO Potência de recepção insuficiente, ruptura de fibra
17 TD Transmissor de fibra óptica
18 RD Receptor de fibra óptica
IMPORTANTE: danos ao aparelho
Monte e desmonte os equipamentos somente em estado sem tensão!
IMPORTANTE: danos ao aparelho
A carga máxima de corrente num acoplador de estrela não pode ultrapassar 2 A!
Portanto, um acoplador de estrela não pode ser composto de mais de dez (10) dispositivos.
IMPORTANTE: danos ao aparelho
A máxima capacidade de carga do contato a relé é de 1 A com 18...32 V DC!
ITALIANOPORTUGUÊSESPAÑOL
MNR 9038995
PNR 103302 - 05 DNR 83080765 - 05
PSI-MOS-RS485W2/FO1300 E 2708562
A
CB
D
A B
24 V 0 V 24 V 0 V 0 V24 V
24 V 0 V
24 V DC
24 V 0 V 24 V 0 V 24 V 0 V 24 V 0 V
24 V DC
Datos técnicos Dados técnicos Dati tecnici
Tipo Código Tipo Código Tipo Cod. art. PSI-MOS-RS485W2/FO1300 E 2708562
Alimentación Alimentação Alimentazione
Tensión de alimentación Faixa de tensão de alimentação Intervallo di tensione di alimentazione 18 V DC ... 32 V DC
Tensión de alimentación Según homologación UL Tensão de alimentação de acordo com certificação UL Tensione di alimentazione secondo omologazione UL 24 V DC
Absorción de corriente típica 24 V DC Consumo de corrente típico 24 V DC Corrente assorbita tipica 24 V DC 55 mA
Según UL Listed, 24 V DC Listado pela UL, 24 V DC UL Listed, 24 V DC 170 mA
Según UL Recognized, 24 V DC Reconhecido pela UL, 24 V DC UL Recognized, 24 V DC 110 mA
Absorción de corriente máxima Máximo consumo de energia Max. corrente assorbita 90 mA
Interfaz RS-485, 2 hilos Interface RS-485, 2 fios Interfaccia RS-485, 2 fili
Resistencia de cierre Resistência terminal Resistenza terminale 390 Ω / 220 Ω / 390 Ω
Velocidad de transmisión Taxa de transmissão Velocità di trasmissione 4,8/9,6/19,2/38,4/57,6/75/93,75/115,2/136/187,5/375/500 kBit/s
Longitud de transmisión En función de la velocidad de transmisión de datos
con una línea de datos apantallada, de par trenzado
Comprimento de transmissão
de acordo com o índice de dados com linha de dados blindada, torcida
Lunghezza di trasmissione
in base alla velocità dati con linea dati schermata, twisted
≤ 1200 m
Conexión Conexión por tornillo enchufable Conexão Borne a parafuso plugável COMBICON Collegamento Morsetto a vite estraibile
Interface óptico Interface óptica Interfaccia ottica
Conexión SC-dúplex Conexão SC-Duplex Collegamento SC-Duplex
Longitud de onda Comprimento de onda Lunghezza d'onda 1300 nm
Longitud de transmisión, incl. reserva del sistema de 3 dB Comprimento máx. de transmissão incl. 3 dB de reserva de sistema Distanza di trasmissione incl. riserva di sistema da 3 dB
con F-G 50/125 0,7 dB/km para 1300 nm com F-G 50/125 0,7 dB/km com 1300 nm con F-G 50/125 0,7 dB/km F a 1300 nm 25 km
con F-G 62,5/125 0,8 dB/km para 1300 nm com F-G 62,5/125 0,8 dB/km em 1300 nm con F-G 62,5/125 0,8 dB/km a 1300 nm 22 km
con F-E 9/125 0,4 dB/km a 1300 nm com F-E 9/125 0,4 dB/km com 1300 nm con F-E 9/125 0,4 dB/km a 1300 nm 45 km
Salida de relé Número Saída de relé Quantidade Uscita relè Numero 1
Corriente constante límite Corrente máx. em regime permanente Corrente di carico permanente 1 A
Datos generales Dados Gerais Dati generali
Retardo de bits en el funcionamiento estándar Retardo do bit na operação padrão Ritardo bit in modalità standard < 1 Bit
Separación galvánica Isolação galvânica Isolamento galvanico VCC // RS-485
Tensión de prueba 50 Hz, 1 min Tensão de teste 50 Hz, 1 min Tensione di prova 50 Hz, 1 min 1,5 kVeff
Índice de protección Grau de proteção Grado di protezione IP20
Margen de temperatura ambiente Funcionamiento Faixa de temperatura ambiente Operação Range temperature Funzionamento -20 °C ... 60 °C
Almacenamiento/transporte Armazenamento/transporte Immagazzinamento/trasporto -40 °C ... 85 °C
Altitud Para limitaciones véase declaración del fabricante Altitude Restrição, ver declaração do fabricante Altezza Per le limitazioni vedere la dichiarazione del produttore 5000 m
Material de la carcasa PA 6.6-FR Material da caixa PA 6.6-FR Materiale custodia PA 6.6-FR
Dimensiones An. / Al. / Pr. Dimensões L / A / P Dimensioni L / A / P 35 mm / 99 mm / 105 mm
Sección de conductor Perfil de condutor Sezione conduttore 0,2 - 2,5 mm² (AWG 24 - 14 )
Humedad del aire sin condensación Umidade do ar sem condensação Umidità dell'aria senza condensa 30 ... 95 %
Choque 15g todas las direcciones del espacio, según IEC 60068-2-27 Choque 15g por direção do espaço, de acordo com IEC 60068-2-27 Urti 15g in ogni direzione, a norma IEC 60068-2-27
Vibración (servicio) Según IEC 60068-2-6: 5g, 150 Hz Vibração (funcionamento) conforme IEC 60068-2-6: 5g, 150 Hz Vibrazioni (funzionamento) a norma IEC 60068-2-6: 5g, 150 Hz
Conformidad / Homologaciones Conformidad CE Conformidade / Certificações Conforme CE Conformità/omologazioni CE conforme
Homologaciones Certificações Omologazioni Ex: ATEX Tenga en cuenta las instrucciones especiales de instalación
indicadas en la documentación.
ATEX
Observar as instruções especiais de instalação na documentação!
ATEX Rispettare le note particolari relative all'installazione
riportate nella documentazione! II 3 G Ex nA nC IIC T4 Gc X
UL, EE.UU. / Canadá UL, EUA / Canadá UL, USA / Canada 508 Listed
508 Recognized
xxxxxxxxxxxxxxxxxxxxxx
Ord.-No.xxxxxxx
VCC
TD
RD
FO
ERR
A
B
A
1
DIP
23
45
67
89
10
ON
S1...S10
DIP-Switch1 2 3 4
Speed[kBit/s]
OFFOFFOFFOFFOFFOFFOFFOFFONONONON
OFFOFFOFFOFF
OFF
ONONONON
OFFOFFOFF
OFFOFF
OFFOFF
OFF
ONON
ONON
OFFONON
OFF
OFF
OFF
OFF
OFF
ON
ON
ON
ON
ON
ONOFF
500375
187,5136
115,293,75
7557,638,419,29,64,8
DIP56789
10
ON10 BITN.C.
NORMN.C.N.C.
MULTI-MODE
OFF11 BIT
INVERS
SINGLE-MODE
DISPOSITIF DE RÉGULATION INDUSTRIEL 11AE
Zone de câbles : 24-14 AWG
Fil en cuivre Cu, 60/75C
Couple de serrage : 5-7 (Lbs-In)
Désignation pour l'environnement « Open Type Device »
« Environnement d'installation : degré de pollution 2 »
3.7 Connessione delle linee dati
Per un collegamento alla schermatura ottimale utilizzare le fascette per schermatura fornite.
Se si inserisce il dispositivo all'inizio o alla fine di un segmento elettrico RS-485, attivare la terminazione sul lato
superiore dell'apparecchio. ()
3.8 Collegamento dei conduttori FO
• Rimuovere il cappuccio di protezione.
• Innestare il connettore duplex SC sui connettori femmina corrispondenti fino a sentire lo scatto in posizione.
( - )
4. Configurazione
• Sbloccare la testa della custodia con un cacciavite (A).
• Estrarre con cautela il circuito stampato fino a battuta (B). ()
Al momento della fornitura tutti i DIP switch si trovano nella posizione "OFF". Configurare i DIP switch in base
all'utilizzo previsto con l'aiuto della tabella a fianco. ( - )
4.1 Impostazione della velocità dati (DIP switch 1-4)
4.2 Commutazione tra 10 e 11 bit (DIP switch 5)
La lunghezza di word standard di un UART è di 11 bit.
Alcuni sistemi bus, come ad es. il modbus in modalità ASCII trasmettono tuttavia lunghezze di word da 10 bit.
In questo caso portare il DIP 5 in posizione "10 bit" (DIP 5 = "ON").
4.3 Commutazione della posizione di riposo (DIP switch 7)
Impostazione di fabbrica: posizione di riposo = logico 1 = luce accesa.
Se necessario, cambiare la posizione di riposo del dispositivo: posizione di riposo = logico 1 = luce spenta.
Portare a tale scopo il DIP switch 7 in posizione "NORM" (DIP 7 = "ON").
4.4 Adattamento della potenza di trasmissione (DIP switch 10)
• Adattare la potenza di trasmissione in funzione del tipo di fibra impiegato.
IMPORTANTE: Danni materiali del dispositivo
Utilizzare linee dati schermate. Collegare la schermatura del cavo su entrambi i lati della linea di
trasmissione.
La lunghezza massima delle linee RS-485 dipende dalla velocità di trasmissione. Non superare i valori
massimi seguenti.
Velocità di trasmissione dati [kBit/s] Copertura [m]
≤ 93,75 1200
≤ 500 400
AVVERTENZA: Rischio di ferite agli occhi! - Durante il funzionamento non guardare mai direttamente
nei diodi di trasmissione o con strumenti ottici nella fibra di vetro! La luce infrarossa non è visibile.
IMPORTANTE: malfunzionamento
Non collegare mai i tipi di dispositivo PSI-MOS.../FO 660..., PSI-MOS.../FO 850... e PSI-MOS.../
FO 1300... direttamente tra loro mediante cavi in fibra ottica! Questi tipi di dispositivi presentano
lunghezze d'onda operative diverse.
IMPORTANTE: malfunzionamento
Rispettare l'incrocio del canale di trasmissione e di ricezione!
IMPORTANTE: Scariche elettrostatiche
Le cariche statiche possono danneggiare gli apparecchi elettronici. Prima di aprire e
configurare l'apparecchio scaricare la carica elettrica del vostro corpo. Per questo scopo
toccate una superficie collegata a terra, ad es. la custodia metallica del quadro elettrico!
IMPORTANTE: malfunzionamento
Regolare tutti i convertitori in fibra ottica e tutti i partecipanti bus RS-485 collegati sulla stessa
velocità dati!
Nello stato operativo "NORM" (= posizione di riposo "luce spenta") non è disponibile alcuna
diagnostica FO!
In caso di accoppiamento con dispositivi esterni, tenere conto della sensibilità di ricezione e del limite di
sovraccarico delle interfacce a fibra ottica.
Ulteriori informazioni sono disponibili nella scheda tecnica alla pagina phoenixcontact.net/products.
3.7 Conexión de las líneas de datos
Para una conexión óptima de pantalla, utilice la brida para conexión de pantalla suministrada.
Si instala usted el dispositivo al comienzo o al final de un segmento eléctrico RS-485, active la terminación en
la parte superior del dispositivo. ()
3.8 Conexión de los cables de FO
• Retire los capuchones protectores contra el polvo.
• Encaje el conector SC-Duplex en los correspondientes conectores hembra hasta escuchar cómo la
conexión encastra. ( - )
4. Configuración
• Desbloquee el cabezal de la carcasa con un destornillador (A).
• A continuación, extraiga la placa de circuito impreso con cuidado hasta el tope (B). ()
En estado de suministro, todos los interruptores DIP se encuentran en posición "OFF". Configure el interruptor
DIP según la aplicación planeada con la ayuda de la tabla que aparece al lado. ( - )
4.1 Ajuste velocidad de transmisión de datos (interruptor DIP 1-4)
4.2 Conmutación 10/11 bits (microinterruptor DIP 5)
La longitud de palabra estándar de un carácter UART es de 11 bits.
Sin embargo, algunos sistemas de bus, como p. ej. Modbus en modo ASCII, transmiten unas longitudes de
palabra de 10 bits. A tal efecto, sitúe el interruptor DIP 5 en la posición "10 bits" (DIP 5 = "ON").
4.3 Conmutación de la posición de pausa de luz (microinterruptor DIP 7)
Ajuste de fábrica: posición de pausa = 1 lógico = luz encendida.
De ser necesario, cambie la posición de pausa de luz del dispositivo: posición de pausa = 1 lógico = luz
apagada. Ponga para ello el microinterruptor DIP 7 en la posición "NORM" (DIP 7 = "ON").
4.4 Adaptación de la potencia de emisión (microinterruptor DIP 10)
• Adapte la potencia de emisión en función del tipo de fibra que utilice.
ATENCIÓN: Desperfectos en el dispositivo
Utilice líneas de datos apantalladas. Conecte el blindaje del cable en ambos lados del tramo de
transmisión.
La longitud máxima de los cables RS-485 depende de la velocidad de transmisión. No supere los
siguientes valores máximos.
Velocidad de transmisión de datos [kbits/s] Alcance [m]
≤ 93,75 1200
≤ 500 400
ADVERTENCIA: ¡Riesgo de daños oculares! - ¡No mire nunca directamente a los diodos emisores ni
con medios auxiliares ópticos a la fibra de vidrio durante el servicio! La luz infrarroja no es visible.
IMPORTANTE: Funcionamiento incorrecto
¡Nunca interconecte los tipos de dispositivo PSI-MOS.../FO 660..., PSI-MOS.../FO 850... y
PSI-MOS.../FO 1300... directamente a través de líneas de fibra óptica! Estos tipos de dispositivo
funcionan a diferentes longitudes de onda.
IMPORTANTE: Funcionamiento incorrecto
¡Tenga en cuenta el cruzamiento del canal emisor y receptor!
IMPORTANTE: descarga electrostática
Las cargas estáticas pueden dañar los equipos electrónicos. Antes de abrir y configurar el
equipo, descargue la carga eléctrica de su cuerpo. Para ello, toque una superficie puesta a
tierra, p.ej. la carcasa metálica del armario de distribución.
IMPORTANTE: Funcionamiento incorrecto
Ajuste a la misma velocidad de transmisión de datos todos los adaptadores de fibra óptica y
todos los participantes RS-485 conectados.
¡En el estado "NORM" (= posición de pausa "luz apagada") no se dispone de diagnóstico de
fibra óptica!
Al acoplar con dispositivos externos tenga en cuenta las sensibilidades del receptor y los límites de
sobremodulación de las interfaces de fibra óptica.
Encontrará más información en la ficha de datos correspondiente en phoenixcontact.net/products.
3.7 Conexão das linhas de dados
Para ligação blindada perfeita utilize a abraçadeira protetora para shield com alívio de tração.
Se usar o equipamento no início ou final de um segmento elétrico RS-485; então ative a terminação na parte
superior do equipamento. ()
3.8 Conexão dos cabos de fibra óptica
• Remover as proteções contra pó.
• Conectar o conector SC-Duplex às respectivas tomadas até o conector de encaixe engatar de forma
audível. ( - )
4. Configuração
• Destravar a tampa da caixa com uma chave de fenda (A).
• Por fim, remover cuidadosamente a placa de circuito impresso (B). ()
No estado de entrega, todas as chaves DIP encontram-se na posição "OFF". Configure as chaves DIP de
acordo com a utilização planejada com auxílio da tabela ao lado. ( - )
4.1 Ajuste do índice de transmissão (chave DIP 1-4)
4.2 Comutação 10/11 bits (chave DIP 5)
O comprimento de palavra padrão de uma caractere UART é de 11 Bits.
Alguns sistemas barramento, como, p. ex., Modbus no modo ASCII, porém, transmitem um comprimento de
tamanhos de palavra de 10 Bits. Comutar a chave DIP 5 para a posição "10 Bit" (DIP 5 = ON).
4.3 Comutação da posição de repouso da luz (chave DIP 7)
Ajuste de fábrica: posição de repouso = 1 lógico = luz ligada.
Caso necessário, alterar a posição de repouso de luz do dispositivo: posição de repouso = 1 lógico = luz
desligada. Para este fim, comutar DIP 7 para a posição "NORM! (DIP 7 = "ON").
4.4 Adaptar a potência de emissão (chave DIP 10)
• Adapte a potência de transmissão de acordo com o tipo de fibra utilizado.
IMPORTANTE: danos ao aparelho
Utilize cabos de dados blindados. Conecte a blindagem do cabo a ambos os lados da linha de
transmissão.
O comprimento máximo dos cabos RS-485 depende da taxa de transmissão. Não exceder os seguintes
valores máximos.
Taxa de dados [kBit/s] Alcance [m]
≤ 93,75 1200
≤ 500 400
ATENÇÃO: Perigo de ferimento nos olhos! - Durante o funcionamento, nunca olhe diretamente para
os diodos de transmissão ou com acessórios ópticos para a fibra de vidro! A luz infravermelha não é
visível.
IMPORTANTE: Falha de função
Nunca conectar os modelos PSI-MOS.../FO 660..., PSI-MOS.../FO 850... e PSI-MOS.../FO 1300
diretamente entre si via condutores de fibra ótica! Estes dispositivos possuem cumprimento de
ondas de operação diferente.
IMPORTANTE: Falha de função
Observar o cruzamento do canal de transmissão e recepção!
IMPORTANTE: Descarga eletrostática
Cargas estáticas podem danificar equipamentos eletrônicos. Descarregue a carga elétrica de
seu corpo antes de abrir e configurar o equipamento. Para isso, toque uma superfície aterrada,
por ex. a caixa metálica do quadro de comando!
IMPORTANTE: Falha de função
Ajuste todos os conversores de fibra ótica e participantes RS-485 conectados para a mesma
taxa de dados!
No estado operacional "NORM" (= posição de repouso "luz desligada"), o diagnóstico de fibra
ótica não está disponível!
Ao acoplar com equipamentos de outros fornecedores, observar a sensibilidade do receptor e os limites
de sobremodulação das interfaces de fibra ótica.
Outras informações encontram-se respectiva na ficha técnica em phoenixcontact.net/products.
ITALIANOPORTUGUÊSESPAÑOL
© PHOENIX CONTACT 2016 DNR 83080765 - 05PNR 103302 - 05
PHOENIX CONTACT GmbH & Co. KG
Flachsmarktstraße 8, 32825 Blomberg, Germany
Fax +49-(0)5235-341200, Phone +49-(0)5235-300
phoenixcontact.com
TR Elektrik personeli için montaj talimatı
RU Инструкция по установке для электромонтажника
ZH 电气人员安装须知
2016-06-02
© PHOENIX CONTACT 2016
RS-485 2 kablolu bus sistemleri için fiber optik dönüştürücü
1. Güvenlik notları
1.1 Montaj talimatları
• Kategori 3 cihaz patlama riski bulunan bölge 2'ye montaj için tasarlanmıştır. EN 60079-0:2012+A11:2013 ve
EN 60079-15:2010 gereksinimlerini karşılar.
• Montaj, işletme ve bakım yalnız yetkin elektrik personeli tarafından yapılmalıdır. Belirtilen montaj talimatlarına
uyun. Cihazı kurarken ve çalıştırırken geçerli güvenlik yönetmelikleri (ulusal güvenlik yönetmelikleri dahil) ve
genel teknik yönetmelikler gözetilmelidir. Teknik güvenlik verileri paket içeriğinde ve sertifika üzerinde
verilmektedir (uygunluk belgesi, gerekli durumlarda ek onaylar).
• Cihaz DIP siviç konfigürasyonu yapma dışında açılmamalıdır. Cihazı kendiniz tamir etmeyin, aynısıyla
değiştirin. Onarımlar sadece üretici tarafından yapılır. Üretici uygun olmayan kullanımdan kaynaklanan
hasardan sorumlu değildir.
• Cihazın IP20 koruması (IEC 60529/EN 60529) temiz ve kuru ortam için tasarlanmıştır. Cihaz tanımlanan
limitlerin üzerinde mekanik zorlanma ve/veya termal yüklere maruz kalmamalıdır.
• Cihaz patlama riskli ortamlarda kullanılmamalıdır.
• Cihazın anahtarları sadece enerji yokken kullanılmalıdır.
• Cihaz yalnız IEC 60950/EN 60950/VDE 0805'e göre SELV kullanımı için tasarlanmıştır. Cihaz yalnız
EN 60950 gereklerini karşılayan cihazlara bağlanabilir.
1.2 Zone 2'de montaj
• Patlama riskli alanlarda belirtilen şartlara uyun.
• Montaj sırasında EN 60079-15 gereksinimlerini karşılayan onaylı bir muhafaza (minimum IP54 koruma)
kullanın. Bu kapsamda IEC 60079-14/EN 60079-14 gereklerini karşılayın.
• Zone 2'de cihazları sadece Ex zone 2'de çalışmaya ve montaj koşullarına uygun besleme ve sinyal
devrelerine bağlayın.
• Patlama riskli bölgelerde raydan klemens sökme takma ve kablo sökme takma işleri yalnız enerji yokken
yapılmalıdır.
• Cihaz hasar gördüğünde, aşırı yüklendiğinde, uygun olmayan şekilde muhafaza edildiğinde veya hatalı
çalıştığında kapatılmalı ve derhal Ex alandan çıkarılmalıdır.
• Güncel dokümanları phoenixcontact.net/products adresinden indirebilirsiniz.
2. Kısa tanım
RS-485 2 kablolu bus sistemleri için fiber optik dönüştürücü, 1300 nm aktarım teknolojisine sahip sonlandırma
cihazı.
3. Bağlantı talimatları
3.1 Geçmeli vidalı klemensler ()
3.2 Anahtar
3.3 Arıza teşhisi ve durum göstergeleri ()
3.4 Montaj ve demontaj ( - )
• Bir topraklama klemensi kullanarak, bir 35 mm EN DIN rayını koruyucu bbir toprak bağlantısına bağlayın.
Modül, DIN rayına takılarak topraklanır.
• Tek başına bir cihaz (stand-alone) olarak monte etme
Cihazı DIN rayına üstten yerleştirin. Cihazın ön kısmını montaj yüzeyine doğru sesli şekilde yerine oturana dek
itin.
• Kombine montaj (modüler yıldız modülü) ()
Bir yıldız modülü için, DIN ray konnektörlerini (A) birbirlerine takın (Sipariş No.:2709561, cihaz başına 2 adet).
Bağlı DIN ray konnektörlerini DIN rayına (B, C) doğru bastırın. Cihazı üstten DIN rayına yerleştirin (D). DIN ray
konnektörleriyle doğru şekilde hizalı olduğundan emin olun. Cihazın ön kısmını sesli şekilde yerine oturana
kadar montaj yüzeyine doğru itin.
• Sökme ()
Kilitleme mandalını ince uçlu kargaburun, tornavida veya benzeri bir alet ile aşağıya doğru bastırın (A). Cihazın
alt kenarını montaj yüzeyinden uzağa doğru çekin. Cihazı DIN rayından uzağa doğru üstten çapraz şekilde
çekin (B). Bir yıldız kuplörü çıkarırken, DIN rayı konnektörlerini de sökün.
3.5 Besleme geriliminin bağlantısı ()
• Beslemeyi cihaza 1 (24 V) ve 2 (0 V) klemensleri üzerinden bağlayın. Bağlantı istasyonu söz konusuyusa
gruptaki ilk cihazın beslenmesi yeterlidir.
Sistem güç kaynağı ünitesinden besleme
Bir güç kaynağı ünitesini (MINI-SYS-PS-100-240AC/24DC/1.5; Sipariş No.: 2866983 veya MINI-PS100-
240AC/24DC/1.5/EX; Sipariş No.: 2866653) grubun solundaki iki DIN rayı konnektörüne (Sipariş No.:
2709561) bağlayın.
Yedekli besleme konsepti oluşturmak için ikinci bir güç kaynağı kullanılabilir.
3.6 Anahtarlamalı çıkış ()
Hata teşhisi için cihazda bir adet anahtarlamalı çıkış bulunur (3 (11) ve 4 (12)) klemensleri.
Anahtarlamalı çıkış gerilim göstergesi arızalandığında veya FO kanalın kesilmesi algılandığında veya sistem
rezervleri yetersiz olduğunda (kritik alıcı gücü) deaktive olur.
• Anahtar kontağını, uygulamanıza bağlı olarak bireysel veya grup mesajı olarak bağlayın. ()
1 (24 V) - 2 (0 V) Besleme gerilimi 7 D(B) Al/ver pozitif
3 (11) - 4 (12) Anahtarlamalı çıkış - N/K kontak 8 D(A) Al/ver negatif
5 SHD Ekran
6 GND Toprak
12 RS-485 bus sonlandırması AÇIK/KAPALI
9 yeşil VCC Besleme gerilimi
10 sarı TD Dinamik veri iletimi. CU port
11 yeşil RD Dinamik veri alımı. CU port
FO port Fiber optik (FO-) arayüz
13 yeşil Alım gücü çok iyi
14 yeşil Alım gücü iyi
15 sarı Alım gücü kritik, anahtarlamalı çıkış açar
16 kırmızı FO ERR Alım gücü yetersiz, kopuk fiber
17 TD Fiber optik (FO) verici
18 RD Fiber optik (FO) alıcı
NOT: cihazda hasar
Cihazları yalnız besleme yokken söküp takın.
NOT: cihazda hasar
Bir yıldız kuplörde maksimum akım yükü 2 A'i geçmemelidir.
Bu nedenle, bir yıldız kuplör ondan (10) fazla cihaz içermemelidir.
NOT: cihazda hasar
Röle kontağının 18...32 V DC'deki maksimum yüklenme kapasitesi 1 A'dır!
FO 转换器,用于 RS-485 2 线制总线系统1. 安全提示1.1 安装注意事项• 类别 3 的设备适用于安装在易爆 2 区中。它满足 EN 60079-0:2012+A11:2013 和 EN 60079-15:2010 的
要求。• 仅专业电气人员可进行相关安装、操作和维修。请按说明遵守安装规定。安装与操作设备时,必须遵守适
用的规定和安全规范 (包括国家安全规则)以及普遍认可的技术总则。相关安全数据附于包装单内和认证中 (所适用的一致性评估与附加认证)。
• 设备不可开启或进行 DIP 开关组态范围之外的修改。 请勿自行修理设备,可更换整部设备。 仅生产厂家可进行修理。 生产厂家对因不遵守相关规定而导致的损坏不负责任。
• 该设备的 IP20 防护等级 (IEC 60529/EN 60529) 适用于清洁而干燥的环境。 该设备可能不适用于超过所规定限制的机械应力与 / 或热负荷。
• 该设备不适用于存在尘爆危险的环境。• 该设备开关仅在设备电源断电的情况下方可进行操作。• 该设备专用于符合 IEC 60950/EN 60950/VDE 0805 的 SELV 操作。该设备可连接到符合 EN 60950 要求
的设备。1.2 安装于 2 区• 在可能发生爆炸的危险区域中使用时应注意使用要求。• 安装时,请使用经认证符合 EN 60079-15 要求的壳体 (最低防护等级 IP54)。在这种情况下,请注意
IEC 60079-14/EN 60079-14 的要求,如。• 在 2 区中,仅可将设备与符合 2 区中的操作条件以及相关安装地点条件的电源及信号电路相连接。• 在潜在爆炸区域中,仅在电源切断时方可将模块从 DIN 导轨上进行卡接或拆卸,以及将导线连接或断开。• 如设备被损坏,被用于不允许的负载状况,放置不正确,或出现故障,必须对其停止使用并立即将其移出
Ex 区域。• 您可从 phoenixcontact.net/products 下载最新的相关文件。
2. 概述FO 转换器,用于 RS-485 2 线制总线系统,使用 1300 nm 传输技术的终端设备。
3. 连接注意事项3.1 插拔式螺钉接线端子 ()
3.2 开关
3.3 诊断和状态指示灯 ()
3.4 安装和拆除 ( - )• 使用接地端子将 35 mm EN DIN 导轨连接至保护性接地。将模块卡接到 DIN 导轨上使之接地。
• 作为单一设备安装 (独立)将设备置于 DIN 导轨上方。 将设备前端推入安装表面,直到其卡入安装位并发出相应响声。• 组合式安装 (模块化星形耦合器)()对于星型耦合器,将 DIN 导轨连接器 (A)(订货号 2709561,每台设备 2 件)插接到一起。将连接好的DIN 导轨连接器推到 DIN 导轨 (B-C)上。从上方将设备放到 DIN 导轨上 (D)。确保其位置与 DIN 导轨连接器正确适配。将设备前端推入安装表面,直到其卡入安装位并发出相应响声。• 拆除 ()使用螺丝刀、尖口钳或类似工具将锁扣按下 (A)。将设备底缘从安装表面上拉开。对角向上将设备从 DIN导轨上拉出 (B)。您在拆卸星型耦合器时,也要拆下 DIN 导轨连接器。3.5 连接电源 ()• 通过模块 1 (24 V)和 2 (0 V)给设备供电。如果是连接站,将电源连接到设备组的第一个设备上即可。
通过系统电源装置供电将电源 (MINI-SYS-PS-100-240AC/24DC/1.5 ;订货号:2866983 或 MINI-PS100-240AC/24DC/1.5/EX;订货号:2866653)连接至设备组左侧的两个 DIN 导轨连接器 (订货号:2709561)上。第二个系统电源可用于创建一个冗余供电。3.6 开关输出 ()设备配有一个用于错误诊断的浮地开关输出 (端子 3 (11) 和 4 (12))。当电压显示失效,或检测到 FO 路径中断,或系统裕度不足 (重要接收功率)时,则切换输出被禁用。• 根据您的应用将开关触点单独或成组接线。()
1 (24 V) - 2 (0 V) 供电电源 7 D(B)
接收 / 发送,正
3 (11) - 4 (12) 开关输出 - 常闭触点 8 D(A)
接收 / 发送,负
5 SHD 屏蔽6 GND 接地
12 RS-485 总线终端 ON/OFF (开 / 关)
9 绿色 VCC 供电电源10 黄色 TD 动态发送数据。CU 端口11 绿色 RD 动态接收数据。CU 端口
FO 端口 光纤 (FO)- 接口13 绿色 接收功率极其良好14 绿色 接收功率良好15 黄色 接收功率重要,切换输出打开16 红色 FO ERR 接收功率不足,光缆断裂17 TD 光纤 (FO)发送器18 RD 光纤 (FO)接收器
注意:设备损坏仅在电源断开时方可安装和移除设备。
注意:设备损坏星型耦合器中的最大电流负载不得超过 2 A。因此,星型耦合器不得超过十 (10)台设备。
注意:设备损坏继电器触点最大负载为 1 A (在 18...32 V DC 时)!
Оптический преобразователь для шинных систем с 2-проводным
интерфейсом RS-485
1. Правила техники безопасности
1.1 инструкции по монтажу
• Устройство категории 3 пригодно для монтажа во взрывоопасной области зоны 2. Оно
соответствует требованиям норм EN 60079-0:2012+A11:2013 и EN 60079-15:2010.
• Монтаж, управление и работы по техобслуживанию разрешается выполнять только
квалифицированным специалистам по электротехническому оборудованию. Следовать описанным
указаниям по монтажу. При установке и эксплуатации соблюдайте действующие инструкции и
правила техники безопасности (в том числе и национальные предписания по технике безопасности),
а также общетехнические правила. Сведения о безопасности содержатся в данной инструкции и
сертификатах (сертификат об оценке соответствия, при необходимости дополнительные
сертификаты).
• Запрещается открывать или изменять устройство, за исключением конфигурирования DIP-
переключателей. Не ремонтируйте устройство самостоятельно, а замените его на равноценное
устройство. Ремонтные работы должны производиться только сотрудниками компании-
изготовителя. Производитель не несет ответственности за повреждения, возникшие вследствие
несоблюдения предписаний.
• Степень защиты IP20 (IEC 60529/EN 60529) устройства предусматривает использование в условиях
чистой и сухой среды. Не подвергайте устройство механическим и/или термическим нагрузкам,
превышающим указанные предельные значения.
• Устройство не предназначено для применения во взрывоопасной по пыли атмосфере.
• Манипуляции с открытыми переключателями должны производиться только после отключения
устройства от питания.
• Устройство предназначено только для работы в условиях безопасного сверхнизкого напряжения
(SELV) согласно IEC 60950/EN 60950/VDE 0805. Устройство может быть подключено только к
устройствам, отвечающим требованиям стандарта EN 60950.
1.2 Установка в зоне 2
• Соблюдайте установленные правила применения во взрывоопасных зонах!
• При установке используйте только соответствующий, допущенный к применению корпус
(минимальная степень защиты IP54), отвечающий требованиям стандарта EN 60079-15. При этом
соблюдайте требования стандарта IEC 60079-14/EN 60079-14.
• К цепям питания и сигнальных цепям зоны 2 могут быть подключены только устройства,
предназначенные для применения во взрывоопасной зоне 2 и соответствующие условиям места
применения.
• Установка на монтажную рейку и демонтаж с нее, а также подключение и отключение проводов во
взрывоопасной области должны производиться только в условиях отключенного электропитания.
• В случае повреждения, неправильной установки, неверного функционирования устройства или
воздействия на него ненадлежащей нагрузки, следует немедленно отключить его и вывести за
пределы взрывоопасной зоны.
• Актуальную документацию можно скачать на сайте phoenixcontact.net/products.
2. Краткое описание
Оптический преобразователь для 2-проводных шинных систем RS-485; оконечное устройство в
системах передачи данных на 1300 нм.
3. Указания по подключению
3.1 Вставные винтовые клеммы ()
3.2 Переключатель
3.3 Индикаторы состояния и диагностики ()
3.4 Монтаж и демонтаж ( - )
• С помощью заземляющей клеммы соединить 35-мм монтажную рейку EN с защитным заземлением.
Модуль заземляется после закрепления на монтажной рейке.
• Монтаж как отдельное устройство (STAND-ALONE): Установите устройство на рейку сверху.
Надавливайте на переднюю часть устройства в направлении монтажной поверхности, пока не
услышите щелчок.
• Монтаж модуля (соединение "звезда") (): Для организации соединения по схеме "звезда"
соединить устанавливаемые на монтажную рейку соединители (A) (арт. : 2709561, 2 шт. для
каждого устройства). Объединенные соединители установить на монтажную рейку (B-C).
Устройство установить сверху на монтажную рейку (D). Следить за правильным расположением
устройства относительно устанавливаемых на монтажную рейку соединителей. Нажать на
переднюю сторону устройства в направлении монтажной поверхности до слышимого щелчка.
• Демонтаж (): С помощью отвертки, острогубцев или подобного инструмента опустить вниз
фиксирующую планку (A). Слегка отогнуть нижний край устройства от монтажной поверхности.
Устройство снять с монтажной рейки по диагонали вверх (B). При демонтаже модульного
соединения по схеме "звезда" также должен производиться демонтаж устанавливаемых на
монтажную рейку соединителей.
3.5 Подключение напряжения питания ()
• Подачу напряжения для питания модулей производить через клеммы 1 (24 В) и 2 (0 В). В группе на
первом устройстве имеется достаточная подача питания.
Подача питания посредством системных блоков питания: Подсоединить системное питание
(MINI-SYS-PS-100-240AC/24DC/1.5; арт. : 2866983 или MINI-PS100-240AC/24DC/1.5/EX; арт. :
2866653) через два устанавливаемых на монтажную рейку соединителя (арт. : 2709561) слева к
группе. Второй источник питания позволит реализовать резервную схему питания.
3.6 Выходной переключающий контакт ()
Устройство оснащено сухим переключающим контактом для диагностики неисправностей (клеммы
3 (11) и 4 (12)). Переключающий выходной контакт активируется в случае сбоя в сети напряжения
питания, обнаружения разрыва на участке оптокабеля или при превышении системных резервов
участка оптокабеля (критическая принимаемая мощность).
• Переключающий контакт соединить в зависимости от применения в виде однократного сигнала или
как группу сигналов. ()
1 (24 В) - 2 (0 В) Электропитание 7 D(B) отправление/получение, положительное
3 (11) - 4 (12) Переключающий выходной контакт –
размык. контакт
8 D(A) отправление/получение, отрицательное
5 SHD Экран
6 GND Общий проводник
12 Терминирование шины RS485 ВКЛ/ВЫКЛ
9 зеленый VCC Электропитание
10 желтый TD Передаваемые данные дин., медный порт
11 зеленый RD Принимаемые данные дин., медный порт
Оптоволоконный порт Интерфейс для оптоволоконного кабеля
13 зеленый Очень хорошая принимаемая мощность
14 зеленый Хорошая принимаемая мощность
15 желтый Критич. принимаемая мощность, перекл. вых. контакт открывается
16 красный ERR FO Недостаточная принимаемая мощность, обрыв волокна
17 TD Передатчик для оптоволоконного кабеля
18 RD Приемник для оптоволоконного кабеля
ВНИМАНИЕ: Повреждение устройства
Монтаж и демонтаж устройства должен производиться только после отключения его от
электропитания.
ВНИМАНИЕ: Повреждение устройства
Максимальная токовая нагрузка в разветвителе типа "звезда" не должна превышать 2 A!
Поэтому соединение по схеме "звезда" не должно состоять из более чем десяти (10) устройств.
ВНИМАНИЕ: Повреждение устройства
Предельно допустимая нагрузка релейного контакта составляет 1 А при 18...32 В DC!
TÜRKÇEРУССКИЙ中文
MNR 9038995
PNR 103302 - 05 DNR 83080765 - 05
PSI-MOS-RS485W2/FO1300 E 2708562
A
CB
D
A B
24 V 0 V 24 V 0 V 0 V24 V
24 V 0 V
24 V DC
24 V 0 V 24 V 0 V 24 V 0 V 24 V 0 V
24 V DC
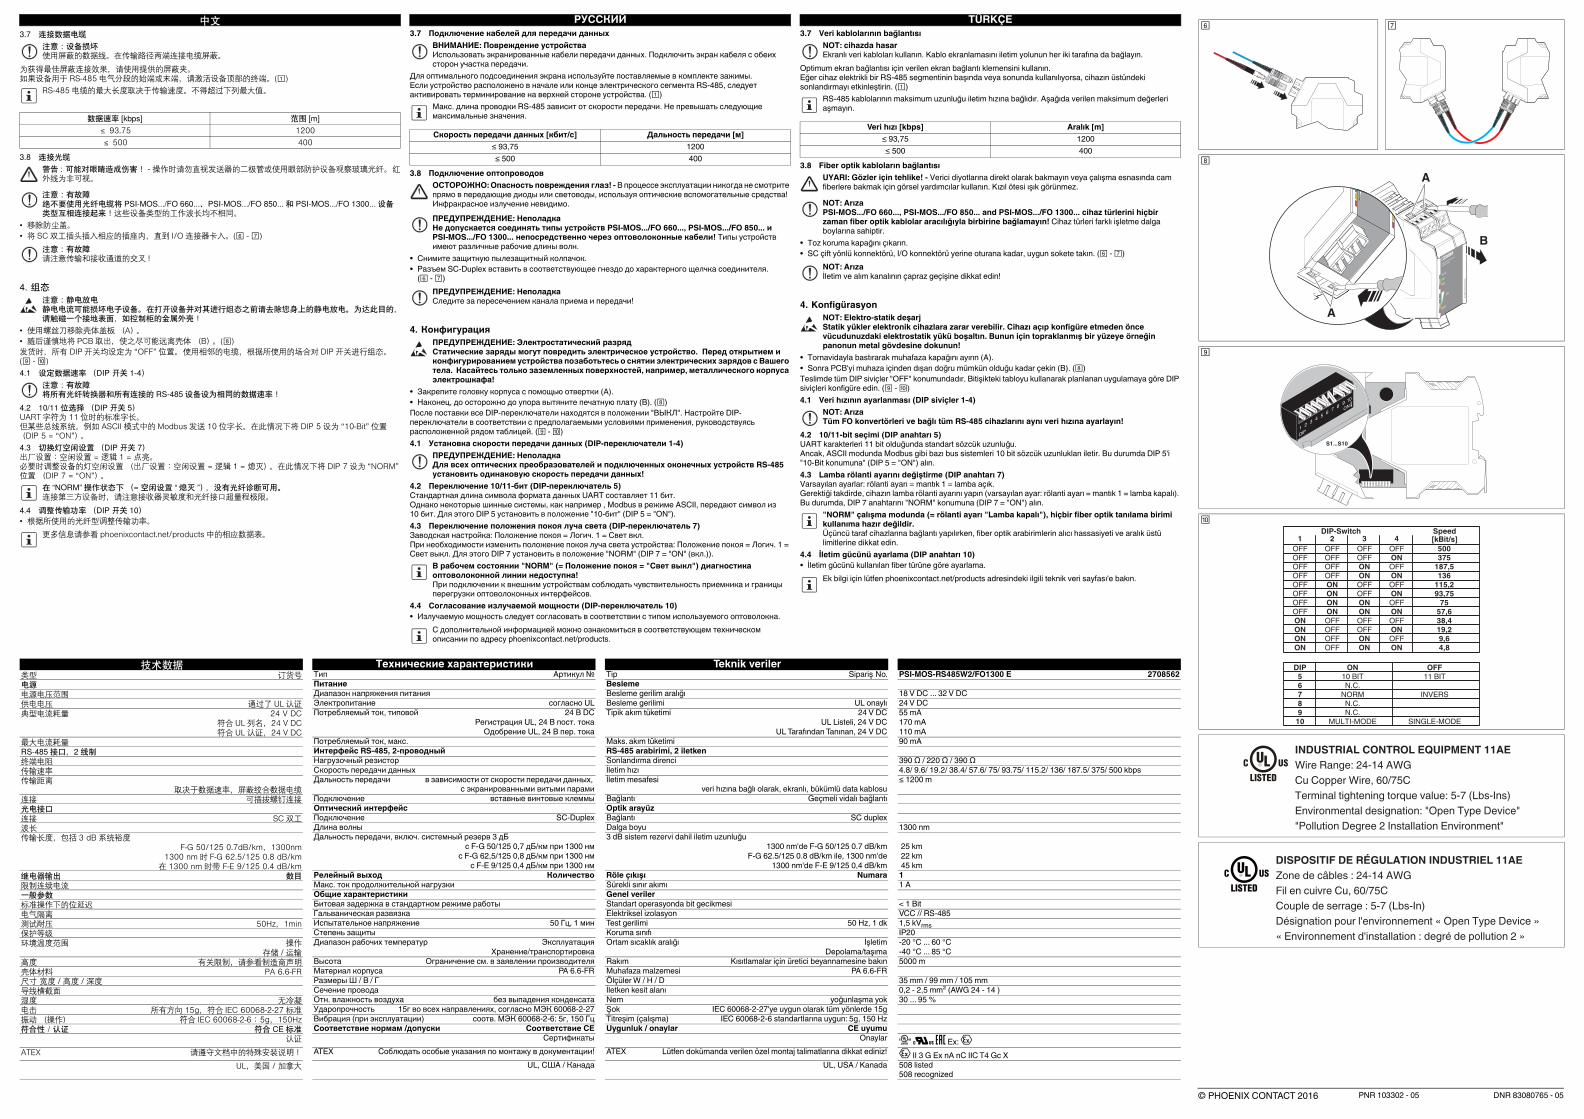
技术数据 Технические характеристики Teknik veriler
类型 订货号 Тип Артикул Tip Sipariş No. PSI-MOS-RS485W2/FO1300 E 2708562
电源 Питание Besleme
电源电压范围 Диапазон напряжения питания Besleme gerilim aralığı 18 V DC ... 32 V DC
供电电压 通过了 UL 认证 Электропитание согласно UL Besleme gerilimi UL onaylı 24 V DC
典型电流耗量 24 V DC Потребляемый ток, типовой 24 В DC Tipik akım tüketimi 24 V DC 55 mA
符合 UL 列名,24 V DC Регистрация UL, 24 В пост. тока UL Listeli, 24 V DC 170 mA
符合 UL 认证,24 V DC Одобрение UL, 24 В пер. тока UL Tarafından Tanınan, 24 V DC 110 mA
最大电流耗量 Потребляемый ток, макс. Maks. akım tüketimi 90 mA
RS-485 接口,2 线制 Интерфейс RS-485, 2-проводный RS-485 arabirimi, 2 iletken
终端电阻 Нагрузочный резистор Sonlandırma direnci 390 Ω / 220 Ω / 390 Ω
传输速率 Скорость передачи данных İletim hızı 4.8/ 9.6/ 19.2/ 38.4/ 57.6/ 75/ 93.75/ 115.2/ 136/ 187.5/ 375/ 500 kbps
传输距离取决于数据速率,屏蔽绞合数据电缆
Дальность передачи в зависимости от скорости передачи данных,
с экранированными витыми парами
İletim mesafesi
veri hızına bağlı olarak, ekranlı, bükümlü data kablosu
≤ 1200 m
连接 可插拔螺钉连接 Подключение вставные винтовые клеммы Bağlantı Geçmeli vidalı bağlantı
光电接口 Оптический интерфейс Optik arayüz
连接 SC 双工 Подключение SC-Duplex Bağlantı SC duplex
波长 Длина волны Dalga boyu 1300 nm
传输长度,包括 3 dB 系统裕度 Дальность передачи, включ. системный резерв 3 дБ 3 dB sistem rezervi dahil iletim uzunluğu
F-G 50/125 0.7dB/km,1300nm с F-G 50/125 0,7 дБ/км при 1300 нм 1300 nm'de F-G 50/125 0.7 dB/km 25 km
1300 nm 时 F-G 62.5/125 0.8 dB/km c F-G 62,5/125 0,8 дБ/км при 1300 нм F-G 62.5/125 0.8 dB/km ile, 1300 nm'de 22 km
在 1300 nm 时带 F-E 9/125 0.4 dB/km с F-E 9/125 0,4 дБ/км при 1300 нм 1300 nm'de F-E 9/125 0,4 dB/km 45 km
继电器输出 数目 Релейный выход Количество Röle çıkışı Numara 1
限制连续电流 Макс. ток продолжительной нагрузки Sürekli sınır akımı 1 A
一般参数 Общие характеристики Genel veriler
标准操作下的位延迟 Битовая задержка в стандартном режиме работы Standart operasyonda bit gecikmesi < 1 Bit
电气隔离 Гальваническая развязка Elektriksel izolasyon VCC // RS-485
测试耐压 50Hz,1min Испытательное напряжение 50 Гц, 1 мин Test gerilimi 50 Hz, 1 dk 1,5 kVrms
保护等级 Степень защиты Koruma sınıfı IP20
环境温度范围 操作 Диапазон рабочих температур Эксплуатация Ortam sıcaklık aralığı İşletim -20 °C ... 60 °C
存储 / 运输 Хранение/транспортировка Depolama/taşıma -40 °C ... 85 °C
高度 有关限制,请参看制造商声明 Высота Ограничение см. в заявлении производителя Rakım Kısıtlamalar için üretici beyannamesine bakın 5000 m
壳体材料 PA 6.6-FR Материал корпуса PA 6.6-FR Muhafaza malzemesi PA 6.6-FR
尺寸 宽度 / 高度 / 深度 Размеры Ш / В / Г Ölçüler W / H / D 35 mm / 99 mm / 105 mm
导线横截面 Сечение провода İletken kesit alanı 0,2 - 2,5 mm² (AWG 24 - 14 )
湿度 无冷凝 Отн. влажность воздуха без выпадения конденсата Nem yoğunlaşma yok 30 ... 95 %
电击 所有方向 15g,符合 IEC 60068-2-27 标准 Ударопрочность 15г во всех направлениях, согласно МЭК 60068-2-27 Şok IEC 60068-2-27'ye uygun olarak tüm yönlerde 15g
振动 (操作) 符合 IEC 60068-2-6: 5g,150Hz Вибрация (при эксплуатации) соотв. МЭК 60068-2-6: 5г, 150 Гц Titreşim (çalışma) IEC 60068-2-6 standartlarına uygun: 5g, 150 Hz
符合性/认证 符合 CE 标准 Соответствие нормам /допуски Соответствие CE Uygunluk / onaylar CE uyumu
认证 Сертификаты Onaylar Ex: ATEX 请遵守文档中的特殊安装说明! ATEX Соблюдать особые указания по монтажу в документации! ATEX Lütfen dokümanda verilen özel montaj talimatlarına dikkat ediniz! II 3 G Ex nA nC IIC T4 Gc X
UL,美国/加拿大 UL, США / Канада UL, USA / Kanada 508 listed
508 recognized
xxxxxxxxxxxxxxxxxxxxxx
Ord.-No.xxxxxxx
VCC
TD
RD
FO
ERR
A
B
A
1
DIP
23
45
67
89
10
ON
S1...S10
DIP-Switch1 2 3 4
Speed[kBit/s]
OFFOFFOFFOFFOFFOFFOFFOFFONONONON
OFFOFFOFFOFF
OFF
ONONONON
OFFOFFOFF
OFFOFF
OFFOFF
OFF
ONON
ONON
OFFONON
OFF
OFF
OFF
OFF
OFF
ON
ON
ON
ON
ON
ONOFF
500375
187,5136
115,293,75
7557,638,419,29,64,8
DIP56789
10
ON10 BITN.C.
NORMN.C.N.C.
MULTI-MODE
OFF11 BIT
INVERS
SINGLE-MODE
DISPOSITIF DE RÉGULATION INDUSTRIEL 11AE
Zone de câbles : 24-14 AWG
Fil en cuivre Cu, 60/75C
Couple de serrage : 5-7 (Lbs-In)
Désignation pour l'environnement « Open Type Device »
« Environnement d'installation : degré de pollution 2 »
3.7 Veri kablolarının bağlantısı
Optimum ekran bağlantısı için verilen ekran bağlantı klemensini kullanın.
Eğer cihaz elektrikli bir RS-485 segmentinin başında veya sonunda kullanılıyorsa, cihazın üstündeki
sonlandırmayı etkinleştirin. ()
3.8 Fiber optik kabloların bağlantısı
• Toz koruma kapağını çıkarın.
• SC çift yönlü konnektörü, I/O konnektörü yerine oturana kadar, uygun sokete takın. ( - )
4. Konfigürasyon
• Tornavidayla bastırarak muhafaza kapağını ayırın (A).
• Sonra PCB'yi muhaza içinden dışarı doğru mümkün olduğu kadar çekin (B). ()
Teslimde tüm DIP siviçler "OFF" konumundadır. Bitişikteki tabloyu kullanarak planlanan uygulamaya göre DIP
siviçleri konfigüre edin. ( - )
4.1 Veri hızının ayarlanması (DIP siviçler 1-4)
4.2 10/11-bit seçimi (DIP anahtarı 5)
UART karakterleri 11 bit olduğunda standart sözcük uzunluğu.
Ancak, ASCII modunda Modbus gibi bazı bus sistemleri 10 bit sözcük uzunlukları iletir. Bu durumda DIP 5'i
"10-Bit konumuna" (DIP 5 = "ON") alın.
4.3 Lamba rölanti ayarını değiştirme (DIP anahtarı 7)
Varsayılan ayarlar: rölanti ayarı = mantık 1 = lamba açık.
Gerektiği takdirde, cihazın lamba rölanti ayarını yapın (varsayılan ayar: rölanti ayarı = mantık 1 = lamba kapalı).
Bu durumda, DIP 7 anahtarını "NORM" konumuna (DIP 7 = "ON") alın.
4.4 İletim gücünü ayarlama (DIP anahtarı 10)
• İletim gücünü kullanılan fiber türüne göre ayarlama.
NOT: cihazda hasar
Ekranlı veri kabloları kullanın. Kablo ekranlamasını iletim yolunun her iki tarafına da bağlayın.
RS-485 kablolarının maksimum uzunluğu iletim hızına bağlıdır. Aşağıda verilen maksimum değerleri
aşmayın.
Veri hızı [kbps] Aralık [m]
≤ 93,75 1200
≤ 500 400
UYARI: Gözler için tehlike! - Verici diyotlarına direkt olarak bakmayın veya çalışma esnasında cam
fiberlere bakmak için görsel yardımcılar kullanın. Kızıl ötesi ışık görünmez.
NOT: Arıza
PSI-MOS.../FO 660..., PSI-MOS.../FO 850... and PSI-MOS.../FO 1300... cihaz türlerini hiçbir
zaman fiber optik kablolar aracılığıyla birbirine bağlamayın! Cihaz türleri farklı işletme dalga
boylarına sahiptir.
NOT: Arıza
İletim ve alım kanalının çapraz geçişine dikkat edin!
NOT: Elektro-statik deşarj
Statik yükler elektronik cihazlara zarar verebilir. Cihazı açıp konfigüre etmeden önce
vücudunuzdaki elektrostatik yükü boşaltın. Bunun için topraklanmış bir yüzeye örneğin
panonun metal gövdesine dokunun!
NOT: Arıza
Tüm FO konvertörleri ve bağlı tüm RS-485 cihazlarını aynı veri hızına ayarlayın!
"NORM" çalışma modunda (= rölanti ayarı "Lamba kapalı"), hiçbir fiber optik tanılama birimi
kullanıma hazır değildir.
Üçüncü taraf cihazlarına bağlantı yapılırken, fiber optik arabirimlerin alıcı hassasiyeti ve aralık üstü
limitlerine dikkat edin.
Ek bilgi için lütfen phoenixcontact.net/products adresindeki ilgili teknik veri sayfası'e bakın.
3.7 连接数据电缆
为获得最佳屏蔽连接效果,请使用提供的屏蔽夹。如果设备用于 RS-485 电气分段的始端或末端,请激活设备顶部的终端。()
3.8 连接光缆
• 移除防尘盖。• 将 SC 双工插头插入相应的插座内,直到 I/O 连接器卡入。( - )
4. 组态
• 使用螺丝刀移除壳体盖板 (A)。• 随后谨慎地将 PCB 取出,使之尽可能远离壳体 (B)。()发货时,所有 DIP 开关均设定为 “OFF” 位置。 使用相邻的电缆,根据所使用的场合对 DIP 开关进行组态。( - )4.1 设定数据速率 (DIP 开关 1-4)
4.2 10/11 位选择 (DIP 开关 5)UART 字符为 11 位时的标准字长。但某些总线系统,例如 ASCII 模式中的 Modbus 发送 10 位字长。在此情况下将 DIP 5 设为 “10-Bit” 位置(DIP 5 = “ON”)。4.3 切换灯空闲设置 (DIP 开关 7)出厂设置:空闲设置 = 逻辑 1 = 点亮。必要时调整设备的灯空闲设置 (出厂设置:空闲设置 = 逻辑 1 = 熄灭)。在此情况下将 DIP 7 设为 “NORM”位置 (DIP 7 = “ON”)。
4.4 调整传输功率 (DIP 开关 10)• 根据所使用的光纤型调整传输功率。
注意:设备损坏使用屏蔽的数据线。在传输路径两端连接电缆屏蔽。
RS-485 电缆的最大长度取决于传输速度。不得超过下列最大值。
数据速率 [kbps] 范围 [m]≤ 93.75 1200≤ 500 400
警告: 可能对眼睛造成伤害! - 操作时请勿直视发送器的二极管或使用眼部防护设备观察玻璃光纤。 红外线为非可视。
注意:有故障绝不要使用光纤电缆将 PSI-MOS.../FO 660...、PSI-MOS.../FO 850... 和 PSI-MOS.../FO 1300... 设备类型互相连接起来!这些设备类型的工作波长均不相同。
注意:有故障请注意传输和接收通道的交叉 !
注意:静电放电静电电流可能损坏电子设备。 在打开设备并对其进行组态之前请去除您身上的静电放电。 为达此目的,请触碰一个接地表面,如控制柜的金属外壳!
注意:有故障将所有光纤转换器和所有连接的 RS-485 设备设为相同的数据速率!
在 “NORM” 操作状态下 (= 空闲设置 “ 熄灭 ”),没有光纤诊断可用。连接第三方设备时,请注意接收器灵敏度和光纤接口超量程极限。
更多信息请参看 phoenixcontact.net/products 中的相应数据表。
3.7 Подключение кабелей для передачи данных
Для оптимального подсоединения экрана используйте поставляемые в комплекте зажимы.
Если устройство расположено в начале или конце электрического сегмента RS-485, следует
активировать терминирование на верхней стороне устройства. ()
3.8 Подключение оптопроводов
• Снимите защитную пылезащитный колпачок.
• Разъем SC-Duplex вставить в соответствующее гнездо до характерного щелчка соединителя.
( - )
4. Конфигурация
• Закрепите головку корпуса с помощью отвертки (А).
• Наконец, до осторожно до упора вытяните печатную плату (В). ()
После поставки все DIP-переключатели находятся в положении "ВЫКЛ". Настройте DIP-
переключатели в соответствии с предполагаемыми условиями применения, руководствуясь
расположенной рядом таблицей. ( - )
4.1 Установка скорости передачи данных (DIP-переключатели 1-4)
4.2 Переключение 10/11-бит (DIP-переключатель 5)
Стандартная длина символа формата данных UART составляет 11 бит.
Однако некоторые шинные системы, как например , Modbus в режиме ASCII, передают символ из
10 бит. Для этого DIP 5 установить в положение "10-бит" (DIP 5 = "ON").
4.3 Переключение положения покоя луча света (DIP-переключатель 7)
Заводская настройка: Положение покоя = Логич. 1 = Свет вкл.
При необходимости изменить положение покоя луча света устройства: Положение покоя = Логич. 1 =
Свет выкл. Для этого DIP 7 установить в положение "NORM" (DIP 7 = "ON" (вкл.)).
4.4 Согласование излучаемой мощности (DIP-переключатель 10)
• Излучаемую мощность следует согласовать в соответствии с типом используемого оптоволокна.
ВНИМАНИЕ: Повреждение устройства
Использовать экранированные кабели передачи данных. Подключить экран кабеля с обеих
сторон участка передачи.
Макс. длина проводки RS-485 зависит от скорости передачи. Не превышать следующие
максимальные значения.
Скорость передачи данных [кбит/с] Дальность передачи [м]
≤ 93,75 1200
≤ 500 400
ОСТОРОЖНО: Опасность повреждения глаз! - В процессе эксплуатации никогда не смотрите
прямо в передающие диоды или световоды, используя оптические вспомогательные средства!
Инфракрасное излучение невидимо.
ПРЕДУПРЕЖДЕНИЕ: Неполадка
Не допускается соединять типы устройств PSI-MOS.../FO 660..., PSI-MOS.../FO 850... и
PSI-MOS.../FO 1300... непосредственно через оптоволоконные кабели! Типы устройств
имеют различные рабочие длины волн.
ПРЕДУПРЕЖДЕНИЕ: Неполадка
Следите за пересечением канала приема и передачи!
ПРЕДУПРЕЖДЕНИЕ: Электростатический разряд
Статические заряды могут повредить электрическое устройство. Перед открытием и
конфигурированием устройства позаботьтесь о снятии электрических зарядов с Вашего
тела. Касайтесь только заземленных поверхностей, например, металлического корпуса
электрошкафа!
ПРЕДУПРЕЖДЕНИЕ: Неполадка
Для всех оптических преобразователей и подключенных оконечных устройств RS-485
установить одинаковую скорость передачи данных!
В рабочем состоянии "NORM" (= Положение покоя = "Свет выкл") диагностика
оптоволоконной линии недоступна!
При подключении к внешним устройствам соблюдать чувствительность приемника и границы
перегрузки оптоволоконных интерфейсов.
С дополнительной информацией можно ознакомиться в соответствующем техническом
описании по адресу phoenixcontact.net/products.
TÜRKÇEРУССКИЙ中文
© PHOENIX CONTACT 2016 DNR 83080765 - 05PNR 103302 - 05